In this article, we are going to learn how to use generated Access Token with Blazor WebAssembly to gain access to the protected resources on the Web API’s side. Until now, we have integrated the Blazor WebAssembly app with IdentityServer4 and enabled login and logout actions. After successful login, IDP sends us the id_token and the access_token. But we are not using that access_token yet. So, in this article, we are going to change that. But, using the access token with Blazor WebAssembly is not going to be our only topic. We are going to learn how to configure our HTTP client to send unauthorized requests as well.
It is very important that you are familiar with the IdentityServer4, OAuth2, and OIDC concepts. If you are not, we strongly suggest you read our IdentityServer4, OAuth2, and OIDC series. There, you can find complete navigation for this series as well.
So, let’s move on.
Web API with IdentityServer4 Configuration Overview
If you take a look at our source code repo, you will find a prepared Web API project. We have borrowed this project, as well as the IdentityServer4 project, from our IdentityServer4, OAuth2, and OIDC series. So logically, the initial setup between these two is already in place. That said, let’s just do a quick overview.
If we inspect the Web API project, we will find the authentication configuration:
services.AddAuthentication("Bearer")
    .AddJwtBearer("Bearer", opt =>
    {
        opt.RequireHttpsMetadata = false;
        opt.Authority = "https://localhost:5005";
        opt.Audience = "companyApi";
    });
As you can see, we populate the Authority property with the URI address of our IDP, and also set up the Audience to the companyApi. For this, we are using the Microsoft.AspNetCore.Authentication.JwtBearer library. Also in the Configure method we call the app.UseAuthentication method to add the authentication middleware to the request pipeline.
Next, if we inspect the IDP configuration inside the InMemoryConfig class:
public static IEnumerable<ApiScope> GetApiScopes() =>
    new List<ApiScope> { new ApiScope("companyApi", "CompanyEmployee API") };

public static IEnumerable<ApiResource> GetApiResources() =>
    new List<ApiResource>
    {
        new ApiResource("companyApi", "CompanyEmployee API")
        {
            Scopes = { "companyApi" }
        }
    };
We can see the configuration for the Web API scopes and resources using the Web API’s Audience value.
Finally, if we inspect the CompaniesController in the Web API, we are going to find the [Authorize] attribute on top of the Get action. We use this attribute to protect our resources from unauthorized calls. Yes, it is commented out, and for now, we are going to leave it as-is.
So, the communication between the IDP and Web API is prepared and ready. Of course, you can read the mentioned OIDC series to learn more about this process.
Fetching Data from Blazor WebAssembly
Before we start using the access token with Blazor WebAssembly, we have to modify the FetchData page to show the data from the protected resource.
First, let’s add a new FetchData.razor.cs file in the Pages folder and modify it:
public partial class FetchData
{
    [Inject]
    public HttpClient Http { get; set; }
    private CompanyDto[] _companies;

    protected override async Task OnInitializedAsync()
    {
        _companies = await Http.GetFromJsonAsync<CompanyDto[]>("companies");
    }
}

public class CompanyDto
{
    public Guid Id { get; set; }
    public string Name { get; set; }
    public string FullAddress { get; set; }
}
So, nothing special here. We just use the HttpClient property to fetch the data from the Web API’s GetCompanies endpoint. Also, you can see a helper CompanyDto class that we use for the data deserialization. We create it in the same file for the sake of simplicity, but of course, you can extract it in another folder or shared project.
Now, we have to modify the FetchData.razor file:
@page "/fetchdata"

<h1>Companies</h1>

<p>This component demonstrates fetching data from the server.</p>

@if (_companies == null)
{
    <p><em>Loading...</em></p>
}
else
{
    <table class="table">
        <thead>
            <tr>
                <th>Id</th>
                <th>Name</th>
                <th>Address (F)</th>
            </tr>
        </thead>
        <tbody>
            @foreach (var company in _companies)
            {
                <tr>
                    <td>@company.Id</td>
                    <td>@company.Name</td>
                    <td>@company.FullAddress</td>
                </tr>
            }
        </tbody>
    </table>
}
As you can see, if we don’t have the _companies array populated, we show the Loading... message. Otherwise, we just create a table and display all the companies from the array.
Finally, we have to modify the HttpClient configuration in the Program.cs class:
builder.Services.AddScoped(sp => new HttpClient { BaseAddress = new Uri("https://localhost:5001/api/") });
To learn more about the HttpClient in Blazor WebAssembly, you can read our Blazor WebAssembly HttpClient article.
Note: If you don’t have a database required for the Web API project, all you have to do is to run the Update-Database command in the Web API’s PMC.
Now, if we start our Web API app and the Blazor app, and navigate to the FetchData page, we are going to see the list of companies:
Excellent. Now we have something to protect.
Accessing Protected Resources by Using Access Token with Blazor WebAssembly Http Client
Before we move on, we have to protect our API resource. To do that, let’s just uncomment the [Authorize] attribute:
[Authorize]
[HttpGet]
public IActionResult GetCompanies()
Next, we have to modify the IDP Client configuration by adding the required API scope in a list of scopes for the blazorWASM client:
new Client
{
       ClientId = "blazorWASM",
       AllowedGrantTypes = GrantTypes.Code,
       RequirePkce = true,
       RequireClientSecret = false,
       AllowedCorsOrigins = { "https://localhost:5020" },
       AllowedScopes =
       {
           IdentityServerConstants.StandardScopes.OpenId,
           IdentityServerConstants.StandardScopes.Profile,
           "companyApi"
       },
       RedirectUris = { "https://localhost:5020/authentication/login-callback" },
       PostLogoutRedirectUris = { "https://localhost:5020/authentication/logout-callback" }
}
Since we have this configuration in the database, we have to remove the existing CompanyEmployeeOAuth database from the SQL Server. As soon as we start our IDP app, the database will be recreated.
Now, let’s move on to the client app, and install the Microsoft.Extensions.Http library:
PM> Install-Package Microsoft.Extensions.Http
After the installation, we are going to modify the Program.cs class:
builder.Services.AddHttpClient("companiesAPI", cl =>
{
    cl.BaseAddress = new Uri("https://localhost:5001/api/");
})
.AddHttpMessageHandler(sp =>
{
    var handler = sp.GetService<AuthorizationMessageHandler>()
    .ConfigureHandler(
         authorizedUrls: new[] { "https://localhost:5001" },
         scopes: new[] { "companyApi" }
     );

     return handler;
});

builder.Services.AddScoped(
   sp => sp.GetService<IHttpClientFactory>().CreateClient("companiesAPI"));

builder.Services.AddOidcAuthentication(options =>
{
    builder.Configuration.Bind("oidc", options.ProviderOptions);
});

await builder.Build().RunAsync();
We use the AddHttpClient method, that resides in the Microsoft.Extensions.Http library, to add the IHttpClientFactory to the service collection and configure a named HttpClient. As you can see, we provide the base address of our API. Then, we call the AddHttpMessageHandler method to attach access tokens to the outgoing HTTP requests. With this handler, we configure the API’s base address and the scope, which must be the same as the one in the IDP configuration.
After we configure our handler, we register the default HttpClient as a scoped instance in the IoC container with the companiesAPI name.
Next, we have to provide the scope in the Oidc configuration in the appsettings.json file:
{
    "oidc": {
        "Authority": "https://localhost:5005/",
        "ClientId": "blazorWASM",
        "ResponseType": "code",
        "DefaultScopes": [
            "openid",
            "profile",
            "companyApi"
        ],
        "PostLogoutRedirectUri": "authentication/logout-callback",
        "RedirectUri": "authentication/login-callback"
    }
}
Finally, let’s protect our FetchData component from unauthorized users:
@page "/fetchdata"
@attribute [Authorize]
For this, we require a using directive, which we can add in the _Imports.razor file:
@using Microsoft.AspNetCore.Authorization
Now, we can start all the applications. If we try to navigate to the FetchData page, we are going to be redirected to the Login screen. There, once we enter valid credentials, the application will navigate us back to the FetchData page and we are going to see our data. So, we have successfully used the access token with the Blazor WebAssembly HttpClient.
To prove this, we can do two things.
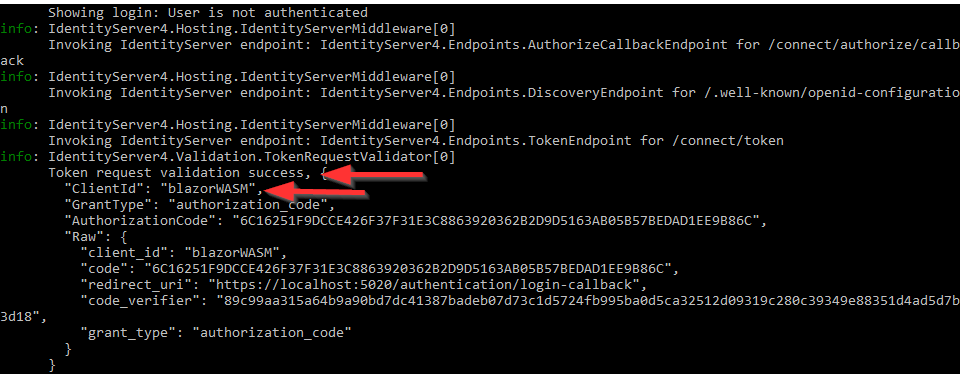
First, let’s inspect the logs from the IDP application:
As you can see the validation was successful.
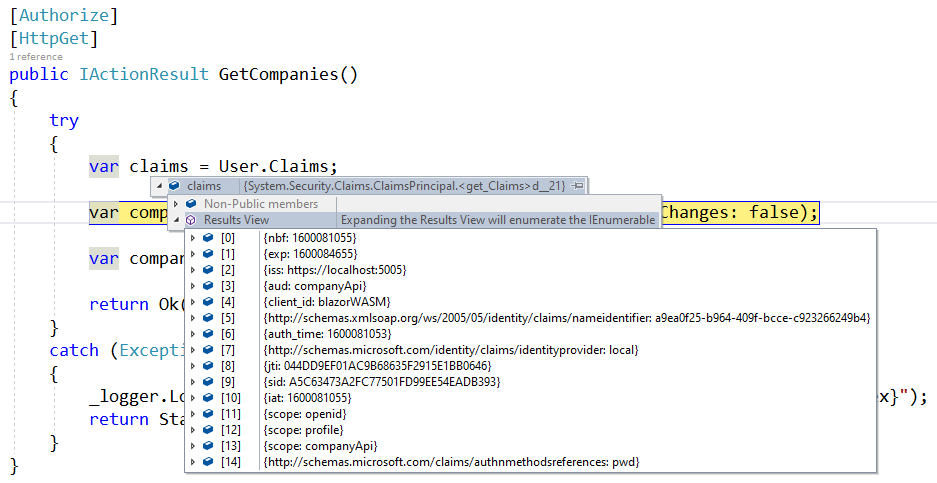
Also, we can place a breakpoint in our GetCompanies action and inspect the token:
We can see all the properties from our token sent to the Web Api with the HTTP request.
Different Approach to Using Access Token with Blazor WebAssembly
Right now, we have our access token included inside the HTTP request, but all of our logic is in the Program.cs class. We don’t want to say this is bad, but with more services to register, this class will become overpopulated and hard to read for sure. To avoid that, we can extract the AuthorizationMessageHandler configuration to a custom class.
So, let’s create a new MessageHandler folder and a new CustomAuthorizationMessageHandler class under it:
public class CustomAuthorizationMessageHandler : AuthorizationMessageHandler
{
    public CustomAuthorizationMessageHandler(IAccessTokenProvider provider, NavigationManager navigation)
        : base(provider, navigation)
    {
        ConfigureHandler(
            authorizedUrls: new[] { "https://localhost:5001" },
            scopes: new[] { "companyApi" });
    }
}
Our new class must inherit from the AuthorizationMessageHanlder class and implement a constructor with two parameters. Then, inside the constructor, we just call the ConfigureHanlder method to do exactly that – configure the message handler.
After that, we can return to the Program.cs class and modify it:
builder.Services.AddScoped<CustomAuthorizationMessageHandler>();

builder.Services.AddHttpClient("companiesAPI", cl =>
{
    cl.BaseAddress = new Uri("https://localhost:5001/api/");
})
.AddHttpMessageHandler<CustomAuthorizationMessageHandler>();

...
As we can see, we register the CustomAuthorizationMessageHandler class as a service and then use it with the AddHttpMessageHandler method.
Now, if we try to log in and navigate to the FetchData page, we are going to be able to see our data. So, the result is the same, but we have a different implementation.
Sending Unauthorized HTTP Requests from Blazor WebAssembly
With this configuration in place, we have to attach the access token with each HTTP request. But in every application, we can find endpoints that are not protected and we should be able to access these resources without logging in.
That said, let’s check the behavior of our application now.
The first thing we are going to do is to add another endpoint in the CompaniesController:
[HttpGet("unauthorized")]
public IActionResult UnauthorizedTestAction() =>
   Ok(new { Message = "Access is allowed for unauthorized users" });
Now, on the client app, we are going to add a new Index.razor.cs file under the Pages folder:
public partial class Index
{
    [Inject]
    public HttpClient Http { get; set; }

    private string _message;

    protected override async Task OnInitializedAsync()
    {
        var result = await Http.GetFromJsonAsync<UnauthorizedTestDto>("companies/unauthorized");
        _message = result.Message;
    }
}

public class UnauthorizedTestDto
{
    public string Message { get; set; }
}
Here, we are using the already registered HttpClient to send a request to the UnauthorizedTestAction.
Finally, let’s slightly modify the Index.razor file:
@page "/"

<h1>Hello, world!</h1>

<div class="alert alert-warning" role="alert">
    Before authentication will function correctly, you must configure your provider details in <code>Program.cs</code>
</div>

Welcome to your new app.

<SurveyPrompt Title="How is Blazor working for you?" />

<p>
    @_message
</p>
So, what we expect here is to see this test message as soon as our application starts and navigates to the Index page.
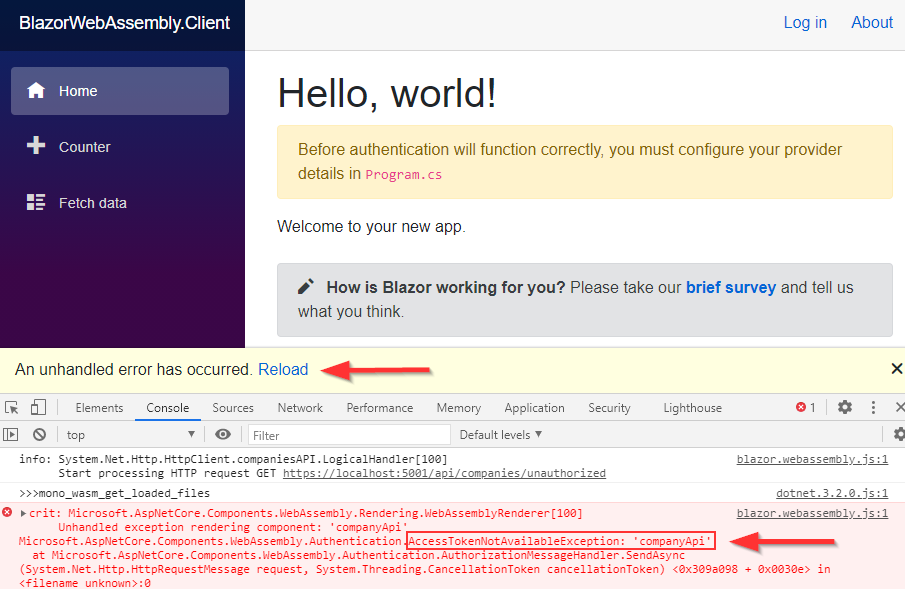
Well, let’s try it:
As soon as we start our app, we hit the error. From the error message description, it is obvious what is the problem. We don’t have an access token.
There are two things we want to solve here. First, we don’t want our application to break if we don’t have the access token included in the HTTP request. Second, we want to allow unauthorized HTTP requests in our application.
To solve the first problem, we can modify the Index.razor.cs file:
public partial class Index
{
    [Inject]
    public HttpClient Http { get; set; }

    private string _message;

    protected override async Task OnInitializedAsync()
    {
        try
        {
            var result = await Http.GetFromJsonAsync<UnauthorizedTestDto>("companies/unauthorized");
            _message = result.Message;
        }
        catch (AccessTokenNotAvailableException ex )
        {
            ex.Redirect();
        }
    }
}
If the access token doesn’t exist, the application will throw the AccessTokenNotAvailableException, which we can use to redirect to the Login screen.
Now if we test this, as soon as the app starts, it will navigate us to the Login page.
So, this is good, nothing breaks our app but still, we didn’t solve our problem of accessing unauthorized resources.
Additional HTTP Configuration
To solve that problem, we have to register another named HttpClient in the Program.cs class:
builder.Services.AddHttpClient("companyAPI.Unauthorized", client =>
    client.BaseAddress = new Uri("https://localhost:5001/api/"));
Then, we can modify the Index.razor.cs class:
public partial class Index
{
    [Inject]
    public IHttpClientFactory HttpClientFactory { get; set; }

    private string _message;

    protected override async Task OnInitializedAsync()
    {
        var client = HttpClientFactory.CreateClient("companyAPI.Unauthorized");
        var result = await client.GetFromJsonAsync<UnauthorizedTestDto>("companies/unauthorized");
        _message = result.Message;
    }
}
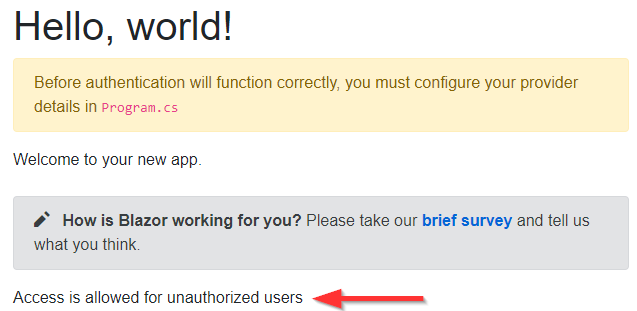
Here, we inject the IHttpClientFactory instead of HttpClient and use that factory to create our named HttpClient instance. Then, we are using that instance to send an HTTP request:
Excellent.
Conclusion
To sum up, we have learned:
- How to include an access token to the HTTP request from the Blazor WebAssembly app
- Different ways to register AuthorizationMessageHandler
- The way to send unauthorized requests to the API
In the next article, we are going to learn how to use Roles to secure our Blazor WebAssembly application.
See you there.


