

Blazor WebAssembly runs on the client and thus, it can’t be trusted. This means that just like with any JavaScript application, the authorization part can be bypassed. So, this means that we have to implement our authorization actions outside of the Blazor WebAssembly app. That said, in this article, we are going to learn how we can secure Blazor WebAssembly with IdentityServer4 using token-based authorization.
It is very important that you are familiar with the IdentityServer4, OAuth2, and OIDC concepts. If you are not, we strongly suggest you read our IdentityServer4, OAuth2, and OIDC series. There, you will learn everything you need related to IdentityServer4. Also, it will be much easier for you to follow along with this article (and the other articles from the Blazor WebAssembly with IdentityServer4 series).
Also, it is obvious that you need to have previous Blazor WebAssembly knowledge to follow along with this series. If you don’t have it or want to refresh your knowledge, you can visit our Blazor WebAssembly series.
Let’s dive in.
Blazor WebAssembly Security Overview
Blazor WebAssembly is a single page application (SPA) and, we can integrate different authorization options inside it. The most common option is using the tokens with OAuth2 and OIDC. As the most common option, we are going to use it in this series as well. Also, we are going to use the Authorization Code flow with PKCE to secure our client application. We won’t talk more about the Authorization Code Flow or the PKCE, since we have that explained in our Angular OAuth2 OIDC Configuration with IdentityServer4 article.
We strongly recommend reading this article because you will find all the information about the Authorization Code flow with PKCE, graphical example, URIs, etc… Also, if you are interested to learn how to integrate the Angular application with IdentityServer4, the mentioned article and all the other articles from the series will help you a lot.
Of course, if you are familiar with the Authorization Code concepts, you can skip the linked article and just move on with this one.
So basically, after we log in with our Blazor WebAssembly application, the IdentityServer will provide us with id and access tokens. We are going to use the id token for the user’s information and the access token to access our Web API’s protected resources. Of course, there are a lot of operations happening between the authentication and fetching the protected resources, and as we said, you can read more about all of that in our IdentityServer4, OAuth2, and OIDC series.
Client Application Overview
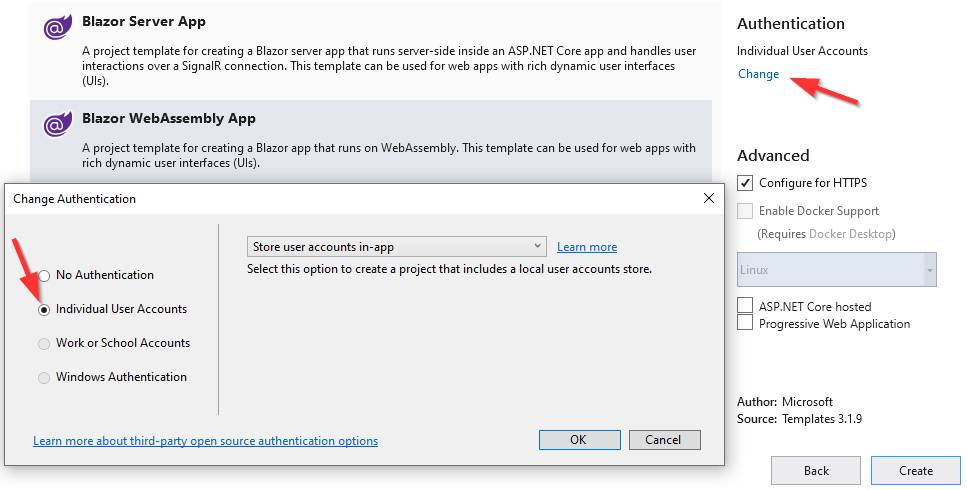
In the start folder, we can find only the IS4 and Web API applications but we can’t find the client app. So, let’s create it. We are going to choose the BlazorWebAssembly project and choose the Individual User Accounts option:
After we create this application, we are going to have several components implemented to help us with the authentication actions. So, let’s inspect them to see what Blazor default authentication provides for us.
Inspecting Components and Libraries
First, we can check the Dependencies part in the Solution Explorer:
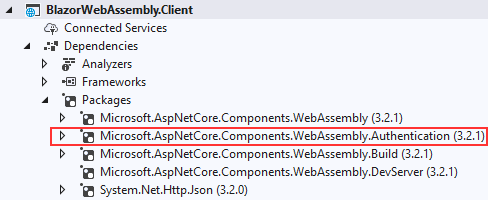
We use this package to support the client-side authentication and to help the integration process of Blazor WebAssembly with IdentityServer4. Let’s inspect the index.html file. We can see the import statement for the AuthenticationService.js library, which helps with the authentication operations:
<script src="_content/Microsoft.AspNetCore.Components.WebAssembly.Authentication/AuthenticationService.js"></script>
Then, we can open the Authentication.razor file under the Pages folder:
@page "/authentication/{action}"
@using Microsoft.AspNetCore.Components.WebAssembly.Authentication
<RemoteAuthenticatorView Action="@Action" />

@code{
    [Parameter] public string Action { get; set; }
}
This component, through its route, accepts the appropriate authentication actions at each stage of authentication. Also, it calls the RemoteAuthenticatorVew component to execute the required action. Of course, we have to send an action to this component from our application. That said, let’s inspect the RedirectToLogin.razor component:
@inject NavigationManager Navigation
@using Microsoft.AspNetCore.Components.WebAssembly.Authentication
@code {
    protected override void OnInitialized()
    {
        Navigation.NavigateTo($"authentication/login?returnUrl={Uri.EscapeDataString(Navigation.Uri)}");
    }
}
As we can see, this component injects the NavigationManager service and use the NavigateTo method to navigate to our Authentication component passing the login as the action parameter.
Finally, we have to use this RedirectToLogin component somewhere.
So, let’s open the App.razor component:
<CascadingAuthenticationState>
    <Router AppAssembly="@typeof(Program).Assembly">
        <Found Context="routeData">
            <AuthorizeRouteView RouteData="@routeData" DefaultLayout="@typeof(MainLayout)">
                <NotAuthorized>
                    @if (!context.User.Identity.IsAuthenticated)
                    {
                        <RedirectToLogin />
                    }
                    else
                    {
                        <p>You are not authorized to access this resource.</p>
                    }
                </NotAuthorized>
            </AuthorizeRouteView>
        </Found>
        <NotFound>
            <LayoutView Layout="@typeof(MainLayout)">
                <p>Sorry, there's nothing at this address.</p>
            </LayoutView>
        </NotFound>
    </Router>
</CascadingAuthenticationState>
If you are not familiar with this file or the CascadingAuthenticationState, AuthorizeRouteView, NotAuthorized components, we strongly suggest you reading our AuthenticationStateProvider in Blazor WebAssembly article. There you will learn a lot about them and what they do. Also, if you want to learn more about the Routing and these routing components (Router, Found, NotFound), you can read our Routing in Blazor WebAssembly article.
So, in the NotAuthorized part, we check if the user is authenticated, and if that’s not true, we call the RedirectToLogin component. Then as we saw, in that component we navigate to the Authentication component, which then calls the RemoteAuthenticatorVew component to handle the auth action.
Securing Blazor WebAssembly with IdentityServer4
After we are familiar with all these actions, we can start with the integration of Blazor WebAssembly with IdentityServer4.
Let’s open the CompanyEmployees.OAuth project and find the Configuration/InMemoryConfig class. This is the in-memory configuration for our users, clients, scopes, and APIs. Don’t start the application yet. This project is borrowed from our IdentityServer4, OAuth, OIDC series, and in the Migrating IdentityServer4 Configuration to the EF Core article of that series, we created a setup to migrate our in-memory configuration to the database as soon as we start the app.
In this series, we assume you already have the required knowledge about the IdentityServer4 implementation. That said, we won’t spend too much time explaining the basic concepts. We’ve linked the IdentityServer4 series several times in this article so feel free to read it if you need any additional information.
Okay, let’s open the InMemoryConfig class and add the required client configuration:
new Client
{
    ClientId = "blazorWASM",
    AllowedGrantTypes = GrantTypes.Code,
    RequirePkce = true,
    RequireClientSecret = false,
    AllowedCorsOrigins = { "https://localhost:5020" },
    AllowedScopes =
    {
        IdentityServerConstants.StandardScopes.OpenId,
        IdentityServerConstants.StandardScopes.Profile
    },
    RedirectUris = { "https://localhost:5020/authentication/login-callback" },
    PostLogoutRedirectUris = { "https://localhost:5020/authentication/logout-callback" }
}
So, there is nothing new here, if you are familiar with the client configuration in the IdentityServer4 project. As you can see, we are using the Code for AllowGrantTypes, which stands for the Authorization Code flow. Also, we require PKCE. Additionally, we can see all the other familiar properties, from the mentioned series, like client id, origins, scopes, redirect, and post redirect URIs.
With this out of the way, we can start our application. This will create a new CompanyEmployeeOAuth database and populate it with the required configuration.
Blazor WebAssembly Project Configuration
Before we start with the client-side configuration, we have to modify the Blazor’s lunchSettings.json file:
{
  "iisSettings": {
    "windowsAuthentication": false,
    "anonymousAuthentication": true,
    "iisExpress": {
      "applicationUrl": "http://localhost:56658",
      "sslPort": 44357
    }
  },
  "profiles": {
    "BlazorWebAssembly.Client": {
      "commandName": "Project",
      "launchBrowser": true,
      "inspectUri": "{wsProtocol}://{url.hostname}:{url.port}/_framework/debug/ws-proxy?browser={browserInspectUri}",
      "applicationUrl": "https://localhost:5020;http://localhost:5021",
      "environmentVariables": {
        "ASPNETCORE_ENVIRONMENT": "Development"
      }
    }
  }
}
In the IS4 configuration class, we set the RedirectUris and PostLogoutRedirectUris properties to localhost:5020/... and therefore, we have to set our client application to run on the same URI.
Now, we can open the Program.cs class and inspect the AddOidcAuthentication part:
builder.Services.AddOidcAuthentication(options =>
{
    // Configure your authentication provider options here.
    // For more information, see https://aka.ms/blazor-standalone-auth
    builder.Configuration.Bind("Local", options.ProviderOptions);
});
By calling this method, we add support for the authentication actions in our Blazor WebAssembly application. Also, inside it, we use the builder object to bind the configuration from the appsettings.json file that resides in the wwwroot folder. Even though we can add all the properties here (ClientId, RedirectURIs…) by using the options parameter, we are not going to do that. What we are going to do is to open the appsettings.json file, remove the content inside it, and add our own configuration:
{
    "oidc": {
        "Authority": "https://localhost:5005/",
        "ClientId": "blazorWASM",
        "ResponseType": "code",
        "DefaultScopes": [
            "openid",
            "profile"
        ],
        "PostLogoutRedirectUri": "authentication/logout-callback",
        "RedirectUri": "authentication/login-callback"
    }
}
As you can see, we have the configuration with the name oidc in place with the familiar properties that match all the properties on the IS4 side. Of course, we have an additional Authority property that points to the IS4 URI.
All we have left to do is to modify the Local string to the oidc in the AddOidcAuthentication method:
builder.Services.AddOidcAuthentication(options =>
{
    builder.Configuration.Bind("oidc", options.ProviderOptions);
});
That’s it. We can test it.
Testing the Blazor WebAssembly with IdentityServer Auth Actions
Now, let’s start the IS4 (if not already started) and the Blazor WebAssembly applications:
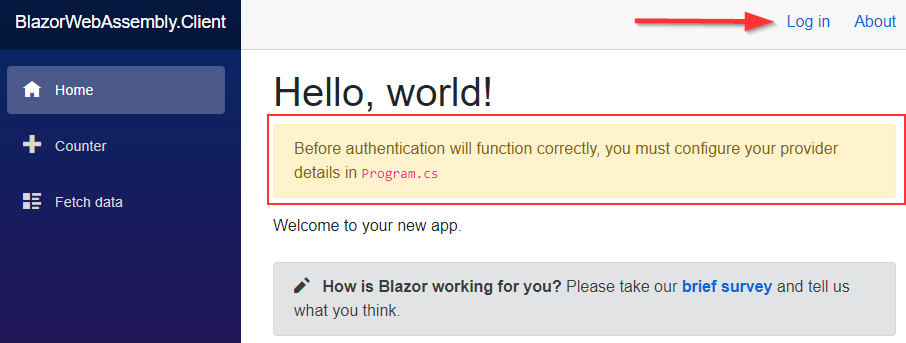
We can see the Home page with the Log in link and the message about the authentication configuration. Of course, we have completed the part this message is referring to.
Let’s click the Log in link:
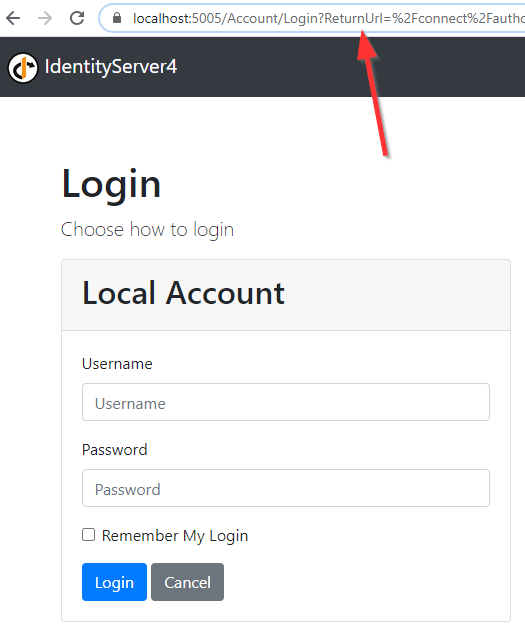
We can see the Login form and also the URI containing all the properties we talked about in the Angular OAuth2 OIDC Configuration with IdentityServer4 article.
To continue, let’s log in with the credentials from one of our users from the InMemoryConfig class (user: Mick, pass: MickPassword):
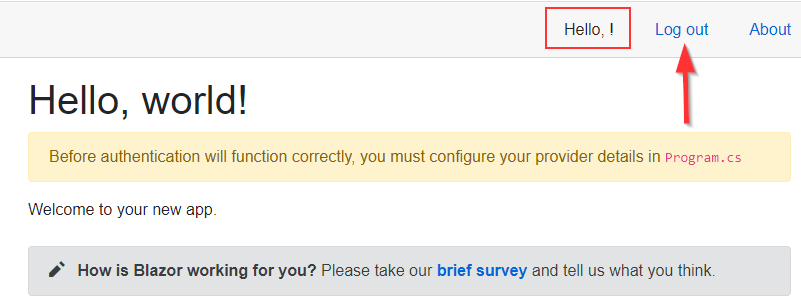
We can see, we are logged in. There is the Log out link as well as the Hello message. But this message is not complete, we are missing something.
Before we solve that problem, let’s click the Log out link:

And, we can see we are logged out and the Log in link is here again.
As a result of our actions, we have a working authentication functionality in our application. But, we still have things to do.
Inspecting Auth Menu and Solving the Claim Issue
We can see that the Log in and Log out links are switching based on the user’s authentication state. But, where does this logic come from?
To answer that, let’s open the Shared/LoginDisplay.razor file:
@using Microsoft.AspNetCore.Components.Authorization
@using Microsoft.AspNetCore.Components.WebAssembly.Authentication

@inject NavigationManager Navigation
@inject SignOutSessionStateManager SignOutManager

<AuthorizeView>
    <Authorized>
        Hello, @context.User.Identity.Name!
        <button class="nav-link btn btn-link" @onclick="BeginSignOut">Log out</button>
    </Authorized>
    <NotAuthorized>
        <a href="authentication/login">Log in</a>
    </NotAuthorized>
</AuthorizeView>

@code{
    private async Task BeginSignOut(MouseEventArgs args)
    {
        await SignOutManager.SetSignOutState();
        Navigation.NavigateTo("authentication/logout");
    }
}
In the AuthorizeView component, if the user is authorized, we show the message and the Log out link. But if the user is not authorized, we show the Log in link. Also, once the user clicks the Log out link, the BeginSignOut method is called. There, we use the SignOutManager.SetSignOutState method to set the authentication state for the log out operation, and navigate to the Authentication component with the logout action parameter.
Finally, we can see the problem in the Hello message. It uses the Name claim to display it within the message. The problem is that our users don’t have that claim in the claims configuration. So, to fix it, let’s remove the database from the SQL Server. Then, we are going to add a new claim to both our users in the InMemoryConfig class:
public static List<TestUser> GetUsers() =>
    new List<TestUser>
    {
        new TestUser
        {
            ...
            Claims = new List<Claim>
            {
                new Claim(JwtClaimTypes.Name, "Mick Mining"),
                new Claim("given_name", "Mick"),
                ...
            }
        },
        new TestUser
        {
            ...
            Claims = new List<Claim>
            {
                new Claim(JwtClaimTypes.Name, "Jane Downing"),
                new Claim("given_name", "Jane"),
                ...
            }
        }
};
Here, we add the Name claim for both our users.
Now, we can start the apps and if we log in, we are going to see the appropriate message:

Excellent. Everything works as it supposed to.
Custom Authentication User Interface
For different application states, when executing authentication actions, we can see different screens provided by the authentication middleware. For example, as soon as we click the log in link, before the Login screen, we can see the screen with the “Checking Login State…” message. Also if we click the Cancel button on the Login screen, we are going to see the page with the “There was an error trying to log you in” message. If we log out from our application, we are going to see the page with the “You are logged out” message.
All of these pages, and many others that we didn’t mention, are provided by the RemoteAuthenticatorView component, which we can find in the Authentication.razor component.
Because we know which component provides these UI state pages, we can modify them. Of course, we won’t modify all of them, but after our example, it will be quite simple to modify the other pages.
That said, let’s modify the Authentication.razor component:
@page "/authentication/{action}"
@using Microsoft.AspNetCore.Components.WebAssembly.Authentication
<RemoteAuthenticatorView Action="@Action">
    <LogInFailed>
        <h2>Your have canceled the Login action.</h2>
    </LogInFailed>
    <LogOutSucceeded>
        <h2>The Logout action was completed successfully.</h2>
    </LogOutSucceeded>
</RemoteAuthenticatorView>

@code{
    [Parameter] public string Action { get; set; }
}
Now, we don’t have a self-closing RemoteAuthenticatorView tag, but instead, we have an open and close tag for that component. Between, we use the LogInFailed and LogOutSuceeded components with the message inside each component. Pay attention that we use here only the <h2>tags to add the message to each component, but you can create your own component and call them instead of the heading tags.
With this in place, we can navigate to the Login page and click the Cancel button:

Also, once we log out from the application, we are going to see our new custom message:

So, there we go. In the same way, we can modify UIs for other authentication states.
Conclusion
We did a great job here integrating Blazor WebAssembly with IdentityServer4 to protect our client application.
To sum up, we have learned:
- About the components provided by the Blazor WebAssembly app with the default Authentication
- How to configure IdentityServer4 and the Blazor WebAssembly app
- The way to use Login and Logout actions
- How to modify different authentication state UIs
In the next article, we are going to talk about using the Access Token to gain the access to the protected Web API resources.
So, see you there.

