In this article, we are going to learn more about Blazor WebAssembly HttpClient and how to use it to fetch data from the ASP.NET Core Web API server. The HttpClient service is preconfigured in BlazorWebAssembly applications, but since we are working with the API project on a different domain (Cross-origin resource sharing), we are going to create our custom HTTP logic and handle the results accordingly.
One thing to mention, when you create your Blazor WebAssembly project, you can check the ASP.NET Core hosted option that will create and configure the server for your application. Both, the client and the server applications will run in the same domain. So, you can do it that way as well.
Start folder to download the projects to follow along with this article and the End folder for the finished projects.For the complete navigation of this series, you can visit the Blazor Series page.
Web API Project Overview
In the Start folder, you can find two projects. The client application from the previous article, and the server Web API application. Since the Web API works with data from the SQL database, all you have to do is to modify the connection string in the appsettings.json file and start the application. This will create the database and seed the required data. Our API project is written in .NET 5, but we will explain what is different in the newer version next to each code snippet.
Before we start, let’s do a quick overview of the Web API application.
We can see two projects. The Web API project and the Entities project that we are going to share with the Blazor client application.
In the Web API project, we can see a standard setup. A context class with the configuration class for seeding data, the MigrationManager class to execute our migration as soon as the application starts, and our Migration files.
We have applied a couple of changes to the launchSettings.json file:
{
  "$schema": "http://json.schemastore.org/launchsettings.json",
  "iisSettings": {
    "windowsAuthentication": false,
    "anonymousAuthentication": true,
    "iisExpress": {
      "applicationUrl": "http://localhost:52497",
      "sslPort": 44316
    }
  },
  "profiles": {
    "BlazorProducts.Server": {
      "commandName": "Project",
      "launchBrowser": false,
      "applicationUrl": "https://localhost:5011;http://localhost:5010",
      "environmentVariables": {
        "ASPNETCORE_ENVIRONMENT": "Development"
      }
    }
  }
}
And to the Startup class, to configure CORS and register DbContext:
public void ConfigureServices(IServiceCollection services)
{
    services.AddCors(policy =>
    {
        policy.AddPolicy("CorsPolicy", opt => opt
            .AllowAnyOrigin()
            .AllowAnyHeader()
            .AllowAnyMethod());
    });

    services.AddDbContext<ProductContext>(opt => opt.UseSqlServer(Configuration.GetConnectionString("sqlConnection")));

    services.AddControllers();
}
public void Configure(IApplicationBuilder app, IWebHostEnvironment env)
{
    if (env.IsDevelopment())
    {
        app.UseDeveloperExceptionPage();
    }

    app.UseHttpsRedirection();
    app.UseCors("CorsPolicy");

    //the rest of the code
}
In a newer .NET version, we don’t have these two methods, and we use only the Program class:
var builder = WebApplication.CreateBuilder(args);

// Add services to the container.

builder.Services.AddControllers();

var app = builder.Build();

// Configure the HTTP request pipeline.

app.UseHttpsRedirection();

app.UseAuthorization();

app.MapControllers();

app.Run();
That said, we have to use builder.Services.AddCors method to register CORS, and of course, builder.Services.AddDbCntenxt method to register DbContext right below the comment that states where should we register our services to the container.
The app.UseCors method should be used in the same place below the app.UseHttpsRedirection method.
That said, let’s start with the Web API logic first.
Fetching Products from the Database
We are going to start by creating a Repository folder with the ProductRepository class and the IProductRepository interface inside it. After creation, let’s modify the interface:
public interface IProductRepository
{
    Task<IEnumerable<Product>> GetProducts();
}
Right after that, let’s modify the ProductRepository class:
public class ProductRepository : IProductRepository
{
    private readonly ProductContext _context;

    public ProductRepository(ProductContext context)
    {
        _context = context;
    }

    public async Task<IEnumerable<Product>> GetProducts() => await _context.Products.ToListAsync();
}
This is just a basic async operation where we extract our data from the database. We are not going to dive deep into the repository logic, but if you want to learn more about it and how to implement it using the best practices, you can read our Repository Pattern in ASP.NET Core Web API article. There is the async version of that implementation as well.
Now, let’s register our repository service in the Startup class:
public void ConfigureServices(IServiceCollection services)
{
    services.AddCors(policy =>
    {
        policy.AddPolicy("CorsPolicy", opt => opt
            .AllowAnyOrigin()
            .AllowAnyHeader()
            .AllowAnyMethod());
       });

       services.AddDbContext<ProductContext>(opt => opt.UseSqlServer(Configuration.GetConnectionString("sqlConnection")));

       services.AddScoped<IProductRepository, ProductRepository>();

       services.AddControllers();
}
In a newer .NET version, we would use:
builder.Services.AddScoped<IProductRepository, ProductRepository>();
Finally, let’s create an empty API Controller named ProductsController in the Controllers folder and modify it to send our data to the client:
[Route("api/products")]
[ApiController]
public class ProductsController : ControllerBase
{
    private readonly IProductRepository _repo;

    public ProductsController(IProductRepository repo)
    {
        _repo = repo;
    }

    public async Task<IActionResult> Get()
    {
        var products = await _repo.GetProducts();
        return Ok(products);
    }
}
And that’s all it takes.
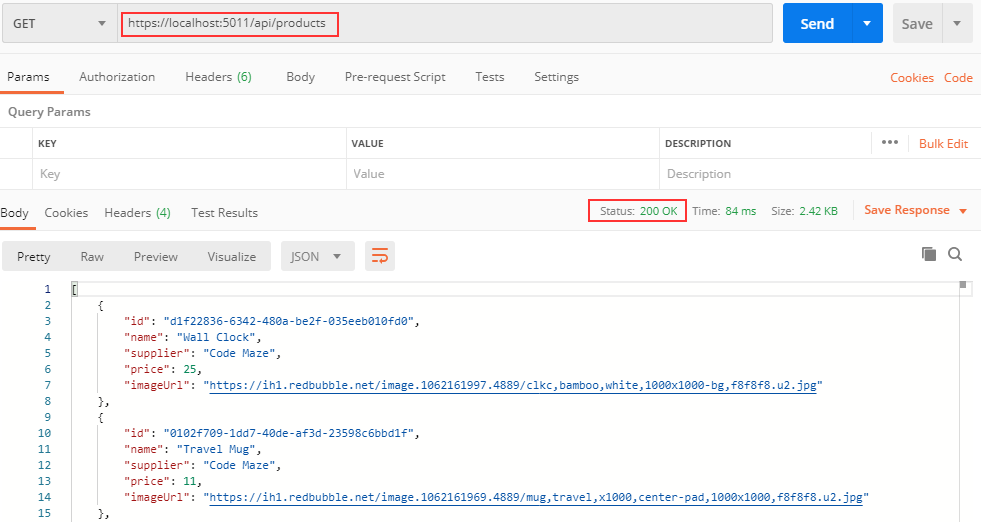
We can test this with Postman:
We can confirm everything is working as expected.
Now, let’s continue with the client-side logic.
Blazor WebAssembly HttpClient
When we want to communicate with the Web API project from our client-side project, we can use the HttpClient service provided by the framework. It is already registered in the Program.cs class:
var builder = WebAssemblyHostBuilder.CreateDefault(args);
builder.RootComponents.Add<App>("#app");

builder.Services.AddScoped(sp => new HttpClient { BaseAddress = new Uri(builder.HostEnvironment.BaseAddress) });

await builder.Build().RunAsync();
You can see that we don’t have the Startup class and the ConfigureServices method.
We have to register our services in the Program class. Additionally, HttpClient is configured to use a base address (https://localhost:5001) as a default address, but that won’t work for us because our API runs on https://localhost:5011.
We are going to deal with that.
Furthermore, if we inspect the FetchData razor file, we can see the usage of the HttpClient service with the GetFromJsonAsync method. But, since we are going to require additional logic in our get request, with query parameters and all, we are going to use our logic for the HTTP requests. We don’t need the FetchData component, so let’s remove it and let’s modify the NavMenu component to include the Products menu instead of Fetch Data:
<div class="@NavMenuCssClass" @onclick="ToggleNavMenu">
    <ul class="nav flex-column">
        <li class="nav-item px-3">
            <NavLink class="nav-link" href="" Match="NavLinkMatch.All">
                <span class="oi oi-home" aria-hidden="true"></span> Home
            </NavLink>
        </li>
        <li class="nav-item px-3">
            <NavLink class="nav-link" href="counter">
                <span class="oi oi-plus" aria-hidden="true"></span> Counter
            </NavLink>
        </li>
        <li class="nav-item px-3">
            <NavLink class="nav-link" href="products">
                <span class="oi oi-list-rich" aria-hidden="true"></span> Products
            </NavLink>
        </li>
    </ul>
</div>
Excellent.
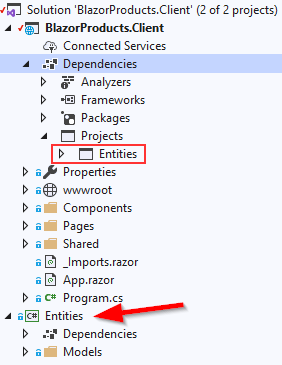
Now, let’s import the Entities project to our client solution by using the Add Existing Project option. Additionally, we have to add the Entities project’s reference to the BlazorProducts.Client project:
To continue, we are going to create a new HttpRepository folder in the client project with the IProductHttpRepository interface and the ProductHttpRepository class.
Let’s start with the interface modification:
public interface IProductHttpRepository
{
    Task<List<Product>> GetProducts();
}
And let’s implement this interface in the class:
public class ProductHttpRepository : IProductHttpRepository
{
    private readonly HttpClient _client;
    private readonly JsonSerializerOptions _options;

    public ProductHttpRepository(HttpClient client)
    {
        _client = client;
        _options = new JsonSerializerOptions { PropertyNameCaseInsensitive = true };
    }

    public async Task<List<Product>> GetProducts()
    {
        var response = await _client.GetAsync("products");
        var content = await response.Content.ReadAsStringAsync();
        if (!response.IsSuccessStatusCode)
        {
            throw new ApplicationException(content);
        }

        var products = JsonSerializer.Deserialize<List<Product>>(content, _options);
        return products;
    }
}
Here, we inject the HttpClient service and use it to send a Get request to the server-side application. As soon as we receive the response, we extract it in the content variable, deserialize it, and return it to the component.
Additionally, we have to register this service in the Program class:
builder.Services.AddScoped(sp => new HttpClient { BaseAddress = new Uri(builder.HostEnvironment.BaseAddress) });
builder.Services.AddScoped<IProductHttpRepository, ProductHttpRepository>();

await builder.Build().RunAsync();
Excellent.
Setting the HttpClient BaseAddress
As you can see in the GetProducts method when we call the _client.GetAsync() method, and just use the products for the requestUri parameter. To support this, we have to modify the HttpClient registration in the Program.cs class:
builder.Services.AddScoped(sp => new HttpClient { BaseAddress = new Uri("https://localhost:5011/api/") });
With this approach, you can register the base URI during the HttpClient registration and then just use the rest of the URI in the request.
AddHttpClient method:
builder.Services.AddHttpClient("ProductsAPI", (sp, cl) =>
{
    cl.BaseAddress = new Uri("https://localhost:5011/api/");
});

builder.Services.AddScoped(
    sp => sp.GetService<IHttpClientFactory>().CreateClient("ProductsAPI"));
This method adds the IHttpClientFactory interface and configures the named HttpClient. So, don’t get confused, this is just a different way to register the HttpClient in our app, but it is the more preferred way of doing so. We strongly recommend reading the Using HttpClientFactory in ASP.NET Core Applications article to learn more about the HttpClientFactory and why you should use it. We will continue with the default HttpClient registration.
Let’s move to the component logic.
Creating Components to Display Data
In the Pages folder, we are going to create two files – Products.razor and Products.razor.cs files. Let’s start with the Products.razor file modification:
@page "/products"

<div class="row">
    <div class="col-md-10">
        @*Place for search and sort*@
    </div>
    <div class="col-md-2">
        <a href="/createProduct">Create Product</a>
    </div>
</div>
<div class="row">
    <div class="col">
        @*Place for products*@
    </div>
</div>
<div class="row">
    <div class="col">
        @*Place for pagination*@
    </div>
</div>
And after that, let’s modify the Products class:
public partial class Products
{
    public List<Product> ProductList { get; set; } = new List<Product>();

    [Inject]
    public IProductHttpRepository ProductRepo { get; set; }

    protected async override Task OnInitializedAsync()
    {
        ProductList = await ProductRepo.GetProducts();

        //just for testing
        foreach (var product in ProductList)
        {
            Console.WriteLine(product.Name);
        }
    }
}
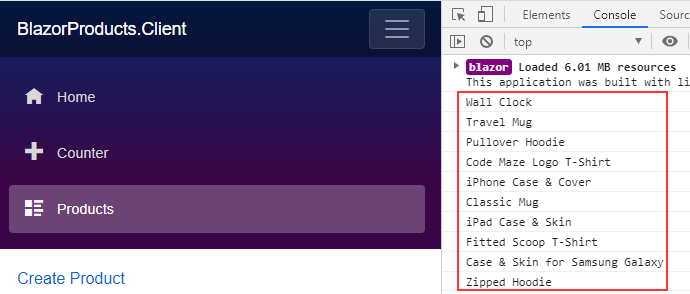
In this file, we inject our IProductHttpRepository interface using the [Inject] attribute and use it to call the GetProducts method from the repository class. After that, we just loop through each product to test if this works as expected.
Now, we can start our applications, press F12, navigate to the Products page, and inspect the logs:
Excellent. Our data is here.
To continue, let’s create a new ProductTable folder with ProductTable.razor and ProductTable.razor.cs files inside it. All of that in the Components folder.
So, let’s start with the class modification first:
public partial class ProductTable
{
    [Parameter]
    public List<Product> Products { get; set; }
}
All we do here is create a Products parameter to accept all the products from the parent component. Now, let’s use it to generate our view in the razor file:
@if (Products.Count > 0)
{
    <table class="table">
        <thead>
            <tr>
                <th scope="col"></th>
                <th scope="col">Name</th>
                <th scope="col">Supplier</th>
                <th scope="col">Price</th>
                <th scope="col">Update</th>
                <th scope="col">Delete</th>
            </tr>
        </thead>
        <tbody>
            @foreach (var product in Products)
            {
                <tr>
                    <td>
                        <img src="@product.ImageUrl" alt="product image" style="width:100px;" />
                    </td>
                    <td class="align-middle">
                        @product.Name
                    </td>
                    <td class="align-middle">
                        @product.Supplier
                    </td>
                    <td class="align-middle">
                        [email protected]
                    </td>
                    <td class="align-middle">
                        <button type="button" class="btn btn-info">Update</button>
                    </td>
                    <td class="align-middle">
                        <button type="button" class="btn btn-danger">Delete</button>
                    </td>
                </tr>
             }
            </tbody>
    </table>
}
else
{
    <span>
        Loading products...
    </span>
}
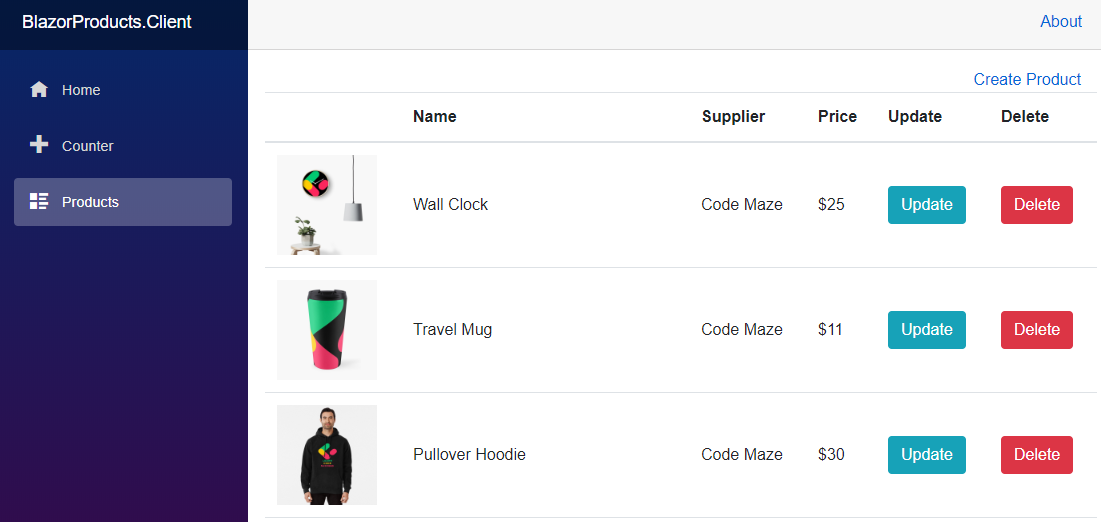
Here, we create a conditional rendering. If our Products parameter is still an empty list, we just show the message “Loading products…”. But as soon as we populate the Products list, we render the table with some bootstrap CSS classes.
Finally, we have to add this component to the Products.razor file:
@page "/products"
@using BlazorProducts.Client.Components.ProductTable

<div class="row">
    <div class="col-md-10">
        @*Place for search and sort*@
    </div>
    <div class="col-md-2">
        <a href="/createProduct">Create Product</a>
    </div>
</div>
<div class="row">
    <div class="col">
        <ProductTable Products="ProductList" />
    </div>
</div>
<div class="row">
    <div class="col">
        @*Place for pagination*@
    </div>
</div>
As soon as we start our application and navigate to the Products page, we are going to see a quick “Loading products…” message and then our products:
Nicely done.
Conclusion
Now we know how to fetch our data from the API using the HttpClient provided by the Blazor framework. Additionally, we have learned how to create and register services in the Blazor WebAssembly application and how to render data we got from the server.
In the next article, we are going to implement pagination on both Web API and Blazor WebAssembly sides.


