

In this article, we are going to learn how we can implement Angular JWT authentication and authorization. We are going to see how we can securely transfer the user’s credentials from a browser to a server and vice versa.
VIDEO: ASP.NET Core Authentication with JWT and Angular - Part 2.
This part is the continuation of the previous part where we have covered the JWT authentication backend side. In this part, we are going to consume that Web API and implement Angular JWT authentication to secure our pages and add a token to our HTTP requests. Furthermore, in the next article, we are going to learn how to refresh the token generated from our API.
So, let’s start.
Enabling Cross-Origin Requests (CORS)
By default, we can’t send an HTTP request to servers of a different origin due to browser security concerns.
So, what can we do?
We need to configure the server to receive cross-origin requests. By default, the ASP.NET Core application will reject any request coming from the cross-origin clients. To enable CORS in .NET Core Web API, we need to implement a middleware in the Program class.
Let’s open our JwtAuthentication.Server start project (you may find it in here) and add the code to configure the CORS policy:
builder.Services.AddCors(options =>
{
    options.AddPolicy("EnableCORS", builder =>
    {
        builder.AllowAnyOrigin()
        .AllowAnyHeader()
        .AllowAnyMethod();
    });
});
To make this middleware available for the application, we have to add one more line above the UseAuthentication method:
app.UseCors("EnableCORS");
We can find out more about CORS and the additional options to configure it on this location: Enabling CORS in ASP.NET Core.
Perfect.
At this point, the server is ready to listen to the cross-origin requests.
The Login Component for the Angular JWT Authentication
We have created the Angular starter application (available for download from here) which contains all the necessary code (basic Angular components and the routes) we need for this post. With this project, it is going to be much easier to follow along with this post, because we can focus only on the parts important for the Angular JWT authentication. To find out in detail how to work with Angular, visit our Angular Series.
Before we start with the login implementation, we are going to create a new _interfaces folder, and inside a new login.model file:
export interface LoginModel {
  username: string;
  password: string;
}
And then one more, to accept the response from the server with a token:
export interface AuthenticatedResponse{
  token: string;
}
Next, to implement the login, we are going to modify the LoginComponent:
export class LoginComponent implements OnInit {
  invalidLogin: boolean;
  credentials: LoginModel = {username:'', password:''};

  constructor(private router: Router, private http: HttpClient) { }

  ngOnInit(): void {

  }

  login = ( form: NgForm) => {
    if (form.valid) {
      this.http.post<AuthenticatedResponse>("https://localhost:5001/api/auth/login", this.credentials, {
        headers: new HttpHeaders({ "Content-Type": "application/json"})
      })
      .subscribe({
        next: (response: AuthenticatedResponse) => {
          const token = response.token;
          localStorage.setItem("jwt", token);
          this.invalidLogin = false;
          this.router.navigate(["/"]);
        },
        error: (err: HttpErrorResponse) => this.invalidLogin = true
      })
    }
  }
}
We have two properties. The invalidLogin where we store whether the login action was successful or not and the credentials to fetch user credentials from the form.
Inside the login function, we check if the form is valid and if it is, we send a POST request to the API’s login endpoint. Here, as a response, we accept an object of the AuthenticatedResponse type (the one we return from the API’s Login action), which contains the token property.
The server is going to validate the data. If the username and password are valid, the server will issue a JSON web token and send it back to the browser.
When we accept the response, we extract the token, store it in storage, set invalidLogin to false, and navigate to the home page. In the case of the error response, we just set invalidLogin to true.
Once we have the token persisted in storage, we can use it for future calls to access the protected resources on the server. You can think of a token as a special identity card that you may use to access the secret resources in your organization.
Creating Login Form
The first thing we have to do is to import the FormsModule inside the app.module file:
import { FormsModule } from '@angular/forms';

...

@NgModule({
  declarations: [
    ...
  ],
  imports: [
    BrowserModule,
    AppRoutingModule,
    HttpClientModule,
    BrowserAnimationsModule,
    FormsModule
  ],
We need it in order to enable the template-driven form and binding.
Next, let’s continue with the login form implementation in the login.component.html file:
<div class="container">
  <form #loginForm="ngForm" (ngSubmit)="login(loginForm)">
    <h2 class="form-signin-heading">Login</h2>
      <div *ngIf="invalidLogin" class="alert alert-danger">Invalid username or password.</div>
      <br/>
      <label for="username" class="sr-only">Email address</label>
      <input type="email" id="username" name="username" [(ngModel)]="credentials.username"
        class="form-control" placeholder="User Name" required>
      <br/>
      <label for="password" class="sr-only">Password</label>
      <input type="password" id="password" name="password" [(ngModel)]="credentials.password"
        class="form-control" placeholder="Password" required>
      <br/>
      <button class="btn btn-lg btn-primary" type="submit" [disabled]="!loginForm.valid">Log in</button>
  </form>
</div>
This is a simple template-driven form where we store the form value inside the #loginForm reference and pass it to the login function. Also, with [(ngModel)] we bind the values of the input fields to each property inside the LoginModel object.
Implementing Home Component and the Logout Function
Implementing the logout function is very simple. It’s similar to losing the identity card. If we don’t have the card, we are not able to access the secretly protected resources. To log out the user, we are simply going to delete the token stored in the local storage which is the only key to access protected resources.
If we don’t have the token, the server simply doesn’t know our identity and it’s going to reject our calls to the protected resources. To implement log out we are going to create the logout function in the HomeComponent:
isUserAuthenticated = (): boolean => {
  return false
}

logOut = () => {
  localStorage.removeItem("jwt");
}
Inside the logout method, we just remove the token from the local storage. Also, we have the isUserAuthenticated function, which we will use later on. For now, it only returns false.
Now, let’s modify the template file:
<h1>Home Page</h1>

<br>
<div *ngIf="isUserAuthenticated()" style="color:blue;">
  <h2>
    YOU ARE LOGGED IN
  </h2>
</div>

<br>
<ul>
  <li><a routerLink="/customers">Customer</a></li>
  <li *ngIf="!isUserAuthenticated()"><a routerLink="/login">Login</a></li>
  <li *ngIf="isUserAuthenticated()"><a class="logout" (click)="logOut()">Log out</a></li>
</ul>
At this point our logout functionality is complete.
Using Angular Jwt Library With Angular JWT Authentication
We are going to use the @auth0/angular-jwt library, to help us with JWT validation and with adding the token to the HTTP requests.
So, let’s install it first:
npm i @auth0/angular-jwt
Next, let’s configure it by modifying the app.module.ts file:
...
import { FormsModule } from '@angular/forms';
import { JwtModule } from "@auth0/angular-jwt";

...

export function tokenGetter() {
  return localStorage.getItem("jwt");
}

@NgModule({
  declarations: [
    ...
  ],
  imports: [
    ...
    FormsModule,
    JwtModule.forRoot({
      config: {
        tokenGetter: tokenGetter,
        allowedDomains: ["localhost:5001"],
        disallowedRoutes: []
      }
    })
  ],
  providers: [AuthGuard],
  bootstrap: [AppComponent]
})
export class AppModule { }
We inject the JwtModule and configure it to use the tokenGetter function to retrieve the token from the local storage and to include it into any Http request executed by the HttpClientModule.
Additionally, we add the server’s URI to the allowed domain list required by JwtModule.
For additional information about this library, you can visit @auth0/angular-jwt.
Protecting Angular Routes with Guards
Protecting the Angular routes is a crucial part of implementing security in the Angular application. To protect the routes, Angular provides the CanActivate interface. This interface exposes the canActivate method which we can implement to provide a route guard. The canActivate method triggers before the Angular route activates, it acts as a guard to the Angular routes. Inside the canActivate method, we can write any custom logic to protect our routes.
That said, in the guards folder, we can find the auth.guard.ts file. Let’s implement the AuthGuard logic which provides a custom implementation of the CanActivate interface:
import { Injectable } from '@angular/core';
import { ActivatedRouteSnapshot, CanActivate, Router, RouterStateSnapshot } from '@angular/router';
import { JwtHelperService } from '@auth0/angular-jwt';

@Injectable({
  providedIn: 'root'
})
export class AuthGuard implements CanActivate  {

  constructor(private router:Router, private jwtHelper: JwtHelperService){}

  canActivate(route: ActivatedRouteSnapshot, state: RouterStateSnapshot) {
    const token = localStorage.getItem("jwt");

    if (token && !this.jwtHelper.isTokenExpired(token)){
      return true;
    }

    this.router.navigate(["login"]);
    return false;
  }
}
Inside the canActivate method, we check if the token expired. To check the validity of a token, we use the JwtHelper service. The JwtHelper service is defined in the @auth0-angular-jwt library which is a lightweight library that provides some helper services to easily work with JSON web tokens in Angular. If a token is valid, our guard returns true. Otherwise, it navigates the user to the home component and returns false.
After the guard implementation, we are going to apply the AuthGuard service to the CustomersComponent route in the app-routing.module. To apply the AuthGuard, we simply provide the service name in the CustomersComponent‘s route object by using thecanActivate attribute:
const routes: Routes = [
  { path: '', component: HomeComponent },
  { path: 'login', component: LoginComponent },
  { path: 'customers', component: CustomersComponent, canActivate: [AuthGuard] }
];
The canActivate property in the Route object is an array. That means we can specify more than one service. At this point, if we are not authenticated and try to visit the Customer page, we will be redirected to the Login page.
Before we continue, let’s add a few changes to the home.component.ts file:
constructor(private jwtHelper: JwtHelperService) { }

ngOnInit(): void {
}

isUserAuthenticated = (): boolean => {
  const token = localStorage.getItem("jwt");

  if (token && !this.jwtHelper.isTokenExpired(token)){
    return true;
  }

  return false;
}
Accessing Protected Resources
To access the protected resources we need to send the JWT token in the Authorization header with each request. The server is going to verify the token and grant access to protected resources.
In our CustomerComponent, on the component initialization, we are going to send a request to the server to access a list of customers.
import { Component, OnInit } from '@angular/core';
import { HttpClient, HttpErrorResponse } from '@angular/common/http';

@Component({
  selector: 'app-customers',
  templateUrl: './customers.component.html',
  styleUrls: ['./customers.component.css']
})
export class CustomersComponent implements OnInit {
  customers: any;

  constructor(private http: HttpClient) { }

  ngOnInit(): void {
    this.http.get("https://localhost:5001/api/customers")
    .subscribe({
      next: (result: any) => this.customers = result,
      error: (err: HttpErrorResponse) => console.log(err)
    })
  }

}
Here, we send an HTTP GET request to the http://localhost:5000/api/customers endpoint with the JSON web token in the Authorization header. Yes, you can’t see the authorization header in the request but it will be there due to the auth-jwt library configuration:
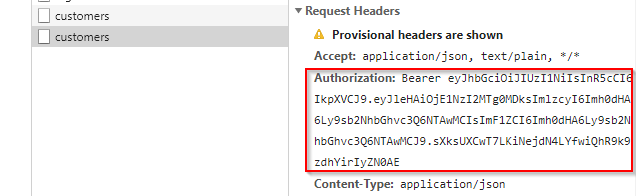
If the token is invalid the server is going to reply with the 401 Unauthorized response. If the token is valid, then we are going to see a list of customers.
Now, all we have to do is to show some results in the customer template file:
<h1>Customers</h1>
<ul>
  <li *ngFor="let cust of customers">{{ cust }}</li>
</ul>
Role-Based Authorization
Right now, we have a fully functional application (the backend and the frontend part) that uses the JWT features for user authentication. But, because we have only the [Authorize] attribute on top of the Customers controller’s GET action, all the authenticated users have access to that endpoint.
What if we don’t want this type of behavior? What if we want only Managers to have access to that endpoint?
Well, to accomplish that, we need to make a couple of changes to our Web API part.
First, let’s modify the [Authorize]attribute to give access only to a user with the Manager role:
[HttpGet, Authorize(Roles = "Manager")]
public IEnumerable<string> Get()
{
    return new string[] { "John Doe", "Jane Doe" };
}
Excellent.
Additionally, let’s modify the Login action in the AuthController to set up the user claims:
if (user.UserName == "johndoe" && user.Password == "def@123")
{
    var secretKey = new SymmetricSecurityKey(Encoding.UTF8.GetBytes("superSecretKey@345"));
    var signinCredentials = new SigningCredentials(secretKey, SecurityAlgorithms.HmacSha256);

    var claims = new List<Claim>
    {
        new Claim(ClaimTypes.Name, user.UserName),
        new Claim(ClaimTypes.Role, "Manager")
    };

    var tokeOptions = new JwtSecurityToken(
        issuer: "https://localhost:5001",
        audience: "https://localhost:5001",
        claims: claims,
        expires: DateTime.Now.AddMinutes(5),
        signingCredentials: signinCredentials
    );

    var tokenString = new JwtSecurityTokenHandler().WriteToken(tokeOptions);

    return Ok(new AuthenticatedResponse { Token = tokenString });
}
In the changed parts of the code, we create claims by adding the username and the role claim to the Claim list. Now, our “johndoe” user is a Manager and it should have access to the Customer’s GET action. These claims are going to be included in our token. If we try to log in with the Angular application, everything should work as before without any problems.
Finally, let’s check what is going to happen if the “johndoe” has the Operator role and not the Manager role. To simulate this, we need to modify the role claim from the Manager to the Operator:
var claims = new List<Claim>
{
     new Claim(ClaimTypes.Name, user.UserName),
     new Claim(ClaimTypes.Role, "Operator")
};
Now, we still are able to log in but once we try to access the Customer’s GET action, we are going to get the 403 Forbidden response:
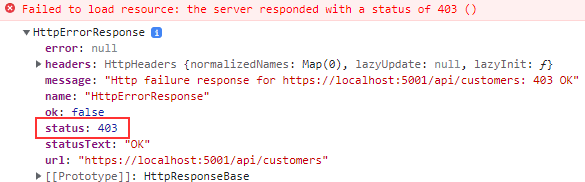
Awesome, our authorization part works like a charm.
JwtHelper DecodeToken
One more thing though. Let’s see how we can extract the data from the token on the client side.
The jwtHelper service has the decodeToken function which can decode our token into the JSON object. Because we have already injected the JwtHelper service into the AuthGuard service, let’s modify that service a bit just to see how the decodeToken function works. We are going to add one line of code that checks if the token exists and if it hasn’t expired:
if (token && !this.jwtHelper.isTokenExpired(token)){
  console.log(this.jwtHelper.decodeToken(token))
  return true;
}
Once we log in again, we can see the result in the console window:
aud: "https://localhost:5001"
exp: 1650718465
http://schemas.microsoft.com/ws/2008/06/identity/claims/role: "Manager"
http://schemas.xmlsoap.org/ws/2005/05/identity/claims/name: "johndoe"
iss: "https://localhost:5001"
Conclusion
By reading this post you have learned:
- How to configure cross-origin requests in the browser and on the server
- To login users in AngularStore save JWT in local storage.
- How to remove JWT from local storage and how to log out a user in Angular
- To protect Angular routes with the
CanActivateinterface - How to access protected resources on the server by sending tokens in the Authorization header
In the next article, we are going to learn about Refreshing Tokens in Web Applications.

