

View-based authorization is an authorization strategy that enables us to manage UI elements’ visibility based on the user’s identity. In this article, we’ll take a look at how we can achieve view-based authorization in an ASP.NET core application.
Let’s begin.
What Is Authorization?
Before we dive deeper into the implementation of view-based authorization, let’s take a step back and review the concept of authorization.
Authorization refers to the process of determining what actions or resources a user is permitted to access. It is based on their identity and associated permissions. In other words, it ensures that the users only interact with the parts of an application that they are authorized to use.
Often it’s the process that comes after authentication. While authentication verifies who a user claims to be, authorization determines the level of access granted to authenticated users.
View-Based Authorization
In view-based authorization, we conditionally display or enable different view parts, such as buttons, links, and form fields, based on the user’s authorization status.
Unlike other forms of authorization such as route-based or resource-based authorization, which focus on controlling access to entire routes or data resources, view-based authorization targets individual components within the user interface.
Here, we often leverage user roles or policies to determine access to UI elements. We can check whether the current user belongs to a specific role and accordingly render UI elements for them. View-based authorization also allows us to move the authorization logic from the backend to the presentation layer. We can apply authorization rules directly on the razor views without cluttering the controller or backend APIs with authorization-related code.
Role-Based Access Control (RBAC)
Building upon the concept of view-based authorization, Role-Based Access Control (RBAC) can help us refine the access within ASP.NET Core Razor views.
RBAC is an authorization technique where access decisions are determined by a user’s role within the system. It allows us to restrict access to specific UI elements based on the roles associated with the current user:
@if (User.IsInRole("Admin"))
{
    <a class="btn btn-danger" href="/[email protected]">Delete</a>
}
Here, we only display the Delete link to users who belong to the Admin role. Thus, users who do not have administrator access are unable to delete resources.
Policy-Based Access Control (PBAC)
Expanding on the concept of view-based authorization and Role-Based Access Control, let’s explore Policy-Based Access Control (PBAC).
PBAC is an authorization model where we decide user access based on policies. A policy refers to a set of rules that define whether a user is authorized to access a particular resource or perform a specific action. Policies are dependent on claims, which are individual pieces of information about an authenticated user. When a user requests access to a resource, we evaluate these policy requirements against the role or claims associated with the user.
These policies allow for fine-grained control over access to UI components within ASP.NET Core Razor views:
@if ((await AuthorizationService.AuthorizeAsync(User, "EditDocument")).Succeeded)
{
    <a class="btn btn-primary" href="/[email protected]">Edit</a>
}
Here, we use the AuthorizeAsync() method to check whether the current user is authorized according to the EditDocument policy defined in the application’s policy configuration. If the user is authorized, we display the Edit link.
Implement View-Based Authorization in ASP.NET Core
Let’s create an application in which, based on a user’s roles and policies, we’ll conditionally display UI elements in the view.
Firstly, we use the dotnet new webapp command to create a new ASP.NET Core Razor Pages project in which to implement view-based authorization. We’ll be using the SQLite Entity Framework package to manage database persistence.
Now let’s create a Document class:
public class Document
{
    public int Id { get; set; }
    public required string Title { get; set; }
    public string Content { get; set; } = string.Empty;
}
This class will act as the base model for our application.
Next, let’s create a context class named DocumentContext that inherits from IdentityDbContext<IdentityUser>. This will allow us to extend the capabilities of IdentityDbContext to include default user and role management features provided by ASP.NET Core Identity.
Identity Configuration
Now let’s set up the default user and role management using DocumentContext as the database:
builder.Services.AddDefaultIdentity<IdentityUser>(options =>
{
    options.SignIn.RequireConfirmedAccount = true;
})
.AddRoles<IdentityRole>()
.AddEntityFrameworkStores<DocumentContext>();
Here, we configure the default Identity system with IdentityUser as the user type. IdentityUser is the built-in user model provided by ASP.NET Core Identity, which includes properties like Id, UserName, and Email.
We also extend the Identity system to support role-based authorization. It registers IdentityRole as the role type associated with users.
Policy Configuration
Next, let’s set up some policies in the application to restrict access to the resources:
builder.Services.AddAuthorizationBuilder()
    .AddPolicy("EditDocument", policy => policy.RequireClaim("Permission", "CanEdit"))
    .AddPolicy("DeleteDocument", policy => policy.RequireRole("Admin"));
The EditDocument policy requires the users to have a Permission claim with the value CanEdit, while the DeleteDocument policy requires the user to be an admin.
At this point, we can create and apply initial migrations to generate our Documents table and default ASP.NET Identity tables such as AspNetUsers and AspNetRoles.
User Creation for View-Based Authorization
To demonstrate how view-based authorization works for different users, let’s seed our application with different user roles:
private static void SeedUser(UserManager<IdentityUser> userManager, string email, string password,
    string roleName, params Claim[] claims)
{
    var user = userManager.FindByEmailAsync(email).Result;

    if (user is null)
    {
        user = new IdentityUser { UserName = email, Email = email, EmailConfirmed = true };
        userManager.CreateAsync(user, password);
    }

    if (!userManager.IsInRoleAsync(user, roleName).Result)
    {
        userManager.AddToRoleAsync(user, roleName);
    }

    foreach (var claim in claims)
    {
        if (!userManager.GetClaimsAsync(user)
            .Result
            .Any(c => c.Type == claim.Type && c.Value == claim.Value))
        {
            userManager.AddClaimAsync(user, claim);
        }
    }
}
Using the SeedUser() method, we can create users in the AspNetUsers table and assign them specific roles or claims. Let’s create three different types of users – admin, editor, and user:
SeedUser(userManager,
    "[email protected]",
    "Admin123!",
    "Admin",
    new Claim("Permission", "CanEdit"));

SeedUser(userManager,
    "[email protected]",
    "Editor123!",
    "Editor",
    new Claim("Permission", "CanEdit"));

SeedUser(userManager, "[email protected]", "User123!", "User");
The roles “Admin”, “Editor”, and “User” represent different levels of access or privileges within the application. In addition, we give a claim to the “Editor” and “Admin” users, which asserts that those users can edit documents within the application.
View-Based Authorization in Action
Now that we have our tables, users, and their respective roles set up, let’s see our Document Management application in action.
Let’s create an Index page that a logged-in user lands on:
<table class="table table-striped">
    <thead>
        <tr>
            <th>Title</th>
            <th>Actions</th>
        </tr>
    </thead>
    <tbody>
        @foreach (var document in Model.Documents)
        {
            <tr>
                <td>@document.Title</td>
                <td>
                    @if ((await AuthorizationService.AuthorizeAsync(User, "EditDocument")).Succeeded)
                    {
                        <a class="btn btn-primary" href="/[email protected]">Edit</a>
                    }
                    @if (User.IsInRole("Admin"))
                    {
                        <a class="btn btn-danger" href="/[email protected]">Delete</a>
                    }
                </td>
            </tr>
        }
    </tbody>
</table>
<hr/>
<p><a class="btn btn-success" href="/Add">Add New Document</a></p>
We inject the AuthorizationService into the view. Using this, we can dynamically perform authorization checks directly within the Razor Page. Finally, authorization policies ("EditDocument") and role-based checks (User.IsInRole("Admin")) dictate which actions are available to the user.
User Interface Differences
Let’s see how the application user interface varies for different types of users.
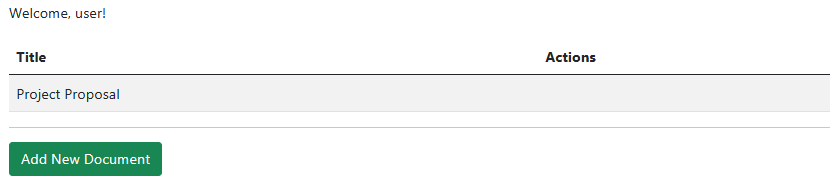
A “User” doesn’t have the permission to edit or delete documents. Thus, all they see is an option to add new documents:
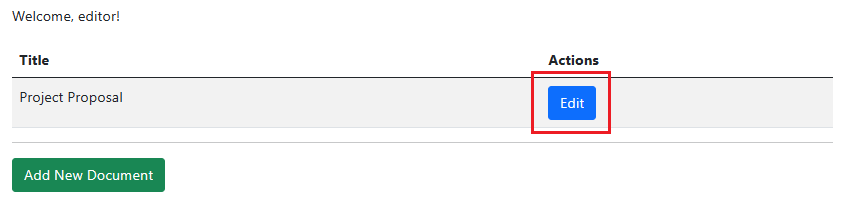
An “Editor” has permission to edit the existing documents. Thus, in addition to the ability to add new documents, they can also perform “Edit” actions:
Finally, an “Admin” has all the permissions, so they can add, edit, and delete a document:

Here, we render different action buttons conditionally based on the user’s permissions, thus ensuring a controlled user experience where each user only sees what’s relevant to them.
Benefits of View-Based Authorization
View-based authorization offers several advantages that enhance the flexibility and user experience of web applications.
It allows us to dynamically control the visibility of UI elements based on a user’s permissions and roles. In other words, users only see the content they are authorized to access, leading to a more intuitive user interface.
Because we embed the authorization logic directly into the client-side code, our application becomes more responsive, and the backend services are less complex. As the views become more self-contained with the authorization logic, it becomes easier to update authorization rules without impacting the overall application architecture.
Drawbacks of View-Based Authorization
If our application depends solely on conditionally rendered view controls, a malicious user can easily bypass the authorization.
A “User” can potentially bypass view-based authorization by directly accessing URLs associated with edit or delete operations (such as /Edit?id=1 or /Delete?id=1). This allows unauthorized users to perform actions that should be restricted based on their permissions.
To mitigate this, we need to implement server-side authorization checks within the Razor pages associated with restricted operations, thus ensuring that access permissions are validated before allowing users to perform any actions.
We can achieve this using the [Authorize] attribute:
[Authorize(Policy = "EditDocument")]
public class EditModel : PageModel
This acts as an extra authorization measure to restrict access to the page for editing documents.
Conclusion
In this article, we learned how view-based authorization provides us with a mechanism for controlling user access to specific UI elements based on roles, claims, and policies. Also, we looked into the principles, implementation strategies, benefits, and drawbacks of this essential authorization mechanism.
