

In this article, we are going to look at different ways of implementing an audit trail in ASP.NET Core.
So let’s get going.
VIDEO: Audit Trail Implementation in ASP.NET Core Web API.
What Is Audit Trail?
An audit trail refers to the record of all activities that the users perform in an application. We use it to identify who accessed the application, what changes were made, etc.
An audit trail typically includes the following information:
- The author of the change
- The date and time of the change
- The type of change
- The changed data
We can store audit trail data in databases, files, storage services, etc. The most common way is to store this kind of data in the application database and we are going to learn how to do that.
Implementing an audit trail is very important for ensuring data integrity in our application. With an audit trail, we can:
- Track changes to data
- Identify unauthorized access
- Investigate security breaches
Many industry regulations require organizations to implement audit trails for their software applications. For instance, while implementing card transactions, we should comply with the Payment Card Industry Data Security Standard (PCI DSS). Similarly, the applications that deal with health care data in the US should comply with the Health Insurance Portability and Accountability Act (HIPAA). These standards require us to implement a proper audit trail in our application.
Setting Up the Application
Let’s begin by creating an API application using either the dotnet new webapi command or the Visual Studio templates.
Next, let’s add a Product model class:
public class Product
{
    public int Id { get; set; }
    public required string Name { get; set; }
    public decimal Price { get; set; }
    public int Quantity { get; set; }
}
Along with that, let’s create an AuditLog model class:
public class AuditLog
{
    public int Id { get; set; }
    public string UserEmail => "[email protected]";
    public required string EntityName { get; set; }
    public required string Action { get; set; }
    public DateTime Timestamp { get; set; }
    public required string Changes { get; set; }
}
The AuditLog entity has UserEmail, EntityName, Action, Timestamp, and Changes properties. Ideally, once we implement authentication, we should get the user details such as name, email, etc. from the User object in the context. However, since we are not planning to implement authentication for this example, let’s hardcode the UserEmail value. Of course, if we wish to authenticate the users, we can implement authentication in ASP.NET Core Web API.
Once we implement authentication, we can replace the hard-coded UserEmail value with the respective value from ClaimsPrincipal by getting the current user with claims.
Let’s add an API Controller to carry out CRUD operations. To keep things simple, we’ll create a DbContext and Controller using the Visual Studio Scaffolding option.
To do this, right-click on the Controllers folder and select Add – New Scaffolded Item option. From here, we can choose the option API Controller with actions using Entity Framework. After that, we can choose the Product model class and choose to create a new data context by providing a name:
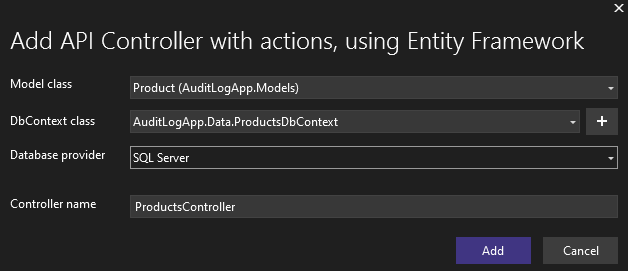
Visual Studio will then create the data context for us and add API controller action methods. If we want to create everything manually, we can do so as well.
Audit Trail With EF Core Change Tracking
It is possible to configure the Entity Framework Core’s change tracking to automatically capture all changes made to data into a table. Let’s see how to do that.
First, let’s add the AuditLog entity to the ProductsDbContext class:
public DbSet<AuditLog> AuditLogs { get; set; } = default!;
After that, let’s override the SaveChangesAsync() method of the ProductsDbContext class and add the functionality to capture the changes to the AuditLog table:
public override Task<int> SaveChangesAsync(CancellationToken cancellationToken = default)
{
    var modifiedEntities = ChangeTracker.Entries()
        .Where(e => e.State == EntityState.Added
        || e.State == EntityState.Modified
        || e.State == EntityState.Deleted)
        .ToList();

    foreach (var modifiedEntity in modifiedEntities)
    {
        var auditLog = new AuditLog
        {
            EntityName = modifiedEntity.Entity.GetType().Name,
            Action = modifiedEntity.State.ToString(),
            Timestamp = DateTime.UtcNow,
            Changes = GetChanges(modifiedEntity)
        };

        AuditLogs.Add(auditLog);
    }

    return base.SaveChangesAsync(cancellationToken);
}

private static string GetChanges(EntityEntry entity)
{
    var changes = new StringBuilder();

    foreach (var property in entity.OriginalValues.Properties)
    {
        var originalValue = entity.OriginalValues[property];
        var currentValue = entity.CurrentValues[property];

        if (!Equals(originalValue, currentValue))
        {
            changes.AppendLine($"{property.Name}: From '{originalValue}' to '{currentValue}'");
        }
    }

    return changes.ToString();
}
First, we find the modified entities from the EF Core change tracker. After that, for each of the modified entities, we find the properties that have changed using the GetChanges() method and write that to the AuditLog table.
This will store the changes in an audit log table whenever we create, update, or delete an entity.
Next, we can add database migrations and update our database. Along with that, let’s update the database connection string in the appsettings file.
Let’s first create a migration:
add-migration initial
After that, let’s apply the changes to the database:
update-database
This will generate the migration files and create the database tables.
Now let’s check the ProductsController class.
The POST method just creates a new product entry:
[HttpPost]
public async Task<ActionResult<Product>> PostProduct(Product product)
{
    if (_context.Products == null)
    {
        return Problem("Entity set 'ProductsDbContext.Product' is null.");
    }
    _context.Products.Add(product);
    await _context.SaveChangesAsync();

    return CreatedAtAction("GetProduct", new { id = product.Id }, product);
}
Let’s change the PUT method slightly so that it updates only the changed properties:
[HttpPut("{id}")]
public async Task<IActionResult> PutProduct(int id, Product product)
{
    if (id != product.Id)
    {
        return BadRequest();
    }

    var oldProduct = await _context.Products.FindAsync(id);
    if (oldProduct is null)
    {
        return NotFound();
    }

    _context.Entry(oldProduct).CurrentValues.SetValues(product);

    try
    {
        await _context.SaveChangesAsync();
    }
    catch (DbUpdateConcurrencyException)
    {
        if (!ProductExists(id))
        {
            return NotFound();
        }
        else
        {
            throw;
        }
    }

    return NoContent();
}
Here we get the original record by using the FindAsync() method. Then we set the values of this object by copying values from the current object by using the SetValues() method. The advantage of this method is that it will ignore the unchanged properties and generate the SQL UPDATE statement with just the changed properties.
Testing Audit Trail
Now let’s test the audit trail functionality.
First, let’s try creating a new product using the POST endpoint:
curl -X 'POST' \
  'https://localhost:7004/api/Products' \
  -H 'accept: text/plain' \
  -H 'Content-Type: application/json' \
  -d '{

  "name": "Milk",
  "price": 5,
  "quantity": 50
}'
This will create a new product record in the database:
{
  "id": 1,
  "name": "Milk",
  "price": 5,
  "quantity": 50
}
Additionally, this will create an entry in the AuditLog table:

Next, let’s update the product record using the PUT endpoint:
curl -X 'PUT' \
  'https://localhost:7004/api/Products/1' \
  -H 'accept: */*' \
  -H 'Content-Type: application/json' \
  -d '{
  "id": 1,
  "name": "Milk",
  "price": 5,
  "quantity": 55
}'
This time we can see a second entry in the audit trail corresponding to the update operation:

Notice how the Changes field correctly captures the property value that changed.
While implementing the audit trail with EF Core change tracking, we just need to override the SaveChangesAsync() method of the DbContext class and it automatically captures all the modifications that we make to data along with the changed values. So while using EF Core for data access, this is an excellent approach for implementing audit trail.
Audit Trail in API Controllers
Another way of implementing an audit trail is by capturing all events at the individual API controller action level. Since this is done at the controller level, this approach works with any database and data access technique.
Let’s modify the POST method to implement this:
[HttpPost]
public async Task<ActionResult<Product>> PostProduct(Product product)
{
    if (_context.Products == null)
    {
        return Problem("Entity set 'ProductsDbContext.Product'  is null.");
    }

    _context.Products.Add(product);

    var auditLog = new AuditLog
    {
        Action = "Product Created",
        Timestamp = DateTime.UtcNow,
        EntityName = typeof(Product).Name,
        Changes = JsonSerializer.Serialize(product)
    };
    _context.AuditLogs.Add(auditLog);

    await _context.SaveChangesAsync();

    return CreatedAtAction("GetProduct", new { id = product.Id }, product);
}
Here, after adding the product to the Products DbSet, we create a new AuditLog object with the change details and add it to the _context. For tracking the current object values, we serialize the Product object and add it in the Changes column.
With this approach in place, there is no need to capture the audit trail with EF Core change tracking in the ProductsDbContext class as it will be a duplicate entry. So feel free to remove the SaveChangesAsync() method from the ProductsDbContext class.
Now let’s create a new product record using the POST endpoint:
curl -X 'POST' \
  'https://localhost:7004/api/Products' \
  -H 'accept: text/plain' \
  -H 'Content-Type: application/json' \
  -d '{

  "name": "Bread",
  "price": 4,
  "quantity": 25
}'
This will capture the audit trail entry:
![]()
With this approach, we have full control over where to add audits, what data to capture, etc. However, we will have to repeat the audit logging functionality in multiple places. To solve this, we are going to create a middleware so that we can plug it into the .NET Core pipeline without the need to repeat this code.
Audit Trail Using Middleware
Instead of adding an audit trail for every controller action, we can create an audit trail middleware and hook it to the ASP.NET Core pipeline.
For creating the middleware, first, let’s create an AuditLogMiddleware class:
public class AuditLogMiddleware
{
    private const string ControllerKey = "controller";
    private const string IdKey = "id";

    private readonly RequestDelegate _next;

    public AuditLogMiddleware(RequestDelegate next)
    {
        _next = next;
    }

    public async Task InvokeAsync(HttpContext context, ProductsDbContext dbContext)
    {
        await _next(context);

        var request = context.Request;

        if (request.Path.StartsWithSegments("/api"))
        {
            request.RouteValues.TryGetValue(ControllerKey, out var controllerValue);
            var controllerName = (string)(controllerValue ?? string.Empty);

            var changedValue = await GetChangedValues(request).ConfigureAwait(false);

            var auditLog = new AuditLog
            {
                EntityName = controllerName,
                Action = request.Method,
                Timestamp = DateTime.UtcNow,
                Changes = changedValue
            };

            dbContext.AuditLogs.Add(auditLog);
            await dbContext.SaveChangesAsync();
        }
    }
}
Here, first, we define the constants for the Controller and Id keys. After that, we write the middleware functionality in the InvokeAsync() method. Inside the method, we first check the request path to make sure we process only the API endpoints. We get the controller name and assign it to the Entity property and the request method to the Action property. Similarly, we call the GetChangedValues() method to get the change values:
private static async Task<string> GetChangedValues(HttpRequest request)
{
    var changedValue = string.Empty;

    switch (request.Method)
    {
        case "POST":
        case "PUT":
            changedValue = await ReadRequestBody(request, Encoding.UTF8).ConfigureAwait(false);
            break;

        case "DELETE":
            request.RouteValues.TryGetValue(IdKey, out var idValueObj);
            changedValue = (string?)idValueObj ?? string.Empty;
            break;

        default:
            break;
    }

    return changedValue;
}

private static async Task<string> ReadRequestBody(HttpRequest request, Encoding? encoding = null)
{
    request.Body.Position = 0;
    var reader = new StreamReader(request.Body, encoding ?? Encoding.UTF8);
    var requestBody = await reader.ReadToEndAsync().ConfigureAwait(false);
    request.Body.Position = 0;

    return requestBody;
}
In the GetChangedValues() method, we check the request method. In the case of POST and PUT requests, we read the request body with the ReadRequestBody() method and assign it to the changedValue variable. For the DELETE method, we get the Id value and assign it to the changedValue variable.
In the ReadRequestBody() method, we read the request body using a StreamReader. Note that we reset the current position of the Stream before and after we read it. Apart from that, to ensure that we can read the request body multiple times, we need to enable buffering for the request.
Let’s add a middleware for that in the Program class:
var builder = WebApplication.CreateBuilder(args);

// code removed for brevity

app.UseAuthorization();

    app.Use(next => context => {
        context.Request.EnableBuffering();
        return next(context);
    });

app.UseMiddleware<AuditLogMiddleware>();

app.MapControllers();
app.Run();
Here, we add a middleware to enable buffering of the request. After that, we add the AuditLogMiddleware.
Now let’s create a new record using the POST endpoint:
curl -X 'POST' \
  'https://localhost:7004/api/Products' \
  -H 'accept: text/plain' \
  -H 'Content-Type: application/json' \
  -d '{

  "name": "Eggs",
  "price": 10,
  "quantity": 100
}'
After that, let’s update the quantity value using the PUT endpoint:
curl -X 'PUT' \
  'https://localhost:7004/api/Products/3' \
  -H 'accept: */*' \
  -H 'Content-Type: application/json' \
  -d '{
  "id": 4,
  "name": "Eggs",
  "price": 10,
  "quantity": 110
}'
Finally, let’s delete the record using the DELETE endpoint:
curl -X 'DELETE' \
  'https://localhost:7004/api/Products/4' \
  -H 'accept: */*'
This will create three entries in the AuditLog table:

We can see that it captures the request body as changes for the POST and PUT actions. In the case of the DELETE action, it captures the Id as changes.
Conditional Middleware
With the middleware approach, we can add the audit functionality centrally without the need to repeat it in every action method. However, we might still want to have some control over this. For example, we might want to execute this middleware only for some controllers. For that purpose, we can write conditional middleware using the UseWhen() method:
app.UseWhen(context => context.Request.Path.StartsWithSegments("/api"), appBuilder =>
{
    appBuilder.UseMiddleware<AuditLogMiddleware>();
});
Here it will execute the AuditLog middleware only if the request path starts with /api. Of course, we can give different conditions as the predicate and it will create a branch in the request pipeline based on it. By using this approach, we can conditionally limit our middleware to just certain requests.
Conclusion
In this article, we learned different ways of implementing audit trails in an ASP.NET Core Web API. We started by looking at how to do that using EF Core change tracking. After that, we learned to implement an audit trail at the individual controller action level and hook it as a middleware.

