In this article, we are going to show you how to elegantly integrate a validation pipeline into our project using the MediatR and FluentValidation libraries.
Let’s get started.
VIDEO: FluentValidation with CQRS and MediatR in ASP.NET Core Web API.
What is CQRS?
CQRS or Command Query Responsibility Segregation is a design pattern that is becoming very popular in recent years. The idea behind CQRS is to logically split the flow of your application into two separate flows, either Commands or Queries.
Commands are used to change the state of the application. If we talked about CRUD (Create, Read, Update, Delete), Commands would cover the Create, Update, and Delete parts.
On the other hand, Queries are used to retrieve information in the application. Naturally, they cover the Read part in CRUD.
To learn how to implement CQRS with MediatR in your ASP.NET Core application, be sure to check out this article CQRS and MediatR in ASP.NET Core. You should be familiar with CQRS and MediatR to follow along with this article. So, if you are not, we strongly suggest reading the linked article first.
Advantages and Disadvantages of CQRS
What are the benefits of CQRS, and why should we consider using it in our application?
The benefits of CQRS are:
- Single Responsibility – Commands and Queries have only one job. It is either to change the state of the application or retrieve it. Therefore, they are very easy to reason about and understand.
- Decoupling – The Command or Query is completely decoupled from its handler, giving you a lot of flexibility on the handler side to implement it the best way you see fit.
- Scalability – The CQRS pattern is very flexible in terms of how you can organize your data storage, giving you options for great scalability. You can use one database for both Commands and
- Queries. You can use separate Read/Write databases, for improved performance, with messaging or replication between the databases for synchronization.
- Testability – It is very easy to test Command or Query handlers since they will be very simple by design, and perform only a single job.
Of course, it can’t all be good. Here are some of the disadvantages of CQRS:
- Complexity – CQRS is an advanced design pattern, and it will take you time to fully understand it. It introduces a lot of complexity that will create friction and potential problems in your project. Be sure to consider everything, before deciding to use it in your project.
- Learning Curve – Although it seems like a straightforward design pattern, there is still a learning curve with CQRS. Most developers are used to the procedural (imperative) style of writing code, and CQRS is a big shift away from that.
- Hard to Debug – Since Commands and Queries are decoupled from their handler, there isn’t a natural imperative flow of the application. This makes it harder to debug than traditional applications.
Commands and Queries with MediatR
We talked about Commands and Queries in the previous section, now let’s see how we can implement them using MediatR.
MediatR uses the IRequest interface to represent both a Command and a Query. For our use case, we will create separate abstractions for Commands and Queries.
First, let’s see how the ICommand interface is defined:
using MediatR;

namespace Application.Abstractions.Messaging
{
    public interface ICommand<out TResponse> : IRequest<TResponse>
    {
    }
}
Let’s also see how the IQuery interface is defined:
using MediatR;

namespace Application.Abstractions.Messaging
{
    public interface IQuery<out TResponse> : IRequest<TResponse>
    {
    }
}
We are declaring the generic type TResponse with the out keyword, which denotes that it is covariant. This allows us to use a more derived type than that specified by the generic parameter. To learn more about covariance and contravariance you check out the Microsoft documentation.
Additionally, we will need separate abstractions for Command and Query handlers, for the sake of completeness. So, let’s inspect them:
using MediatR;

namespace Application.Abstractions.Messaging
{
    public interface ICommandHandler<in TCommand, TResponse> : IRequestHandler<TCommand, TResponse>
        where TCommand : ICommand<TResponse>
    {
    }
}
using MediatR;

namespace Application.Abstractions.Messaging
{
    public interface IQueryHandler<in TQuery, TResponse> : IRequestHandler<TQuery, TResponse>
        where TQuery : IQuery<TResponse>
    {
    }
}
Why are we bothering ourselves with defining custom interfaces for Command and Queries?
Isn’t MediatR’s IRequest interface good enough?
With additional abstractions for Commands and Queries, the approach that we are talking about gives us much more flexibility going forward. Imagine if you want to enrich your Commands and Queries with additional features?
Here’s a simple example: we want all our commands to be idempotent. Idempotent means that they can only execute once.
We can extend the ICommand interface and create a new IIdempotentCommand interface:
public interface IIdempotentCommand<out TResponse> : ICommand<TResponse>
{
    Guid RequestId { get; set; }
}
After that, we have to implement some logic to ensure that we have idempotency. But that is a very complex subject, for a future article.
Also, using additional abstractions for Commands and Queries gives us the ability to perform filtering within the MediatR pipeline, which we are going to see in the next sections.
Validation with FluentValidation
The FluentValidation library allows us to easily define very rich custom validation for our classes. Since we are implementing CQRS, it makes the most sense to define validation for our Commands.
We should not bother ourselves with defining validators for Queries, since they don’t contain any behavior. We use Queries only for fetching data from the application.
For example, we will take a look at the UpdateUserCommand:
public sealed record UpdateUserCommand(int UserId, string FirstName, string LastName) : ICommand<Unit>;
We will use this command to update an existing user’s first and last name. To learn more about the role of Commands in CQRS be sure to check out CQRS and MediatR in ASP.NET Core.
Let’s see how to implement a validator for the UpdateUserCommand:
public sealed class UpdateUserCommandValidator : AbstractValidator<UpdateUserCommand>
{
    public UpdateUserCommandValidator()
    {
        RuleFor(x => x.UserId).NotEmpty();

        RuleFor(x => x.FirstName).NotEmpty().MaximumLength(100);

        RuleFor(x => x.LastName).NotEmpty().MaximumLength(100);
    }
}
With our UpdateUserCommandValidator we want to make sure that the command’s arguments are not empty, and that the first and last names are less than the allowed maximum length.
That’s it, it is that simple!
In this article, we won’t go into more detail about what the FluentValidation library offers. But if you are not familiar with it, or want to learn more, be sure to check out this article FluentValidation in ASP.NET Core.
Creating Decorators with MediatR PipelineBehavior
The CQRS pattern uses Commands and Queries to convey information, and receive a response. In essence, it represents a request-response pipeline. This gives us the ability to easily introduce additional behavior around each request that is going through the pipeline, without actually modifying the original request.
You may be familiar with this technique under the name Decorator pattern. Another example of using the Decorator pattern is the ASP.NET Core Middleware concept.
MediatR has a similar concept to middleware, and it is called IPipelineBehavior:
public interface IPipelineBehavior<in TRequest, TResponse> where TRequest : notnull
{
    Task<TResponse> Handle(TRequest request, CancellationToken cancellationToken, RequestHandlerDelegate<TResponse> next);
}
The pipeline behavior is a wrapper around a request instance and gives you a lot of flexibility with how you can implement it. Pipeline behaviors are a good fit for cross-cutting concerns in your application. Good examples of cross-cutting concerns are logging, caching, and of course, validation!
Creating a Validation PipelineBehavior
To implement validation in our CQRS pipeline, we are going to use the concepts that we just talked about, and those are MediatR’s IPipelineBehavior and FluentValidation.
Let’s first see the ValidationBehavior implementation:
public sealed class ValidationBehavior<TRequest, TResponse> : IPipelineBehavior<TRequest, TResponse>
    where TRequest : class, ICommand<TResponse>
{
    private readonly IEnumerable<IValidator<TRequest>> _validators;

    public ValidationBehavior(IEnumerable<IValidator<TRequest>> validators) => _validators = validators;

    public async Task<TResponse> Handle(TRequest request, CancellationToken cancellationToken, RequestHandlerDelegate<TResponse> next)
    {
        if (!_validators.Any())
        {
            return await next();
        }

        var context = new ValidationContext<TRequest>(request);

        var errorsDictionary = _validators
            .Select(x => x.Validate(context))
            .SelectMany(x => x.Errors)
            .Where(x => x != null)
            .GroupBy(
                x => x.PropertyName,
                x => x.ErrorMessage,
                (propertyName, errorMessages) => new
                {
                    Key = propertyName,
                    Values = errorMessages.Distinct().ToArray()
                })
            .ToDictionary(x => x.Key, x => x.Values);

        if (errorsDictionary.Any())
        {
            throw new ValidationException(errorsDictionary);
        }

        return await next();
    }
}
Now, let’s discuss everything that is going on in the ValidationBehavior.
First of all, notice how we are using the where clause to only apply this IPipelineBehavior implementation for classes that also implement the ICommand interface. Essentially, we are only allowing this IPipelineBehavior to execute if the request that is going through the pipeline is a Command. Remember how we said earlier that we would only want to validate Commands? This is how we achieve that.
Next, you can see that we are injecting a collection of IValidator implementations in the constructor. The FluentValidation library will scan our project for all AbstractValidator implementations for a given type, and then provide us with the instance at runtime. This is how we can apply the actual validators that we implemented in our project.
Lastly, if there are any validation errors we throw a ValidationException that contains the validation errors dictionary. When the exception is thrown due to a validation error, the pipeline short-circuits and we prevent further execution. The only thing that is missing is to handle the exception in some of the higher layers of the application and present a meaningful response to the consumer. We are going to see how to do this in the next section.
Handling Validation Exceptions
To handle the ValidationException that is thrown when we encounter a validation error, we can use the ASP.NET Core IMiddleware interface. We will implement a global exception handler:
internal sealed class ExceptionHandlingMiddleware : IMiddleware
{
    private readonly ILogger<ExceptionHandlingMiddleware> _logger;

    public ExceptionHandlingMiddleware(ILogger<ExceptionHandlingMiddleware> logger) => _logger = logger;

    public async Task InvokeAsync(HttpContext context, RequestDelegate next)
    {
        try
        {
            await next(context);
        }
        catch (Exception e)
        {
            _logger.LogError(e, e.Message);

            await HandleExceptionAsync(context, e);
        }
    }

    private static async Task HandleExceptionAsync(HttpContext httpContext, Exception exception)
    {
        var statusCode = GetStatusCode(exception);

        var response = new
        {
            title = GetTitle(exception),
            status = statusCode,
            detail = exception.Message,
            errors = GetErrors(exception)
        };

        httpContext.Response.ContentType = "application/json";

        httpContext.Response.StatusCode = statusCode;

        await httpContext.Response.WriteAsync(JsonSerializer.Serialize(response));
    }

    private static int GetStatusCode(Exception exception) =>
        exception switch
        {
            BadRequestException => StatusCodes.Status400BadRequest,
            NotFoundException => StatusCodes.Status404NotFound,
            ValidationException => StatusCodes.Status422UnprocessableEnttity,
            _ => StatusCodes.Status500InternalServerError
        };

    private static string GetTitle(Exception exception) =>
        exception switch
        {
            ApplicationException applicationException => applicationException.Title,
            _ => "Server Error"
        };

    private static IReadOnlyDictionary<string, string[]> GetErrors(Exception exception)
    {
        IReadOnlyDictionary<string, string[]> errors = null;

        if (exception is ValidationException validationException)
        {
            errors = validationException.ErrorsDictionary;
        }

        return errors;
    }
}
To learn more about how to create a global exception handler in your ASP.NET Core applications, be sure to check out this article Global Error Handling in ASP.NET Core Web API.
Setting up Dependency Injection
Before we can run our application, we need to make sure that we registered all of our services with the DI container.
If you are using the newest MediatR library, you will see that below MediatR registration code is not working, we must change it:
builder.Services.AddMediatR(cfg => cfg.RegisterServicesFromAssembly(typeof(Program).Assembly));
Let’s see how to register our Commands and Queries with MediatR. In the Startup class ConfigureServices we will add the following lines:
services.AddMediatR(typeof(Application.AssemblyReference).Assembly);

services.AddTransient(typeof(IPipelineBehavior<,>), typeof(ValidationBehavior<,>));
In .NET 6, we have to modify the Program class:
builder.Services.AddMediatR(typeof(Application.AssemblyReference).Assembly);
builder.Services.AddTransient(typeof(IPipelineBehavior<,>), typeof(ValidationBehavior<,>));
The first method call will scan our Application assembly and add all our Commands, Queries, and their respective handlers to the DI container.
The second method call is our ValidationBehavior registration step. Without this, the validation pipeline would not execute at all.
Next, we need to make sure to also add the validators that we implemented using FluentValidation:
services.AddValidatorsFromAssembly(typeof(Application.AssemblyReference).Assembly);

//Or in .NET 6 and above

builder.Services.AddValidatorsFromAssembly(typeof(Application.AssemblyReference).Assembly);
Lastly, we need to add the ExceptionHandlingMiddleware in the ConfigureServices:
services.AddTransient<ExceptionHandlingMiddleware>();

//or in .NET 6 and above

builder.Services.AddTransient<ExceptionHandlingMiddleware>();
And also in the Configure method or in the pipeline registration part of the Program class for .NET 6:
app.UseMiddleware<ExceptionHandlingMiddleware>();
That’s it, we have completed registering our services with the DI container. Now that we have everything wired up, we can proceed to test out our implementation.
Validation Pipeline in Practice
We are going to look at our UsersController that we can find in the Presentation project under the Controllers folder:
/// <summary>
/// The users controller.
/// </summary>
[ApiController]
[Route("api/[controller]")]
public sealed class UsersController : ControllerBase
{
    private readonly ISender _sender;

    /// <summary>
    /// Initializes a new instance of the <see cref="UsersController"/> class.
    /// </summary>
    /// <param name="sender"></param>
    public UsersController(ISender sender) => _sender = sender;

    /// <summary>
    /// Updates the user with the specified identifier based on the specified request, if it exists.
    /// </summary>
    /// <param name="userId">The user identifier.</param>
    /// <param name="request">The update user request.</param>
    /// <param name="cancellationToken">The cancellation token.</param>
    /// <returns>No content.</returns>
    [HttpPut("{userId:int}")]
    [ProducesResponseType(StatusCodes.Status204NoContent)]
    [ProducesResponseType(StatusCodes.Status404NotFound)]
    public async Task<IActionResult> UpdateUser(int userId, [FromBody] UpdateUserRequest request, CancellationToken cancellationToken)
    {
        var command = request.Adapt<UpdateUserCommand>() with
        {
            UserId = userId
        };

        await _sender.Send(command, cancellationToken);

        return NoContent();
    }
}
Please note that this isn’t the complete implementation of the UsersController, we are only going to focus on the API endpoint for updating the user. For the complete implementation, you can visit our source code repository.
We can see that the UpdateUser action is very simple, it collects the user identifier from the route and the first and last name from the request body, and creates a new UpdateUserCommand instance. It then sends the command through the pipeline. And returns a 204 – No Content response in the end.
We’re not concerned with the validation at all in our API endpoint. This is the concern of the ValidationBehavior.
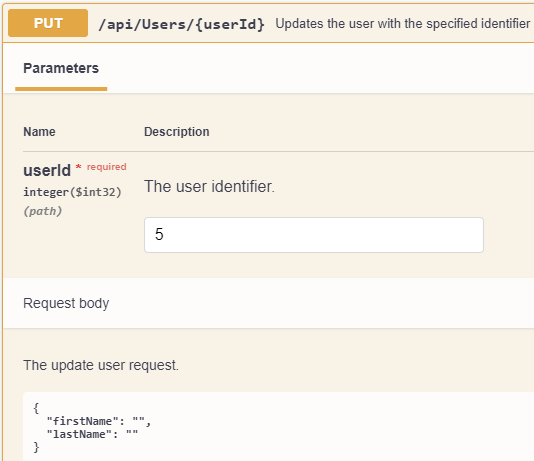
Let’s try to send an invalid request through the Swagger interface:
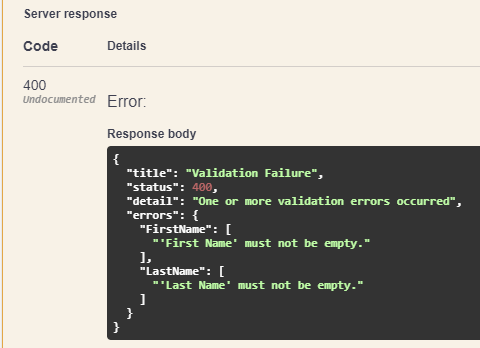
This is the response we receive from the server:
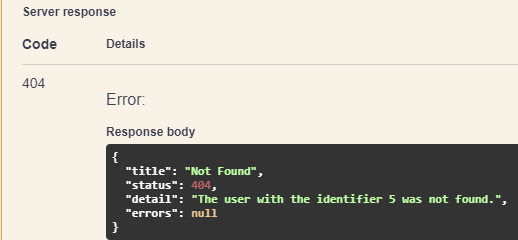
Once we fix the request body and send the same request (userId 5):
We get the response stating that we don’t have the user with that identifier in our database.
When we change the user identifier to one that exists in the database, we get the expected response from the API with the 204 – No Content status code.
Conclusion
In this article, we have learned some more advanced concepts of the CQRS pattern and how to implement validation as a cross-cutting concern in our application.
We started with a basic explanation of what CQRS is, and what are its advantages and disadvantages. We then saw how to create Commands and Queries with the MediatR library.
Next, we briefly discussed how to use the FluentValidation library to add validation for our Commands.
We then saw how to implement the ValidationBehavior to encapsulate validation as a cross-cutting concern in our application. We explained why we only want to validate our Commands, and how we can filter the pipeline so that it does not execute validation for Queries.
And finally, we saw how to bring it all together the ExceptionHandlingMiddleware and how we can wire everything up with the ASP.NET Core DI container.


