

In the previous article, we’ve talked about securing our Blazor WebAssembly Hosted application with Azure Active Directory. So in this article, as a continuation, we are going to learn how to use App Roles from Azure Active Directory to provide a greater level of security for our apps.
Let’s dive in.
Adding App Roles to Our Application in Azure AD
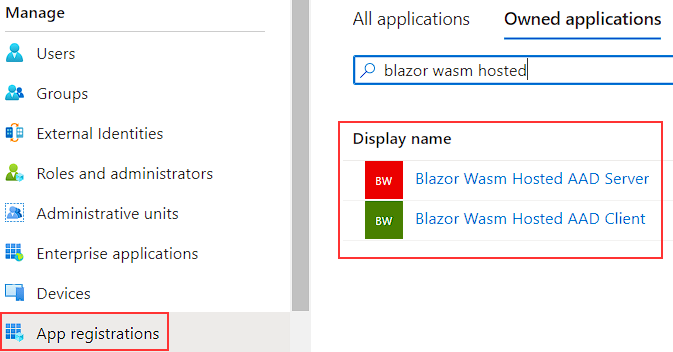
In our previous article, we’ve used the App registrations menu several times to register both the client and the server apps. That said, we have to use the same menu once again.
So, let’s navigate to our Azure Active Directory resource, and under the Manage section, click the App registrations where we can find our previously created apps:
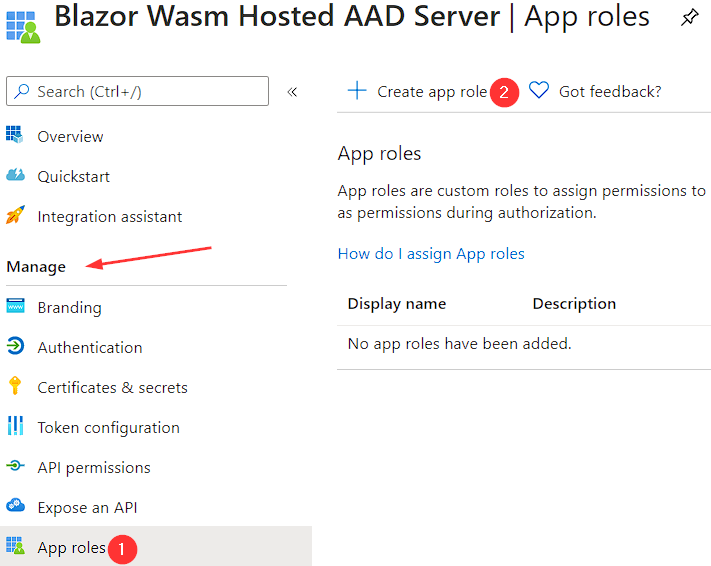
We are going to start with the server app.
Let’s click on it and then under the Manage section, we are going to click on App roles and then Create app role:
After we click the Create app role button, we are going to see a new window where we need to populate information about our role:
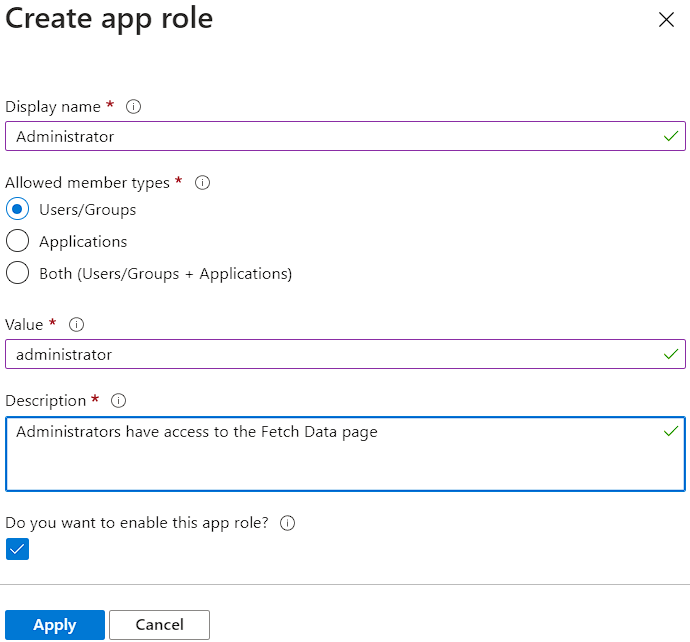
So, we have to provide a display name, choose the Users/Groups for the member types, provide the value for our role, provide a description, check the enable this app role checkbox, and click the Apply button.
After that, in the same way, we are going to create one more role named Viewer:

Excellent.
Adding our App Roles to the Client App
Now, we have to do all the steps for the client app. If you want, you can repeat all the steps from the server app roles creation process. But, there is a faster way and we are going to show it to you.
Under the Manage section, we can find the Manifest link. Let’s click on it and copy the entire appRoles array:
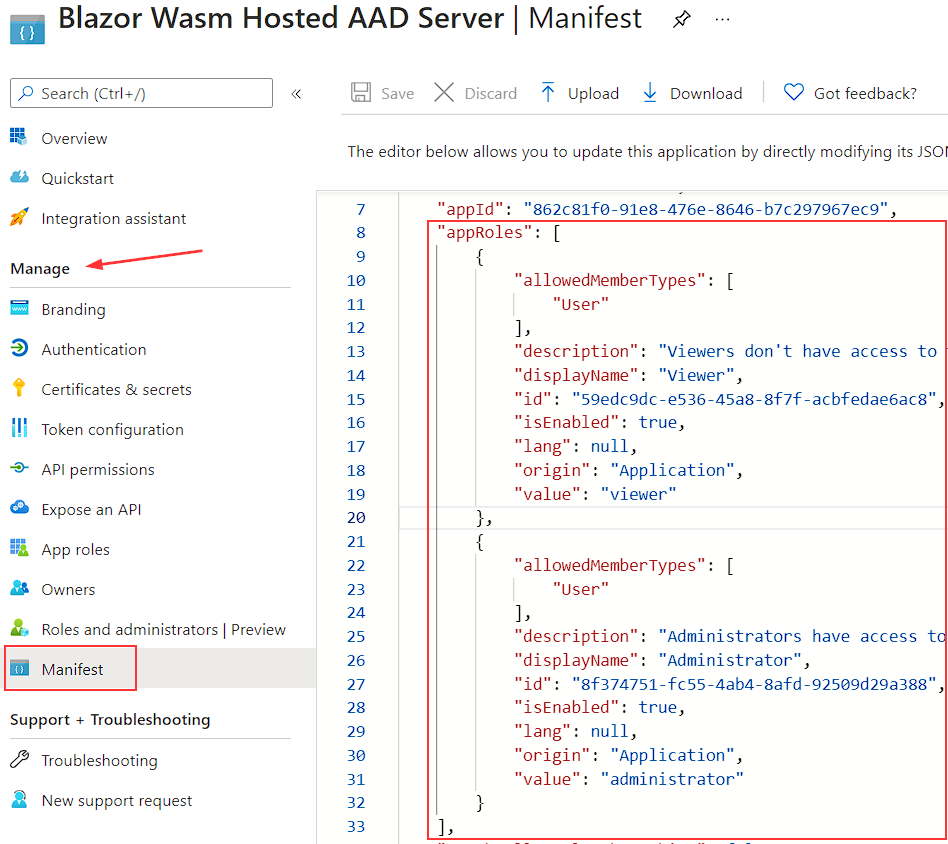
Then, we have to navigate to the client app, open the Manifest file from that app, replace the empty appRoles array with the copied one, and click the Save button. It is very important that the appRoles array is identical in both files.
Assigning Users to Our New Roles
Before we assign roles to our users, we must have those users in our Azure Active Directory. If you want to add more users, you can do that by navigating to Azure Active Directory, and under the Manage section click the Users link. Then, all you have to do is to click the New user button and add a new user.
Now, that we have both roles in both applications, we have to assign these roles to our users.
To do that, we have to navigate to the Azure Active Directory folder and click the Enterprise applications link under the Manage section.
There, we can see our applications:
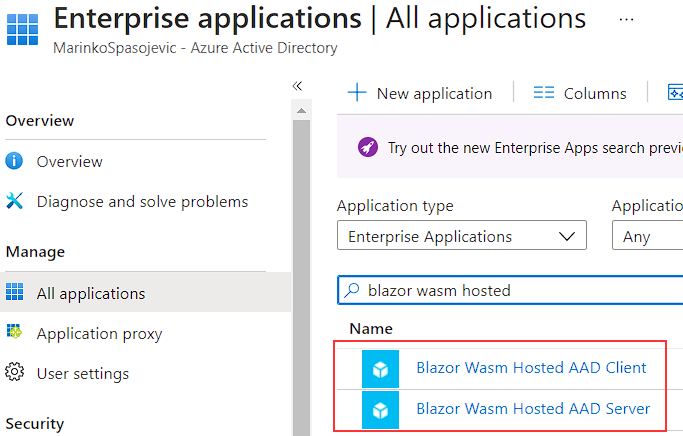
Let’s start by clicking on the client app.
Under the Manage section, we are going to click the Users and groups menu, and click the Add user/group button:
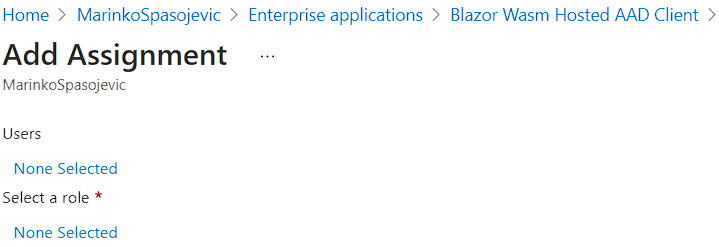
We can see that we didn’t connect our users with the appropriate roles.
So, let’s first click the None Selected link under the Users section. There we can find all of our users:
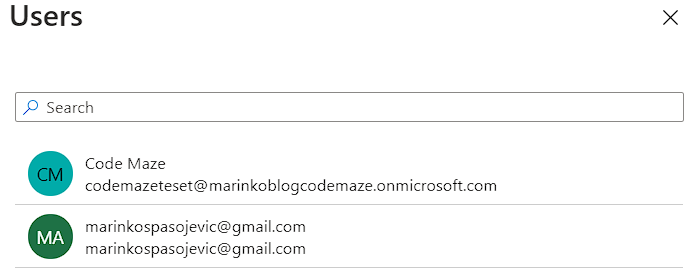
We are going to click on the Code Maze user and click the Select button.
Then, we have to click the None Selected link under the Select a role section, choose a role for the selected user, and click the Select button. We are going to select a Viewer role.
The last thing we have to do is to click the Assign button.
After that, we can repeat these steps to assign an Administrator role for another user (in our case for my personal account):
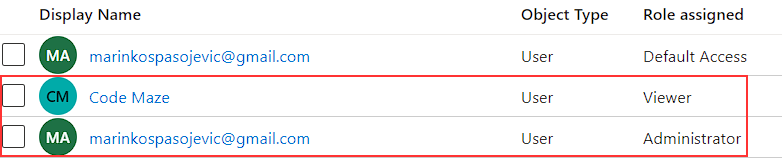
And we are done with the client app.
Of course, we have to repeat all the steps for the server-side application. So, under the Enterprise applications menu, navigate to the server application and repeat all the previous steps to assign roles to users.
Obtaining App Roles in Our Application
Now, we can use the project we’ve created in the previous article.
The first thing we are going to do is to extend the RemoteUserAccount class with one additional property. So in the client app, let’s create a new class and extend the mentioned class:
public class CustomUserAccount : RemoteUserAccount
{
    [JsonPropertyName("roles")]
    public string[] Roles { get; set; } = Array.Empty<string>();
}
The app will map all the roles for the authorized user to this property.
For this to work, we have to add two using directives:
using Microsoft.AspNetCore.Components.WebAssembly.Authentication;
using System.Text.Json.Serialization;
Since the Roles property can contain multiple roles, we have to find a way to separate each role into its own claim. Of course, even if the Roles property contains only one role, we have to do the same.
To do that, we are going to create another class in the client project:
public class CustomAccountFactory : AccountClaimsPrincipalFactory<CustomUserAccount>
{
    public CustomAccountFactory(IAccessTokenProviderAccessor accessor)
        : base(accessor)
    {
    }

    public async override ValueTask<ClaimsPrincipal> CreateUserAsync(CustomUserAccount account,
        RemoteAuthenticationUserOptions options)
    {
        var initialUser = await base.CreateUserAsync(account, options);
        if (initialUser.Identity.IsAuthenticated)
        {
            var userIdentity = (ClaimsIdentity)initialUser.Identity;

            foreach (var role in account.Roles)
            {
                userIdentity.AddClaim(new Claim("appRole", role));
            }
        }

        return initialUser;
    }
}
We extend the AccountClaimsPrincipalFactory<TAccount> class, and inside the CreateUserAsync method, we just iterate through the Roles array and add a new app role claim to the userIdentity object. As you can see each role has the appRole claim name.
Of course, additional namespaces are required:
using Microsoft.AspNetCore.Components.WebAssembly.Authentication;
using Microsoft.AspNetCore.Components.WebAssembly.Authentication.Internal;
using System.Security.Claims;
using System.Threading.Tasks;
Next, we have to modify the AddMsalAuthentication method inside the Program.cs file:
builder.Services.AddMsalAuthentication<RemoteAuthenticationState, CustomUserAccount>(options =>
{
    builder.Configuration.Bind("AzureAd", options.ProviderOptions.Authentication);
    options.ProviderOptions.DefaultAccessTokenScopes.Add("api://862c81f0-91e8-476e-8646-b7c297967ec9/BlazorHostedAPI.Access");
    options.UserOptions.RoleClaim = "appRole";
})
.AddAccountClaimsPrincipalFactory<RemoteAuthenticationState, CustomUserAccount,
    CustomAccountFactory>();
This time, we have to use the generic version of the AddMsalAuthentication method, and also use the AddAccountClaimsPrincipalFactory method to replace the default AccountClaimsPrincipalFactory<TAccount> method implementation. Additionally, we are setting up the claim type for the user roles by assigning the appRole value to the RoleClaim property.
Server App Configuration
The only thing we have to configure on the server app is inside the Startup class:
public void ConfigureServices(IServiceCollection services)
{
    services.AddAuthentication(JwtBearerDefaults.AuthenticationScheme)
        .AddMicrosoftIdentityWebApi(options =>
        {
            Configuration.Bind("AzureAd", options);
            options.TokenValidationParameters.RoleClaimType =
                "http://schemas.microsoft.com/ws/2008/06/identity/claims/role";
        },
        options => { Configuration.Bind("AzureAd", options); });

    services.AddControllersWithViews();
    services.AddRazorPages();
}
Here, we extend the AddMicrosoftIdentityWebApi method with additional configuration for the role claim type.
Protecting Pages and Controllers
That is all regarding the app roles integration. Now we can use them to additionally protect our application.
Let’s start with the server app.
Inside the WeatherForecastController, we can extend the existing [Authorize] attribute:
[Authorize(Roles = "administrator")]
[ApiController]
[Route("[controller]")]
public class WeatherForecastController : ControllerBase
This will allow only administrators to access the endpoints from this controller.
Now, since we are accessing this controller with the Fetch data page from the client app, let’s modify the same attribute there as well:
@attribute [Authorize(Roles = "administrator")]
After doing that, we can start our application, use the administrator credentials, and navigate to the Fetch data page:
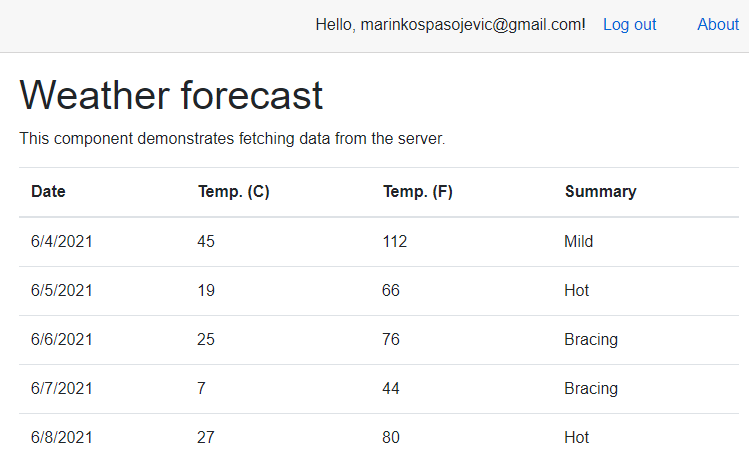
And we can see that we have access to this page and data as well.
Moreover, if we inspect the claims in the session storage:
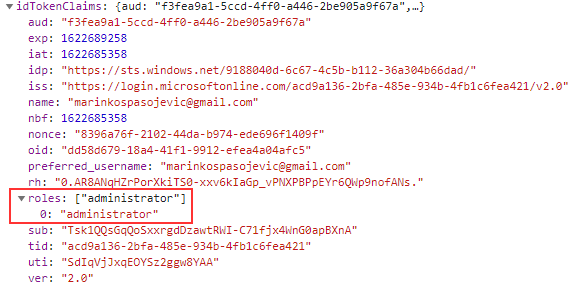
We can find our role in the roles array.
Of course, if we log out and log in with the Viewer credentials, we won’t be able to access this page:
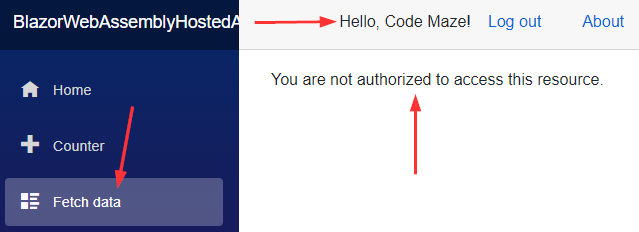
Excellent.
Working with Roles in the Code
We can use our roles in a business logic if we want to.
To show you how to do that, we are going to use an example from our AuthenticationStateProvider article.
So, let’s open the Counter page and modify the @code part:
@code {
    [CascadingParameter]
    public Task<AuthenticationState> AuthState { get; set; }

    private int currentCount = 0;

    private async Task IncrementCount()
    {
        var authState = await AuthState;
        var user = authState.User;

        if (user.IsInRole("viewer"))
            currentCount++;
        else if (user.IsInRole("administrator"))
            currentCount--;
    }
}
We use the CascadingParameter attribute to apply the authentication state information to the AuthState property. Then, in the IncrementCount method, we extract the user from the AuthState property and check their role with the IsInRole method. If the user has a viewer role, we are going to increment the count. Otherwise, if the user is an administrator, we are going to decrement it.
You can log in with both users and test this.
Hiding Pages
Lastly, if we don’t want our users with viewer roles to even be able to see the Fetch data page, we can hide it in the NavMenu.razor file:
<AuthorizeView Roles="administrator">
    <Authorized>
        <li class="nav-item px-3">
            <NavLink class="nav-link" href="fetchdata">
                <span class="oi oi-list-rich" aria-hidden="true"></span> Fetch data
            </NavLink>
        </li>
    </Authorized>
</AuthorizeView>
With this code, we are hiding the Fetch data page from unauthorized users and also from all the users without the administrator role.
Conclusion
Excellent.
We’ve seen how we can create app roles in our Azure portal, and how to assign them to specific users. Furthermore, we have modified our existing project to support those roles created with Azure Active Directory.
Until the next article,
All the best.

Thanks for the clear explanation!
You are most welcome
This is an awesome article. Very well described and good to follow. I like, that it is based on the default template. Thank you so much!
Thanks a lot for reading the article and for your comment. I’m so glad you liked the article.
After following this tutorial my client app can get the app roles from Azure just fine. Inspecting the session storage shows my claim has a roles property and it has the value defined for that user. However, the server side seems completely disconnected. If I try to add [Authorize] to any server side controller, that code will never get hit. If I leave it wide open, the code is hit and if I inspect the httpContextAccessor.HttpContext.User.Identity.Name it’s null along with no claims even though on the client side, the app shows the user name within an AuthorizeView section just fine. It seems like my server’s startup class is missing something or there is something else I need to do in order for the client to pass the authorized user context to the server when I call the server portion. Perhaps I am missing something in my httpclient setup in the client project.
Are you sure that the setup at the Azure’s side is good for the server-side app? Basically, as much as I can see from your comment, it doesn’t recognize authorization at all.
My last statement turned out to be true. In my client code the HttpClient registration code was missing “AddHttpMessageHandler<BaseAddressAuthorizationMessageHandler>()” and I had completely left out the IHttpClientFactory registration which is why all the calls from my client to the server were missing the tokens! Fixing those two statements in my client’s Program.cs file solved the problem. Thanks for making the code available in github as that enabled me to find my mistake.
Well, that’s the whole point of the source code 🙂 Thank you too for sharing your solution.
This working at local machine but when publish to Azure Wep App then roles not working any more “Microsoft.AspNetCore.Authorization.DefaultAuthorizationService[2]
Authorization failed. These requirements were not met:
RolesAuthorizationRequirement:User.IsInRole must be true for one of the following roles: (administrator)”
I didn’t try to deploy it, so I am not sure about the reason behind it. If you manage to fix it, it would be great if you could add another comment here about the solution.
Controller works in localmachine OK, but when publish to Azure webapp controller not working anymore. Authorization works OK because counter page works ok in Azure. Looks like Client app dosen’t find controller. SPA Redirect URI is updated after publish. Microsoft.AspNetCore.Components.WebAssembly.Rendering.WebAssemblyRenderer[100]
Unhandled exception rendering component: ExpectedStartOfValueNotFound, < Path: $ | LineNumber: 0 | BytePositionInLine: 0.
I created app again and always ended same situation.
Modifying Fetchdata.razor helped.
forecasts = await Http.GetFromJsonAsync<WeatherForecast[]>(“https://xxxxxxx/weatherforecast”);
Thanks for the clarification. Yes, there is no localhost at Azure, you have to use the exact address. We’ve covered that in our blazor course in the azure publish section. I just didn’t know, what was your issue exactly. Once again, thank you for sharing.
You have good tutorials. Do you have Blazor WASM hosted app and Azure Key Vault tutorial?
We have something like this: https://code-maze.com/aspnet-configuration-azure-key-vault/
You can always search for the topic you would like to read in our search box, on our site.