


Updated on
xUnit is a unit testing framework for .NET. A test is a public method marked [Fact], or [Theory] when the same method should run once per set of inputs, and Assert decides whether it passed.
The framework builds a fresh instance of the test class for every single test, which is why setup goes in the constructor and why tests cannot leak state into one another. That one design decision is most of what makes xUnit different from the alternatives.
For the complete navigation of this series, you can visit ASP.NET Core Testing.
So, let’s dive right into it.
What Is xUnit and Which .NET Versions Does It Support?
xUnit is a free, open-source unit testing framework for .NET, co-created by an original author of NUnit and now the framework the .NET team’s own repositories use.
A test is a public method marked [Fact]. A parameterised test is marked [Theory] with one [InlineData] per set of arguments, and the runner reports each set as its own test.
Assertions go through the static Assert class: Assert.True(), Assert.Equal(), Assert.Throws<T>(), and the rest of the family. A test passes by not throwing anything.
Setup goes in the class constructor and teardown in IDisposable.Dispose(), because xUnit builds a new instance of the test class for every test method. There is no [SetUp] attribute and none is needed.
It targets current .NET, and older versions remain supported for as long as their runtimes are. The framework itself is on version 3.
The missing [SetUp] attribute is one of the differences that catches people out when they move between frameworks, and we cover the rest in our look at how xUnit compares with NUnit and MSTest.
Some of the attributes we are going to use are:
- [Fact]: attribute states that the method should be executed by the test runner
- [Theory]: attribute implies that we are going to send some parameters to our testing code. So, it is similar to the [Fact] attribute, because it states that the method should be executed by the test runner, but additionally implies that we are going to send parameters to the test method
- [InlineData]: attribute provides those parameters we are sending to the test method. If we are using the [Theory] attribute, we have to use the [InlineData] as well
As we said, xUnit provides us with a lot of assertion methods that we use to validate our production code. As we progress through this series, we are going to use different assertion methods to test different production functionalities.
Once we write our test method, we need to run it to be sure whether it works or not. So to run a unit test in .NET Core, we are going to use Visual Studio’s Test Explorer, by opening the Test menu and then Windows > Test Explorer. We can use a keyboard shortcut as well: CTRL+E, T.
Overview of the Starting Project
We have created a starting project that the rest of this series builds on. We strongly recommend downloading it and using it as you follow along.
Once we open the project, we can inspect a solution explorer.
We can see that we have a repository class for the repository logic with its IEmployeeRepository interface. This will be quite important for us once we start writing tests for our controller in future articles.
Our controller contains three actions, one for the GET request and two for the POST request. We can see views for Index and Create actions as well.
Finally, we can see the Migrations folder, which contains migration files for our series. So, in order for you to use the prepared data, you have to change a connection string in the appsettings.json file and just run the project. It will automatically create a database and seed all the required data.
Now, that we are familiar with the starting project, we can move on to the next phase by adding an additional class with validation logic.
Preparing Validation for Unit Testing with xUnit
Before we start, let’s take a look at our Employee entity class:
[Table("Employee")]
public class Employee
{
    public Guid Id { get; set; }

    [Required(ErrorMessage = "Name is required")]
    public string? Name { get; set; }

    [Required(ErrorMessage = "Age is required")]
    public int Age { get; set; }

    [Required(ErrorMessage = "Account number is required")]
    public string? AccountNumber { get; set; }
}
And the HttpPost action in the controller:
[HttpPost]
[ValidateAntiForgeryToken]
public IActionResult Create([Bind("Name,AccountNumber,Age")] Employee employee)
{
    if(!ModelState.IsValid)
    {
        return View(employee);
    }

    _repo.CreateEmployee(employee);
    return RedirectToAction(nameof(Index));
}
In the Create action, we are adding a new employee object to the database if the model is valid.
But now, we’ve decided to add additional validation for the AccountNumber property. To do that, we need to create a new validation class and after that write tests for each validation rule inside that class.
So, let’s start by adding a new folder named Validation and inside it a new class AccountNumberValidation:
public class AccountNumberValidation
{
    private const int startingPartLength = 3;
    private const int middlePartLength = 10;
    private const int lastPartLength = 2;

    public bool IsValid(string? accountNumber)
    {
        if (string.IsNullOrWhiteSpace(accountNumber))
            return false;

        var firstDelimiter = accountNumber.IndexOf('-');
        var secondDelimiter = accountNumber.LastIndexOf('-');

        if (firstDelimiter == -1 || secondDelimiter == -1)
            throw new ArgumentException();

        var firstPart = accountNumber.Substring(0, firstDelimiter);
        if (firstPart.Length != startingPartLength)
            return false;

        var tempPart = accountNumber.Remove(0, startingPartLength + 1);
        var middlePart = tempPart.Substring(0, tempPart.IndexOf('-'));
        if (middlePart.Length != middlePartLength)
            return false;

        var lastPart = accountNumber.Substring(secondDelimiter + 1);
        if (lastPart.Length != lastPartLength)
            return false;

        return true;
    }
}
So, we want to ensure that the AccountNumber consists of three parts with different lengths (3, 10, and 2). Also, we want to ensure that those parts are divided by the minus sign separator.
The first check rejects a missing account number outright. Employee.AccountNumber is declared as string?, so the parameter is nullable too and a null value returns false instead of throwing a NullReferenceException.
That said, we can see that if delimiters are invalid we are throwing an exception. If any of the AccountNumber parts is invalid, we return false. Finally, if everything goes well, we return true.
At first glance, this looks great and our validations are up to the task. But, let’s test those validation rules and make sure that everything works as expected.
Just before we test this code, we can use this validation method in the EmployeesController:
public class EmployeesController : Controller
{
    private readonly IEmployeeRepository _repo;
    private readonly AccountNumberValidation _validation;

    public EmployeesController(IEmployeeRepository repo)
    {
        _repo = repo;
        _validation = new AccountNumberValidation();
    }

    ...

    [HttpPost]
    [ValidateAntiForgeryToken]
    public IActionResult Create([Bind("Name,AccountNumber,Age")] Employee employee)
    {
        if(!ModelState.IsValid)
        {
            return View(employee);
        }

        if (!_validation.IsValid(employee.AccountNumber))
        {
            ModelState.AddModelError("AccountNumber", "Account Number is invalid");
            return View(employee);
        }

        _repo.CreateEmployee(employee);
        return RedirectToAction(nameof(Index));
    }

    ...
}
The validator has no dependencies of its own, so we construct it directly. Anything that reaches outside the process (a repository, an HTTP client, a clock) would be injected instead, which is what we do in the next article.
Adding the xUnit Testing Project
Let’s start by creating a new xUnit Test Project and naming it EmployeesApp.Tests:
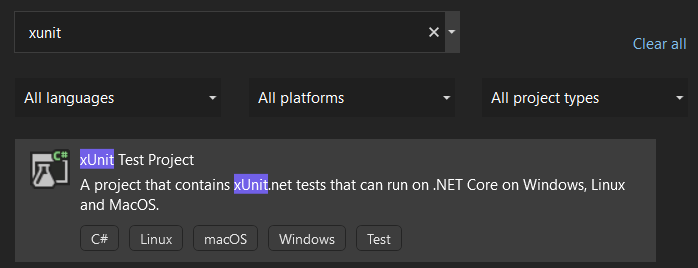
A new project will prepare a single test class for use, named UnitTest1.cs and will have installed xUnit library and xUnit runner as well.
We can remove UnitTest1 class, add a new folder Validation and create a new class AccountNumberValidationTests inside it.
Since we want to test the validation logic from the main project, we have to add its reference to the testing.
After these preparations, we are ready to write some tests.
If you like, you can add a new test project from the command window as well. All you have to do is to open your cmd window next to the main project’s solution file and type:
mkdir EmployeesApp.Tests
cd EmployeesApp.Tests
dotnet new xunit
dotnet sln ../EmployeesApp.sln add EmployeesApp.Tests.csproj
dotnet add reference ../EmployeesApp/EmployeesApp.csproj
The first two commands create the folder and move into it, and dotnet new xunit creates the test project named after that folder. Note the lower-case xunit. Template short names are case-sensitive, so dotnet new xUnit does not create a broken project, it creates nothing at all and reports that no template matched.
The last two commands are the ones that are easy to forget: they add the new project to the solution and give it a reference to the project we are testing. Without that reference none of the tests below will compile.
The same window runs them. dotnet test from the solution folder builds the projects and runs every test it finds, and it is what a build server calls, so a suite that has only ever run in Test Explorer has not been shown to run anywhere else.
How Should We Write Unit Test Cases
When writing unit test cases, they should be well organized and easy to maintain. It is a best practice to write unit tests for small functionality.
Additionally, we shouldn’t write unit tests that depend on other unit tests. This means that we should be able to run our unit tests in any order we need. If this is not the case, we should modify our tests.
We should follow the naming test convention for each unit test we write. We are going to see this in practice in a minute.
Our unit tests have to be fast. To make them fast, they have to be as simple as possible, without dependency on other tests, and we should mock external dependencies (this is something you can read more about in our next article).
The tests that we write should be deterministic – meaning the tests should always behave the same if no changes were made to the code under the test. Let’s imagine that we write a test for a single method and that test passes. That test is deterministic if it passes every time we run it. It applies the same if we modify the code under the test and the test fails. It should fail every time we run it until the code under the test is fixed.
The usual reason a test stops being deterministic is that it reads the current time, which is why testing time-dependent code with TimeProvider gets its own article in this cluster.
Unit Testing with xUnit
A test class is an ordinary public class, and a test is an ordinary public method marked [Fact].
Dependencies the tests share go in the constructor. xUnit creates a new instance of the class for each test, so a field assigned there is fresh every time and nothing carries over between tests.
The naming convention that survives contact with a real codebase is three parts: the method under test, the state being set up, and the expected result, for example IsValid_ValidAccountNumber_ReturnsTrue. When a build fails, the test name alone should say what broke.
One assertion per test is the goal rather than a rule. A test asserting three unrelated things reports only the first failure and hides the other two.
Tests should not depend on each other or on the order they run in, because xUnit gives no guarantee about that order and parallelises across classes by default.
xUnit’s parallelism documentation states the rule that follows from: “By default, there is a test collection per test class”, so two tests in one class never race each other and two tests in different classes can.
To start with unit testing, let’s modify the AccountNumberValidationTests class:
public class AccountNumberValidationTests
{
    private readonly AccountNumberValidation _validation;

    public AccountNumberValidationTests() => _validation = new AccountNumberValidation();

    [Fact]
    public void IsValid_ValidAccountNumber_ReturnsTrue()
        => Assert.True(_validation.IsValid("123-4543234576-23"));
}
We are going to use the _validation object with all the test methods in this class. Therefore, the best way is to create it in a constructor, and then just use it when we need it. By doing so, we prevent the repetition of instantiating the _validation object.
Below the constructor, we can see our first test method decorated with the [Fact] attribute. Pay attention to the naming convention we use for test methods:
[MethodWeTest_StateUnderTest_ExpectedBehavior]
The method’s name implies that we are testing a valid account number and that the test method should return true. We can achieve that by using the Assert class and the True method which verifies that the expression inside it returns true. For the expression, we call the IsValid method from the AccountNumberValidation class and pass a valid account number.
Now we can run the Test Explorer and verify if our test passes:
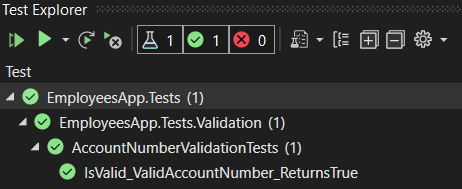
Works great. Let’s move on.
[Fact] is the only attribute we have needed so far, but it is one of a small set worth knowing before we reach for the next one:
| Attribute | Marks | Use it when |
|---|---|---|
[Fact] | A test that takes no parameters | The test has one fixed scenario |
[Theory] | A test that takes parameters | The same assertion runs over several inputs |
[InlineData] | One set of arguments for a [Theory] | The inputs are constants |
[MemberData] | Arguments from a property or method | The inputs are computed or reused |
[ClassData] | Arguments from a class | The input set is large or shared widely |
[Trait] | A category on a test | Tests need filtering by name and value |
IClassFixture<T> | Shared setup across one class | Setup is expensive and safe to reuse |
ICollectionFixture<T> | Shared setup across several classes | Several classes need the same expensive setup |
Theory and InlineData
In the AccountNumberValidation class, the IsValid method contains validations for the first, middle, and last part of the account number. Therefore, we are going to write tests for all these situations. Let’s start with the test where the first part is wrong:
[Fact]
public void IsValid_AccountNumberFirstPartWrong_ReturnsFalse()
    => Assert.False(_validation.IsValid("1234-3454565676-23"));
We expect our test to return false if we have a wrong account number. Therefore we are using the False() method with the provided expression.
Once we run the test, we can see that it passes. But now, if we want to test an account number with 2 digits for the first part (we tested just with 4 digits), we would have to write the same method again just with a different account number. Obviously, this is not the best scenario. To improve that, we are going to modify this test method by removing the [Fact] attribute and adding the [Theory] and [InlineData] attributes:
[Theory]
[InlineData("1234-3454565676-23")]
[InlineData("12-3454565676-23")]
public void IsValid_AccountNumberFirstPartWrong_ReturnsFalse(string accountNumber)
    => Assert.False(_validation.IsValid(accountNumber));
By using the [Theory] attribute, we are stating that we are going to provide some data to this test method as a parameter. Additionally, with the [InlineData] attribute, we are providing concrete data for the test method.
Now, let’s check the result:
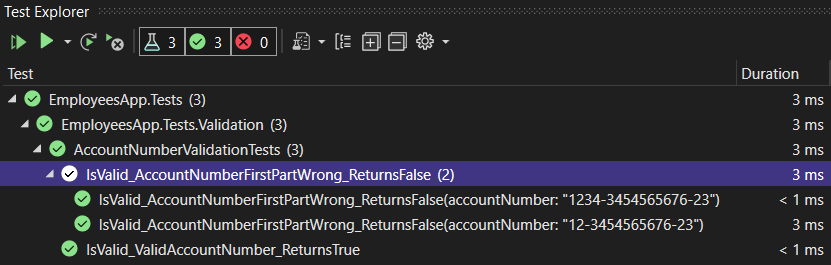
Even though we have only two test methods, the test runner runs three tests. One test for the first test method and two tests for each [InlineData] attribute.
Additional Unit Tests with xUnit
Now when we know how to use the [Theory] and [InlineData] attributes, let’s write additional tests for our account number:
[Theory]
[InlineData("123-345456567-23")]
[InlineData("123-345456567633-23")]
public void IsValid_AccountNumberMiddlePartWrong_ReturnsFalse(string accNumber)
    => Assert.False(_validation.IsValid(accNumber));

[Theory]
[InlineData("123-3434545656-2")]
[InlineData("123-3454565676-233")]
public void IsValid_AccountNumberLastPartWrong_ReturnsFalse(string accNumber)
    => Assert.False(_validation.IsValid(accNumber));
There is nothing new in the code above (except different parameters). So, we can run the test runner right away and verify that everything works as expected.
The Assert family covers everything in this series, though a failed Assert.False tells us very little about why. If that starts to bother us, we can get more readable assertions with FluentAssertions without changing the test framework.
Excellent! One more test to go.
Testing Exceptions with xUnit
In the IsValid method, we verify that both delimiters should be minus signs. If this is not the case, we throw an exception. So, let’s write a test for that:
[Theory]
[InlineData("123-345456567633=23")]
[InlineData("123+345456567633-23")]
[InlineData("123+345456567633=23")]
public void IsValid_InvalidDelimiters_ThrowsArgumentException(string accNumber)
    => Assert.Throws<ArgumentException>(() => _validation.IsValid(accNumber));
We test three different situations here when the second delimiter is wrong, when the first delimiter is wrong, and when both delimiters are wrong. To test an exception, we have to use the Throws<T> method with the exception type as a T value. Note that, we are using a lambda expression inside the Throws method which is a little different from what we have used before.
The same assertion is written differently in the other two frameworks, and our guide to testing exceptions across the three frameworks puts the three side by side.
Having done this, let’s check the result:
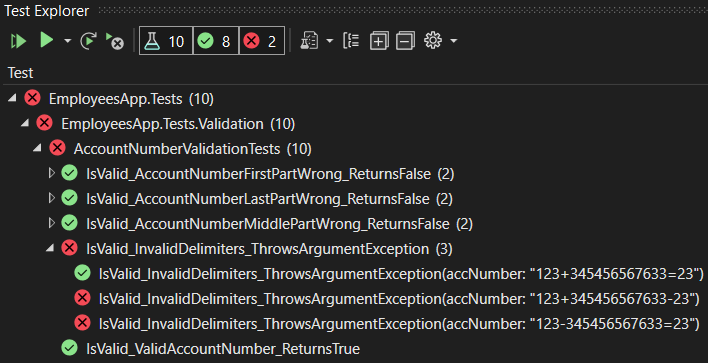
Well, would you look at that! Our test has failed.
To be more precise, two of them have failed and one has passed. So this means that our validation check in the IsValid method is wrong. And now, we see why tests are so important. Even though the code looked like a good one at first glance, we can see that it is not that good. So, let’s fix it:
var firstDelimiter = accountNumber.IndexOf('-');
var secondDelimiter = accountNumber.LastIndexOf('-');

if (firstDelimiter == -1 || (firstDelimiter == secondDelimiter))
    throw new ArgumentException();
Great!
Now, once we run the test again, it will pass.
What Changed in xUnit v3?
The tests in this article are written the same way in v3 as in v2. [Fact], [Theory], [InlineData] and the Assert methods are unchanged, and nothing above needs rewriting.
What changed is the shape of the test project rather than the tests inside it. xUnit’s own v3 migration guide puts it plainly: v3 test projects are “stand-alone executables now, capable of running themselves”, where a v2 project was a class library a separate runner loaded.
The packages changed with it. v3 ships under its own package identity, so upgrading is a project-file change and a package swap rather than a version bump.
dotnet new xunit still creates a v2 project, so the test project built above is what the SDK gives you today. The v3 template ships separately, in a xunit.v3.templates package you install yourself. The reason to know about v3 anyway is that v2 is in maintenance mode and gets critical bug fixes only, while all new work happens on v3.
Conclusion
So, this brings us to the end of the first article in the series.
We have learned how to create the xUnit project and how to use [Fact], [Theory], and [InlineData] attributes. Also, we have created several tests to test our validation logic from the AccountNumberValidation class. But this is just the beginning.
In the next article, we are going to learn how to test our controller class and how to use mocked objects with the testing code. Further along, the series leaves single classes behind and moves on to integration testing an ASP.NET Core app.
Tested with .NET 10.0.10 and xUnit 2.9.3.

Hi ,Can we use regex in Employee Acccount number validation instead of writing this long code
Hello. You can do whatever you like as long as it validates the number correctly. This is totally up to you.
great
Brilliant.
Thank you Simon.