

In this article, we are going to learn how to integrate Swagger UI in an ASP.NET Core Web API application.
Let’s dive in.
VIDEO: Implement SwaggerUI in the ASP.NET Core Web API Project.

Why We Should Document Our API
When developers consume APIs, they probably want to try and solve important business problems. Hence, it’s very important for them to understand how to use APIs effectively. This is where API documentation comes into play.
API documentation is the process of giving instructions about how to use and integrate an API effectively. Thus, it can be thought of as a concise reference manual containing all the information required to work with an API, with details about the functions, classes, return types, arguments, and much more, supported by tutorials and examples.
So having the proper documentation for an API enables the consumers to integrate that API as quickly as possible and move forward with their development. Furthermore, this also helps them understand the value and usage of the API, improves the chances for API adoption, and makes APIs easier to maintain and support in general.
Swagger/OpenAPI
Okay, let’s talk about a tool we’re going to use to create API documentation.
Swagger is a set of tools created by the company SmartBear to help us with the API production and documentation process. Although we still hear Swagger being referred to as OpenAPI, this is no longer true. OpenAPI refers to the industry-standard specification for RESTful API design.
In short, OpenAPI is an industry-standard specification for Restful APIs, and Swagger is composed of the tools used to implement OpenAPI.
Open source Swagger tools consist of:
- Swagger Editor
- Swagger Codegen
- Swagger UI
In this tutorial, we’re going to talk about configuring and using Swagger UI.
Swagger UI offers a web-based interface that allows anyone to interact with the API without having to know the implementation. It’s automatically generated from our OpenAPI specification and it allows for an easy documentation visualization.
Integrating Swagger UI into our Applications
We can use the Swashbuckle package to easily integrate Swagger into our .NET Core Web API projects. It will generate the Swagger specification for our project. Additionally, the Swagger UI is also contained within Swashbuckle.
There are three main components in the Swashbuckle package:
Swashbuckle.AspNetCore.Swagger: This contains the Swagger object model and the middleware to expose SwaggerDocument objects as JSON.
Swashbuckle.AspNetCore.SwaggerGen: A Swagger generator that builds SwaggerDocument objects directly from our routes, controllers, and models.
Swashbuckle.AspNetCore.SwaggerUI: An embedded version of the Swagger UI tool. It interprets Swagger JSON to build a rich, customizable experience for describing the web API functionality.
Installing the Package
The first step is to install the Swashbuckle package.
We can execute the following command in the Package Manager Console window:
Install-Package Swashbuckle.AspNetCore -version 6.1.4
This will install the Swashbuckle package in our application. You can upgrade the version on your end, but this article is compatible with version 6.1.4.
Configuring the Swagger Middleware
The next step is to configure the Swagger Middleware.
Let’s make the following changes in the ConfigureServices() method of the Startup.cs class:
public void ConfigureServices(IServiceCollection services)
{
    // Register the Swagger generator, defining 1 or more Swagger documents
    services.AddSwaggerGen(c =>
    {
        c.SwaggerDoc("v1", new OpenApiInfo { Title = "My API", Version = "v1" });
    });

    services.AddControllers();
}
As a result, this adds the Swagger generator to the services collection.
In the Configure() method, let’s enable the middleware for serving the generated JSON document and the Swagger UI:
public void Configure(IApplicationBuilder app, IWebHostEnvironment env)
{
    // Enable middleware to serve generated Swagger as a JSON endpoint.
    app.UseSwagger();

    // Enable middleware to serve swagger-ui (HTML, JS, CSS, etc.),
    // specifying the Swagger JSON endpoint.
    app.UseSwaggerUI(c =>
    {
        c.SwaggerEndpoint("/swagger/v1/swagger.json", "My API V1");
    });
}
By executing these steps, the Swagger is configured and ready for use in our project.
Exploring the Swagger UI
First, we are going to create an Employee class:
public class Employee
{
    public int Id { get; set; }

    public string FirstName { get; set; }

    public string LastName { get; set; }

    public string EmailId { get; set; }
}
Next, let’s create an API controller with action methods. We are going to use some mock data and keep the focus on understanding Swagger’s capabilities:
[Route("api/[controller]")]
[ApiController]
public class EmployeeController : ControllerBase
{
    // GET: api/Employee
    [HttpGet]
    public IEnumerable<Employee> Get()
    {
        return GetEmployees();
    }

    // GET: api/Employee/5
    [HttpGet("{id}", Name = "Get")]
    public Employee Get(int id)
    {
        return GetEmployees().Find(e => e.Id == id);
    }

    // POST: api/Employee
    [HttpPost]
    [Produces("application/json")]
    public Employee Post([FromBody] Employee employee)
    {
        // Logic to create new Employee
        return new Employee();
    }

    // PUT: api/Employee/5
    [HttpPut("{id}")]
    public void Put(int id, [FromBody] Employee employee)
    {
        // Logic to update an Employee
    }

    // DELETE: api/Employee/5
    [HttpDelete("{id}")]
    public void Delete(int id)
    {
    }
    private List<Employee> GetEmployees()
    {
        return new List<Employee>()
        {
            new Employee()
            {
                Id = 1,
                FirstName= "John",
                LastName = "Smith",
                EmailId ="[email protected]"
            },
            new Employee()
            {
                Id = 2,
                FirstName= "Jane",
                LastName = "Doe",
                EmailId ="[email protected]"
            }
        };
    }
}
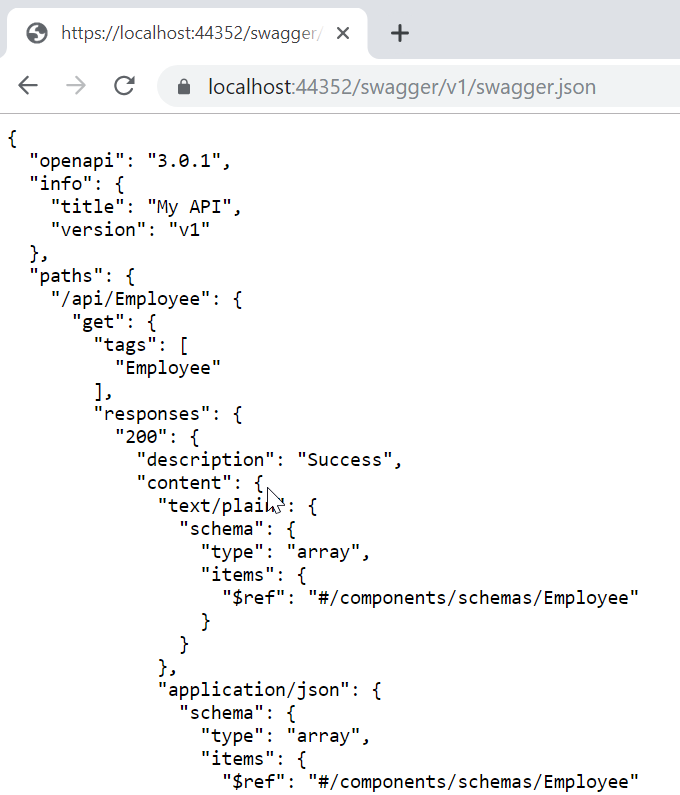
Now, let’s run the app and navigate to https://localhost:<port>/swagger/v1/swagger.json. We can see that a document describing the endpoints is generated:
To inspect the Swagger UI, we can navigate to https://localhost:<port>/swagger:
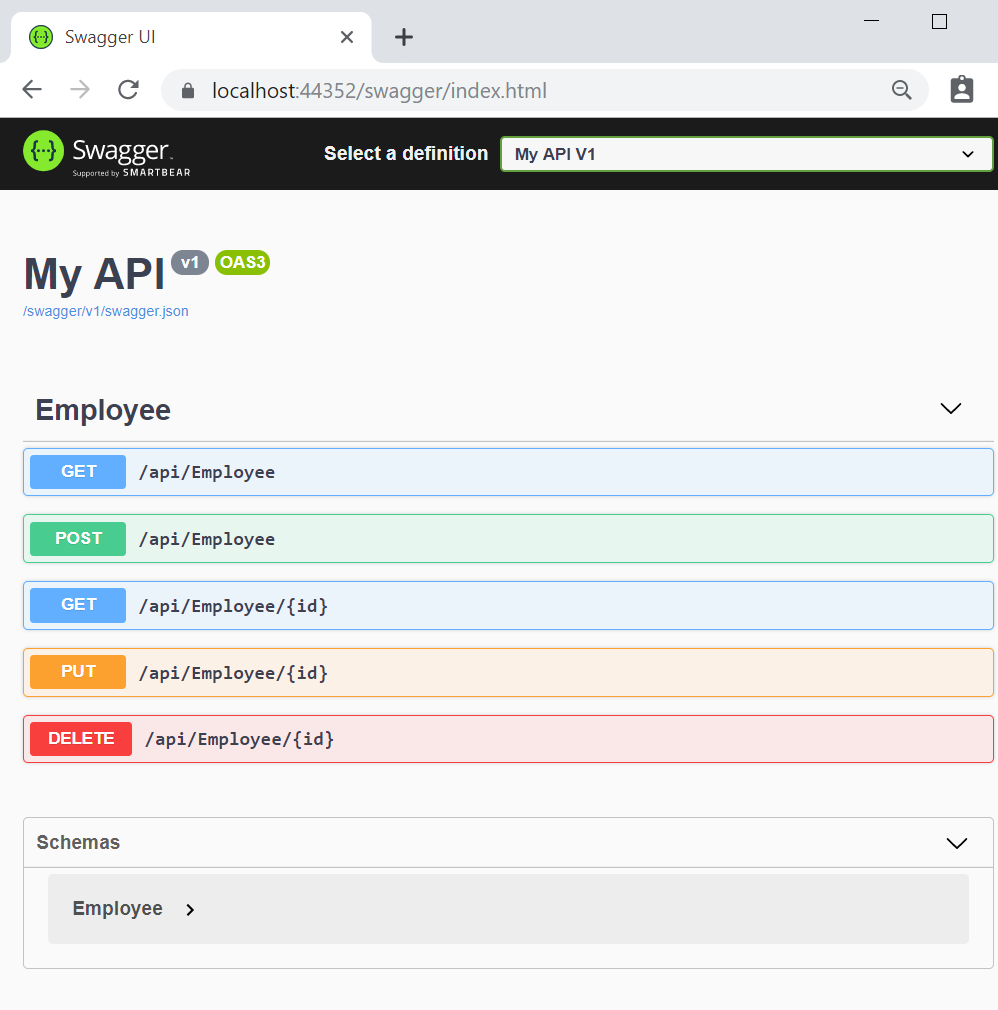
Now we can explore the API via the Swagger UI and it will be easier to incorporate it into other applications. Furthermore, we can see each controller and its action methods.
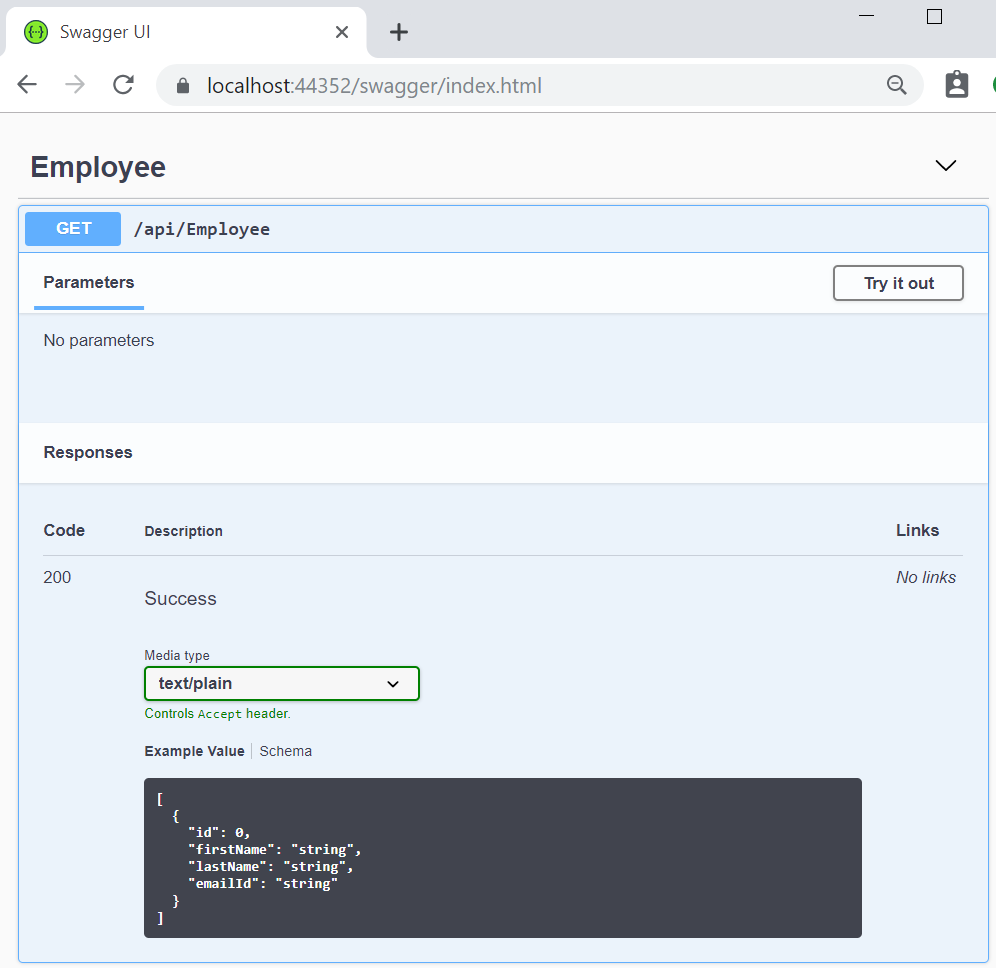
Once we click on an action method, we can see detailed information like parameters, response, and example values. There is also an option to try out each of those action methods:
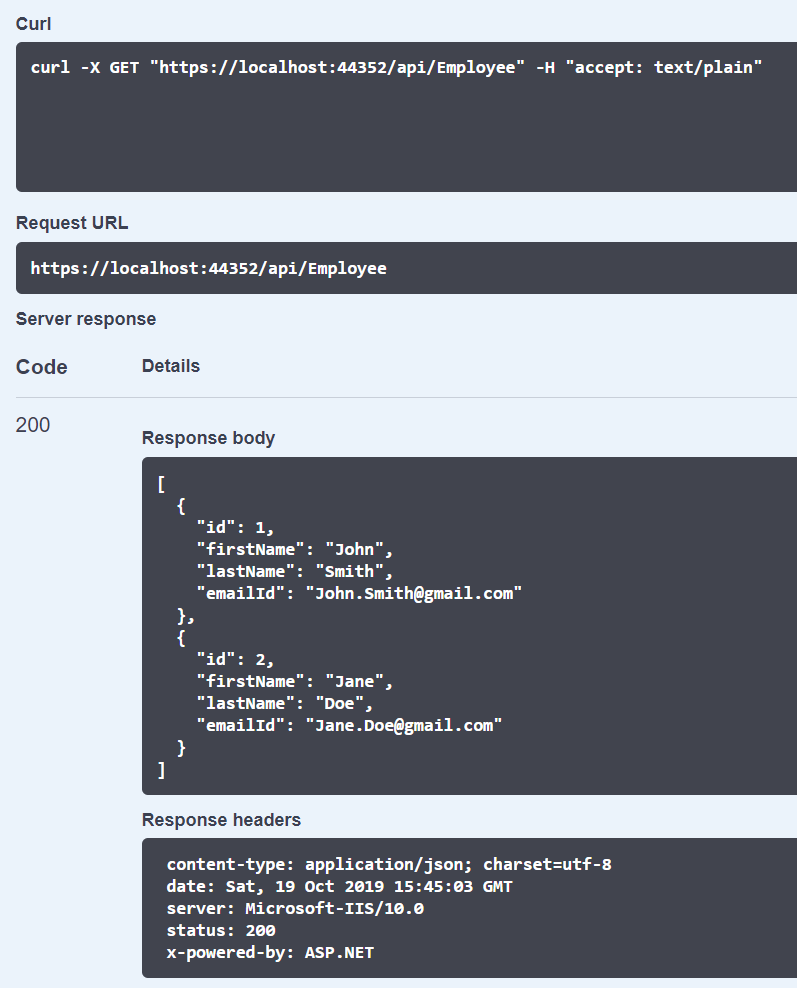
By clicking on the “Try it out” button, we can test the endpoint and see the response:
Extending and Customizing
Swagger provides options for extending the documentation and customizing the UI.
Extending the documentation
Let’s look at the various options to extend the documentation.
API Info & Description
First, let’s see how we can specify the API info and description.
The configuration action passed to the AddSwaggerGen() method adds information such as Contact, License, and Description. Let’s provide some values for those:
// This method gets called by the runtime. Use this method to add services to the container.
public void ConfigureServices(IServiceCollection services)
{
    // Register the Swagger generator, defining 1 or more Swagger documents
    services.AddSwaggerGen(c =>
    {
        c.SwaggerDoc("v1", new OpenApiInfo
        {
            Title = "Employee API",
            Version = "v1",
            Description = "An API to perform Employee operations",
            TermsOfService = new Uri("https://example.com/terms"),
            Contact = new OpenApiContact
            {
                Name = "John Walkner",
                Email = "[email protected]",
                Url = new Uri("https://twitter.com/jwalkner"),
            },
            License = new OpenApiLicense
            {
                Name = "Employee API LICX",
                Url = new Uri("https://example.com/license"),
            }
        });
    });
}
Now let’s run the application once again and explore the Swagger UI:
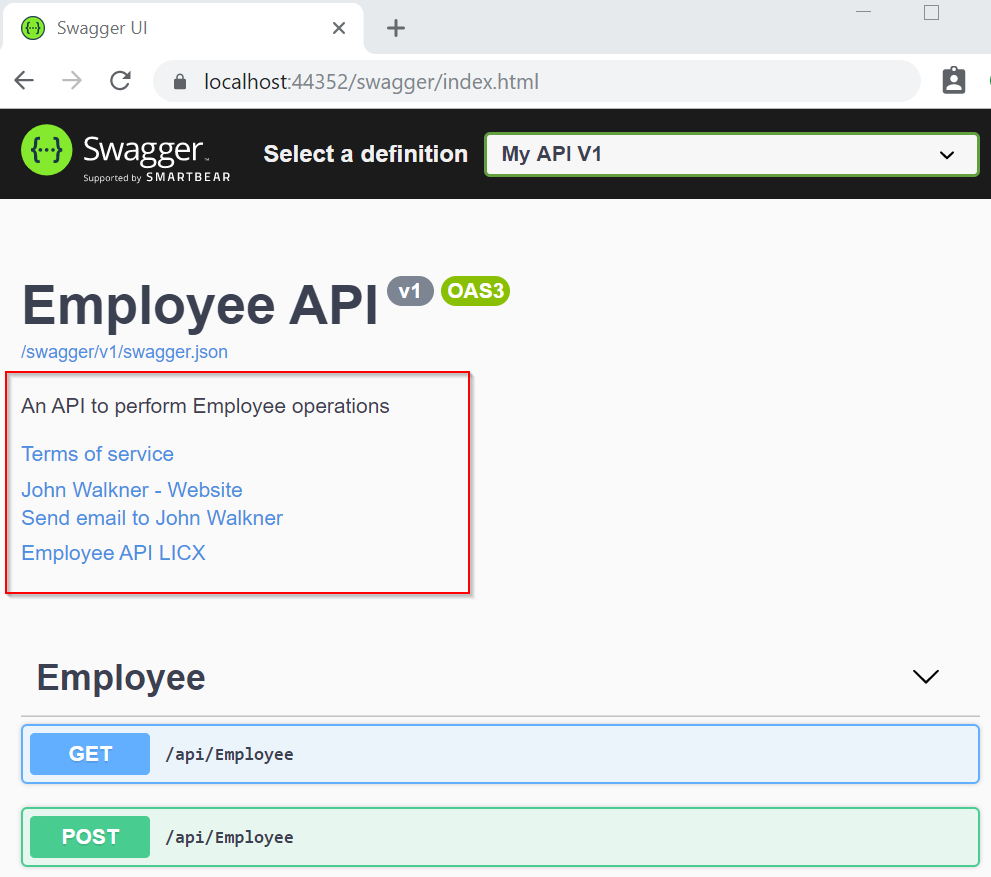
We can see that the Swagger document is now updated with API Info.
XML Comments
For enabling XML comments, we need to do the following steps:
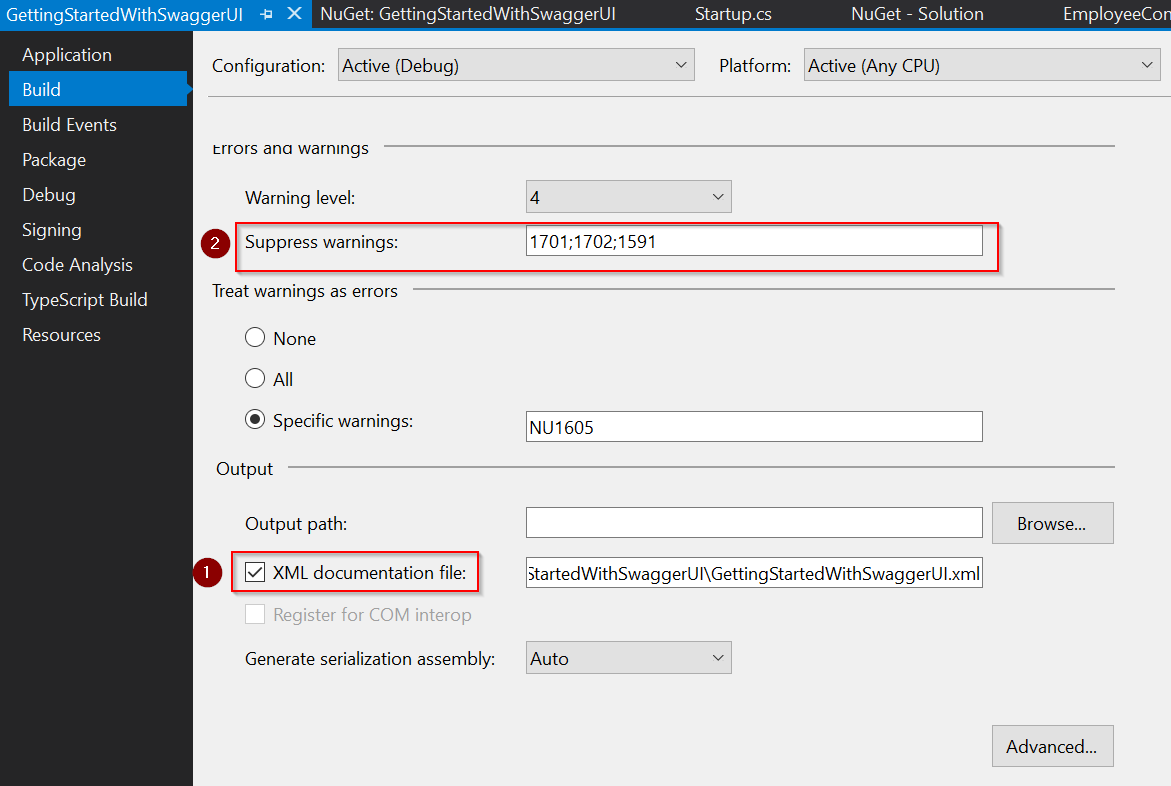
- In the Build tab of the project properties, check the box labeled
XML documentation file. Let’s keep the auto-generated file path. - Suppress warning 1591, which will now give warnings about any method, class, or field that doesn’t have triple-slash comments.
In the ConfigureServices() method, configure Swagger to use the XML file that’s generated in the above step:
public void ConfigureServices(IServiceCollection services)
{
    // Register the Swagger generator, defining 1 or more Swagger documents
    services.AddSwaggerGen(c =>
    {
        c.SwaggerDoc("v1", new OpenApiInfo
        {
            Title = "Employee API",
            Version = "v1",
            Description = "An API to perform Employee operations",
            TermsOfService = new Uri("https://example.com/terms"),
            Contact = new OpenApiContact
            {
                Name = "John Walkner",
                Email = "[email protected]",
                Url = new Uri("https://twitter.com/jwalkner"),
            },
            License = new OpenApiLicense
            {
                Name = "Employee API LICX",
                Url = new Uri("https://example.com/license"),
            }
        });

        // Set the comments path for the Swagger JSON and UI.
        var xmlFile = $"{Assembly.GetExecutingAssembly().GetName().Name}.xml";
        var xmlPath = Path.Combine(AppContext.BaseDirectory, xmlFile);
        c.IncludeXmlComments(xmlPath);
    });

    services.AddControllers();
}
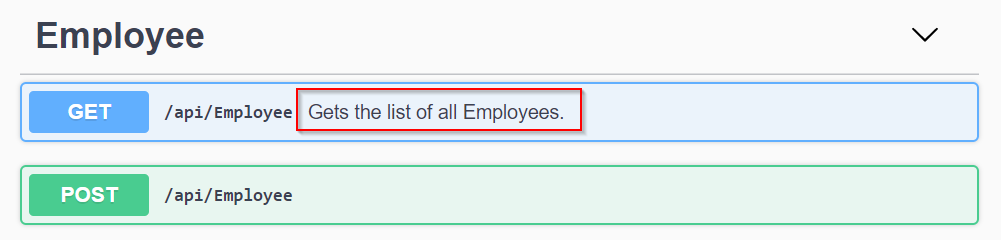
Now, adding triple-slash comments to the action method enhances the Swagger UI by adding a description to the section header.
Let’s add a summary:
/// <summary>
/// Gets the list of all Employees.
/// </summary>
/// <returns>The list of Employees.</returns>
// GET: api/Employee
[HttpGet]
public IEnumerable<Employee> Get()
{
    return GetEmployees();
}
This displays the summary against the action method:
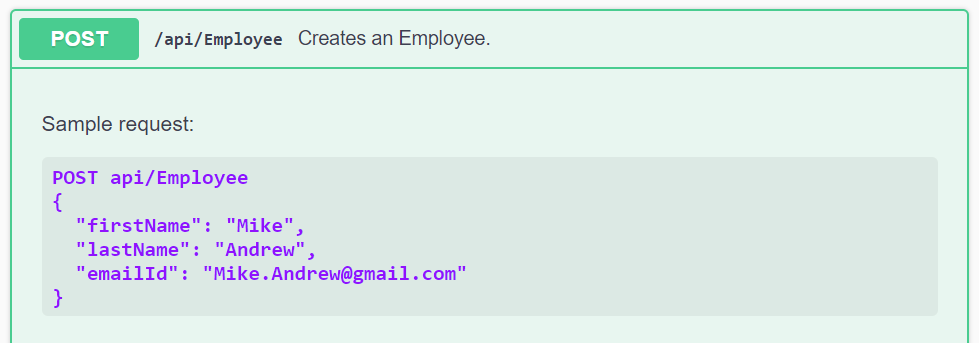
We can additionally add <remarks> element to the documentation. It supplements information specified in the <summary> element and provides a more robust Swagger UI. The <remarks> element content can consist of text, JSON, or XML:
/// <summary>
/// Creates an Employee.
/// </summary>
/// <remarks>
/// Sample request:
///
///     POST api/Employee
///     {
///       "firstName": "Mike",
///       "lastName": "Andrew",
///       "emailId": "[email protected]"
///     }
/// </remarks>
/// <param name="employee"></param>
[HttpPost]
[Produces("application/json")]
public Employee Post([FromBody] Employee employee)
{
    // Logic to create new Employee
    return new Employee();
}
This will enhance the UI with additional info:
We’ve learned how to enhance the documentation using XML comments.
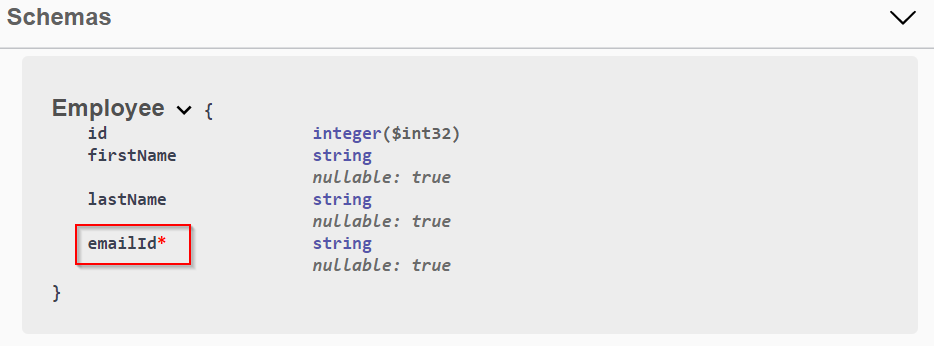
Using Data Annotations
We can decorate a model with attributes to enhance the documentation.
Let’s add a [Required] attribute to the EmailId field of the Employee model:
public class Employee
{
    public int Id { get; set; }

    public string FirstName { get; set; }

    public string LastName { get; set; }

    [Required]
    public string EmailId { get; set; }
}
As a result, the Swagger UI will accept this change:
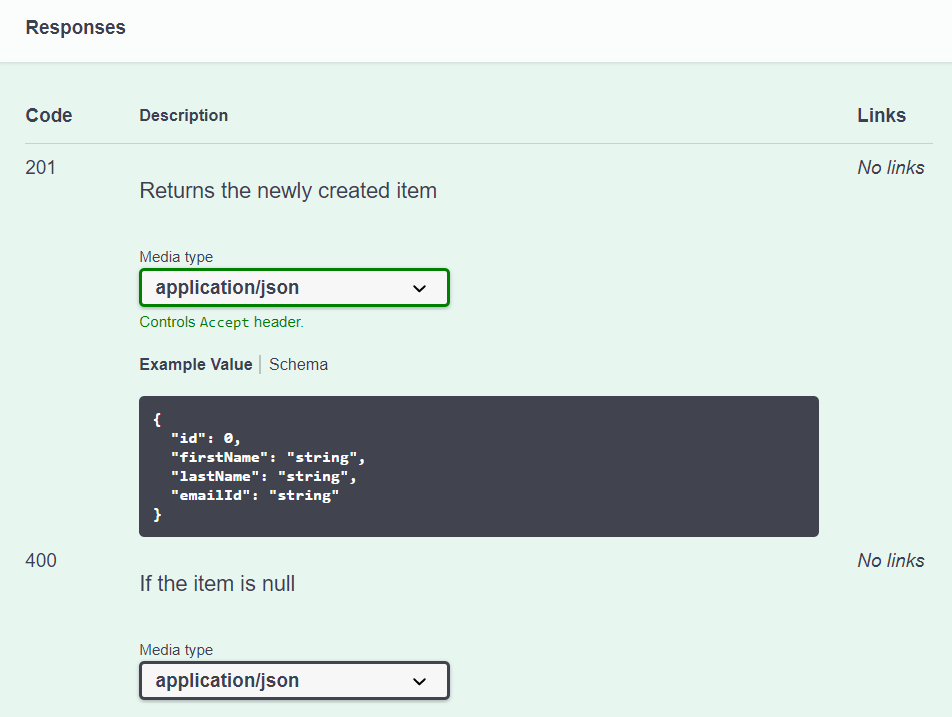
Describing Response Types
The developers who consume our APIs are usually more interested in what it returns- specifically the response types and error codes. Hence it is very important to describe our response types. These are denoted using XML comments & data annotations.
Let’s enhance the response types a little bit:
/// <summary>
/// Creates an Employee.
/// </summary>
/// <remarks>
/// Sample request:
///
///     POST api/Employee
///     {
///       "firstName": "Mike",
///       "lastName": "Andrew",
///       "emailId": "[email protected]"
///     }
/// </remarks>
/// <param name="employee"></param>
/// <returns>A newly created employee</returns>
/// <response code="201">Returns the newly created item</response>
/// <response code="400">If the item is null</response>
[HttpPost]
[ProducesResponseType(201)]
[ProducesResponseType(400)]
[Produces("application/json")]
public Employee Post([FromBody] Employee employee)
{
    // Logic to create new Employee
    return new Employee();
}
This will reflect in the Responses section:
In this section, we’ve looked at various options for extending the documentation.
Customizing the UI
The default UI of Swagger is pretty good. But we can customize it If we wish to do so. We may change the documentation pages to represent our brand or theme. Branding the Swagger components requires adding the resources to serve static files and building the folder structure to host those files.
First of all, we are going to enable static file middleware in the Configure() method in the Startup.cs file:
app.UseStaticFiles();
After that, let’s acquire the contents of the dist folder from the Swagger UI GitHub repository. This folder contains the necessary assets for the Swagger UI page.
Let’s create a wwwroot/swagger/ui folder, and copy the contents of the dist folder into it.
Additionally, let’s create a custom.css file in wwwroot/swagger/ui with the following CSS to customize the page header:
.swagger-ui .topbar {
    background-color: grey;
    border-bottom: 3px solid black;
}
We have to reference custom.css in the index.html file inside UI folder, after any other CSS files:
<link rel="stylesheet" type="text/css" href="./swagger-ui.css">
<link rel="stylesheet" type="text/css" href="custom.css">
Finally, let’s browse to the index.html page at https://localhost:<port>/swagger/ui/index.html, enter https://localhost:<port>/swagger/v1/swagger.json in the header’s textbox, and click the Explore button.
We can see that the UI is now customized with the changes we made:

At this point, we are familiar with different options for customizing the Swagger UI.
Conclusion
We have looked at the following topics in this article:
- The need for documenting our APIs
- Swagger/OpenAPI – Swagger Specification & Swagger UI
- Integrating Swagger UI into an ASP.NET Core Web API
- Extending the Swagger Documentation
- Customizing the Swagger UI