In this article, we will show you how to use HttpOnly Cookie in .NET Core apps to secure our JWT or JSON Web Tokens, when implementing the authentication and refresh token actions.
So, let’s start.
VIDEO: Using HttpOnly Cookie To Protect Your JWTs.
The Standard Flow for the Authentication Logic Using JWT
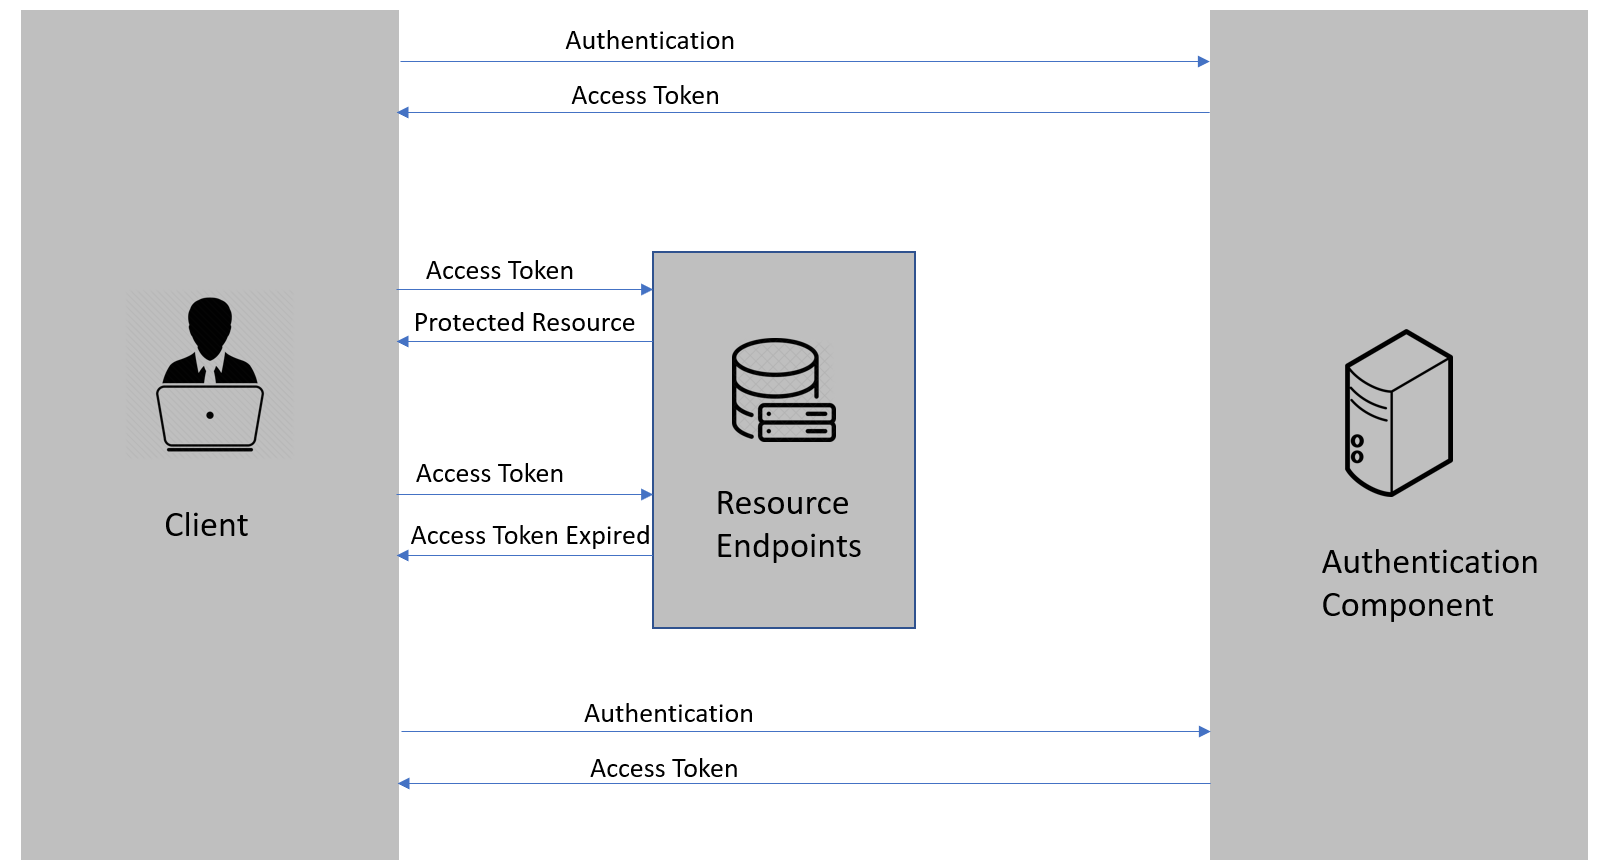
When we follow the usual flow with the JWTs:
We can see that once the client sends the authentication request, they get the access token, which we then usually store inside the local or session storage.
Both storages are considered not that secure, and of course, we can increase the security of our tokens by encrypting them before storing them inside the storage. Then we can decrypt them before sending them with the request. In that case, if an attacker somehow gets access to the storage the tokens will be of no use for them.
But, there is another option, which is considered a bit better and more secure. Of course, we are talking about the HttpOnly cookies.
What is an HttpOnly Cookie?
An HttpOnly Cookie is a tag that we add to a browser cookie to prevent client-side scripts from accessing data. It provides a gate that we use to prevent specialized cookies from being accessed by anything other than the server. When we generate a cookie, using the HttpOnly tag helps mitigate the risk of client-side scripts accessing the protected cookie, thus making these cookies more secure.
So, with all this in mind, let’s see how we can implement the HttpOnly cookie in .NET Core application with the authentication and refresh token action.
Implement HttpOnly Cookie in .NET Core Application
Now, we already have a project with both the authentication and refresh actions implemented:
Here, we are using the regular way where the tokens are sent to the client using the response body:
[HttpPost("login")]
public async Task<IActionResult> Authenticate([FromBody] UserForAuthenticationDto user)
{
    if (!await _service.AuthenticationService.ValidateUser(user))
        return Unauthorized();

    var tokenDto = await _service.AuthenticationService.CreateToken(populateExp: true);

    return Ok(tokenDto);
}
This is the code we used in our Refresh Token video, so we won’t dive into the authentication or refresh token logic here. If you want to learn more about both, you can watch the video, or you can read about the Refresh Token logic and the JWT authentication logic.
Ok, the first thing first.
Let’s start by modifying our JWT configuration inside the ServiceExtensions class:
.AddJwtBearer(options =>
{
    options.TokenValidationParameters = new TokenValidationParameters
    {
        ValidateIssuer = true,
        ValidateAudience = true,
        ValidateLifetime = true,
        ValidateIssuerSigningKey = true,

        ValidIssuer = jwtSettings["validIssuer"],
        ValidAudience = jwtSettings["validAudience"],
        IssuerSigningKey = new SymmetricSecurityKey(Encoding.UTF8.GetBytes(secretKey))
    };

    options.Events = new JwtBearerEvents
    {
        OnMessageReceived = ctx =>
        {
            ctx.Request.Cookies.TryGetValue("accessToken", out var accessToken);
            if (!string.IsNullOrEmpty(accessToken))
                ctx.Token = accessToken;

            return Task.CompletedTask;
        }
    };
});
So, to avoid any confusion, we are using the JWT authentication and we will continue to use the JWT authentication even after we implement the HttpOnly cookie logic. The cookie will be used as a transporting mechanism and nothing more – so we are not using the cookie authentication here and we don’t have to register the cookie middleware.
But what we have to do is extend the JwtBearer configuration with the Events property and instantiate it with a new JwtBearerEvents class… Then inside, we call the OnMessageReceived property that acts as an event here once the authentication protocol message is received. This is a Func delegate that accepts the context as a parameter.
With the help of the context parameter, we call the Request.Cookies property trying to extract the value of the accessToken cookie and place it inside the accessToken local variable. Of course, only if we find the accessToken, we use the Token property and set it to the value of the accessToken.
Finally, we return the Task.completedTask.
Using TestController To Authorize the Request With the HttpOnly Cookie Attached
Now, to explain this a bit. If you check the test controller:
[Route("api/test")]
[ApiController]
public class TestController : ControllerBase
{
    [HttpGet]
    [Authorize]
    public IActionResult TestAction()
    {
        return Ok();
    }
}
It has a single dummy Get action and it is decorated with the Authorize attribute. As soon as the request reaches that Authorize attribute, the OnMessageReceived event will be triggered. Then, we simply want to extract the token’s value from the cookie and set it as the Token for the validation process.
Also, to make it clear, we will store both the access and the refresh tokens inside the HttpOnly cookie, but for the authorization part, we only need the access token.
That’s all regarding the configuration, and we can move on to modify the logic inside the Authentication controller.
Modify the Authentication Action to Use the HttpOnly Cookie in .NET Core Apps.
In this controller, we have different actions, but the Authenticate action is the one that concerns us:
[HttpPost("login")]
public async Task<IActionResult> Authenticate([FromBody] UserForAuthenticationDto user)
{
    if (!await _service.AuthenticationService.ValidateUser(user))
        return Unauthorized();

    var tokenDto = await _service.AuthenticationService.CreateToken(populateExp: true);

    return Ok(tokenDto);
}
You can see we are calling the authentication service to do the heavy lifting regarding the authentication logic and the token creation logic, and then, we return both the access and the refresh tokens to the controller:
public async Task<TokenDto> CreateToken(bool populateExp)
{
    …
    var accessToken = new JwtSecurityTokenHandler().WriteToken(tokenOptions);

    return new TokenDto(accessToken, refreshToken);
}
Then, we simply return the tokenDto containing both tokens to the client.
Well, now, we don’t want to do that. What we want to do is to set both tokens inside the HttpOnly cookie, and send it to the client.
Authentication Service Modification
So, let’s return to the authentication service class and create a new method that will store the tokens inside the cookie. We are creating it inside the authentication service so we can reuse it for both the authentication and the refresh logic:
public void SetTokensInsideCookie(TokenDto tokenDto, HttpContext context)
{
    context.Response.Cookies.Append("accessToken", tokenDto.AccessToken,
        new CookieOptions
        {
            Expires = DateTimeOffset.UtcNow.AddMinutes(5),
            HttpOnly = true,
            IsEssential = true,
            Secure = true,
            SameSite = SameSiteMode.None
        });

    context.Response.Cookies.Append("refreshToken", tokenDto.RefreshToken,
        new CookieOptions
        {
            Expires = DateTimeOffset.UtcNow.AddDays(7),
            HttpOnly = true,
            IsEssential = true,
            Secure = true,
            SameSite = SameSiteMode.None
        });
}
Inside the method, we use the context parameter, call the Cookies properties, and then call the Append method to add a new cookie. We have to provide the key first, and this key must be the same as the one we used inside the configuration event. Then we need the value, which is the generated access token.
Finally, we need to set up some cookie options using the CookieOptions class.
This cookie entry will expire in five minutes, and this is the exact value for the access token expiration period. Also, we want this one to be an HttpOnly cookie, and we will state it is essential for the app to work. Additionally, we want to enable a cookie transfer via SSL or HTTPS only with the Secure property, and finally, let’s use the SameSite property and populate it to SameSiteMode.None.
We do the same for the refresh token with some small changes for the names and the expiration period.
That’s it.
Of course, we have to modify the IAuthenticationService interface, and add the same member there:
void SetTokensInsideCookie(TokenDto tokenDto, HttpContext context);
AuthenticationController Modification to Use the HttpOnly Cookie
Now, we can go back to my authentication controller:
[HttpPost("login")]
public async Task<IActionResult> Authenticate([FromBody] UserForAuthenticationDto user)
{
    if (!await _service.AuthenticationService.ValidateUser(user))
        return Unauthorized();

    var tokenDto = await _service.AuthenticationService.CreateToken(populateExp: true);

    _service.AuthenticationService.SetTokensInsideCookie(tokenDto, HttpContext);

    return Ok();
}
Here, we first remove the payload from the Ok method. We don’t want to return any token inside the response body.
Then, we use the AuthenticationService and then the SetTokens method to set the required tokens inside the cookie.
At this point, we will return a 200 status code to the client but the cookie with the tokens will be sent separately.
Let’s test this.
Let’s first send a request to the TestController:
https://localhost:5001/api/test
We get the 401 unauthorized response, and we expect that since we protect the action with the Authorize attribute.
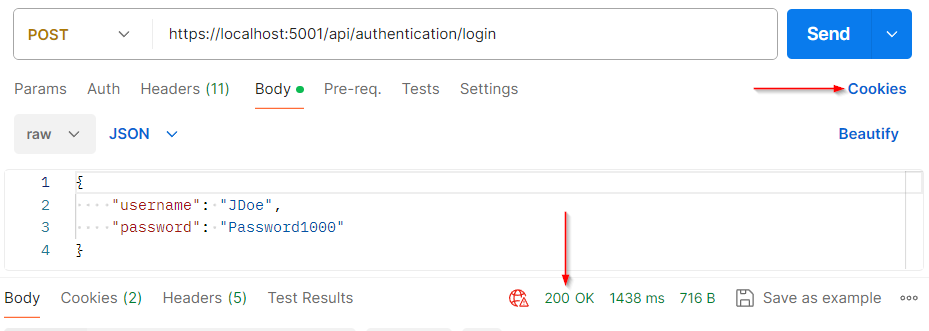
Now, let’s send the request to the authentication action:
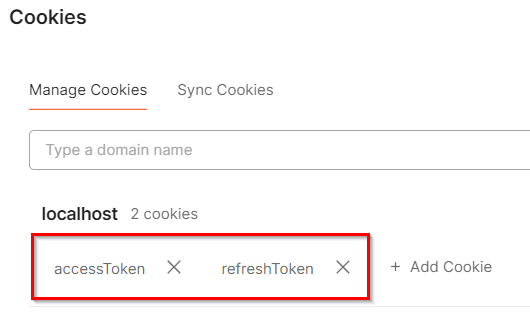
We get the 200 OK result, but if we check the Cookies link:
We can see we have both tokens here. You can inspect both tokens to find both token values and other properties we set in the cookie options class.
Excellent.
Now, with the cookies stored inside the Postman, we can send the previous request again. Again, we will get a 200 OK result. This means the authentication works.
Implement HttpOnly Cookie in .NET for the Refresh Token Logic
Great, now we can move to the refresh logic:
[HttpPost("refresh")]
public async Task<IActionResult> Refresh([FromBody] TokenDto tokenDto)
{
    var tokenDtoToReturn = await _service.AuthenticationService.RefreshToken(tokenDto);

    return Ok(tokenDtoToReturn);
}
Well, to be honest, we need to make only a slight change here. We don’t want to modify anything inside the service layer, so just this part inside the action.
As you can see, right now, we are accepting both the accessToken and the refreshToken inside the request body. But now, we want to do it differently:
[HttpPost("refresh")]
public async Task<IActionResult> Refresh()
{
    HttpContext.Request.Cookies.TryGetValue("accessToken", out var accessToken);
    HttpContext.Request.Cookies.TryGetValue("refreshToken", out var refreshToken);

    var tokenDto = new TokenDto(accessToken, refreshToken);

    var tokenDtoToReturn = await _service.AuthenticationService.RefreshToken(tokenDto);

    _service.AuthenticationService.SetTokensInsideCookie(tokenDtoToReturn, HttpContext);

    return Ok();
}
So, we remove the input parameter from the action. What I want to do is to extract both entries from the cookie manually.
To do so, we use the HttpContext property, and then call the Request.Cookies property and call the TryGetValue method to try to extract the accessToken inside the local variable named accessToken.
We do the same for the refreshToken with some small name changes.
Now, once we have both values, we create a new tokenDto variable and populate it with both the access and the refresh tokens.
Then, we again use the authentication service and call the SetTokensInsideCookie method with both required arguments to add new tokens into a cookie – tokens created inside the RefreshToken method.
Finally, I don’t want to return anything inside the response body.
And that’s all.
I can again start the app… and repeat the flow, but first remove the cookies from the postman.
Then, once we send the test request, we get 401. After that, we authenticate the user, and get the cookies… Of course, this will allow us to access the test action…
Finally, we can send the refresh token request:
POST: https://localhost:5001/api/token/refresh
Again we get a 200 OK result. If we inspect the token, we can find a different refresh token and a different access token.
Great.
Conclusion
In this article, we learned about how to implement the HttpOnly Cookie in .NET applications with the authentication and refresh token actions. This feature can improve the security of our tokens and prevent client-side scripts from manipulating the tokens.


