

In this article, we will review the Flux pattern with its benefits, and drawbacks in general. Then we will take a look into how Fluxor implements this pattern. Finally, we will learn how to use the library using an example Blazor application.
That said, let’s get started.
What Is the Flux Pattern
When an application grows too big, it becomes quite a challenge to update the state correctly. It is also difficult to debug why a specific state change happened. The Flux pattern is an architectural pattern designed to solve these complex state management problems on the front end. Its main goal is to make state changes transparent and predictable, thus making unit testing and debugging easier.
Let’s take a look at a typical Flux pattern flow and components:
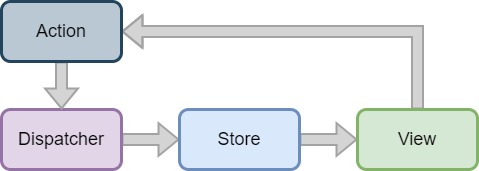
Typically we’re starting from an action. Actions are events or user interactions in the application that require a state change. Next, the Dispatcher directs dispatched actions to the appropriate Store functions. The Store holds the application state. And the View is the UI that can generate new actions.
The most important principles of the Flux pattern are the unidirectional data flow and the read-only state.
Unidirectional Data Flow
Unidirectional data flow means, that data only flows in one direction in the application directly, typically from top to bottom, so from parent to children. Passing data directly back to the parent is forbidden, since we would have to have a reference to the parent which can cause serious problems. So to achieve this, the first thing we must enforce is that children cannot have access to their parents’ state. However, parents should also not modify their children’s state directly, because it can lead to unexpected state changes. They should initialize them, and then let them manage their state. So the state should be immutable.
Immutable State
In the Flux pattern, stores store the state. The store is responsible for managing state changes and emitting events when the state changes, allowing the UI to react. So if the state is immutable, children have no chance of modifying their parent’s state, nor the other way around. But then no data exchange can happen between components. That wasn’t our intention. Everyone should be able to modify their state and we need a way to allow the data flow between components.
This is where we employ actions. Using a dispatcher, we dispatch actions that contain any data necessary for the new state. Then, reducers handle these actions. A reducer’s task is to take an action and the current state, creating a new state object based on the two inputs. This ensures that the state is never modified; instead, it is always replaced.
Effects
Reducers are always pure functions, which means they cannot have a side effect, like data fetching. For example, if we need external data, we should use effects to fetch it, then dispatch an action from the effect, so reducers can update the state with the new data. The action dispatching is needed because only reducers are allowed to replace the state, effects can only execute side effects.
What Is Fluxor
Fluxor is a library for .NET that implements the Flux pattern and requires minimal boilerplate code to start using it. It has every infrastructure-related code already written, we just have to set it up.
Service Registrations
So let’s start by creating a Blazor WebAssembly application and installing the Fluxor.Blazor.Web NuGet package. Now we can register Fluxor into the dependency injection container in the Program class:
builder.Services.AddFluxor(options => options.ScanAssemblies(typeof(Program).Assembly));
Here, we use the AddFluxor() method, as well as the ScanAssemblies() method to scan our assembly for reducers and effects, then add them to the dependency injection container. However, Fluxor will not register middleware automatically.
Middlewares
We haven’t talked about middleware yet, because it is not strictly part of the Flux pattern, it’s rather an extension of it. Middleware allows us to hook into various lifecycle events, and execute side effects that shouldn’t be part of an effect. For example, we aim to log every dispatched action. Writing an effect for every action to just log it, is very inefficient. So the Fluxor team introduced middleware. We can execute code before and after every action dispatch, and the middleware itself can decide if it wants to execute something on a given action’s lifecycle event.
Razor Component Setup
Next, let’s add the store initializer component to the top of the App.razor file:
<Fluxor.Blazor.Web.StoreInitializer/>
We add the StoreInitializer component to initialize and keep track of the store, which can contain many state objects. It’s also responsible for collecting unhandled exceptions and throwing them.
And the last note about integrating Fluxor into our Blazor WebAssembly application is, that every component that has a state should inherit from the Fluxor.Blazor.Web.Components.FluxorComponent class. This ensures that the component rerenders when its state changes, because in the OnInitialized() and OnInitializedAsync() methods the base class registers its event listeners. Note, that if we override the aforementioned methods it’s important to call base.OnInitialized(), otherwise our component won’t rerender and won’t reflect state changes.
That said, let’s introduce the Flux pattern on the Counter page.
Using Reducers in Fluxor
The first thing we should do is to make the Counter page inherit the Fluxor.Blazor.Web.Components.FluxorComponent class:
@inherits Fluxor.Blazor.Web.Components.FluxorComponent
By adding the @inherits attribute to the top of the file, we make the Counter page a Fluxor component.
Creating the Fluxor State
Now let’s create a State folder and a Counter folder inside it, then add a new CounterState record to it:
[FeatureState]
public record CounterState
{
    public int ClickCount { get; init; }
}
Records are immutable reference types, so they are the perfect candidate to be state. Due to their immutability, we can’t modify them accidentally. We add the FeatureState attribute to the state, because Fluxor must discover and manage them. Also, we keep a parameterless constructor in state records. This is necessary because Fluxor uses reflection to instantiate them. If we were to add a constructor with parameters, it’s a good practice to create the parameterless one as private. Finally, we make the ClickCount property init only, so we will be able to use the with keyword when updating the state.
Let’s inject our state and the Dispatcher into the Counter page:
@page "/counter"
@using FluxorInBlazor.State.Counter
@using Fluxor
@inherits Fluxor.Blazor.Web.Components.FluxorComponent
@inject IState<CounterState> CounterState
@inject IDispatcher Dispatcher
<PageTitle>Counter</PageTitle>

<h1>Counter</h1>

<p role="status">Current count: @CounterState.Value.ClickCount</p>

<button class="btn btn-primary" @onclick="IncrementCount">Click me</button>

@code {
    private void IncrementCount()
    {
    }
}
Also, we remove the currentCount field, and use the state’s value in the markup. Now we are reading data from the state, but we are not updating it yet. Let’s fix it by creating the action and the reducer.
Creating the Action and the Reducer
In the Counter folder let’s create an Actions folder and add an IncrementCounterAction record:
public record IncrementCounterAction;
Actions should also be immutable since we do not want them to change after we dispatch them. Therefore using records here is also appropriate. Because we only want to increment the counter by one at a time, we won’t need any properties for our action, but we could have.
Next, let’s create a static Redures class inside the Counter folder:
[ReducerMethod]
public static CounterState ReduceIncrementCounterAction(CounterState state, IncrementCounterAction action)
{
    return new() {ClickCount = state.ClickCount + 1};
}
Here, We add the ReducerMethod attribute to the ReduceIncrementCounterAction() method, so Fluxor can discover it.
We make reducers static because they only take the previous state and the action as inputs and output a new state. If they are static, we cannot use dependency injection in them, thus we won’t trigger accidental side effects. Reducers always take the current state as their first argument and the action they handle as the second one. Fluxor will infer from the method signatures which one it should call for a specific action.
Finally, we return a new state with the incremented ClickCount.
Using the Dispatcher
The last step to make this work is to dispatch the IncrementCounterAction in the Counter page’s IncrementCount() method:
private void IncrementCount()
{
    Dispatcher.Dispatch(new IncrementCounterAction());
}
We use the Dispatch() method, passing in a new instance of our IncrementCounterAction record.
Notice, that action dispatching is not async code, because behind the scenes it just appends our action to a Queue and could process it at a later time. So regardless of synchronous code, Fluxor may not handle actions immediately.
Until now we created a CounterState record, an IncrementCounterAction, and a ReduceIncrementCounterAction() reducer method, and wired them up. Let’s now navigate to the Counter page in the application and click the button. The current count should be incremented by one. Behind the scenes, the dispatcher queued our action, and Fluxor forwarded it to our reducer. Which in turn, created a new state, with ClickCount incremented by one. Then the store replaced the state, and the counter component rerendered, displaying the state change to us. This is the basic Flux workflow, dispatch an action, reduce it into state, and rerender the page that relies on that state.
But how can we fetch data from the server if we can’t use async, or dependency injection in reducers? Let’s take a look at it using effects on the Weather page.
Using Effects in Fluxor
As on the Counter page, let’s start by inheriting the Weather page from Fluxor.Blazor.Web.Components.FluxorComponent:
@inherits Fluxor.Blazor.Web.Components.FluxorComponent
Creating the Fluxor State
Still similar to the Counter page, let’s create a Weather folder inside the State folder and add a WeatherState record to it:
[FeatureState]
public record WeatherState
{
    public bool IsLoading { get; init; }
    public IEnumerable<WeatherForecast> Forecasts { get; init; } = new List<WeatherForecast>();
}
Here, we introduce two properties on the state, to help avoid null pointer exceptions. When IsLoading is true, we will display a loading text, and we won’t access the Forecasts property. However, even if we accidentally access it while loading, it won’t throw a null pointer exception, because it has a default value of an empty list. And when the loading is finished, we set IsLoading to false, to indicate that the page can render the forecast list.
Let’s inject the state into the page, and update the razor markup to read data from the state:
@inject IState<WeatherState> WeatherState
@inject IDispatcher Dispatcher

@if (WeatherState.Value.IsLoading)
{
    <p>
        <em>Loading...</em>
    </p>
}
else
{
    @foreach (var forecast in WeatherState.Value.Forecasts)
    {
        @* code removed for brevity *@
        <tr>
            <td>@forecast.Date.ToShortDateString()</td>
            <td>@forecast.TemperatureC</td>
            <td>@forecast.TemperatureF</td>
            <td>@forecast.Summary</td>
        </tr>
    }
}
Here, we inject the state and the Dispatcher and remove the forecasts field. Instead, we use data from the state and do not send an HTTP request from the OnInitialized() method.
Creating the Actions
Now we will need two actions: one to initialize the data fetching, and another to dispatch when we have the data. So let’s create a FetchDataAction and a DataFetchedAction record in a new Actions folder inside Weather:
public record FetchDataAction;
The FetchDataAction is a simple record without any properties, because we use it as a signal to start fetching the data:
public record DataFetchedAction(IEnumerable<Pages.Weather.WeatherForecast> Forecasts);
On the other hand, we add a Forecasts property to the DataFetchedAction record because it will contain the fetched data.
Creating the Reducer
Let’s create a Reducers class and add a reducer that will initialize the state when the FetchDataAction is dispatched:
public static class Reducers
{
    [ReducerMethod(typeof(FetchDataAction))]
    public static WeatherState ReduceFetchDataAction(WeatherState state) => new() { IsLoading = true };
}
Here, we do not need any data from the action, so instead of adding it to the parameter list, we can pass its type as a parameter to the ReducerMethod attribute. We successfully evaded an unused method parameter warning.
Creating the Effects
Now let’s create an Effects class and add an effect method for this same action because Fluxor will execute both reducers and effects if they match an action, we don’t have to dispatch different actions for reducers and effects:
public class Effects(HttpClient http)
{
    [EffectMethod(typeof(FetchDataAction))]
    public async Task HandleFetchDataAction(IDispatcher dispatcher)
    {
        var forecasts = await http.GetFromJsonAsync<WeatherForecast[]>("sample-data/weather.json")
                        ?? Array.Empty<WeatherForecast>();
        dispatcher.Dispatch(new DataFetchedAction(forecasts));
    }
}
We utilize C# 12’s primary constructors to inject the HttpClient into the Effects class. Next, we decorate the HandleFetchDataAction() method with the EffectMethod attribute, which can be used very similarly to the ReducerMethod attribute. Effect methods always get the dispatcher as a parameter, so when data fetching is finished, we can dispatch the DataFetchedAction.
Let’s create a reducer for this action too:
[ReducerMethod]
public static WeatherState ReduceDataFetchedAction(WeatherState state, DataFetchedAction action)
{
    return new() {IsLoading = false, Forecasts = action.Forecasts};
}
We take the data from the action and create a new state with it, that has IsLoading set to false, so the page will know that forecasts are available to display.
Finally, let’s dispatch the FetchDataAction in the Weather page’s OnInitialized() method:
protected override void OnInitialized()
{
    base.OnInitialized();
    Dispatcher.Dispatch(new FetchDataAction());
}
Remember to always call the base.OnInitialized() method to make the page rerender on state changes.
Now, when navigating to the weather page, the first reducer briefly displays the loading screen for a split second before the effect, and the second reducer finishes execution and shows the data.
Using Middleware in Fluxor
In the Fluxor introductory section, we mentioned middleware, and how they can execute code before and after all actions, or just specific ones. Let’s look at an example logging middleware, to see how they work.
Let’s start by creating a Middlewares folder inside the State folder and add a LogginMiddleware class inside:
public class LoggingMiddleware : Middleware
{
}
We inherit the LoggingMiddleware from Fluxor’s Middleware base class and we will override the specific lifecycle methods we need.
Fluxor’s Middleware Lifecycles
Let’s look at the lifecycle of Fluxor’s middleware, which has five steps:
| Middleware Lifecycle | Description |
|---|---|
| Task InitializeAsync(IStore store) | This is the first method that gets called during a middleware's lifecycle. We can use it to get a reference to the store and perform other necessary initialization. |
| void AfterInitializeAllMiddlewares() | This method is called when all other middlewares finish their initialization, and the store is also ready to be used. |
| bool MayDispatchAction(object action) | This method is called after the Dispatcher.Dispatch() method is called, but before the action is passed to the effects and reducers. Here, we can terminate the action dispatch, and completely prevent all effects and reducers from handling the action. If all middlewares return true, Fluxor dispatches the action; however, if even one returns false, it discards it. |
| void BeforeDispatch(object action) | If the action didn't get discarded by a middleware, then before actually dispatching it this method will be called. |
| void AfterDispatch(object action) | Finally, after reducers and effects finish execution, this method is called so we are notified about successful action handling. |
Logging Implementation
For our logging middleware, let’s override the BeforeDispatch() method:
public override void BeforeDispatch(object action)
{
    Console.WriteLine($"Before dispatching action {action.GetType().Name}");
}
We simply log the name of the action to the console. As we already mentioned, middleware will not be registered automatically, so let’s add it by calling the AddMiddleware() method inside the AddFluxor() extension:
builder.Services.AddFluxor(options => options.ScanAssemblies(typeof(Program).Assembly)
    .AddMiddleware<LoggingMiddleware>());
Let’s reload the page and inspect the console output:
Before dispatching action StoreInitializedAction
Before dispatching action FetchDataAction
Before dispatching action DataFetchedAction
StoreInitializedAction is a built-in action Fluxor uses to notify its components that the store is ready. Also, we see in the log our two actions from the weather page in the order we dispatch them.
Conclusion
We discussed the Flux pattern itself, its core principles, and why and when should we use it.
Then we looked at how Fluxor implements this pattern, discovered some of its inner workings, and integrated it into a Blazor WebAssembly application.
After, we did a deep dive into reducers, effects, and middleware. We made the whole Blazor template use Fluxor for state management.
All in all, the most important takeaway is, to know when we need Fluxor, and when is the application simple enough to use easier state management mechanics. But if we need Fluxor, then we will now have the confidence to utilize its powerful state management features.

Will the same works with Blazor Web App Sever Interactive Render?
Hi Karthikeyan,
Thanks for the question, it’s a good one. Fluxor is designed to be a client-side-only framework, thus officially it only works with WebAssembly projects. However, people are trying to get it to work in the new hybrid model with some success, take a look at this GitHub issue: https://github.com/mrpmorris/Fluxor/issues/459
However these solutions are not official and have some drawbacks and unintended behavior, so I wouldn’t use them as a production-ready solution.