

In this article, we’re going to discuss the use of FluentValidation in ASP.NET Core.
Traditionally, most validation in .NET is done using Data Annotations:
public class SampleClass
{
    [Required]
    public int Id { get; set; }

    [MaxLength(100)]
    public string Name { get; set; }
}
There are a few issues with this approach:
- Our model can get “bloated”
- Extensibility is limited
- Testing isn’t the nicest experience
To address some of these concerns, instead, we’re going to utilize a .NET library called FluentValidation to perform validation for our classes. We’re going to add validation to a basic ASP.NET Core API, but the techniques we’re going to follow can in fact be applied to any .NET application.
Let’s move on.
Creating a Simple ASP.NET Core API
Let’s go ahead and create a File -> New -> ASP.NET Core 3.1 API using Visual Studio, accepting all the defaults.
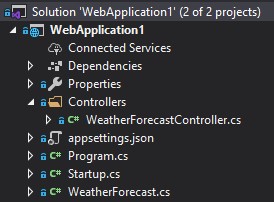
At the end of the wizard, we’ll end up with the familiar “Weather Forecast” API structure:
Now let’s hit CTRL-F5 to run our API and we should see some weather readings for the next few days:
[
  {
    "date": "2020-07-01T14:34:13.7180989+10:00",
    "temperatureC": 42,
    "temperatureF": 107,
    "summary": "Bracing"
  },
  {
    "date": "2020-07-02T14:34:13.7181617+10:00",
    "temperatureC": 31,
    "temperatureF": 87,
    "summary": "Freezing"
  },
  {
    "date": "2020-07-03T14:34:13.7181627+10:00",
    "temperatureC": 24,
    "temperatureF": 75,
    "summary": "Scorching"
  },
  {
    "date": "2020-07-04T14:34:13.7181632+10:00",
    "temperatureC": -17,
    "temperatureF": 2,
    "summary": "Hot"
  },
  {
    "date": "2020-07-05T14:34:13.7181636+10:00",
    "temperatureC": 52,
    "temperatureF": 125,
    "summary": "Bracing"
  }
]
To demonstrate the use of validation, we’re going to add a new API method that allows us to add a new forecast.
First, let’s open up WeatherForecastController.cs.
We can see there’s a single method called Get() which returns some weather forecasts (an array of WeatherForecast), which is the API called when we ran the application previously:
[HttpGet]
public IEnumerable<WeatherForecast> Get()
{
    var rng = new Random();
    return Enumerable.Range(1, 5).Select(index => new WeatherForecast
    {
		Date = DateTime.Now.AddDays(index),
		TemperatureC = rng.Next(-20, 55),
		Summary = Summaries[rng.Next(Summaries.Length)]
    }).ToArray();
}
Now let’s add a method to the WeatherForecastController class:
[HttpPost]
public ActionResult Post([FromBody] WeatherForecast forecast)
{
    return Ok("Success!");
}
This method accepts a WeatherForecast parameter from the body of an HTTP POST request, and returns the string “Success!”.
Normally we’d do a few more useful things such as saving to a database and returning an HTTP 201 (Created) pointing to the location of our newly saved resource. However, for demonstration purposes let’s keep it nice and simple.
Using Postman for API Testing
Let’s now fire up Postman and confirm that our API works as expected.
First, we’ll add a new request using the “New” button in Postman:
![]()
In the request, we’ll set the following values:
- “POST” as the HTTP Verb
- http://localhost:61997/weatherforecast as the URL (change the port as necessary)
- A header called “Content-Type” with the value “application/json”
- A body of type “JSON”, setting the “TemperatureC” field on our WeatherForecast model to the value 6000
Then, let’s hit the “Send” button. If we did everything correctly, we should see our “Success!” text in the response:
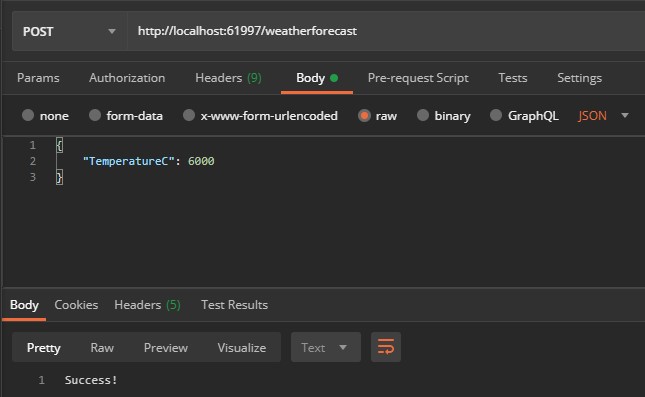
Great!
So we now have the ability to add new weather forecast. Notice however we’ve passed a value of 6000 as the value for TemperatureC. This is hotter than the temperature of the Sun, so we probably shouldn’t allow this into our system for a weather forecast!
To put some rules around this, in the next section let’s add a simple validator to ensure that the value of TemperatureC cannot exceed 100.
Adding a Simple FluentValidation Validator
To add our simple validator, we first need to install FluentValidation in the package manager console:
PM>> install-package FluentValidation.AspNetCore
The FluentValidation.AspNetCore package installs both FluentValidation and also some extra functionality specific to ASP.NET Core that we’ll make use of a bit later.
Now, let’s go ahead and add a new validator with our rule directly in the WeatherForecast class:
public class WeatherForecastValidator : AbstractValidator<WeatherForecast>
{
    public WeatherForecastValidator()
    {
        RuleFor(model => model.TemperatureC).LessThanOrEqualTo(100);
    }
}
Let’s explain our code:
- We create a class called
WeatherForecastValidatorthat inherits from theAbstractValidator<T>class, specifying the typeWeatherForecast. This lets FluentValidation know that this validation is for theWeatherForecastclass. - We can see a constructor specifying our rules. In this case, we define a single rule saying that the
TemperatureCvalue needs to be <=100.
We can place the validation class anywhere we like, but for the sake of simplicity let’s keep it in the same file.
We can add as many rules as we like, chain validators, and even use custom validators, but we’ll focus on a single simple rule for now.
In the next section, we’ll look at how we can write a simple unit test for our validator.
Testing Our FluentValidation Validator
One of the great things about FluentValidation is how easy it is to write unit tests. There is a nice set of built-in test helpers that make assertions a breeze and keep our tests nice and clean. To learn more about testing ASP.NET Core application, we strongly recommend reading our ASP.NET Core Testing series.
Let’s go ahead and set one up now.
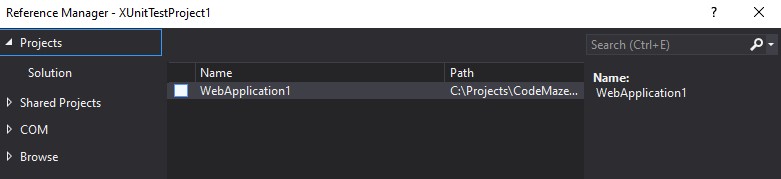
First, we’ll add a new xUnit Test Project (.NET Core) to our solution:

Let’s rename UnitTest.cs to WeatherForecastValidatorTests.cs. It’s good practice to name the test file matching the validator we are testing.
Next, let’s add a couple of references to the project. First, add a reference to our WebApplication1 project:
Now we are going to install a couple of packages into the tests project from the Package Manager Console.
First the FluentValidation library:
PM>> install-package FluentValidation
Now the xUnit visual studio test runner:
PM>> install-package xunit.runner.visualstudio
Then let’s go ahead and open up the WeatherForecastValidatorTests class and add some tests.
Adding Test Methods
First, we’ll add the following using statements:
using FluentValidation.TestHelper;
using WebApplication1;
The first statement imports a set of test helpers that we can utilize, and the second adds a reference to our web application, so we can test the validator we wrote earlier.
Next, let’s add the following instance member to the WeatherForecastValidatorTests class:
private readonly WeatherForecastValidator _validator = new WeatherForecastValidator();
This creates an instance of our validator so that we can use it for the tests we are about to write.
Now, we are going to add a method to test failing validation:
[Fact]
public void GivenAnInvalidTemperatureCValue_ShouldHaveValidationError()
    => _validator.ShouldHaveValidationErrorFor(model => model.TemperatureC, 101);
We are using an extension from the FluentValidation.TestHelper namespace, that allows us to do 3 things in 1 line:
- Set a property to a value of our choosing (in this case,
101) - Invoke the validator
- Cause the test to pass/fail based on the result
After that, let’s add a method to test successful validation:
[Theory]
[InlineData(99)]
[InlineData(100)]
public void GivenAValidTemperatureCValue_ShouldNotHaveValidationError(int temperatureC)
	=> _validator.ShouldNotHaveValidationErrorFor(model => model.TemperatureC, temperatureC);
This time we’re using the handy xUnit “theories”, which allow us to pass multiple values to the test.
Now, if we jump over to the Test Explorer and run all our tests, we should see green lights across the board:
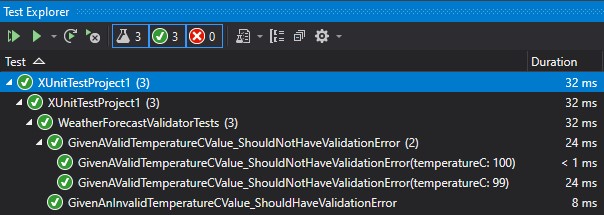
As you can see, FluentValidation makes it really easy to test our validation, allowing us to focus on testing individual properties. However, we can still test the entire validators for more complex scenarios.
Now that we know our validator works as expected, in the next section we are going to wire it up in our API.
Wiring up Our FluentValidation Validator
Firstly, we need to tell ASP.NET Core MVC that we’d like to use FluentValidation and to look for validators in our assembly when performing the model binding.
To do that, we need to add a single line to the ConfigureServices in Startup.cs in .NET 5 or previous versions:
public void ConfigureServices(IServiceCollection services)
{
    services.AddControllers()
            .AddFluentValidation(fv => fv.RegisterValidatorsFromAssemblyContaining<WeatherForecastValidator>());
}
In .NET 6 and later, we have to modify the Program class:
builder.Services.AddControllers()
    .AddFluentValidation(fv => fv.RegisterValidatorsFromAssemblyContaining<WeatherForecastValidator>());
This wires up the FluentValidation middleware with ASP.NET Core MVC, and tells FluentValidation to look for any validators in the assembly containing our WeatherForecastValidator. In other words, look for any validators in our API project.
Let’s confirm everything is working by hitting Send again in Postman:
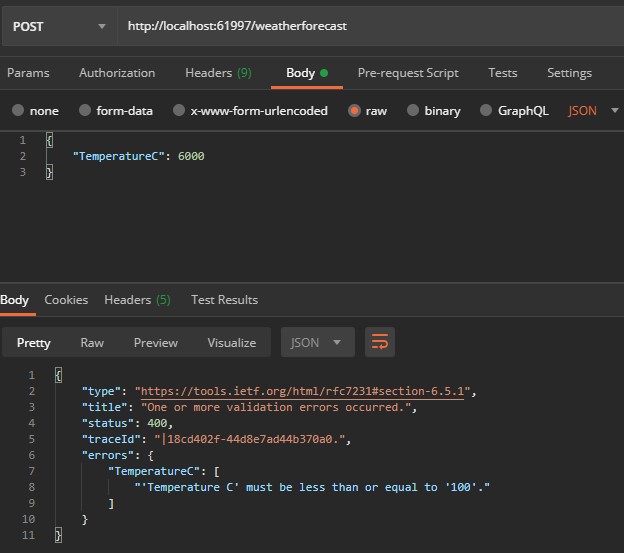
As expected, our validation is firing correctly, and we’re now returning an error back to the user.
What’s great about this approach is we don’t need to explicitly check the ModelState in our controller to see if the input is valid. The FluentValidation ASP.NET middleware will automatically find our validator, and if validation fails it will prepare the ModelState and our action will return a 400 response as we can see above.
Conclusion
FluentValidation provides a great alternative to Data Annotations in order to validate our models. As we’ve seen, the validation rules are easy to read, easy to test, and enable great separation of concerns keeping our controllers lightweight.
In this article, we’ve only really touched the tip of the iceberg. FluentValidation also has a bunch of other great features such as:
- Collection validators, where we can invoke our validator N times when we have a sequence of items
- A large number of built-in validators (for example, validating credit card numbers, email addresses, and enums)
- Ability to write custom validators and pull in dependencies, for example, if we need to do validation via our database
Happy coding!

