In this article, we’ll look at setting up an SSL certificate for use in ASP.NET web applications and creating a new SSL certificate using Visual Studio and the .NET CLI. We’ll also look at how to remove SSL certificates using the Windows certificate manager and the .NET CLI. Finally, we’ll cover some common problems and investigate how to troubleshoot them.
Let’s start.
How to Create an SSL Certificate From a Fresh Visual Studio Installation
We may or may not already have an SSL certificate set up after installing Visual Studio. Visual Studio allows us to install it if we don’t have an SSL certificate installed.
Creating a New Project With HTTPS Enabled
Let’s create a new Web API project and make sure that HTTPS is enabled:
Visual Studio uses a project template set up to use SSL because the “Configure for HTTPS” option is checked. We’ll keep the other options at their default values.
Visual Studio has a “Start Debugging button” on the toolbar, identifiable by the green triangle. We can see the launch profiles configured by pressing the down arrow. This allows us to select and run the application using different launch profiles:
Let’s open the launchSettings.json file and look at how the “https” profile is configured:
"https": {
  "commandName": "Project",
  "dotnetRunMessages": true,
  "launchBrowser": true,
  "launchUrl": "swagger",
  "applicationUrl": "https://localhost:7175;http://localhost:5199",
  "environmentVariables": {
    "ASPNETCORE_ENVIRONMENT": "Development"
  }
}
The most important part of the “https” profile is the applicationUrl property. It has 2 URLs separated by a semicolon: an HTTP URL, and an HTTPS URL.
Both URLs will be available when we run the application with the “https” profile. The application is configured to redirect to HTTPS in the Program.cs file, so if we attempt to access the HTTP URL, we’ll be redirected to the HTTPS URL:
app.UseHttpsRedirection();
This method will add a middleware to the pipeline, redirecting HTTP requests to the HTTPS URL.
Installing the SSL Certificate in Visual Studio
Let’s run our application.
If we already have an SSL certificate set up on our machine, the application will run, and we’ll be able to navigate to our application’s web pages or make a request to its API endpoints via HTTPS.
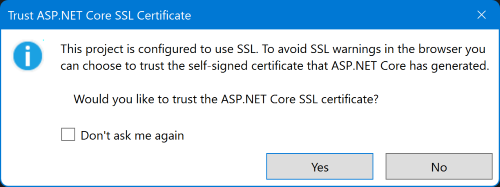
Visual Studio will prompt us to set up an SSL certificate on our machine if there isn’t one already. It will generate a self-signed certificate, and we’ll receive a prompt asking if we want to trust it:
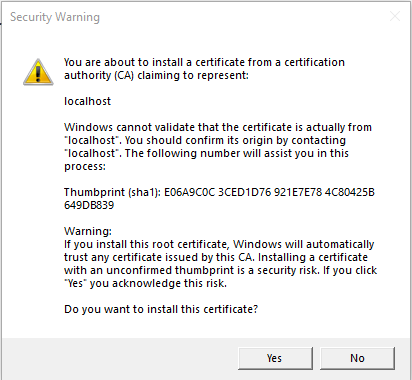
We select “Yes” to trust the certificate that ASP.NET Core generated for us. This will cause another prompt to appear for us to install the certificate:
We should be careful about which certificates we install on our machines and be confident that they do come from the certificate authority (CA) they claim to represent.
In this case, the CA is for localhost, the hostname for our local machine. ASP.NET Core generated this certificate to select “Yes” and install the certificate safely.
The certificate should then be installed, and the application should run using HTTPS:
How to Create an SSL Certificate Using the Command Line
Another way to generate an SSL certificate without Visual Studio is to use the .NET CLI.
The .NET CLI provides commands that allow us to manipulate SSL certificates. We can check that they exist or are trusted, and we can create or remove them too:
dotnet dev-certs https
Let’s check to make sure we don’t already have an SSL certificate setup:
dotnet dev-certs https --check
If there is already an SSL certificate in the current user’s certificate store, then the command will return a message:
A valid HTTPS certificate is already present.
If we already have an SSL certificate setup but want to create a new one, we should remove the old one first. We’ll discuss how to remove it in a later section.
Let’s use the .NET CLI and create and trust a new self-signed SSL certificate:
dotnet dev-certs https --trust
The dotnet dev-certs https part of the command installs a new self-signed SSL certificate. The --trust flag is what trusts the certificate on the local machine.
After running this command, we should get the prompt asking if we want to install the SSL certificate. We select “Yes” to confirm the installation of the certificate.
The Web API application should now run with the “https” profile and give access to everything via HTTPS.
How to Remove an SSL Certificate
We may want to remove an SSL certificate if it’s broken or malformed before creating a new one.
How to Remove an SSL Certificate Using the Certificate Manager
Let’s remove our developer SSL certificate using the Windows certificate manager. To open the certificate manager, let’s use the “Run” application by either searching in the Windows search bar or pressing the Windows + R keys together:
Let’s type “certmgr.msc” in the textbox and select the “OK” button. This should open the Certificate Manager application:
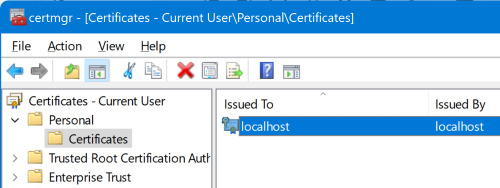
Our localhost certificate will be located under, Certificates – Current User > Personal > Certificates. Let’s select the localhost certificate and delete it by right-clicking and selecting “Delete”.
After confirming the certificate deletion, it shouldn’t appear in the list. We can now set up a new self-signed SSL certificate using Visual Studio or the .NET CLI.
How to Remove an SSL Certificate Using the Command Line
The .NET CLI also allows us to remove an ASP.NET Core SSL certificate by using the --clean flag.
Let’s remove our SSL certificates:
dotnet dev-certs https --clean
The user’s certificate store has had all of our development certificates removed. Running the dotnet dev-certs https --check command will confirm that our certificate store no longer has an SSL certificate.
Troubleshooting
Sometimes we can run into unexpected issues when creating and removing SSL certificates. We’ll look at some common issues we might face and find out what troubleshooting steps we can take.
Browser Error - NET::ERR_CERT_AUTHORITY_INVALID
This error occurs when there’s an SSL certificate installed on our machine, but it’s not trusted. We can trust the certificate by using the .NET CLI and running the command dotnet dev-certs https --trust.
Browser Error - NET::ERR_CERT_INVALID
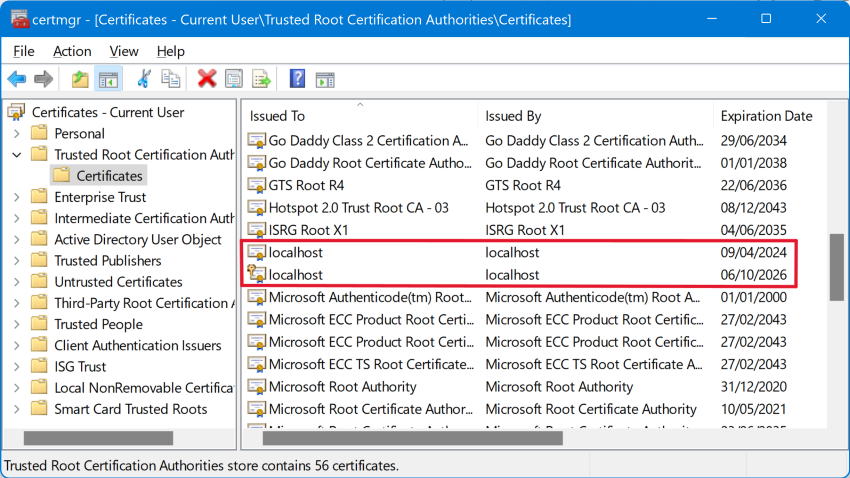
We get this error when the browser thinks the SSL certificate is invalid. This may be because it can’t validate the certificate against the certificate authority. We can confirm if this is a problem by opening the Certificate Manager. Then we need to check if there’s more than one localhost row in, Certificates – Current User > Trusted Root Certification Authority > Certificates:
If we do have more than 1 row for localhost, we should run the .NET CLI command, dotnet dev-certs https --clean and then manually remove the localhost rows in the Windows certificate manager application under Certificates – Current User > Trusted Root Certification Authority > Certificates.
Visual Studio Prompt to Add Certificate Not Appearing After Removing SSL Certificate Using the CLI
Manually check the certificate has been removed using the Certificate Manager or by running the .NET CLI command, dotnet dev-certs https. After confirming that, restart Visual Studio, and the prompt should appear when attempting to run the application.
Conclusion
In this article, we’ve looked at how to set up a self-signed developer SSL certificate to run our ASP.NET applications locally via HTTPS using Visual Studio. We also learned how to generate an SSL certificate using the .NET CLI. Then we looked at how to remove any locally installed SSL certificates when they’ve become broken somehow by using the Windows certificate manager and the .NET CLI. Finally, we looked at common errors around creating and removing local SSL certificates and how we can troubleshoot them.


