

In this article, we’ll explore EF Core Power Tools, a popular toolbox aimed at simplifying the development workflow when using Entity Framework Core in .NET applications. Its standout feature is the graphical user interface (GUI) it provides for reverse engineering databases. With EF Core Power Tools, we can effortlessly create entity models and database contexts without the need to write boilerplate code.
Let’s get started!
Requirements and Download Process
Let’s start by taking a look at the requirements of this toolset. EF Core Power tool provides two usage options, the first one is as a Visual Studio 2022 extension and the second one is as a .NET cross-platform tool. At the time of the article’s writing the cross-platform tool is in preview that’s why we will analyze the first option. When it comes to .NET and EF Core versions, we should have at least version 6.0 or higher to ensure compatibility.
To download the Visual Studio’s extension we can either download it through Microsoft’s Visual Studio Marketplace or the Visual Studio by opening the Extensions tab and searching it in the Manage Extensions window. From there a VSIX installer will finish the job and the extension will be available the next time we open Visual Studio.
Create a Database and the Tables
Let’s create a simple database with a few tables:
USE DatabaseFirstDevelopmentUsingEFCorePowerToolsDB

CREATE TABLE Authors (
    ID INT IDENTITY(1,1) PRIMARY KEY,
    FirstName VARCHAR(255) NOT NULL,
    LastName VARCHAR(255) NOT NULL
);

CREATE TABLE Categories (
    ID INT IDENTITY(1,1) PRIMARY KEY,
    Name VARCHAR(255) NOT NULL
);

CREATE TABLE Books (
    ID INT IDENTITY(1,1) PRIMARY KEY,
    Name VARCHAR(255) NOT NULL,
    AuthorID INT,
    YearPublished INT,
    FOREIGN KEY (AuthorID) REFERENCES Authors(ID)
);

CREATE TABLE Books_Categories (
    ID INT IDENTITY(1,1) PRIMARY KEY,
    BookID INT,
    CategoryID INT,
    FOREIGN KEY (BookID) REFERENCES Books(ID),
    FOREIGN KEY (CategoryID) REFERENCES Categories(ID)
);

CREATE SCHEMA dbo2;

CREATE TABLE dbo2.Movies (
    ID INT IDENTITY(1,1) PRIMARY KEY,
    Name VARCHAR(255) NOT NULL
);
For the dbo schema we create four tables Books, Authors, Categories, and Books_Categories with relationships:
Bookshave a one-to-many relationship withAuthorsBookshave a many-to-many relationship withCategoriesby using theBooks_Categoriestable as a join table
For the dbo2 schema we create the table Movies
Next, let’s create a view that will show the details of every book from the dbo schema tables:
USE DatabaseFirstDevelopmentUsingEFCorePowerToolsDB

CREATE VIEW BookDetails AS
SELECT
    B.ID AS BookID,
    B.Name AS BookName,
    B.YearPublished,
    A.FirstName AS AuthorFirstName,
    A.LastName AS AuthorLastName,
    C.ID AS CategoryID,
    C.Name AS CategoryName
FROM
    Books B
JOIN
    Authors A ON B.AuthorID = A.ID
LEFT JOIN
    Books_Categories BC ON B.ID = BC.BookID
LEFT JOIN
    Categories C ON BC.CategoryID = C.ID;
Last but not least we will create a function and a stored procedure. Both will receive a category’s ID and return the book number of this category:
CREATE FUNCTION dbo.CountBooksInCategory_FN
(
    @CategoryID INT
)
RETURNS INT
AS
BEGIN
    DECLARE @Count INT;

    SELECT @Count = COUNT(*)
    FROM Books B
    LEFT JOIN Books_Categories BC ON B.ID = BC.BookID
    WHERE BC.CategoryID = @CategoryID;

    RETURN @Count;
END;

CREATE PROCEDURE CountBooksInCategory_SP
(
    @CategoryID INT,
    @BookCount INT OUTPUT
)
AS
BEGIN
    SELECT @BookCount = COUNT(*)
    FROM Books B
    LEFT JOIN Books_Categories BC ON B.ID = BC.BookID
    WHERE BC.CategoryID = @CategoryID;
END;
Reverse Engineer a Database
At this point, after creating our database it’s time to start reverse engineering it to create the entities and the contexts.
Setup a Datasource
To set a Datasource we can right-click in our project and select the EF Core Power Tools. When we select the Reverse Engineer we can see a new window:
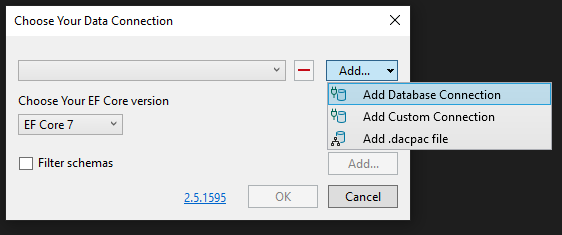
Here, we can select as a data source either a Database or a Data-tier Application Package.
Map Database Objects
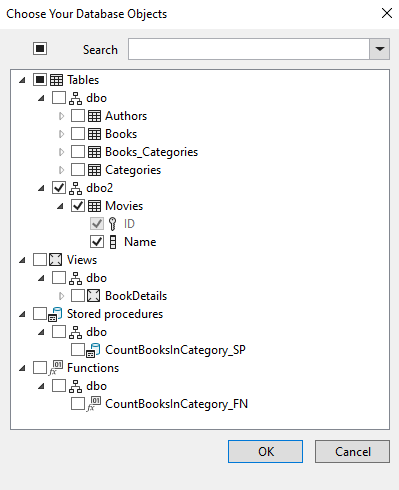
After selecting a data source EF Core Power Tools detects all custom-created database objects and lets us select which ones we want to map:
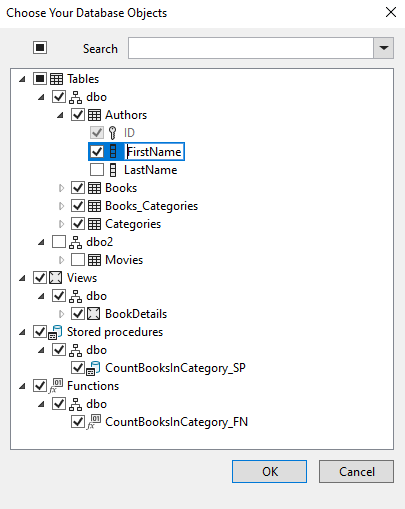
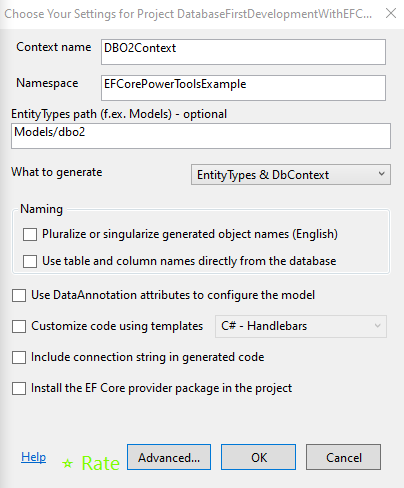
In this window, we can change the objects and attributes’ names as well as include or exclude columns from a view or a table. The last step before the objects are created is to select through a large variety of mapping settings:
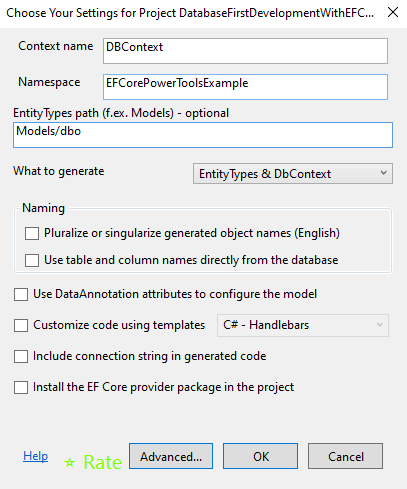
From these two windows, we can set all the mapping settings, some of which determine:
- Whether we want to map only the
Entities, theContext, or both - The paths and namespaces of the produced classes
- Naming of the objects (pluralizer)
- Whether we want to use DataAnnotations or Fluent API
- The customization of code using Handlebars/ T4
This procedure will produce the DbContext class, the Entities classes along with a efpt.config.json file which includes all the mapping settings.
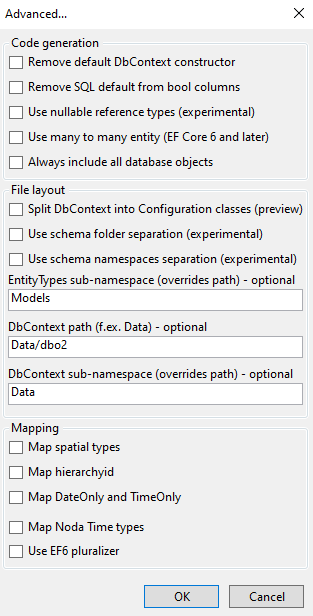
Modify Generated Mapping
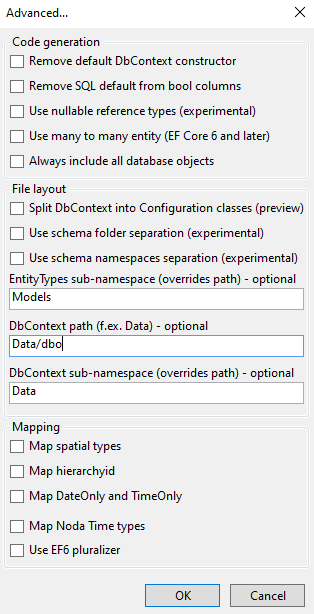
By selecting the Always include all database objects option, we have the flexibility to effortlessly add or remove database objects. This choice enables us to implement any alterations to the entities and the context with a simple right-click on the configuration file and selecting EF-Core Power Tools – Refresh. If for any reason we want to apply the changes manually each time, we can do that by right-clicking the configuration file and selecting the EF-Core Power Tools – Edit. Following this, we proceed with the steps from the initial setup.
Use Multiple Database Contexts
To enable the presence of multiple contexts within our project using EF Core Power Tools, it is necessary to create a second configuration file adhering to the format efpt.*.config.json. Additionally, the second DBContext class should be located in a distinct path from the first one to prevent file overlap and potential overwriting.
Let’s see an example of how we can do that for the dbo2 schema we created earlier. First, we select the database objects we want to map:
Then we can choose the mapping settings for this context and its entities but keep in mind the location limitation of the context class we mentioned before:
Customize Created Code
As we can see in the screenshots, when we select the mapping setting there is the option of code customization using a template (either Handlebars or T4).
Handlebars Customization
When we select the C# – Handlebars option, EF Core Power Tools will automatically generate a CodeTemplates folder. It includes CSharpDbContext and CSharpEntityType folders:
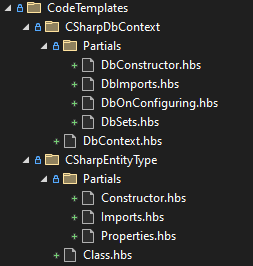
These subfolders serve as containers for Handlebars templates that enable extensive customization of various aspects of code generation. They allow us to tailor Entity and DbContext classes’ constructors, import statements, and properties according to our specific requirements. Each of these templates is stored as a partial .hbs (Handlebars) file and is used inside the main files (DbContext.hbs or Class.hbs).
For example, let’s say that we want to add an import statement for the EFCorePowerToolsExample.Data namespace that will be inside every entity class. We can do this by adding the using EFCorePowerToolsExample.Data; inside Imports.hbs file:
using EFCorePowerToolsExample.Data;
{{#if use-data-annotations}}
using System.ComponentModel.DataAnnotations;
using System.ComponentModel.DataAnnotations.Schema;
using Microsoft.EntityFrameworkCore;
{{/if}}
{{#each imports}}
using {{import}};
{{/each}}
T4 Customization
When we select the C# – T4 (EF7+) option EF Core Power Tools will automatically generate a CodeTemplates folder with the EFCore folder inside:
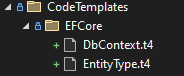
It’s important to note that to use this feature we need to have at least EF Core 7.0. Inside the two .t4 files we can customize the generated classes by using the T4 template.
Benefits of Using EF Core Power Tools
EF Core Power Tools offer a range of benefits that significantly help us streamline and enhance the development process when working with Entity Framework Core.
This tool provides a comprehensive visual representation of the database schema, making it easier for us to understand the underlying data structure. This means that we can gain deeper insights into our data models. This visual clarity aids in database design and optimization, ultimately leading to more efficient and well-structured database schemas. This, in turn, helps improve application performance.
In addition, EF Core Power Tools automates the code generation process based on the database schema. This automation drastically reduces the need for manual coding and ensures consistency between the application’s data model and the database structure. This not only accelerates the development pace but also minimizes the likelihood of errors that can occur when creating these elements manually. Additionally, the tool simplifies the management of database migrations, making it more straightforward to evolve the database schema as the application grows.
Limitations of Using EF Core Power Tools
Even though EF Core Power Tools help us simplify the process of database reverse engineering, it comes with some limitations as well.
We cannot use it in legacy projects as it requires EF Core and .NET 6.0 or newer. Furthermore, some of its features are still in preview or experimental, like the automatic schema folder separation. As a result, some operations may need to be reviewed by us to ensure that the result is the wanted one.
Another problem that may occur with EF Core Power Tools is the over-reliance on it. Using it without a good understanding of underlying EF Core concepts can lead us to rely on the tools for tasks that are better handled manually. This could result in less efficient database designs or difficulty troubleshooting complex issues.
Conclusion
In this article, we discussed EF Core Power Tools and its application in the context of database-first development. We began by outlining the prerequisites for using this tool and delved into the process of reverse engineering a database. Additionally, we explored some noteworthy functionalities this tool offers, including the ability to customize code through T4 templates or Handlebars. Finally, we concluded by summarizing the advantages and drawbacks of EF Core Power Tools.
