

When designing and building applications, often we find ourselves needing various third-party services, such as databases, push notifications, hosting, authentication, and many other complex features. Firebase, built by Google, is an all-in-one application development platform that provides all this functionality and more, giving us an easy-to-use platform to develop and scale our applications.
Let’s start by understanding some of the features Firebase provides.
What is Firebase?
Firebase is a service offered by Google for developing and scaling mobile, web, and desktop applications. It originally launched in 2011, with a single service, the Realtime Database, which as the name suggests, is a real-time, NoSQL database that allows storing and syncing of data between users.
Now, Firebase is much more than just a NoSQL database. Let’s look at some of the features it offers:
- Authentication: an end-to-end authentication system, allowing users to authenticate to our applications using simple email and password accounts, through to social logins with Google, Facebook, GitHub, and many more.
- Cloud messaging: Firebase focuses a lot on the mobile application market, so we need to send and receive notifications to Android and iOS devices frequently, which is covered by the cloud messaging functionality.
- Hosting: we need somewhere to host our applications, which is where the Firebase hosting features come into play. It allows for simple previewing, deployment, and rollback of our applications.
- Cloud storage: More often than not, we want to store files for our users, such as photos and videos. Firebase provides a fast and reliable cloud storage platform for handling these scenarios.
Create Firebase Project
There are various client libraries for different programming languages, including .NET, that allow us to interact and develop applications with Firebase. There is a great list of the available libraries on GitHub, a few of which we’ll explore in this article. To start, let’s create a new web application using the Visual Studio Project Wizard or the dotnet new webapp command.
To kick things off, we need a Firebase project. A Firebase project is a top-level entity that we use to manage the various services on offer. We create Firebase projects from the Firebase console, so let’s start with that.
With our project created, let’s retrieve the Project ID as we’ll need this later on for interacting with various services.
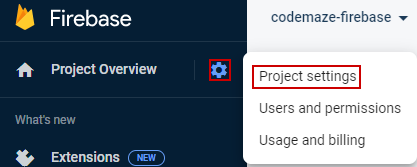
To retrieve this ID, from the project overview, navigate to Project settings:
From here, we’ll see the project details, including the Project ID:
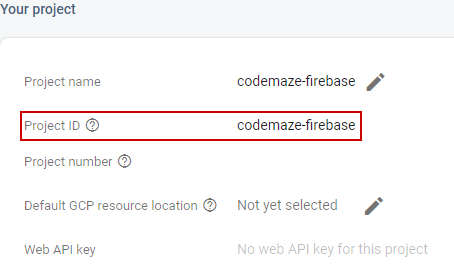
Depending on the name of the project, the ID may be different. Take note of this for use later on.
Authenticate With Firebase
With our new Firebase project created, we need to configure our authentication. Firebase handles authentication with service accounts, which allows us to authenticate with multiple Firebase features programmatically.
Firebase automatically creates a service account for us when we create a project, so to retrieve the credentials, we navigate to Project settings, then Service accounts, and generate a new private key:
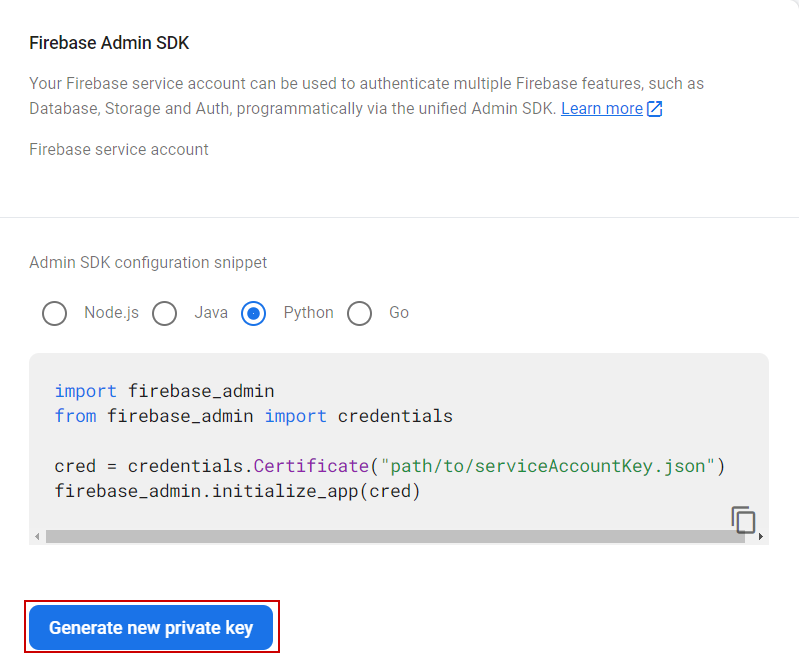
This downloads a JSON configuration file with the required credentials. Keep a record of where this is saved as we’ll use this next.
There are a couple of different methods to authenticate with the service account credentials. The simplest method is to set the GOOGLE_APPLICATION_CREDENTIALS environment variable to the file path for the JSON file we just downloaded.
Let’s do this in our Program class:
var builder = WebApplication.CreateBuilder(args);

Environment.SetEnvironmentVariable("GOOGLE_APPLICATION_CREDENTIALS", @"<PATH_TO_CREDENTIALS_FILE");

var app = builder.Build();
Here, we use the SetEnvironmentVariable() method to set up our authentication. Note that we are using the @ symbol, which allows us to define a verbatim string literal for our file path, avoiding the need for any character escaping.
With our authentication configured, let’s take a look at the first of the Firebase services we’ll cover, Firestore.
Firestore in .NET
Firestore is the newer version of Firebase’s low-latency, real-time databases that allows us to store JSON documents.
First, let’s add the Firestore NuGet packages to our project:
Install-Package Google.Cloud.Firestore
For our project, we’ll create a shoe website, so let’s create a class to model our domain:
public class Shoe
{
    public required string Id { get; set; }

    public required string Name { get; set; }

    public required string Brand { get; set; }

    public decimal Price { get; set; }
}
Firestore is a document database and our entities will be saved as JSON, so let’s create a JSON-friendly version of our Shoe class, that we’ll configure to allow Firestore to work with it:
[FirestoreData]
public class ShoeDocument
{
    [FirestoreDocumentId]
    public string Id { get; set; }

    [FirestoreProperty]
    public required string Name { get; set; }

    [FirestoreProperty]
    public required string Brand { get; set; }

    [FirestoreProperty]
    public required string Price { get; set; }
}
This time, we define the same properties, but decorate them with the FirestoreProperty attribute, letting Firestore know we want to save these properties in the store. We use the FirestoreDocumentId attribute for the Id property, which tells Firestore to populate this property with the document Id.
Furthermore, we decorate the class with the FirestoreData attribute, again letting Firestore know this is a model that will be stored in a database.
Note here that we define the Price property as a string instead of a decimal. This is because Firestore doesn’t support decimals as one of its data types.
Next, let’s create a service for interacting with Firestore:
public class FirestoreService : IFirestoreService
{
    private readonly FirestoreDb _firestoreDb;
    private const string _collectionName = "Shoes";

    public FirestoreService(FirestoreDb firestoreDb)
    {
    	_firestoreDb = firestoreDb;
    }

    public async Task<List<Shoe>> GetAll()
    {
    	var collection = _firestoreDb.Collection(_collectionName);
    	var snapshot = await collection.GetSnapshotAsync();

    	var shoeDocuments = snapshot.Documents.Select(s => s.ConvertTo<ShoeDocument>()).ToList();

    	return shoeDocuments.Select(ConvertDocumentToModel).ToList();
    }

    public async Task AddAsync(Shoe shoe)
    {
        var collection = _firestoreDb.Collection(_collectionName);
        var shoeDocument = ConvertModelToDocument(shoe);

        await collection.AddAsync(shoeDocument);
    }

    private static Shoe ConvertDocumentToModel(ShoeDocument shoeDocument)
    {
        return new Shoe
        {
            Id = shoeDocument.Id,
            Name = shoeDocument.Name,
            Brand = shoeDocument.Brand,
            Price = decimal.Parse(shoeDocument.Price)
        };
    }

    private static ShoeDocument ConvertModelToDocument(Shoe shoe)
    {
        return new ShoeDocument
        {
            Id = shoe.Id,
            Name = shoe.Name,
            Brand = shoe.Brand,
            Price = shoe.Price.ToString()
        };
    }
}
Here, we start by defining our _collectionName and a FirestoreDb field, which we use dependency injection to inject into the constructor.
Next, we define two methods. The GetAll() method retrieves a snapshot of the shoe collection, which we then convert to our ShoeDocument model using the ConvertTo() method. Finally, we use our private ConvertDocumentToModel() method to return a List<Shoe>.
The Add() method uses the ConvertModelToDocument() method so we use the correct model that Firestore expects, finally calling the AddAsync() method to add the new shoe.
Let’s register this service with the DI framework in the Program class:
var builder = WebApplication.CreateBuilder(args);

// code removed for brevity

builder.Services.AddSingleton<IFirestoreService>(s => new FirestoreService(
    FirestoreDb.Create("<PROJECT_ID>")
    ));

var app = builder.Build();
We add the FirestoreService as a singleton, using the Create() method from the FirestoreDb class to create our database. Here, we use the Project ID for our Firebase project we took note of earlier.
Interact With Firestore Model
Now that we’ve configured our FirestoreService and required models, let’s create a few Razor Pages to interact with the database.
First, let’s create a page for displaying all our shoes in Firestore:
@page
@model Firebase.Pages.Firestore.IndexModel
@{
    ViewData["Title"] = "Shoes";
}

<h2>Shoes</h2>
<p><a asp-page="Create">Create New</a></p>
<table class="table">
    <thead>
        <tr>
            <th>
                <label>Id</label>
            </th>
            <th>
                <label>Name</label>
            </th>
            <th>
                <label>Brand</label>
            </th>
            <th>
                <label>Price</label>
            </th>
        </tr>
    </thead>
    <tbody>
        @foreach (var shoe in Model.Shoes)
        {
            <tr>
                <td>
                    <label>@shoe.Id</label>
                </td>
                <td>
                    <label>@shoe.Name</label>
                </td>
                <td>
                    <label>@shoe.Brand</label>
                </td>
                <td>
                    <label>@shoe.Price</label>
                </td>
            </tr>
        }
    </tbody>
</table>
Here, we have a very basic table view of all the shoes in our Firestore database. Let’s retrieve these from the store whenever we navigate to the page:
public class IndexModel : PageModel
{
    private readonly IFirestoreService _firestoreService;

    public List<Shoe>? Shoes;

    public IndexModel(IFirestoreService firestoreService)
    {
        _firestoreService = firestoreService;
    }

    public async Task OnGetAsync()
    {
        Shoes = await _firestoreService.GetAll();
    }
}
In our IndexModel code-behind, we inject our IFirestoreService interface which we use in the OnGetAsync() method to retrieve our list of shoes.
This is great, but we don’t have any shoes yet, so let’s add a page for creating shoes:
@page
@model Firebase.Pages.Firestore.CreateModel
@{
    ViewData["Title"] = "Create Shoe";
}

<h2>Create Shoe</h2>

<div class="row">
    <div class="col-md-4">
        <form method="post">
            <div class="form-group mb-2">
                <label asp-for="@Model.Shoe.Name" class="control-label"></label>
                <input asp-for="@Model.Shoe.Name" class="form-control" />
                <span asp-validation-for="@Model.Shoe.Name" class="text-danger"></span>
            </div>
            <div class="form-group mb-2">
                <label asp-for="@Model.Shoe.Brand" class="control-label"></label>
                <input asp-for="@Model.Shoe.Brand" class="form-control" />
                <span asp-validation-for="@Model.Shoe.Brand" class="text-danger"></span>
            </div>
            <div class="form-group mb-2">
                <label asp-for="@Model.Shoe.Price" class="control-label"></label>
                <div class="input-group">
                    <div class="input-group-prepend">
                        <span class="input-group-text">£</span>
                    </div>
                    <input asp-for="@Model.Shoe.Price" class="form-control" />
                </div>
                <span asp-validation-for="@Model.Shoe.Price" class="text-danger"></span>
            </div>
            <div class="form-group">
                <input type="submit" value="Create" class="btn btn-primary" />
            </div>
        </form>
    </div>
</div>
Here we create a very simple form for creating shoes. In our code-behind, we create the shoe when submitting our form:
public class CreateModel : PageModel
{
    private readonly IFirestoreService _firestoreService;

    [BindProperty]
    public ShoeDto Shoe { get; set; }

    public CreateModel(IFirestoreService firestoreService)
    {
        _firestoreService = firestoreService;
    }

   public async Task<IActionResult> OnPostAsync()
   {
       await _firestoreService.Add(new Shoe
       {
            Name = Shoe.Name,
            Brand = Shoe.Brand,
            Price = Shoe.Price
       });

       return RedirectToPage("Index");
   }
}
In the OnPostAsync() method, we simply call the Add() method of our FirestoreService, and then redirect to the Index page.
We use a DTO as our BindProperty, defining some attributes on the properties:
public class ShoeDto
{
    [Required]
    public required string Name { get; set;}

    [Required]
    public required string Brand { get; set; }

    [Required]
    public required decimal Price { get; set; }
}
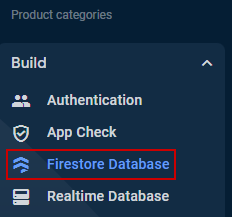
Before we test this out, we need to enable the Firestore API for our project. To do so, let’s navigate to the Firebase console and select the Firestore Database service:
Next, we create a new database:

We’ll choose Start in Test Mode for the rules configuration, and choose a suitable location. Test Mode is fine for our purposes, but in production environments, we’d strongly recommend Production Mode.
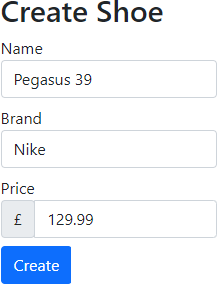
Now we’re ready to add some shoes! Running our application, let’s navigate to /firestore/create and create a new shoe:
This will create a new document in Firestore, and redirect us to /firestore/index to confirm this has been created:

Notice that we have an auto-generated Id for the shoe, which Firestore created for us.
Firebase Cloud Storage
So far we’ve explored the Firestore database service. Now, let’s take a look at another storage service, Firebase Cloud Storage. This allows us to store unstructured blob data, such as images and files. Let’s use it to store images of the shoes we save to Firestore.
We’ll start by adding another NuGet package:
Install-Package Google.Cloud.Storage.V1
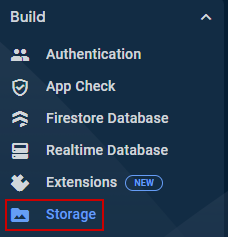
As we did with Firestore, we need to set up Cloud Storage in the Firebase console. Navigate to Storage from the menu:
And click Get Started. Once again, we’ll choose the Start in Test Mode option, and choose a suitable location.
Now it’s time to create a new service to interact with Cloud Storage:
public class FirebaseStorageService : IFirebaseStorageService
{
    private readonly StorageClient _storageClient;
    private const string BucketName = "<BUCKET_NAME>";

    public FirebaseStorageService(StorageClient storageClient)
    {
        _storageClient = storageClient;
    }

    public async Task<Uri> UploadFile(string name, IFormFile file)
    {
        var randomGuid = Guid.NewGuid();

        using var stream = new MemoryStream();
        await file.CopyToAsync(stream);

        var blob = await _storageClient.UploadObjectAsync(BucketName,
            $"{name}-{randomGuid}", file.ContentType, stream);
        var photoUri = new Uri(blob.MediaLink);

        return photoUri;
    }
}
To start, we define some private fields. First, we have an instance of StorageClient which is the class for interacting with Cloud Storage, that we’ll inject into our constructor.
Secondly, we have BucketName which is the default bucket that Cloud Storage creates for us. Buckets are containers for files, which can contain subdirectories. By default, the bucket name is a concatenation of our project name, along with appspot.com, so for example codemaze-firebase.appspot.com.
We define a single method, UploadFile() which takes two parameters, name and file. To avoid naming collisions, we generate a random GUID with the NewGuid() method.
Then, we read our IFormFile content into a MemoryStream with the CopyToAsync() method. Now we can upload the image to our bucket using the UploadObjectAsync() method.
Finally, we want to return the link to our newly uploaded image so we can display it, which we do by using the MediaLink property.
Next, we need to register the service in the Program class:
var builder = WebApplication.CreateBuilder(args);

// code removed for brevity

builder.Services.AddSingleton<IFirebaseStorageService>(s => new FirebaseStorageService(StorageClient.Create()));

// code removed for brevity

var app = builder.Build();
Here, we register a singleton instance of our service, using the Create() method to create a new StorageClient instance.
With the logic for uploading files to Cloud Storage implemented, let’s add the ability to upload photos when creating a new shoe.
Upload Images to Firebase Cloud Storage
First, in our ShoeDto class, we’ll add a new property:
public class ShoeDto
{
    [Required]
    public required string Name { get; set;}

    [Required]
    public required string Brand { get; set; }

    [Required]
    public required decimal Price { get; set; }

    [Required]
    public required IFormFile Image { get; set; }
}
Next, let’s add the functionality to our shoe creation form:
public class CreateModel : PageModel
{
    private readonly IFirestoreService _firestoreService;
    private readonly IFirebaseStorageService _storageService;

    [BindProperty]
    public ShoeDto Shoe { get; set; }

    public CreateModel(IFirestoreService firestoreService, IFirebaseStorageService storageService)
    {
        _firestoreService = firestoreService;
        _storageService = storageService;
    }

    public async Task<IActionResult> OnPostAsync()
    {
        var photoUri = await _storageService.UploadFile(Shoe.Name, Shoe.Image);
        await _firestoreService.Add(new Shoe
        {
            Name = Shoe.Name,
            Brand = Shoe.Brand,
            Price = Shoe.Price,
            ImageUri = photoUri,
        });

        return RedirectToPage("Index");
    }
}
Here, we inject our IFirebaseStorageService interface into our class constructor. In the OnPostAsync() method, we start by calling the UploadFile() method, retrieving the link to our newly created image. We use this when creating our shoes in Firestore.
Also, we need to update our FirestoreService to set and retrieve the ImageUri property from our document:
public class FirestoreService : IFirestoreService
{
    // code removed for brevity

    private static Shoe ConvertDocumentToModel(ShoeDocument shoeDocument)
    {
        return new Shoe
        {
            Id = shoeDocument.Id,
            Name = shoeDocument.Name,
            Brand = shoeDocument.Brand,
            Price = decimal.Parse(shoeDocument.Price),
            ImageUri = new Uri(shoeDocument.ImageUri)
        };
    }

    private static ShoeDocument ConvertModelToDocument(Shoe shoe)
    {
        return new ShoeDocument
        {
            Id = shoe.Id,
            Name = shoe.Name,
            Brand = shoe.Brand,
            Price = shoe.Price.ToString(),
            ImageUri = shoe.ImageUri.ToString()
        };
    }
}
Back on our shoe list page, we can add a new column to display our image:
<td>
    <img src="@shoe.ImageUri" alt="shoe-image">
</td>
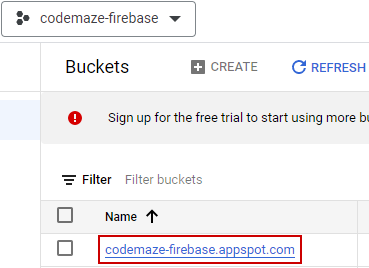
Before testing this out, we need to allow anonymous access to our bucket so unauthenticated users can render our image. To do this, we need to navigate to the Google Cloud Console and locate our bucket:
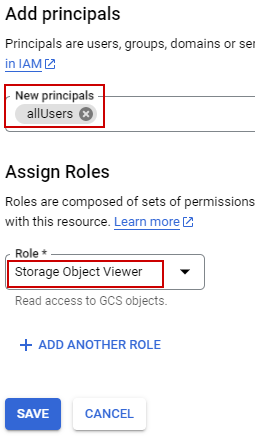
Navigating into our bucket, we navigate to the Permissions tab and click Grant Access:
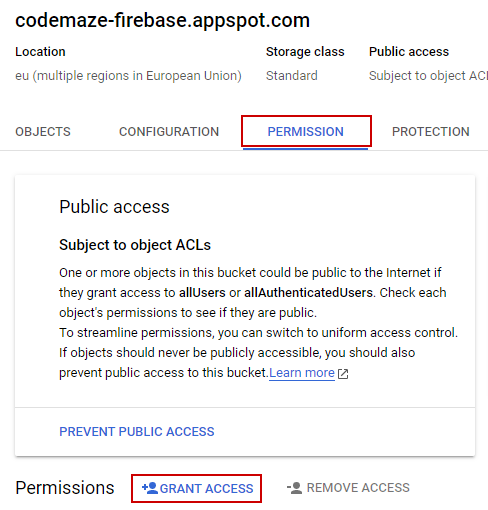
Now, we all the allUsers principal, and assign the Storage Object Viewer role:
Once saved, we can test out our new functionality. Navigating to /firestore/create we have the ability to add a shoe with an image.
When the shoe document is successfully created, we are redirected to the /firestore/index page, where we see our new entry along with a photo, thus demonstrating we’ve successfully saved our image to our Cloud storage bucket, saving the URL to display it in our Firestore document.
Conclusion
In this article, we covered just a few of the many services Firebase offers us. We started by looking at the high-performance NoSQL database, Firestore. Next, we explored another storage option, Cloud Storage, which allows us to store unstructured blob data such as images.
There is much more we can do with Firebase, so let us know in the comments if there’s a specific feature you’d like to see us cover.

