

In this article, we’ll look at a new way of building distributed applications called .NET Aspire.
Let’s dive in, starting with an understanding of what .NET Aspire is!
What Is .NET Aspire?
.NET Aspire presents a cloud-ready framework designed for developing distributed applications. Cloud-native applications typically include small, interconnected components or microservices. They often rely on a multitude of services, including databases, caching, messaging, and so on.
When building such applications, communication between these microservices, scalability, resilience, and monitoring are vital concerns. The .NET Aspire stack is created for the sole purpose of solving all those concerns.
Inter-app communications are solved via Service Discovery. It also provides us with standardized interfaces for commonly used services such as cache and different database providers in the form of different components that are accessible via NuGet packages. We also get project templates and a dashboard where we can monitor our distributed application in great detail.
Project Setup and New Tools
To utilize the features of Aspire, we need to install the .NET Aspire workload. This will install internal dependencies and make available to us other features, such as project templates. We can do this in two different ways – via the Visual Studio installer, where we can locate and install the .NET Aspire SDK (Preview).
We can also do it via the CLI:
dotnet workload install aspire
Here, we install the workload and all of its related features.
dotnet dev-certs https --trust first before you run the application to make HTTPS working locally.Once installed, we have two templates at our disposal – .NET Aspire Application and .NET Aspire Starter Application. For this article, we’ll use the latter and skip the optional Redis cache as part of this for now – we’ll set it up ourselves later. The template creates the well-known weather app and provides us with four projects by default:
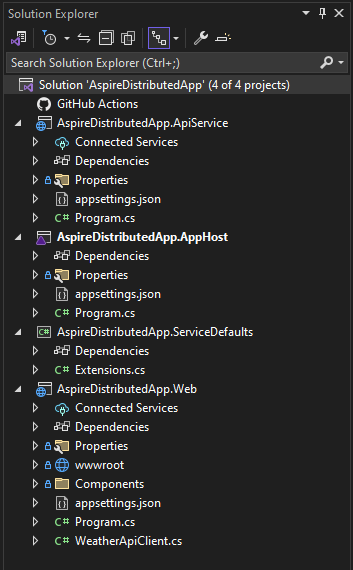
We have an API in the ApiService project which contains our minimal API and a Blazor front-end in the Web project.
The AppHost and ServiceDefaults projects are what bring everything together. The ServiceDefaults project is responsible for configuring resilience, service discovery, and monitoring for all projects in our distributed application. The AppHost project glues everything together and acts as an orchestrator. It is our startup project and it is responsible for running everything inside our app.
Let’s start our project:
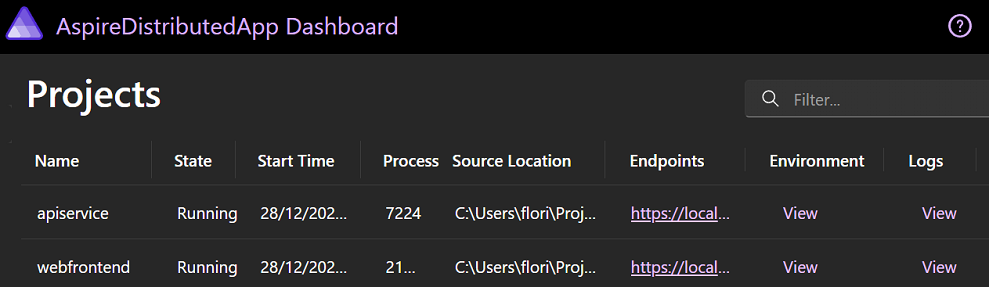
When we do so, the Dashboard page loads by default. On this page, we can see what projects are in our solution alongside their status, location, environmental variables, and endpoints. Moreover, we gain the flexibility of exploring logs and traces for each project. In addition, the dashboard provides a comprehensive set of metrics for our distributed application.
Orchestration With .NET Aspire
As we already know, the AppHost project is responsible for the orchestration inside our app. Let’s see how it works:
var builder = DistributedApplication.CreateBuilder(args);

var apiservice = builder.AddProject<Projects.AspireDistributedApp_ApiService>("apiservice");

builder.AddProject<Projects.AspireDistributedApp_Web>("webfrontend")
    .WithReference(apiservice);

builder.Build().Run();
Everything happens in the Program.cs file. First, we create a DistributedApplication builder using the CreateBuilder() method. Then we add our two projects using the AddProject() method and passing the desired project name as a string.
Currently, our API doesn’t need to know about any other project so its setup only relies on the AddProject() method. However, our front-end strictly relies on the API to get its data, so after adding it to our builder instance we also use the WithReference() method to register the API. Finally, we use the Build() and Run() methods to build and run our distributed app.
Next, let’s take a look at the service configuration.
Global Service Configurations
The ServiceDefaults project takes care of all of our global configurations:
public static IHostApplicationBuilder AddServiceDefaults(this IHostApplicationBuilder builder)
{
    builder.ConfigureOpenTelemetry();

    builder.AddDefaultHealthChecks();

    builder.Services.AddServiceDiscovery();

    builder.Services.ConfigureHttpClientDefaults(http =>
    {
        http.AddStandardResilienceHandler();

        http.UseServiceDiscovery();
    });

    return builder;
}
Everything happens in the AddServiceDefaults() extension method on IHostApplicationBuilder in the Extensions class. Here, we add and configure various services to our builder instance. To begin, we start with the ConfigureOpenTelemetry() and AddDefaultHealthChecks() methods that are defined in the same class.
Following these initial steps, we proceed to enhance our IServiceCollection collection by incorporating Service Discovery using the AddServiceDiscovery() method. It’s vital to add the UseServiceDiscovery() to our HTTP client for Service Discovery to work. Additionally, we enable resilience by default for our HTTP client with the AddStandardResilienceHandler() method.
Having covered these essential configurations, there’s one more global configuration method to address:
public static WebApplication MapDefaultEndpoints(this WebApplication app)
{
    app.MapHealthChecks("/health");

    app.MapHealthChecks("/alive", new HealthCheckOptions
    {
        Predicate = r => r.Tags.Contains("live")
    });

    return app;
}
The MapDefaultEndpoints() extension method on the WebApplication class adds a health check endpoint for the different projects in our solution. All health checks must pass to be considered a healthy service to accept traffic. Additionally, we use health checks tagged with the live tag so that our service is considered alive. Here, we can additionally configure any other default endpoints that we desire our projects to have.
.NET Aspire Components
.NET Aspire components include various NuGet packages, chosen to streamline the seamless integration of distributed applications with well-known services and platforms. The NuGet packages extend to well-known services like Redis cache, several database providers, and various Azure services. Each component is designed to deliver vital cloud-native functionalities, achieved through either automated provisioning or adherence to standardized configuration patterns.
Adding a Redis Output Cache Component
Let’s use components to add cache to our application:
var builder = DistributedApplication.CreateBuilder(args);

var apiservice = builder.AddProject<Projects.AspireDistributedApp_ApiService>("apiservice");

var redisCache = builder.AddRedisContainer("cache");

builder.AddProject<Projects.AspireDistributedApp_Web>("webfrontend")
    .WithReference(apiservice)
    .WithReference(redisCache);

builder.Build().Run();
In the AppHost‘s Program class, we use the AddRedisContainer() method passing the name of “cache” to register a Redis container. The next step is to add it as a reference to our front-end project. Note, that Docker will be required for .NET Aspire to be able to run the cache container.
Next, we add a NuGet package to our Web project:
dotnet add package Aspire.StackExchange.Redis.OutputCaching --prerelease
This will add a Microsoft-maintained output caching for Redis to our project. We use --prerelease as everything related to .NET Aspire is still in preview.
After that, we move to configure it:
builder.AddRedisOutputCache("cache");
The first thing we do is use the AddRedisOutputCache() method on our WebApplicationBuilder instance, passing the name defined in the AppHost project.
Then, we need to tell our application to use it:
app.UseOutputCache();
We use the UseOutputCache() method on our app instance. With this, we have successfully added and configured the Redis output caching to our application.
There is one final thing we need to do:
@attribute [OutputCache(Duration = 10)]
In our Weather.razor file we add one attribute called OutputCache. We also set the duration to 10 seconds. With this, every call to our API will be cached for 10 seconds.
Checking Requests to the Redis Component
We can now run our application and go to the weather page:
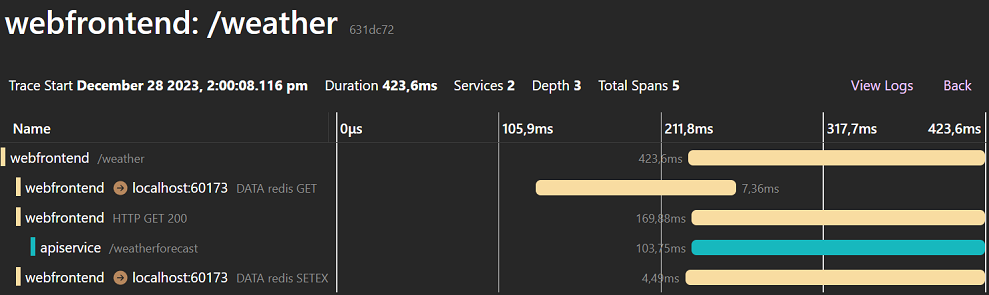
After our page loads, we check the traces to see what happens during our request. We can see that our app makes a GET request to Redis that returns no data, so we call our API to get the weather info. The last thing that happens during our request is for our data to be written to the cache using a SETX request.
We quickly refresh the page before 10 seconds elapse and recheck the telemetry:
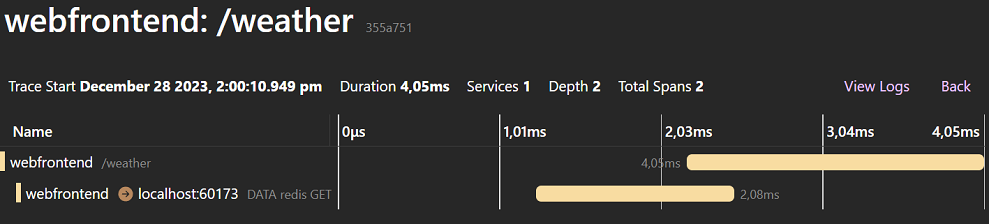
Again, we do a GET request to Redis, but this time our weather data is already in the cache so we just return it to the UI without calling the API.
Conclusion
In this article we provided a comprehensive exploration of the innovative .NET Aspire framework, unveiling its capabilities in simplifying the development of distributed applications. From its cloud-ready architecture catering to microservices to the seamless integration of essential components and services, the framework addresses critical concerns of communication, scalability, resilience, and monitoring.
.NET Aspire stands out by simplifying maintenance and deployment even for large systems, allowing effortless deployment for all apps in a solution. Furthermore, it can serve as a stepping stone for migrating applications from monolithic to microservices architecture, addressing the complexities associated with the move.
