

In this article, we are going to talk about one simple way to deploy an ASP.NET Core Web API app to a Kubernetes Cluster on Azure. This is by no means a beginner article, so some knowledge is required to be able to follow along.
In order to be able to understand the article you need at least some knowledge in:
- ASP.NET Core (Web API) on which we have excellent material on
- Docker and it’s .NET Core applications containerization
- Intermediate C# knowledge
- Basic Kubernetes familiarity
As you can see, the list of technologies is not small, and the threshold is high, but we’re writing this guide in order to show you that .NET Core apps can be easily deployed and connected to modern technologies such as Docker and Kubernetes. Take note that this approach is cross-platform, and you can do it on any OS of your choice.
We won’t go into the details of either Docker or Kubernetes since we’ll assume you have a good understanding of those technologies. We’ll also use a pre-prepared application, but if you want to see an entire process of how you can do it, the best way is to visit our Docker Series.
The Big Picture and the Tools of Trade
So why are we doing this?
First off, we want to show that .NET Core has fully matured into a sophisticated and reliable framework that can easily be used on any platform.
The other thing is that we want to bring technologies like Docker and Kubernetes to developers. There is still some resistance towards these technologies, that stems either from their fear of complexity or unfamiliarity.
We will show you that the process, although scary at first, is not that scary once you get it going.
To do that, we’ll use a tool called Codefresh, which is one of the first CI/CD tools that adopted containers and has native support for Kubernetes and Helm. It’s suited both for small businesses and enterprises alike since it’s scalable, so this makes it a perfect candidate for this guide. Codefresh has been in our Top 8 Continuous Integration tools article for a while now.
As with any other technology, both Kubernetes and Docker are not needed for everything. Kubernetes even more so. If you use them without a real need, you can introduce problems and overhead into your otherwise simple process. Kubernetes is a really robust, (read: complex), technology that requires containers and it’s used when we want to create something crazily scalable. If scalability is not what you need in the first place, you probably don’t need Kubernetes.
If you do, well, read on. 🙂
Without further ado, let’s start with the fun part.
Example Project
Complete source code for the application that we’ll be using throughout the article can be found on this GitHub repo. We recommend forking the repo before you try following this article.
For this guide, we’re going to use an ASP.NET Core Web API app that we’ve configured in our Docker Series.
In short, it’s a simple Web API project that relies on the MySQL database and has an init.sql script to populate it with some seed data. It contains both a Dockerfile that can be run to build it and a docker-compose.yml that can be used to run both the database and the project and connect them with one command. All the details on how to run it and configure it can be found in the Docker series.
Here is how our Dockerfile looks:
FROM mcr.microsoft.com/dotnet/core/sdk:3.1

WORKDIR /home/app

COPY ./*.sln ./
COPY ./*/*.csproj ./
RUN for file in $(ls *.csproj); do mkdir -p ./${file%.*}/ && mv $file ./${file%.*}/; done

RUN dotnet restore

COPY . .

RUN dotnet publish ./AccountOwnerServer/AccountOwnerServer.csproj -o /publish/

FROM mcr.microsoft.com/dotnet/core/aspnet:3.1

WORKDIR /publish

COPY --from=build-image /publish .

ENV ASPNETCORE_URLS="http://0.0.0.0:5000"

ENTRYPOINT ["dotnet", "AccountOwnerServer.dll"]
It’s neat and simple, builds the project using the SDK, and then publishes it into the runtime container.
That said, we won’t be needing the docker-compose file because Codefresh has its own mechanism of running composite projects such as this one. It’s called “compositions” (and services which is a similar concept), and we’ll see how to utilize it while running our integration tests.
Connecting GitHub to Codefresh
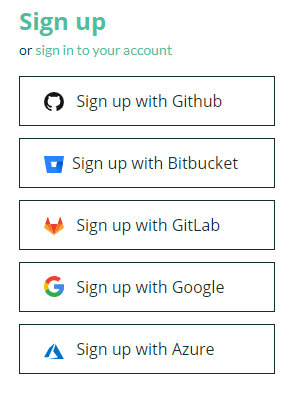
Before doing anything else, you need to sign up with Codefresh. You can use whichever method you want, but we’ll be using the GitHub one since our projects are on GitHub, and we can easily connect them with Codefresh.
If you connect with other providers such as one from this list, you can manually connect to your GitHub by going to Account Settings => Integration => Git => add git provider and signing in to your GitHub account. Give the application the required permissions, fill in your account details and you are on your way. If you get stuck, you can find more on this process here.
One more thing we need to do before we start building our pipeline is to create a Project. Projects in Codefresh are just grouping components. You can put as many pipelines in your projects as you wish. They have no other purpose than that.
So let’s go to the Project tab, click the “New Project” button and give it a name, tags and icon you wish and that’s pretty much it. We’ll call our project CodefreshDemoDotNet.
We can go on ahead and create our first pipeline.
Configuring the Pipeline
Now that we set everything up properly, we can start some real work.
Navigate to the Pipelines tab, and click the “New Pipeline” button. You’ll be prompted with a window in which you need to fill in some details:
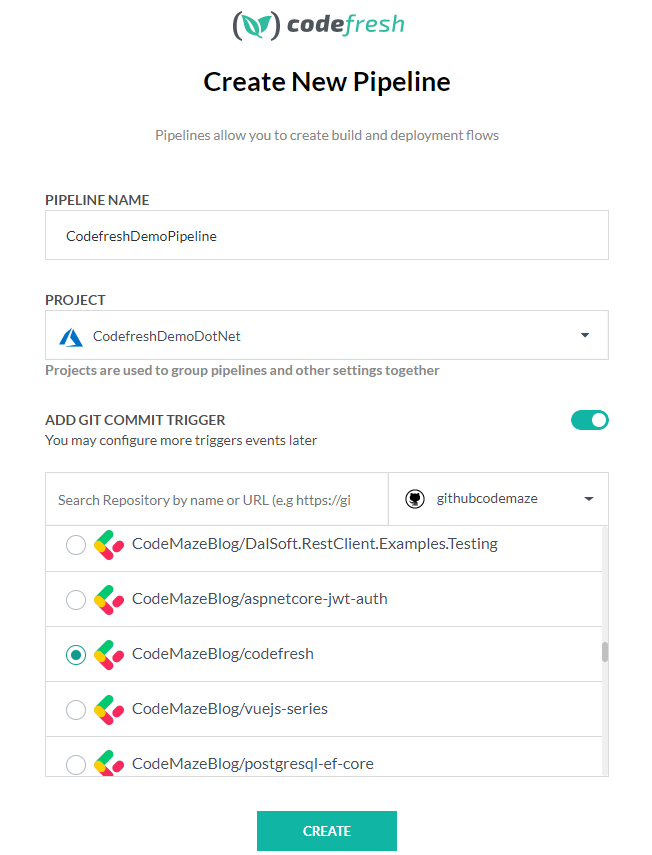
We’ll call it “CodefreshDemoPipeline”, select the project we’ve just created a few moments ago, select our GitHub account we’ve integrated previously, and check the project that we want to build (this one). If you want to use our exact project, you can fork it to your account, or you can create a new repository and upload the project.
Forking seems like an easier choice though. If you don’t see it on the list after you fork it, try refreshing the page.
Once the pipeline is created, you’ll be redirected to the pipeline configuration page, or rather the Pipeline Workflow page, which is practically a YAML file. This YAML file consists of two major parts: stages and steps. The current default configuration has three stages:
stages:
  - "clone"
  - "build"
  - "test"
And it has four steps separated into three of the four stages we have – clone, build, approval_for_push, and parallel push:
steps:
  clone:
    title: "Cloning repository"
    type: "git-clone"
    repo: "CodeMazeBlog/codefresh"
    # CF_BRANCH value is auto set when pipeline is triggered
    # Learn more at codefresh.io/docs/docs/codefresh-yaml/variables/
    revision: "${{CF_BRANCH}}"
    stage: "clone"

  build:
    title: "Building Docker image"
    type: "build"
    image_name: "CodeMazeBlog/codefresh"
    working_directory: "${{clone}}"
    tag: "${{CF_BRANCH_TAG_NORMALIZED}}"
    dockerfile: "Dockerfile"
    stage: "build"

  test:
    title: "Running test"
    type: "freestyle" # Run any command
    image: "mcr.microsoft.com/dotnet/core/sdk:3.1" # The image in which command will be executed
    working_directory: './codefresh/Tests/' # Running command where code cloned
    commands:
    - dotnet test
    stage: "test"
Let’s change the test step slightly before we run it. Our unit tests are located in the Tests folder, so we need to change the workdir_directory, and then run the dotnet test command. We’ll be using the .NET 3.1 SDK image to do this.
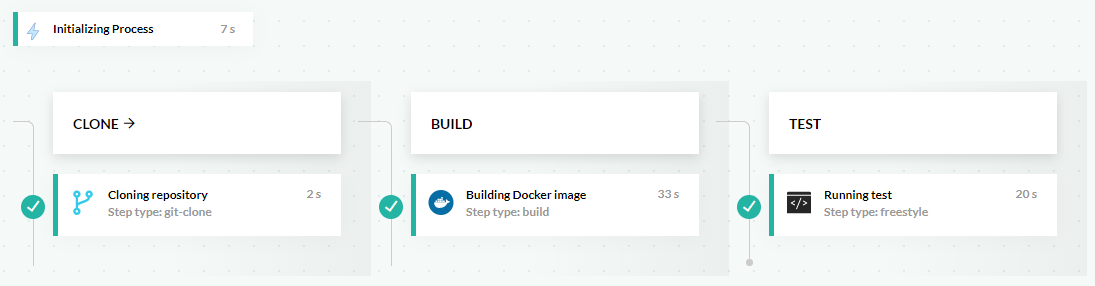
Sure enough, our build is successful.
The most important and amazing thing is that Codefresh automatically detected our Dockerfile and successfully built our image.
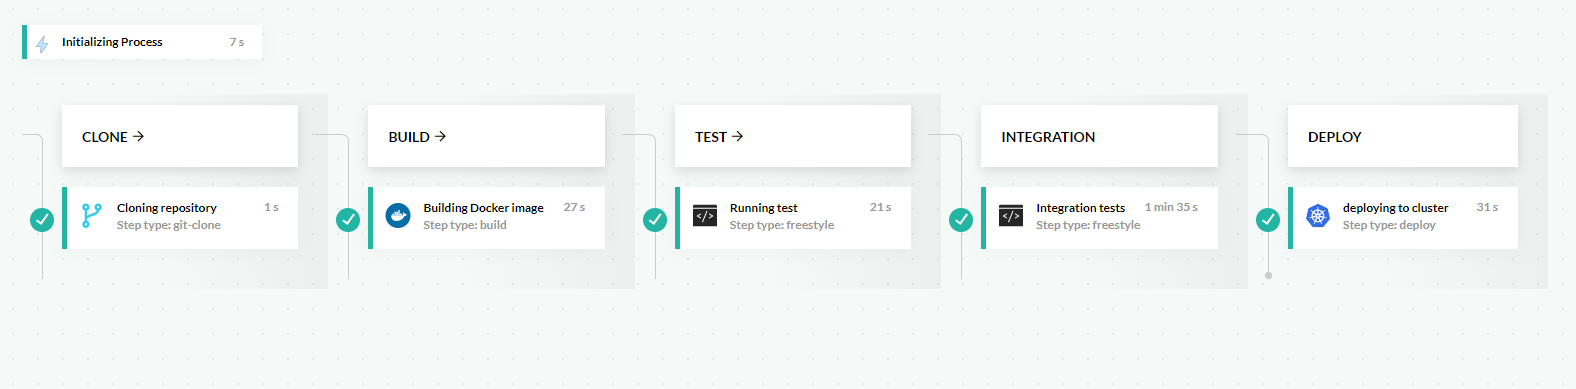
We can clearly see the three different stages of the pipeline now.
By the end of this tutorial, we’ll have: clone, test, build, integration, push, and deploy stages.
Also if we inspect the output of the test step, we should see something like this:
Test Run Successful.
Total tests: 1
Passed: 1
Total time: 1.9927 Seconds
Successfully ran freestyle step: Unit tests
Great!
Before we move on to integration tests, let’s learn how to add a Docker Hub as our default registry provider since it’s one of the most commonly used registry providers out there.
Adding a Docker Hub Registry
Since Docker Hub is a popular registry provider, we’re going to add the integration with it to our account, and then use it to push our image to it in our pipeline.
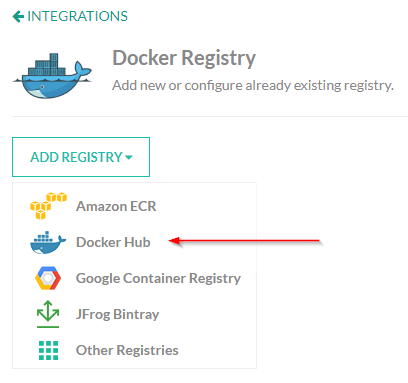
First, let’s go to the Account Settings again, then Integrations and then Docker Registries.
From the dropdown, select the Docker Hub:
And then simply fill in the Docker Registry details. Click test to validate the connection, and if the validation passes, click save to persist the configuration. You can also choose to set the Docker Hub registry as the default one for your account, but that’s optional.
Adding Integration Tests
Now, this step is a bit harder to pull off and more expensive resource-wise and much slower than the unit test phase. Nevertheless, it’s just as important, if not even more.
To be able to run integration tests, we need to have both the database and the application running.
Luckily for us, this is really easy with Docker, and Codefresh offers its own mechanisms to ease that pain.
So what we want is to run these two tests:
[Fact]
public async Task GetAllOwners_ReturnsOkResponse()
{
	// Act
	var response = await _context.Client.GetAsync("/api/owner");
	response.EnsureSuccessStatusCode();

	// Assert
	Assert.Equal(HttpStatusCode.OK, response.StatusCode);
}

[Fact]
public async Task GetAllOwners_ReturnsAListOfOwners()
{
	// Act
	var response = await _context.Client.GetAsync("/api/owner");
	response.EnsureSuccessStatusCode();
	var responseString = await response.Content.ReadAsStringAsync();
	var owners = JsonConvert.DeserializeObject<List<OwnerDto>>(responseString);

	// Assert
	Assert.NotEmpty(owners);
}
We check if the /api/owner endpoint is available and returns 200 OK in the first test, and we check if it actually returns some data in the second one.
In order for these tests to be successful we need to:
- Run the application
- Bring the database up
- Insert some seed data into the database
- Run the tests
So how do we do that with Codefresh?
Enter Service Containers
So what we need to achieve is a capability called “Service Container” or rather containers that run independently from our build pipeline. These can be databases, other applications or whatever you need to run in order to help you do integration testing.
Services can be defined at the root of the pipeline, and in that case, they run for the duration of the pipeline. That means we can do something like this:
version: "1.0"
services:
  name: my_database
  composition:
    mysql-db-host:
      image: mysql:5.7
      ports:
        - 3306
steps:
  my_integration_tests:
    image: my-app-image
    title: Running integration tests
    commands:
      - dotnet test
    services:
      - my_database
And the database will remain active during the whole process.
This is fine, but if your pipelines are more complex, you don’t want to clog them with a crazy amount of services, especially because you have a limited amount of resources available (memory is the biggest concern).
That’s why we want to use them and then dispose of them just for the step we need them. And that’s our integration tests step.
So let’s see how it’s done.
First, let’s add the “integration” stage to our existing stages:
stages:
  - "clone"
  - "test"
  - "build"
  - "integration"
We’re going to add a step just after the build step, so we can use the fresh build image, and set the stage to “integration”:
run_integration_tests:
    title: Integration tests
    stage: integration
    image: mcr.microsoft.com/dotnet/core/sdk:3.1
    working_directory: './codefresh/Integration/'
    services:
      composition:
        db:
          image: mysql:5.7
          ports:
            - 3306
          environment:
            MYSQL_RANDOM_ROOT_PASSWORD: 1
            MYSQL_DATABASE: accountowner
            MYSQL_USER: dbuser
            MYSQL_PASSWORD: dbuserpassword
        api:
          image: '${{build}}'
          ports:
            - 5000
      readiness:
        timeoutSeconds: 30
        periodSeconds: 15
        image: 'tutum/dnsutils'
        commands:
          - "nslookup db"
          - "nc -z db 3306"
      setup:
        image: mysql:5.7
        commands:
          - "mysql -h db -u dbuser --password=dbuserpassword accountowner < ./codefresh/_MySQL_Init_Script/init.sql"
    commands:
      - dotnet test
So let’s take a closer look at the services section of the configuration.
The services section consists of three parts:
- Composition – in this section we are actually defining which service containers will be run once the pipeline starts and before the command is run
- Readiness – this section is used to ensure our services are actually available before we run our commands. Imagine if the database is not up yet and we run the
dotnet testcommand. To prevent this we are using thenslookuptool to query our database and check if it’s up. We are looking for the host with the name “db” and port “3306”. There are plenty of other ways to go about this, but this is the one we’ve chosen.periodSecondsis used to define how often we are doing the probe, andtimeoutSecondsis how long it takes before we timeout the command. Both are 10 seconds by default. Besides that there aresuccessThresholdandfailureThresholdoptions that define how many times we do the probe before it is considered to be successful or unsuccessful. In our case, we are just checking for the database, since we know the application takes less time to run, but it would be a good practice to check all the services before running our command. - Setup – in this section, we can do whatever we need to prepare our containers. In order to run our tests, we need some data, so we use it to insert some seed data from our script into the MySQL database
And sure enough, if we run the pipeline now, we’ll see the “integration” stage with the run_integration_tests step, and if everything goes well, our tests are going to be run:
A total of 1 test files matched the specified pattern.
Test Run Successful.
Total tests: 2
Passed: 2
Total time: 14.9505 Seconds
Successfully ran freestyle step: Integration tests
But now if you take a closer look at the pipeline result, you’ll see the services tab at the bottom when you click on the Integration tests step:
![]()
Inside it, you’ll see something similar to what you would if you’d run docker-compose on the images defined in the composition section of the services. You’ll also see our setup command and readiness probe firing to make sure the database is up.
Phenomenal stuff. It makes our lives that much easier.
You can play around a bit, and fail a test on purpose to see what happens.
Great, now that we’ve figured this out, we can proceed to the next phase.
Creating a Kubernetes Cluster on Azure
We’re going to assume you already have a Kubernetes cluster running because most of the companies already provide that, but if you are new to Kubernetes and Azure Kubernetes Service, here are some great starting points.
You can set the cluster up easily using the CLI or through the Portal. We are going to call our cluster “CodefreshCluster”, but you can call yours however you like.
Once you’ve set the Cluster up, we can go on and connect it with Codefresh.
Connecting the Cluster to Codefresh
To connect your cluster to the Codefresh panel, you need to go to Account Settings => Integrations and then click on the Configure button in the Kubernetes section.
You’ll see multiple providers, and Azure AKS is one of them. To be able to integrate your cluster using that option you’ll need an organizational/company Azure account. In that case, you can add your cluster with the native Azure integration:
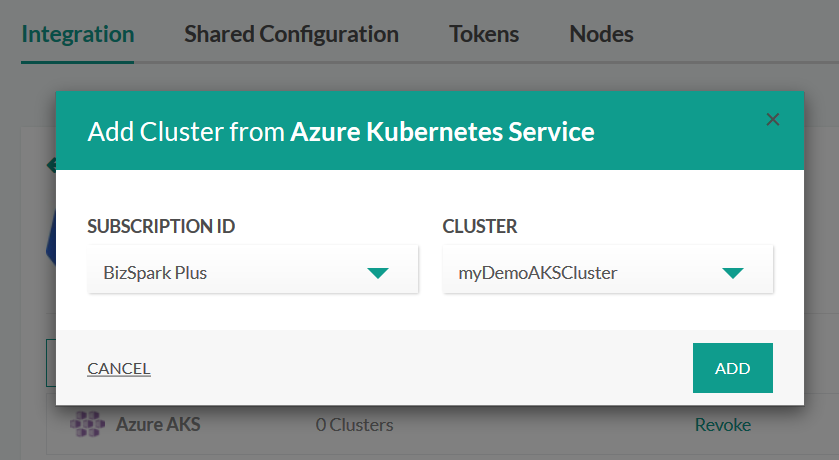
If you work at a company that uses Azure, you probably have one, but if you don’t here’s how to do it anyways.
If you click on the dropdown again, you’ll see one of the options is a “Custom Providers” integration.
That’s exactly what we need. Once you click on the add provider, you’ll see something like this:

So what we need for this integration to happen is a Name, Host, Certificate and Token information. But how do we get it?
You can follow the link just above to learn essentially how to get the required information. It’s just a few commands you need to copy and paste into your Azure CLI if you want to test it out, but if you want to do it securely for a production environment you’ll need role + service account + binding. Either way, the documentation is really good, and you shouldn’t have any trouble connecting the Cluster to Codefresh.
Once you’ve filled in your data you can proceed to the Kubernetes tab, where you’ll see your cluster.
It looks like this:
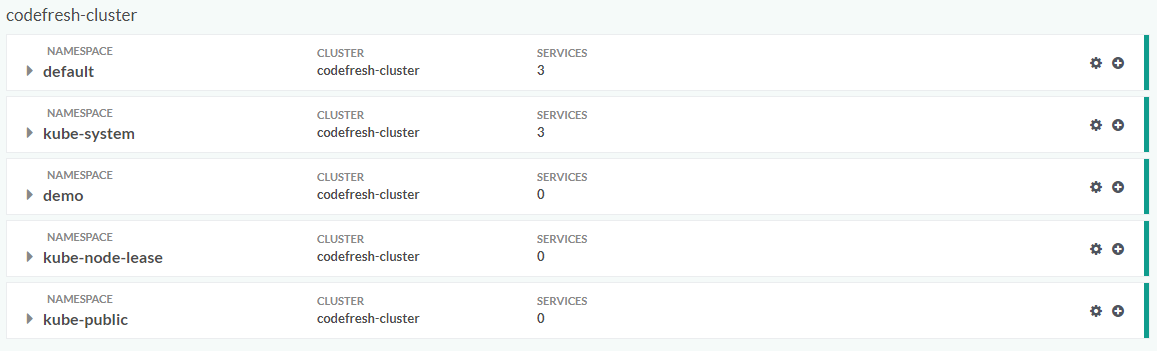
Now as you can see, there is a possibility to create as many namespaces as you need, but for the purposes of this tutorial, we are going to use the default namespace to create our Kubernetes services.
We need two separate services for our images.
Deploying to Kubernetes and Generating our Kubernetes Manifests
If you already have your manifest files, you can use them, but if you are organizing your Cluster from scratch, Codefresh provides an easy mechanism to do that.
By adding a service Codefresh is actually generating a manifest from a public Docker image it provides.
The preferred way would be to use your own manifest files, but here’s how to do it through the Codefresh interface.
Let’s create a MySQL database service first.
Database Service
To create a database service, click to “Add a Service” button and fill in the data like this:
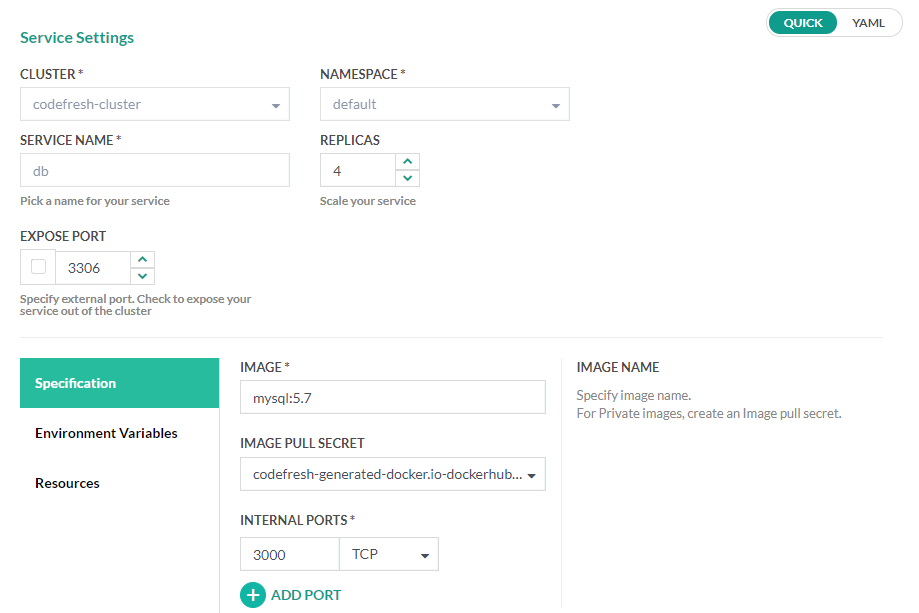
Things to note here:
- Our service is called “db”. This is important because our connection string needs to hit a host with the name “db”.
- We don’t need to expose our port since our application alone will be communicating with the database.
- We’ll create 1 replica of the database for the simplicity of the example.
If you remember, the MySQL image requires some environment variables to be able to set up the database initially, so let’s fill in those too:
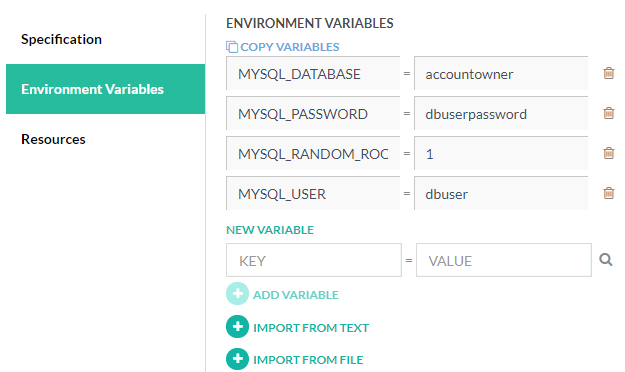
And if everything went as planned, your database replicas should be running now.
Application Service
Creating the application service is pretty much the same as with our database:
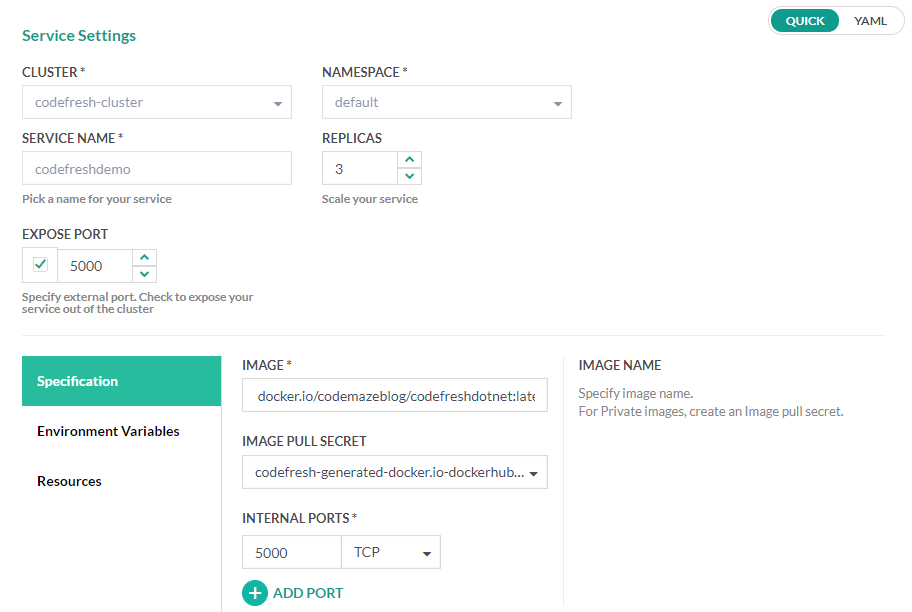
This time we want to expose our port so that Codefresh assigns a public IP address to our application. We create 3 replicas this time and choose the API image we’ve built, but this time from the Docker Hub just for fun.
That’s it, once you hit deploy, both our deployments will be on AKS and we’ll be able to navigate to the public IP assigned to our application. You can find the IP address in the endpoints section of your service on the Kubernetes dashboard.
You can also choose to finetune your services, by switching to YAML instead of Quick, which is something you’ll probably want to do.
Now there is one more thing we should do to complete the cycle.
Adding a Deploy Step to the Pipeline
Once the services are up and running, deploying our container to the Kubernetes is a breeze.
To configure automatic deployment, we need to add a deploy stage to our pipeline YAML first:
stages:
  - "clone"
  - "test"
  - "build"
  - "integration"
  - "deploy"
And then add the step itself:
deploy:
    title: Deploying to cluster
    type: deploy
    image: '${{build}}'
    stage: "deploy"
    arguments:
      kind: kubernetes
      cluster: codefresh-cluster
      namespace: default
      service: codefreshdotnet
And that’s about it.
We can potentially improve our pipeline with a “pending-approval” step which we can insert before the deployment stage. This step allows us to manually choose which build we want to deploy to the Cluster.
Debugging a Pipeline
Now, if you’ve done your share of pipeline configurations, either in Codefresh or any other CI tool, you know how tedious the process can be sometimes. The Codefresh team is obviously aware of this so they introduced a new feature which is something we haven’t seen anywhere else and that’s live debugging of your pipelines.
Debugging the pipelines? “WTH are you talking about?”
With live debugging you can pause your pipeline execution at the predefined points and enter the shell to find out whatever is happening at that exact moment of pipeline execution. Debug mode is a paid feature, but if you have some serious configuring to perform, it pays off easily. Here is how to use it.
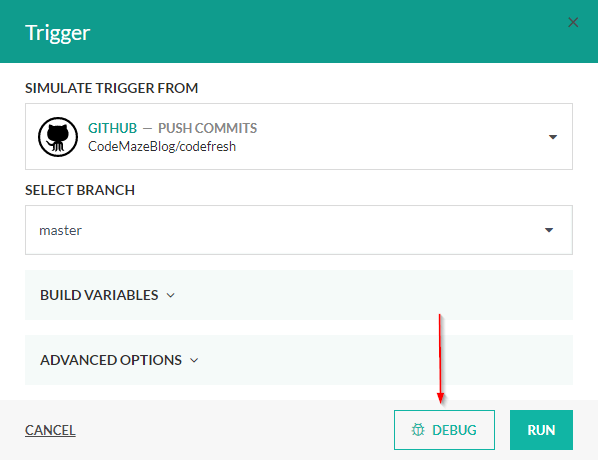
To enter the Debug Mode, you need to click on the Debug button instead of Run to start the pipeline, something like you would in your IDE:
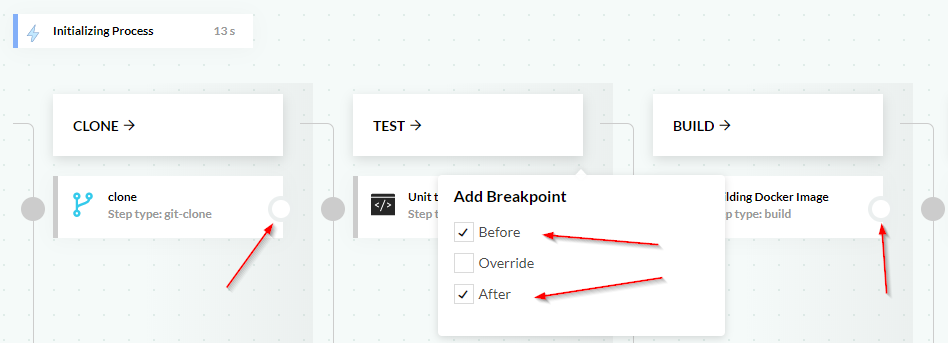
Now you’ll see some changes in your pipeline screen. A new dot appears to the right of each step, and you can click it to decide where you want to put the breakpoint.
Isn’t that cool?
Isn’t that cool?
Now you can play around in the terminal, check the environment variables with printenv, check the processes with top, read a file with cat, or whatever else you need. If you use the Override breakpoint, you can even use the commands from the initialized container at that point in pipeline execution.
So for example, you can run the dotnet command in the Unit Tests step since .NET SDK is initialized at that point.
See how powerful that can be? Sky’s the limit.
To learn more about this feature you can read about it in the official documentation.
Conclusion
This was a pretty long article about the whole Continuous Delivery cycle, and while it might be scary at first, it’s not something that should discourage you from implementing it since it becomes progressively easy the more you do it.
Adding a great tool like Codefresh on top of that is what makes this process enjoyable.
As you might have noticed we’ve cut corners on many steps throughout the article to keep it relatively short. We can improve this process by using multiple environments, environment variables, and Codefresh offers much more in terms of monitoring your clusters and services.
We’ve given you some basic insight into the process, now it’s your turn to play around and customize your pipelines.
