

In this article, we’ll explore how to use the Testcontainers library for testing .NET applications using Docker.
Let’s get started!
Understanding Testcontainers
Testcontainers is an open-source library that provides a simple and efficient way to manage containers for testing purposes. It does this by utilizing Docker containers across all compatible versions of .NET.
Heavily based on the .NET Docker remote API, this library offers a streamlined implementation, enabling an elegant and adaptable testing environment under any scenario. With it, we can configure, create and delete Docker resources. It prepares and initializes our tests and disposes of everything after they are finished. To be able to use Testcontainers in our tests, we need to have Docker installed.
Setting Up the Environment For Testing
There are a couple of things we need before we can start testing:
Creating a .NET Project for Testing
First, we need a project to test. For this article, we will use a simple CRUD API that deals with cats:
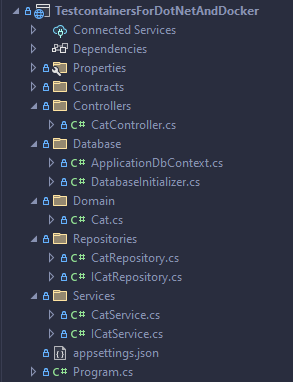
We have a single Cat entity with some basic properties. We also have a DbContext with one DbSet<T> representing our cats which is implemented by the ApplicationDbContext class. Right next to it, we can find the CatRepository and CatService implementing the CRUD functionality.
Next, we can find the CatController which hosts our user interactions. It has five endpoints for creating, retrieving, updating, and deleting cats from our database. We also inject an instance of our ICatService implementation and use it as a mediator between the controller and the database.
All files mentioned here are part of the GitHub repository for this article.
After this, we can create our test project and proceed with the installation of Testcontainers.
Installing Testcontainers
Next, we need to install two NuGet packages – the main Testcontainers package and one dedicated to an extension for Microsoft SQL Server container:
dotnet add package Testcontainers
dotnet add package Testcontainers.MsSql
Once this is done, we can start utilizing it in our tests.
Writing Tests With Testcontainers
Before we can use our test containers, we need to set some things up:
public class CatsApiApplicationFactory : WebApplicationFactory<Program>
{
    private const string Database = "master";
    private const string Username = "sa";
    private const string Password = "yourStrong(!)Password";
    private const ushort MsSqlPort = 1433;

    private readonly IContainer _mssqlContainer;
}
First, we create a CatsApiApplicationFactory class that implements the WebApplicationFactory<T> class where T is our Program class. The WebApplicationFactory<T> provides us with functionality for running an application in memory for various testing purposes.
We declare several constants that we will later use for the container’s configuration and the database connection string, as well as an instance of IContainer called _mssqlContainer.
Configuring Default Test Containers
Next, in the same class, we create a constructor for our CatsApiApplicationFactory class:
public CatsApiApplicationFactory()
{
    _mssqlContainer = new MsSqlBuilder().Build();
}
Here, we create a new instance on the MsSqlBuilder class and invoke its Build() method. This will create a default MSSQL Docker container for us.
The database name, username, password, and port will be the default ones for the Microsoft SQL Server and the same as the constants we defined earlier. The pre-defined image is mcr.microsoft.com/mssql/server:2019-CU18-ubuntu-20.04. This approach comes in handy when we just need a SQL Server container and are not interested in the details of setting it up further.
Similar additional NuGet packages offer support for default containers for MySQL, PostgreSQL, MongoDB, Redis, and many others, which you can find in the GitHub repository from Testcontainers.
Configuring Custom Test Containers
If we want more control, we can define a custom container:
public CatsApiApplicationFactory()
{
    _mssqlContainer = new ContainerBuilder()
        .WithImage("mcr.microsoft.com/mssql/server:2022-latest")
        .WithPortBinding(MsSqlPort)
        .WithEnvironment("ACCEPT_EULA", "Y")
        .WithEnvironment("SQLCMDUSER", Username)
        .WithEnvironment("SQLCMDPASSWORD", Password)
        .WithEnvironment("MSSQL_SA_PASSWORD", Password)
        .Build();
}
In the constructor, we instantiate our _mssqlContainer member variable. We achieve that by using the Testcontainers’ ContainerBuilder class and its provided functionality to build container definitions.
We start by using the WithImage() method to specify which Docker image we want to use, opting for the latest version of the Microsoft SQL Server 2022.
Then, we move on to the WithPortBinding() method, passing the MsSqlPort constant to specify which port to use. This will do a one-to-one port mapping from host to container.
Then we chain several instances of the WithEnvironment() method to set environment variables on the container. Those variables correspond to important properties such as SQL Server username and password. We finish things off with the Build() method which builds an instance of the IContainer interface with all of our custom settings.
Overriding the Database Configuration
Then, we override the ConfigureWebHost() method:
protected override void ConfigureWebHost(IWebHostBuilder builder)
{
    var host = _mssqlContainer.Hostname;
    var port = _mssqlContainer.GetMappedPublicPort(MsSqlPort);

    builder.ConfigureServices(services =>
    {
        services.RemoveAll(typeof(DbContextOptions<ApplicationDbContext>));

        services.AddDbContext<ApplicationDbContext>(options =>
            options.UseSqlServer(
                $"Server={host},{port};Database={Database};User Id={Username};Password={Password};TrustServerCertificate=True"));
    });
}
The first thing we do is extract the host and port of the container.
Then, in the ConfigureServices() method we first remove all services of type DbContextOptions<ApplicationDbContext> to make sure we clear all database configurations. Then we add our ApplicationDbContext again using the AddDbContext() method and passing a connection string pointing to our container.
Starting and Stopping Containers
Finally, let’s add a way to start our container before each test and stop it afterward:
public class CatsApiApplicationFactory: WebApplicationFactory<Program>, IAsyncLifetime
{
    public async Task InitializeAsync()
    {
        await _mssqlContainer.StartAsync();
    }

    public new async Task DisposeAsync()
    {
        await _mssqlContainer.DisposeAsync();
    }
}
We implement the xUnit’s interface IAsyncLifetime and define its methods to achieve this. In the InitializeAsync() method we the StartAsync() method to start our container. In the DisposeAsync() method, we dispose of our container using the identically named disposing method.
Now we can easily write our tests:
public class CreateCatEndpointTests : IClassFixture<CatsApiApplicationFactory>
{
    private readonly HttpClient _httpClient;

    public CreateCatEndpointTests(CatsApiApplicationFactory catsApiApplicationFactory)
    {
        _httpClient = catsApiApplicationFactory.CreateClient();
    }

    [Fact]
    public async Task GivenCatDoesNotExist_WhenCreateCatEndpointIsInvoked_ThenCreatedIsReturned()
    {
        // Arrange
        var catRequest = new CreateCatRequest("Tombili", 6, 7);

        // Act
        var response = await _httpClient.PostAsJsonAsync("CreateCat", catRequest);

        // Assert
        var catResponse = await response.Content.ReadFromJsonAsync<CatResponse>();
        catResponse.Should().NotBeNull().And.BeEquivalentTo(catRequest);
        response.StatusCode.Should().Be(HttpStatusCode.Created);
        response.Headers.Location.Should().Be($"http://localhost/GetCat/{catResponse.Id}");
    }
}
We create the CreateCatEndpointTests class that implements IClassFixture<CatsApiApplicationFactory>.
In the constructor, we initialize a HttpClient using the CatsApiApplicationFactory‘s CreateClient() method. With this approach, xUnit enables us to create a new API with its own containerized database for each separate test class. We then use the client to call our API in the test methods.
You can find a lot more test cases in our source code repository.
Best Practices for Tests With Testcontainers
Let’s see what we can do to take full advantage of Testcontainers in our testing workflows:
Wait Strategies
Awaiting strategies are a key feature that ensures no tests will be run until the Docker container is up and running:
public CatsApiApplicationFactory()
{
    _mssqlContainer = new ContainerBuilder()
        .WithImage("mcr.microsoft.com/mssql/server:2022-latest")
        .WithPortBinding(MsSqlPort)
        .WithEnvironment("ACCEPT_EULA", "Y")
        .WithEnvironment("SQLCMDUSER", Username)
        .WithEnvironment("SQLCMDPASSWORD", Password)
        .WithEnvironment("MSSQL_SA_PASSWORD", Password)
        .WithWaitStrategy(Wait.ForUnixContainer().UntilPortIsAvailable(MsSqlPort))
        .Build();
}
In our container initialization, we add the WithWaitStrategy() method. It takes one parameter of the custom IWaitForContainerOS interface.
For this, we use the Wait class with two of its methods. We start with the ForUnixContainer() method and follow up with the UntilPortIsAvailable() method passing the MsSqlPort. This prevents our test methods from running before everything is up and running, saving us from failed tests due to the unready containers.
Random Host Ports
Having a static host port is not ideal as it can lead to clashes, so it is better to use dynamic host ports:
public CatsApiApplicationFactory()
{
    _mssqlContainer = new ContainerBuilder()
        .WithImage("mcr.microsoft.com/mssql/server:2022-latest")
        .WithPortBinding(MsSqlPort, true)
        .WithEnvironment("ACCEPT_EULA", "Y")
        .WithEnvironment("SQLCMDUSER", Username)
        .WithEnvironment("SQLCMDPASSWORD", Password)
        .WithEnvironment("MSSQL_SA_PASSWORD", Password)
        .WithWaitStrategy(Wait.ForUnixContainer().UntilPortIsAvailable(MsSqlPort))
        .Build();
}
Again in our CatsApiApplicationFactory constructor, we update the WithPortBinding() method call by passing true as a second parameter. This will assign a random host port for each instance of our container.
Conclusion
In this article, we delved into the potential of the Testcontainers library for enhancing the efficacy of testing .NET applications using Docker. With it, creating database containers for our tests is relatively easy, coming down to a few lines of code.
Moreover, the Testcontainers package goes beyond mere containerization. It aids in provisioning the necessary infrastructure within the test itself and simplifies access to vital resources. Instead of external provisioning in a separate CI/CD pipeline, with the complexities of resource sharing, Testcontainers streamlines the process by integrating the container directly into the test, making access very straightforward.
As the software development landscape demands more robust testing methodologies, Testcontainers provides us with a powerful tool for testing excellence through containerization.
