

In this article, we will discuss the use of the strangler fig architectural pattern. While the design can be applied to any programming language, we will focus on C# here.
Common Problems in Application Evolution
When we design applications, we tend to focus on our current use cases but also do our best to predict the future and leave room for expansion. We strive to extend our application to support new use cases without introducing breaking changes. But unfortunately, these breaking changes can’t always be avoided.
Consider the first problem: we have an API application that needs a breaking change. We would likely need to bump the major version of our API, which means we need to support multiple versions of our app. This is normal and to be expected, but we try and avoid it where we can.
The second problem is what if that same API is running in production on .NET 6, but we want to make use of .NET 7 features. Often we don’t have the time or risk tolerance to upgrade the entire application.
These two common problems are where the strangler fig pattern can help.
How Does the Strangler Fig Architecture Help?
Continuing on the .NET example, let’s show a diagram of how our application might look:

Now, instead of modifying our existing application, wouldn’t it be great if we could create a shiny new application and serve all functionality there? We could clone all the existing code to a .NET 7 application, but then we are essentially “modifying” it anyway.
What would be great is if we could create just the “new” functionality we need on .NET 7. If we did that, our architecture might look like this:

That’s great, but now our consumers need to talk to two different APIs. That’s where the strangler fig architecture helps. We can serve both new and old functionality, without the consumer knowing. We do this by introducing a “facade” in front of our API’s:
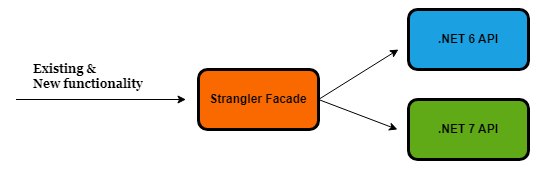
Now the clients continue to talk to a single application, in this case, the strangler facade, and the facade directs the request to the relevant recipient API based on what the functionality is (we can usually make this decision based on the URL).
With our above architecture, we are now able to utilize new technology without risking regression to existing functionality. We can also gradually migrate the old functionality to the new system over time, and at any time pivot our decision making.
If you are wondering where the term “strangler fig” comes from, it’s from the plant species that have a “strangling” growth habit, that suck up its nutrients from its victims, causing them to eventually die. Although that sounds horrible, in the cases of application architecture this is a good thing. We want to gradually deprecate the old system.
In the next few sections, let’s go ahead and see how we might implement this architecture in a real-world application.
Creating a Basic App
Let’s create a new .NET 6 API application, called “LegacyApplication”. If we run the application and open up the https://localhost:7251/weatherforecast URL, we’ll see the familiar weather data:
[
    {
        "date": "2023-10-20T09:22:35.535039+11:00",
        "temperatureC": 43,
        "temperatureF": 109,
        "summary": "Freezing"
    },
    {
        "date": "2023-10-21T09:22:35.5352043+11:00",
        "temperatureC": 38,
        "temperatureF": 100,
        "summary": "Bracing"
    },
    {
        "date": "2023-10-22T09:22:35.5352063+11:00",
        "temperatureC": 36,
        "temperatureF": 96,
        "summary": "Warm"
    },
    {
        "date": "2023-10-23T09:22:35.5352065+11:00",
        "temperatureC": 26,
        "temperatureF": 78,
        "summary": "Chilly"
    },
    {
        "date": "2023-10-24T09:22:35.5352067+11:00",
        "temperatureC": -6,
        "temperatureF": 22,
        "summary": "Scorching"
    }
]
Let’s also go ahead and create a new test project. For the purposes of this article, we can consider the test project the “consumer” of this application. But in reality, we would have a real application consuming this API, such as a mobile app or a web frontend.
Let’s create a new xUnit test project called “Tests”, and add a file called WeatherForecastLiveTest.cs:
public class WeatherForecastLiveTest
{
    [Fact]
    public async Task WhenSendingAGetRequestToTheWeatherForecastEndpoint_ThenWeatherDataIsReturned()
    {
        // Arrange.
        var httpClient = new HttpClient
        {
            BaseAddress = new Uri("https://localhost:7251")
        };

        // Act.
        var weatherForecasts = await httpClient.GetFromJsonAsync<WeatherForecast[]>("weatherforecast");

        // Assert.
        Assert.NotNull(weatherForecasts);
        Assert.NotEmpty(weatherForecasts);

        foreach (var weatherForecast in weatherForecasts)
        {
            Assert.True(weatherForecast.Date > DateTime.MinValue);
            Assert.True(weatherForecast.TemperatureC != 0);
            Assert.True(weatherForecast.TemperatureF != 0);
        }
    }
}
When we run the test we can see it passes.
Let’s pretend this application is now in production, and this test is the “consumer” which has a contract expecting this exact payload, at this exact URL and path. We’ll ensure that no matter what changes we make, we will not have to change this test, and therefore the consumer.
Now let’s say we want to add a new endpoint at /rainforecast, but we want to build it with .NET 7. Easy enough, let’s add a new .NET 7 API called “ModernApplication”, and add a new controller called RainForecastController:
[ApiController]
[Route("[controller]")]
public class RainForecastController : ControllerBase
{
    private readonly ILogger<RainForecastController> _logger;

    public RainForecastController(ILogger<RainForecastController> logger)
    {
        _logger = logger;
    }

    [HttpGet]
    public IEnumerable<RainForecast> Get()
    {
        return Enumerable.Range(1, 5).Select(index => new RainForecast(
            DateOnly.FromDateTime(DateTime.Now.AddDays(index)),
            Random.Shared.NextDouble()
        )).ToArray();
    }
}
We’ll also need to add a record called RainForecast:
public record RainForecast(DateOnly Date, double Rainfall);
If we run this application and hit the URL https://localhost:7139/rainforecast we will see our results. But wait, how can our consumers make use of this endpoint? We mentioned previously the consumer was interacting with our application at the host https://localhost:7251. So this won’t work.
In the next section, we see how the strangler fig comes to the rescue.
Creating the Strangler Fig Facade
In order for our consumer to access our new /rainforecast endpoint at the host https://localhost:7251 as well as the existing /weatherforecast endpoint, we need to introduce a facade in front of our two API’s. This can be done in any technology, for example, NGINX, a custom .NET 7 application, Ocelot, etc. But to keep things simple, let’s use the YARP package.
Let’s create a new .NET 7 application using Minimal APIs, and add the package Yarp.ReverseProxy, running the command:
dotnet add Yarp.ReverseProxy
Next, let’s replace Program.cs with some simple code:
var builder = WebApplication.CreateBuilder(args);
builder.Services.AddReverseProxy()
    .LoadFromConfig(builder.Configuration.GetSection("ReverseProxy"));
var app = builder.Build();
app.MapReverseProxy();
app.Run();
YARP will read our routes from the appsettings.json file, in a section called ReverseProxy. YARP has a lot more configuration options, but this is the default and the simplest so let’s stick to it.
Now let’s modify appsettings.json to add the new section:
{
  "Logging": {
    "LogLevel": {
      "Default": "Information",
      "Microsoft.AspNetCore": "Warning"
    }
  },
  "AllowedHosts": "*",
  "ReverseProxy": {
    "Routes": {
      "weather": {
        "ClusterId": "legacyapp",
        "Match": {
          "Path": "weatherforecast"
        }
      },
      "rain": {
        "ClusterId": "modernapp",
        "Match": {
          "Path": "rainforecast"
        }
      },
      "catchall": {
        "ClusterId": "modernapp",
        "Match": {
          "Path": "{**catch-all}"
        }
      }
    },
    "Clusters": {
      "legacyapp": {
        "Destinations": {
          "destination1": {
            "Address": "https://localhost:7251/"
          }
        }
      },
      "modernapp": {
        "Destinations": {
          "destination1": {
            "Address": "https://localhost:7139/"
          }
        }
      }
    }
  }
}
The configuration is very straightforward. We set up our routes, pointing to two different clusters (being our applications). Notice we also set up a “catchall” route. This is to ensure any new functionality automatically goes to our new application.
If we run all three applications and then open up the https://localhost:7114/rainforecast and https://localhost:7114/weatherforecast URLs in the browser, we’ll notice both routes work.
Our strangler is directing the traffic to the relevant downstream application. But wait! Our consumer expects to hit our application at https://localhost:7251, but now the functionality is served from https://localhost:7114. Easy solution, let’s change the ports.
Updating the Ports
First, we can modify the launchSettings.json of our “LegacyApplication”:
{
  "$schema": "https://json.schemastore.org/launchsettings.json",
  "iisSettings": {
    "windowsAuthentication": false,
    "anonymousAuthentication": true,
    "iisExpress": {
      "applicationUrl": "http://localhost:35491",
      "sslPort": 44336
    }
  },
  "profiles": {
    "LegacyApplication": {
      "commandName": "Project",
      "dotnetRunMessages": true,
      "launchBrowser": true,
      "launchUrl": "weatherforecast",
      "applicationUrl": "https://localhost:7259;http://localhost:5266",
      "environmentVariables": {
        "ASPNETCORE_ENVIRONMENT": "Development"
      }
    },
    "IIS Express": {
      "commandName": "IISExpress",
      "launchBrowser": true,
      "launchUrl": "weatherforecast",
      "environmentVariables": {
        "ASPNETCORE_ENVIRONMENT": "Development"
      }
    }
  }
}
Now this app is running at port 7259.
Let’s modify the launchSettings.json of our “StranglerFacade”:
{
  "$schema": "https://json.schemastore.org/launchsettings.json",
  "iisSettings": {
    "windowsAuthentication": false,
    "anonymousAuthentication": true,
    "iisExpress": {
      "applicationUrl": "http://localhost:46440",
      "sslPort": 44374
    }
  },
  "profiles": {
    "http": {
      "commandName": "Project",
      "dotnetRunMessages": true,
      "launchBrowser": true,
      "launchUrl": "weatherforecast",
      "applicationUrl": "http://localhost:5173",
      "environmentVariables": {
        "ASPNETCORE_ENVIRONMENT": "Development"
      }
    },
    "https": {
      "commandName": "Project",
      "dotnetRunMessages": true,
      "launchBrowser": true,
      "launchUrl": "weatherforecast",
      "applicationUrl": "https://localhost:7251;http://localhost:5173",
      "environmentVariables": {
        "ASPNETCORE_ENVIRONMENT": "Development"
      }
    },
    "IIS Express": {
      "commandName": "IISExpress",
      "launchBrowser": true,
      "launchUrl": "weatherforecast",
      "environmentVariables": {
        "ASPNETCORE_ENVIRONMENT": "Development"
      }
    }
  }
}
Our strangler is now running at port 7251, which is the port the old application was previously running on. Now we just need to update our appsettings.json to specify the updated port for the legacy application:
{
  // ... redacted for brevity
  "ReverseProxy": {
    "Clusters": {
      "legacyapp": {
        "Destinations": {
          "destination1": {
            "Address": "https://localhost:7259/"
          }
        }
      },
      "modernapp": {
        "Destinations": {
          "destination1": {
            "Address": "https://localhost:7139/"
          }
        }
      }
    }
  }
}
If we run the apps again, both routes will work at https://localhost:7251. In reality, we would probably have our applications running at proper hostnames on the internet, but for demonstration purposes, we need to do this exercise on localhost.
So what have we achieved? Well, now our consumers can access both existing and new functionality as if it were a single application, even though it’s running on more than one application with different tech.
Let’s go even further in the final section, and “strangle” the legacy application.
Strangling the Legacy Application
Let’s say we’ve now decided our modern application is the future. We don’t want the legacy one anymore. What are our steps?
First, we need to migrate the existing functionality to the new. Normally this would involve moving the old functionality to the new app. But in our case, the code is already there in the new one since it’s part of the Visual Studio template. So let’s go ahead and delete the “LegacyApplication” altogether. Then we can modify the appsettings.json:
{
  // ... redacted for brevity
  "ReverseProxy": {
    "Routes": {
      "catchall": {
        "ClusterId": "modernapp",
        "Match": {
          "Path": "{**catch-all}"
        }
      }
    },
    "Clusters": {
      "modernapp": {
        "Destinations": {
          "destination1": {
            "Address": "https://localhost:7139/"
          }
        }
      }
    }
  }
}
It’s now a lot simpler. We don’t have two clusters anymore, and we don’t have the explicit routes. Because of the catch-all route, both the weatherforecast and rainforecast routes are served by our new app. If we open up the browser and hit both routes against port 7251, everything works fine. If we run our tests, it still passes.
We have successfully “strangled” our legacy application, meaning that code no longer needs to be maintained, and we are free to create new functionality in our modern application. In addition, since our strangler facade is now just proxying to the one application, we don’t actually need it at all. We could just remove it, and update our ports again for the modern application. But let’s leave things for now.
Considerations When Using Strangler Fig
While this architecture is very powerful, it’s important to understand its limitations and when not to use it.
First of all, like with any reverse proxy, we have introduced a single point of failure. That means if the strangler facade goes down, all functionality goes down. Techniques to solve this are outside the scope of this article, but they can include things like redundancy and resiliency.
Secondly, we need to make sure our new application respects the commonalities of our modern application, so the consumer doesn’t notice the difference. With an API, as shown here, this can include the JSON output (casing, date handling, etc), but it can also things like the HTTP response headers and the way authentication is handled if we ever add that in the future.
In our example, we have a .NET 6 legacy application with only one route, i.e. limited functionality. In a real-world scenario, we should not use the strangler fig architecture here. It would be cheaper to simply upgrade the existing application to .NET 7. To put it differently, when you create a facade and separate the application, it incurs costs both in terms of maintenance and, depending on how the applications are hosted, in physical expenses. This approach is most effective when dealing with a sizable legacy application where a complete overhaul isn’t practically feasible.
Another great thing about the strangler pattern is that we are not limited to just one. If we decide the new application isn’t what we wanted, we can simply introduce another strangler.
Now that we understand the considerations, let’s wrap things up.
Conclusion
In this article, we demonstrated how the “strangler fig” architecture can be used to gradually create new functionality in an isolated area, without risking regression to existing functionality. With this design pattern, coupled with a reverse proxy like YARP, we showed how we are able to serve responses from both hosts from a single host in front, so the consumers are insulated from our changes. We didn’t need to implement any versioning or change our existing application at all. This is a very powerful option when we need to explore new technology but don’t want to touch the existing code or risk our consumers experiencing bugs.
We hope this article gives you another option in your design toolbelt when deciding how to migrate your applications. Happy coding!
