

In this article, we are going to cover the Exceptionless library and see how to use it in an ASP.NET Core application.
So let’s get started.
What Is Exceptionless?
Exceptionless is an open-source error and event reporting service. Once integrated into our applications, it helps us monitor and fix the exceptions that happen inside it. One of the most useful features of Exceptionless is that it automatically collects and reports unhandled exceptions. Furthermore, we can use it to capture feature usage, log messages, and other custom events in real-time.
Exceptionless supports a wide range of platforms, including .NET, JavaScript, and Node.js, making it a versatile tool for monitoring different parts of an application stack. It is open source and offers both cloud-hosted and self-hosted options, providing flexibility in deployment and management.
In short, we can understand what’s happening with our application in production and identify issues quickly, helping improve the overall quality of our application. Exceptionless provides us with rich diagnostics data, including stack traces, request information, and custom objects, making it easier to diagnose and fix problems.
Integrating Exceptionless With ASP.NET Core Web API
First, let’s create an ASP.NET Core Web API application using either the dotnet new webapi command or Visual Studio templates.
Create an Exceptionless Account & Project
Now let’s sign up for an Exceptionless account. There’s a self-hosted version as well, but the hosted version is easier to use and free to get started.
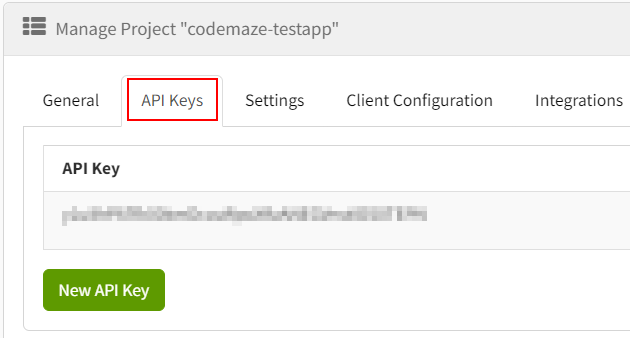
We can either create a new account or log in via an existing social account. After that, let’s create an Organization, then a Project inside it, and then find the API key in the API Keys tab of the Manage Project section:
Let’s add the API key to the appsettings file of our Web API project:
{
  "Exceptionless": {
    "ApiKey": "{Our API Key here}"
  },
  "Logging": {
...
  },
  "AllowedHosts": "*"
}
This will connect our application to the Exceptionless project that we just created.
Configure Exceptionless
Next, let’s configure the Exceptionless service.
For that, we need to first add the Exceptionless NuGet package to our project. There are different Exceptionless packages for working with different types of applications.
Let’s choose the ASP.NET Core variant:
Install-Package Exceptionless.AspNetCore
After installing the package, let’s configure the Exceptionless service in the Main() method of the Program class:
var builder = WebApplication.CreateBuilder(args);

builder.Services.AddControllers();
builder.Services.AddEndpointsApiExplorer();
builder.Services.AddSwaggerGen();
builder.Services.AddExceptionless();

var app = builder.Build();

if (app.Environment.IsDevelopment())
{
    app.UseSwagger();
    app.UseSwaggerUI();
}

app.UseHttpsRedirection();
app.UseAuthorization();
app.MapControllers();
app.UseExceptionless();

app.Run();
Here, we add an instance of ExceptionlessClient to the services collection by calling the AddExceptionless() extension method of the service collection. After that, we add the Exceptionless middleware by calling the UseExceptionless() extension method on the web application builder. This will capture all unhandled exceptions in the application and ensure that the Exceptionless pending queue is processed before the host shuts down.
Exceptionless in Action
Once we configure Exceptionless, it will automatically start capturing the unhandled exceptions.
Let’s add an API controller with a GET method and throw an exception inside it:
[Route("api/[controller]")]
[ApiController]
public class ValuesController : ControllerBase
{
    [HttpGet]
    public string Get()
    {
        throw new Exception("This is a test exception");
    }
}
After that, let’s run the application and navigate to the /values endpoint.
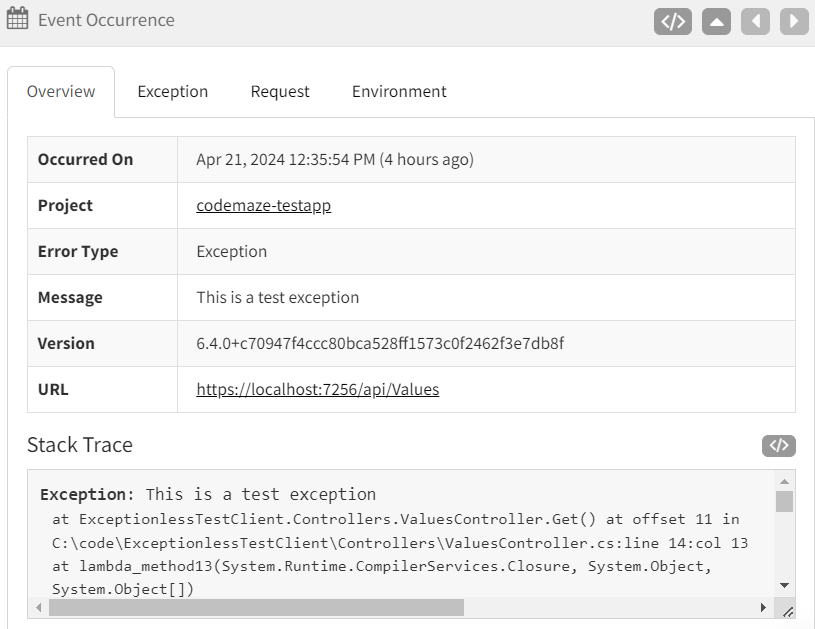
The application will now throw an exception and send it to Exceptionless. We can view it in the Events section of the Exceptions dashboard:
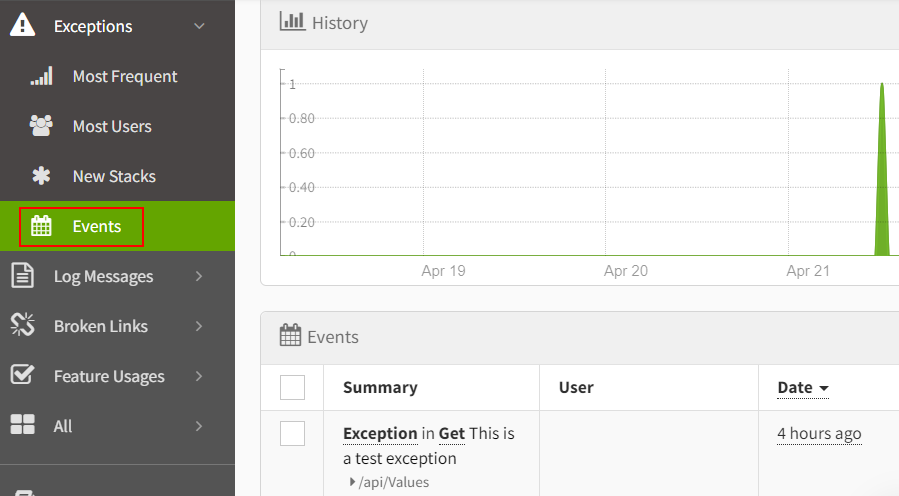
It displays a summary of the recent events there. Furthermore, by clicking on a particular event, we can navigate to the details of the event to see the exception details, request details, environment details, etc.:
Capturing Additional Data Using Exceptionless
Additionally, there are options to capture exceptions, logs, feature usages, etc. Let’s take a look at some of these options now.
Submit an Exception
By default, Exceptionless will only capture unhandled exceptions. However, if we wish to capture handled exceptions as well, we can do that by first calling the ToExceptionless() extension method on the exception and then the Submit() method. This will create an event builder with the exception details and submit it to Exceptionless:
[HttpGet]
[Route("manualexception")]
public void ManualException()
{
    try
    {
        throw new Exception("This is a manual test exception");
    }
    catch (Exception ex)
    {
        ex.ToExceptionless().Submit();
    }
}
If we run the application once again and navigate to the /manualexception endpoint, we can see that it sends the exception details to the Exceptionless dashboard manually. Note that this will appear in the Events section of the Exceptions dashboard similar to how it displays the automatically captured exceptions.
Submit a Log Message
We can also submit log messages to Exceptionless. For that, we can use the SubmitLog() method on the default ExceptionlessClient and pass the log message into it:
[HttpGet]
[Route("logs")]
public void Logs()
{
    ExceptionlessClient.Default.SubmitLog("Logging a message.");
}
This will send the log to Exceptionless and we can view it in the Log Messages dashboard:
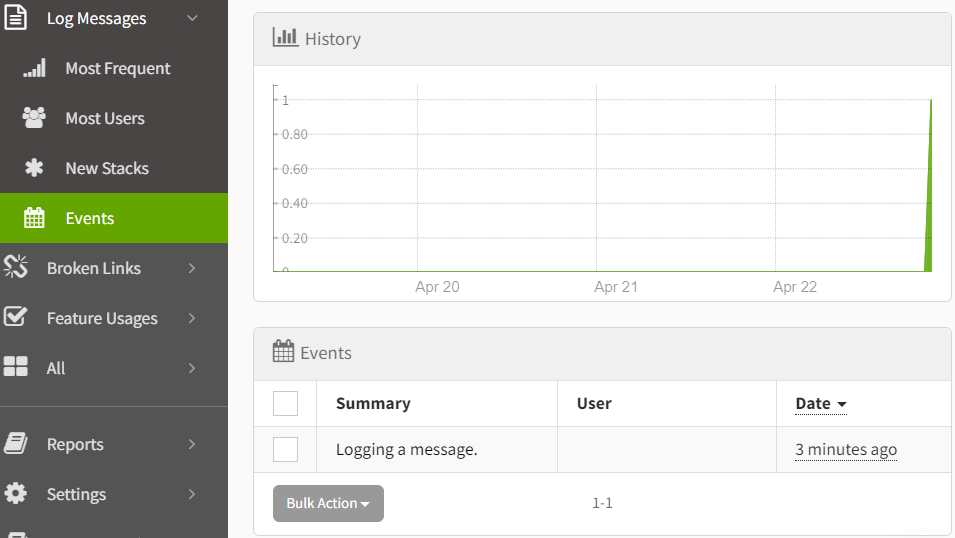
Additionally, we can click on the log message to navigate to its details page.
Submit a Feature Usage
Similarly, for submitting a feature usage to Exceptionless, we can use the SubmitFeatureUsage() method on the default ExceptionlessClient and pass the feature name into it:
[HttpGet]
[Route("feature")]
public void Feature()
{
    ExceptionlessClient.Default.SubmitFeatureUsage("FeatureName");
}
This will capture the feature usages and it will be available in the Feature Usages dashboard:
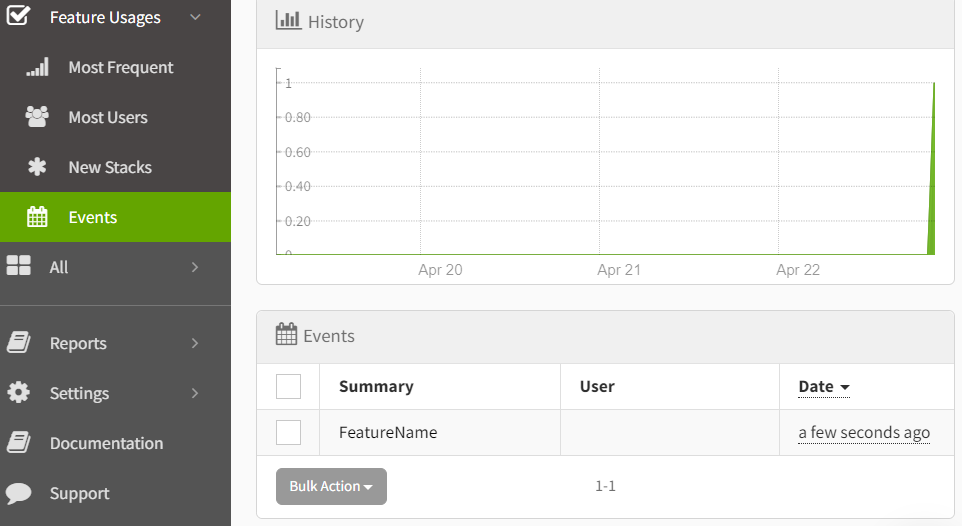
Furthermore, by clicking the feature event, we can navigate to its details page.
Exceptionless Dashboard Features
Now let’s check some of the core capabilities available in the Exceptionless project dashboard.
The Stacks
In Exceptionless, we can use the concept of Stacks to aggregate and organize similar errors or events. A stack represents a group of errors or events that are essentially the same, allowing us to manage those as a single entity. This aggregation helps us to efficiently manage and analyze errors and events. Stacks aggregate similar errors or events based on certain attributes like the type of the exception, the message, the area in the code where it occurred, etc.
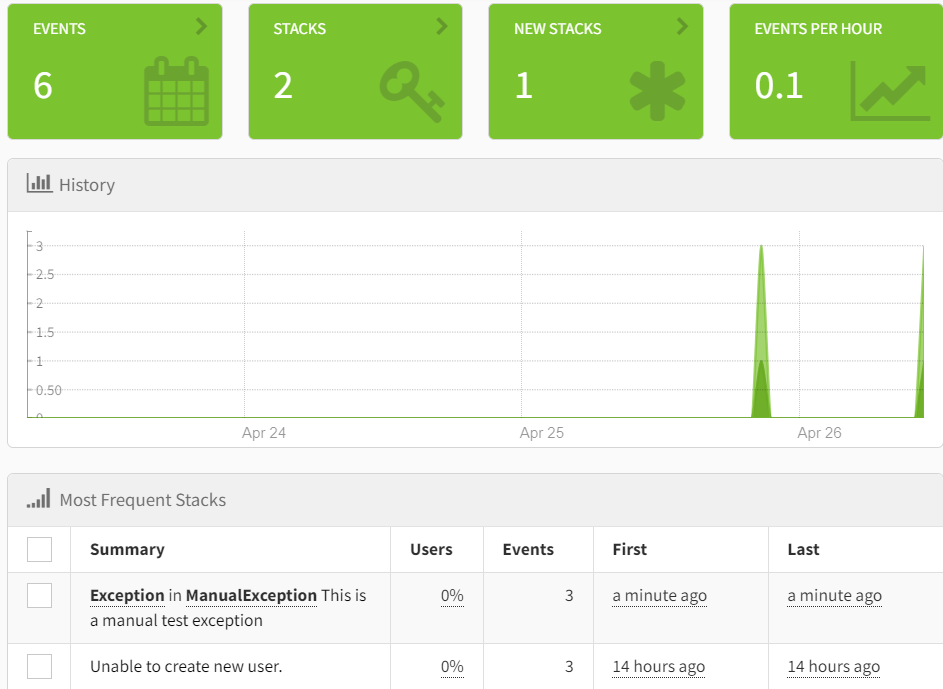
In the Exceptions dashboard, we can see the Stacks tiles along with the history and most frequent stacks:
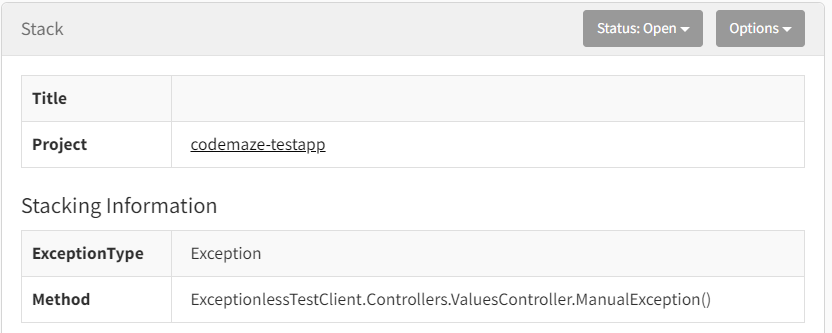
By clicking on a stack, we can view the detailed stacking information:
This can be helpful if we need to isolate certain types of exceptions or events or the ones occurring in certain areas of the applications. We could even change the status of a stack by clicking on the Status dropdown and changing it. For instance, once we identify and fix an error in the application, we could mark the related stack as fixed.
Apart from these, it is possible to create manual stacks as well.
We could set a manual stacking key for an exception:
[HttpGet]
[Route("customstack")]
public void CustomStack()
{
    try
    {
        throw new ApplicationException("Unable to create new user.");
    }
    catch (Exception ex)
    {
        ex.ToExceptionless().SetManualStackingKey("UserCreationError").Submit();
    }
}
Now all exceptions happening in this method will be stacked together. Similarly, we could stack exceptions from multiple areas together by providing the same stacking key.
Filtering and Searching
Exceptionless offers powerful filtering and searching capabilities that help us manage and understand the data efficiently. Furthermore, it has an advanced query syntax that allows filtering events by type, message, date ranges, tags, etc. We can also organize exceptions by stacks and filter them by project, organization, user, status, environment, etc. All these can be done for different types of events such as exceptions, logs, feature usages, etc.
Additionally, we can use the search option to search across a large set of fields such as source, level, message, browser, operating system, user, etc. While performing searches, for some fields such as ID, we need to prefix the field name (eg. id:). However, for other fields such as error.Message, we just need to provide the search string (eg. Object reference not set to an instance of an object). The complete list of Searchable Fields & Requirements is documented on the website.
We can also add multiple queries using AND and OR operators, perform wildcard searches using *, and exclude fields using -. We can even do range searches on date and numeric fields using <,>,=, etc.
Data Exclusions
Data exclusions in Exceptionless give us more control over the exception and log data sent to the server. This is crucial for maintaining user privacy and complying with regulations such as the General Data Protection Regulation (GDPR). By defining data exclusions, we can ensure that sensitive information like passwords, credit card numbers, personal identification data, or any custom-defined patterns are not captured.
Exceptionless offers a way to specify these exclusions through field identification within the project configuration, either through the portal or code. When an event is reported, the client library will scan the data for any fields that match the exclusion rules. If a match is found, the information is removed before the event is sent to the Exceptionless servers. We can specify field names or field name patterns that often contain sensitive data, such as password, token, or SSN, and those fields will be removed from the data payload.
Data exclusions ensure that we can use Exceptionless to track errors and events without the risk of exposing sensitive data. We can set data exclusion rules in the Settings tab on the Manage Project page:
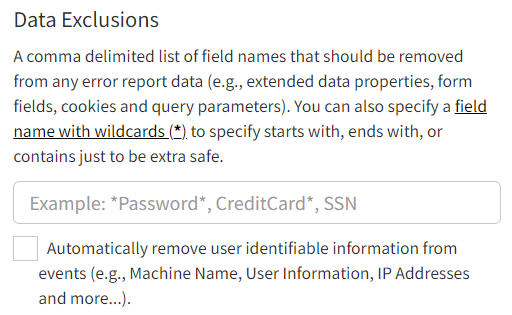
There is an option to automatically remove all user-identifiable data, and we can enable that if we need it.
We can also configure data exclusion in the code:
[HttpGet]
[Route("dataexclusion")]
public void DataExclusion()
{
    ExceptionlessClient.Default.Configuration.AddDataExclusions("password", "*email*");

    try
    {
        throw new ApplicationException("Unable to create new user.");
    }
    catch (Exception ex)
    {
        ex.ToExceptionless()
            .AddObject(new { User = "user1", Password = "password", UserEmail = "[email protected]" })
            .Submit();
    }
}
Here, we configure to exclude any field with the name password or containing the word email in it. In this example, we are logging additional data like user, password, and email along with the exception. However, with the data exclusion policy in place, it automatically excludes Password and UserEmail, recording only the User:
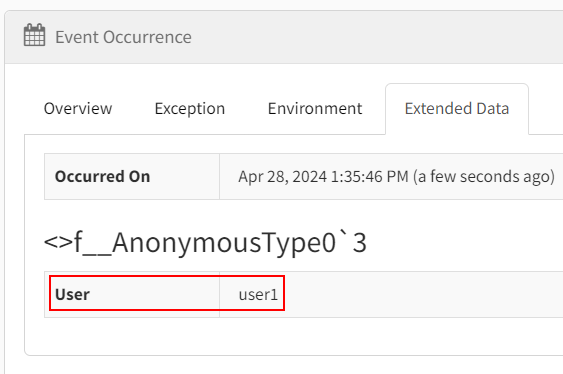
Of course, if we remove the data exclusion configuration, it will log all these fields into the Extended Data section.
Notifications
It is possible to configure email notifications for the events in Exceptionless. We can configure that in the Notifications tab in the My Account section:

We can configure email notifications and daily project summaries as well. Notifications based on event level are available only on higher (paid) plans.
Log Levels
Exceptionless supports various log levels which helps us to categorize log messages based on the severity. The log levels help in filtering and prioritizing log data, making it easier to manage and respond to the most critical issues first.
The different log levels are:
- Trace – Low-level debugging and tracing code execution
- Debug – Debugging the flow of applications
- Info – Informational messages
- Warn – Warning messages
- Error – Errors that cause the application to fail, but are recoverable
- Fatal – Very severe errors that could break the application
To configure different log levels, we can specify the logLevel parameters while calling the SubmitLog() method:
[HttpGet]
[Route("loglevel")]
public void LogLevel()
{
    ExceptionlessClient.Default.SubmitLog(
        "Your log message here",
        Exceptionless.Logging.LogLevel.Trace);
}
We also need to change the Default Log Level to Trace in the Settings tab of Manage Project for capturing trace level logs:
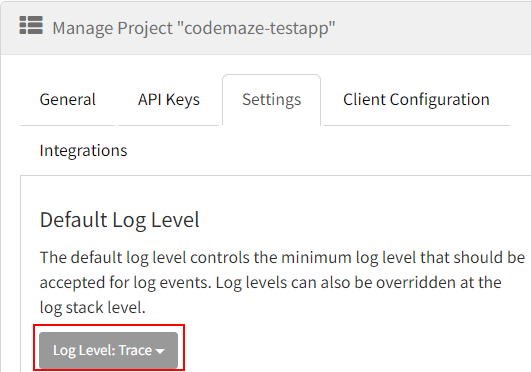
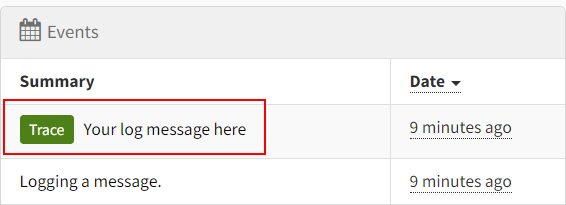
This will capture the logs with a severity level of Trace or higher:
We can also integrate Exceptionless with logging frameworks like NLog, Serilog, or log4net.
By leveraging the log levels and integrating with logging frameworks, we can effectively manage the volume and priority of log data sent to Exceptionless, ensuring that we focus on the most critical information for the application’s health and diagnostics.
Integrations
Exceptionless offers seamless integration with popular tools like Zapier, Slack, and webhooks, which we can use to enhance its capabilities. We can access these integrations through the Integrations tab located in the Manage Project section of the Exceptionless dashboard.
Conclusion
In this article, we talked about the Exceptionless library and discussed how to integrate that into ASP.NET Core applications. Additionally, we looked at how to submit exceptions, logs, and feature usage manually into it.
