

In this article, we are going to take a look at the Azure Storage Platform and learn how to work with Azure BLOB Storage.
We’ll start with an introduction to the Azure Storage Platform. Then, we’ll look at the different types of storage services that Azure offers. After that, we’ll take a deeper look at Azure BLOB storage. Next, we are going to learn how to develop an Angular UI app with ASP.NET Core Web API backend that leverages the Azure BLOB Storage. Finally, we’ll test the application and verify that everything works as expected.
So, let’s get going.
Azure Storage Platform – Introduction
Microsoft offers Azure Storage Platform as a cloud storage solution for all modern data storage scenarios. It offers a highly scalable object store for data objects, a reliable queue-based messaging store, a NoSQL store, disk storage for Azure virtual machines, and a cloud-based file share platform.
The Azure Storage services offer many advantages over a traditional storage solution:
- Durable and Highly Available: Azure Storage has redundancy enabled by default which ensures that our data is safe in the event of unexpected hardware failures. There is also an option to replicate data across data centers or geographical regions for additional protection from local mishaps or natural disasters. Data that we replicate this way will remain highly available in the event of unexpected outages.
- Secure: The Azure Storage service encrypts all the data that it stores. Additionally, it provides fine-grained control over who can access that data.
- Scalable: Azure Storage is massively scalable and is designed to meet modern applications’ data storage and performance needs.
- Managed: Being a cloud service, Azure handles the hardware maintenance, updates, and critical issues for us and we don’t have to worry about any of those.
- Accessible: Data stored in Azure Storage is accessible from anywhere in the world over HTTP. Microsoft provides SDKs for Azure Storage in many languages like .NET, Java, Node.js, Python, PHP, Ruby, Go, etc. Additionally, it is possible to access the storage services via a REST API, Azure PowerShell or Azure CLI. Furthermore, the Azure portal and the Azure Storage Explorer App provide a visual interface to work with the data stored in Azure Storage.
Types of Azure Storage Services
The Azure Storage platform offers various services that cater to different scenarios:
- Azure Blobs: Azure Blob Storage offers massively scalable object stores for storing text and binary data. It also includes support for big data analytics through Data Lake Storage Gen2.
- Azure Queues: Microsoft offers Azure Queue Storage as a service for storing large numbers of messages. They can enable reliable messaging between applications and components.
- Azure Tables: Azure Table storage is an excellent choice if we want to store structured NoSQL data in the cloud. It can store key and attribute values without defining a schema.
- Azure Disks: Azure Disks offer managed block-level storage volumes. We can easily attach them to Azure Virtual Machines.
- Azure Files: Microsoft offers Azure File Storage as a fully managed cloud file share. We can access them from both cloud and on-premises services.
A Deeper Look at Azure BLOB Storage
We have discussed the Azure storage platform and different types of storage services. Now let’s take a deeper look at the Azure BLOB storage. Microsoft offers Azure Blob storage for storing large object blobs in the cloud. This is optimized for storing large amounts of text or binary data.
Blob storage is ideal for many scenarios like:
- Serving images or documents directly through the browser.
- Storing files for access from multiple locations and services.
- Streaming video and audio files.
- Storing data for backup and restore operations, disaster recovery, and archiving, etc.
- Storage for data analysis by both on-premises and Azure-hosted services.
We can access objects stored in BLOB storage from anywhere in the world via HTTP or HTTPS. Users or client applications can access files stored in BLOB storage via URLs, the Azure Storage REST API, Azure PowerShell, Azure CLI, or Azure Storage client libraries(SDKs) that are available in various languages. In this example, we’ll see how to access Azure BLOB storage using the .NET SDK from an ASP.NET Core Web API application.
Blob storage supports Azure Data Lake Storage Gen2, which is Microsoft’s enterprise big data analytics solution designed for the cloud. Azure Data Lake Storage Gen2 offers a hierarchical file system in addition to the capabilities of the Blob storage.
Structure of an Azure BLOB Storage
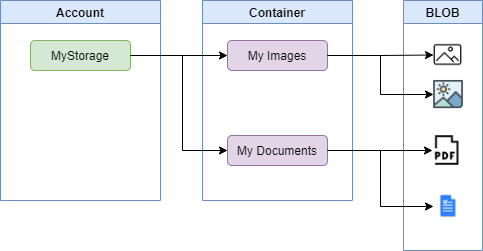
Blob storage has three types of resources:
- Storage Accounts: A storage account provides a unique namespace in Azure for our data. Every object that we store in Azure Storage has an address that includes the unique account name. The combination of the account name and the Azure Storage BLOB endpoint forms the base address for the objects in the storage account.
- Containers: Just like how a directory organizes files in a file system, containers organize a set of blobs. A storage account can include any number of containers, and a container can store an unlimited number of blobs.
- Blobs: BLOB can store text and binary data. Blob storage offers three types of blobs – Block blobs, Append blobs, and Page blobs. We can specify the blob type while creating the blob. It is not possible to change its type afterward and we can only update a blob file using the operations appropriate for that particular blob type, for instance, we can only write a block or list of blocks to a block blob, append blocks to an append blob, and write pages to a page blob.
We can represent the structure of BLOB storage this way:
We have discussed the concepts of Azure BLOB storage in detail. Now it’s time to get hands-on by building an application that connects with Azure BLOB storage.
Building an App to Work with Azure BLOB Storage
We have learned how to upload files using an Angular app with the .NET Core Web API in our How To Upload Files With .NET Core Web API and Angular article. In that example, we store the uploaded files in a folder within the web server application. We are going to modify that example to upload files to Azure BLOB storage instead. This will also help us understand the changes required for migrating on-premises file storage to Azure BLOB storage.
But before we do that, we need to set up the Azure storage account.
Creating the Storage
We have explained the process of creating an Azure Storage account in the Creating Azure Storage section of the Upload Files to Azure with .NET Core Web API and Blazor WebAssembly article. Following through the article section, let’s create a storage account:
Cool!
Our storage account is ready. We don’t have any containers or BLOBs yet but don’t worry, we are going to create those with our app.
The next step is configuring the Web API project.
Configuring the API
Let’s download and set up the server application from the Upload Files .NET Core Angular Finished Project Make sure to copy the connection string of the storage we created and add it to the appsettings.json file:
{
  ...
  },
  "ConnectionStrings": {
    "AzureStorage": "DefaultEndpointsProtocol=https;AccountName=codemazestorage;AccountKey=UjBmo......;EndpointSuffix=core.windows.net"
  },
  "AllowedHosts": "*"
}
Make sure that we have installed the Azure.Storage.Blob library in the server application. This library helps us to work with the Azure Storage Blob service:

After that, let’s define a service for handling the upload.
Creating the Service
First, let’s create an interface IUploadService:
using System.IO;
using System.Threading.Tasks;

namespace UploadFilesServer.Services
{
    public interface IUploadService
    {
        Task<string> UploadAsync(Stream fileStream, string fileName, string contentType);
    }
}
After that, let’s create the UploadService class implementing the interface:
using Azure.Storage.Blobs;
using Azure.Storage.Blobs.Models;
using Microsoft.Extensions.Configuration;
using System.IO;
using System.Threading.Tasks;

namespace UploadFilesServer.Services
{
    public class UploadService : IUploadService
    {
        private readonly string _storageConnectionString;

        public UploadService(IConfiguration configuration)
        {
            _storageConnectionString = configuration.GetConnectionString("AzureStorage");
        }

        public async Task<string> UploadAsync(Stream fileStream, string fileName, string contentType)
        {
            var container = new BlobContainerClient(_storageConnectionString, "file-container");
            var createResponse = await container.CreateIfNotExistsAsync();

            if (createResponse != null && createResponse.GetRawResponse().Status == 201)
                await container.SetAccessPolicyAsync(PublicAccessType.Blob);

            var blob = container.GetBlobClient(fileName);
            await blob.DeleteIfExistsAsync(DeleteSnapshotsOption.IncludeSnapshots);

            await blob.UploadAsync(fileStream, new BlobHttpHeaders { ContentType = contentType });

            return blob.Uri.ToString();
        }
    }
}
The UploadAsync() method accepts the file stream, file name, and content type as parameters. It connects to the storage account using the connection string and creates the container if it does not exist. After that, it sets the access for BLOB as public. By doing so, we are making the documents that we upload to this BLOB public.
Then we check if a BLOB with the same name exists and delete it. After that, we upload the BLOB file. Once the upload is complete, we return the BLOB URL from the method.
Modifying the Controller
As soon as the upload service is ready, the next step is to modify the controller to use this service:
using System;
using System.Linq;
using System.Net.Http.Headers;
using System.Threading.Tasks;
using Microsoft.AspNetCore.Mvc;
using UploadFilesServer.Services;

namespace UploadFilesServer.Controllers
{
    [Route("api/[controller]")]
    [ApiController]
    public class UploadController : ControllerBase
    {
        private readonly IUploadService uploadService;

        public UploadController(IUploadService uploadService)
        {
            this.uploadService = uploadService ?? throw new ArgumentNullException(nameof(uploadService));
        }

        [HttpPost, DisableRequestSizeLimit]
        public async Task<IActionResult> UploadAsync()
        {
            try
            {
                var formCollection = await Request.ReadFormAsync();
                var file = formCollection.Files.First();

                if (file.Length > 0)
                {
                    var fileName = ContentDispositionHeaderValue.Parse(file.ContentDisposition).FileName.Trim('"');
                    string fileURL = await uploadService.UploadAsync(file.OpenReadStream(), fileName, file.ContentType);

                    return Ok(new { fileURL });
                }
                else
                {
                    return BadRequest();
                }
            }
            catch (Exception ex)
            {
                return StatusCode(500, $"Internal server error: {ex}");
            }
        }
    }
}
In the controller’s UploadAsync() method, we read the uploaded file and then pass the file stream, name, and content type to the UpoadAsync() method of the service class. Note that the endpoint now returns the full file URL instead of the DB path.
Also, we need to configure the dependency injection in the ConfigureServices() method of the Startup file:
public void ConfigureServices(IServiceCollection services)
{
    ...
    services.AddScoped<IUploadService, UploadService>();
    ...
}
That’s it.
The server application is ready. Now let’s modify the Angular client app.
Modifying the Client App
We can download and set up the client application from the Upload Files .NET Core Angular Finished Project git repo. In the client app, first, we need to modify the app.component.ts file. We need to set the file URL as the image path instead of the DB path in the response object and inside the onCreate() method:
@Component({
  selector: 'app-root',
  templateUrl: './app.component.html',
  styleUrls: ['./app.component.css']
})
export class AppComponent implements OnInit {
  public isCreate: boolean;
  public name: string;
  public address: string;
  public user: UserToCreate;
  public users: User[] = [];
  public response: {fileURL: ''};

  constructor(private http: HttpClient){}

  ngOnInit(){
    this.isCreate = true;
  }

  public onCreate = () => {
    this.user = {
      name: this.name,
      address: this.address,
      imgPath: this.response.fileURL
    }

    this.http.post('https://localhost:5001/api/users', this.user)
    .subscribe(res => {
      this.getUsers();
      this.isCreate = false;
    });
  }

...

}
After this, we can remove the createImgPath() function as we are not using it anymore.
Finally, in the app.component.html file, we can set the image URL directly to the image source:
<tr *ngFor="let user of users">
  <td><img [src]="user.imgPath" alt="profile picture" style="width:60px; height:60px;"></td>
  <td>{{user.name}}</td>
  <td>{{user.address}}</td>
</tr>
Great!
The client app is ready. Let’s test it now.
Testing the App
For testing the app, we need to start both the server and client applications.
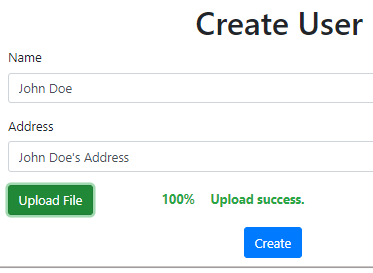
Once both the applications are started, let’s navigate to the URL of the angular app http://localhost:4200/. We can provide the user details, select an image and click on Create button:
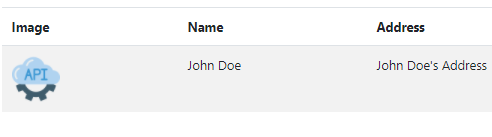
On submitting this page, we will be redirected to the listing page and we can see the user details and the selected image:
Now, let’s inspect the image and verify its source:
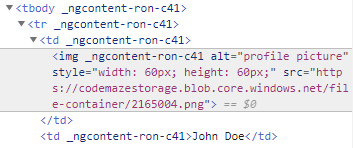
Great!
We can see that the image is now served from the Azure BLOB storage as evident from its source.
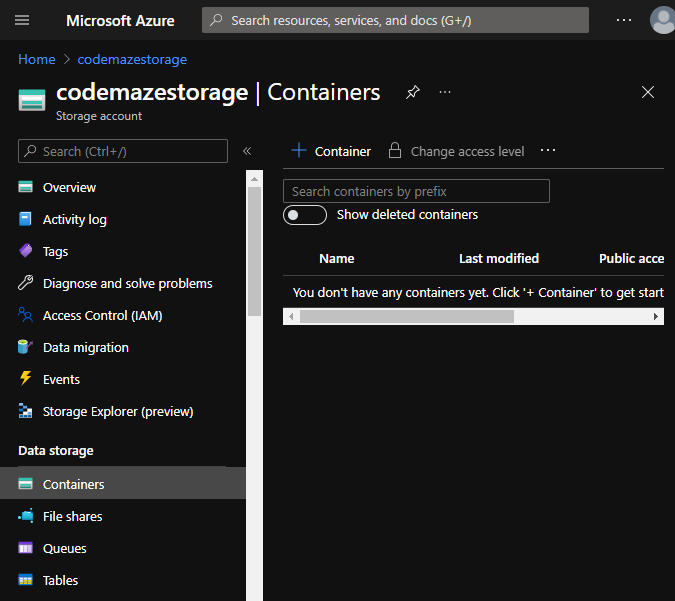
Now, let’s go to the Azure portal and check the storage account:
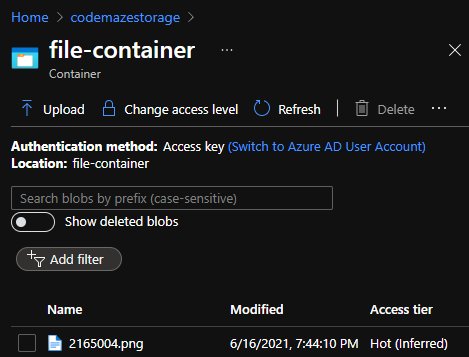
We can see that it creates a new container with the name we specified and uploads the image into it.
It is possible to represent the architecture of the current example using the below diagram:
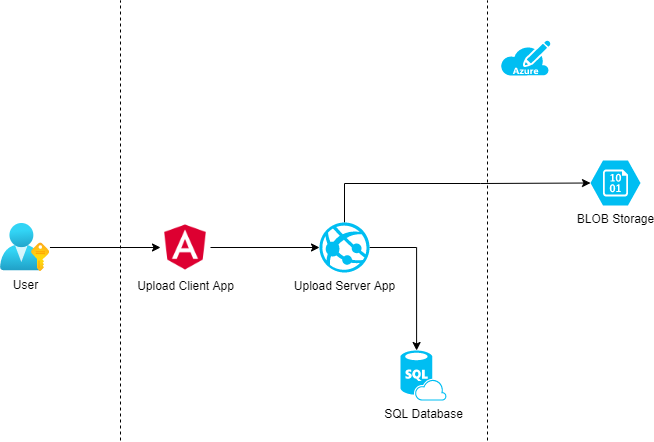
Users access the Angular client app which communicates with the back-end Web API application. The Web API stores the uploaded image in the Azure BLOB storage and saves the details in an SQL database.
Conclusion
We have covered the following topics in this article:
- An introduction to Azure storage platform
- Types of Azure storage services
- A deeper look at Azure BLOB storage
- Connecting to Azure BLOB storage from .NET Core application using the SDK
So, that’s it for this one and until the next article,
All the best.

With this method the files first goes to the server then uploads to Azure, correct? Should we not upload the file from the client directly to Azure and avoid the double transfer?
Yes, It is possible to implement the upload directly from client side. But, in that case we will not have much control on the file upload flow. Ideally, it is good to do it through an API so that we can ensure that it goes through the authorization, validation checks etc.
If we still want to implement upload from client side, we should use an API endpoint to generate a Shared Access Signature(SAS) URL first and then use that SAS URL to upload the file. That way we can still have some control over the upload.
Is there any link to download Files from the blob storage in .net api