

As developers, we often tend to oversee the security of our applications. Whether the user misclicks on the wrong file or purposely uploads a malicious one, we should always validate the input loaded through our application. In this article, we’ll look at a few techniques for uploaded file validation in an ASP.NET Core project.
To learn about file uploading in a .NET Core WebAPI be sure to not miss our article: “Uploading Files With .NET Core Web API and Angular“
Security Considerations
When working with file uploads in our applications, we must be sure to perform a validation check on them. It is good security practice to validate any uploaded file for both size and type. Since these files are coming from an untrusted source, having a clear picture of what files can be used and which should be forbidden is extremely important.
In 99% of the cases, the following extensions should be restricted from being uploaded to an application: .html, .php, .exe, .rar, .zip, .js, .asp, .aspx, .bat, and many more which we will not enumerate here due to the sheer number. These types of files can trigger remote code execution on our server causing lots of damage through malicious tools like malware.
In addition, we should also sanitize the uploaded file name, because there is a common strategy for malicious users to insert XSS payloads into the file name.
Thus, by validating the files, we enhance the security and performance of our applications.
ASP.NET Core File Upload Basics
Let’s talk basics. When dealing with file uploads in ASP.NET Core, we’ll immediately notice in the official documentation, or in any tutorial for that matter, the use of IFormFile.
This interface represents the file sent through an HTTP POST request. It’s typically received in a controller action:
[HttpPost]
public IActionResult Upload(IFormFile file)
{
    // File handling
}
Through its instance we can access different properties and methods that can help with file manipulation, let’s look at a few:
FileName: returns the uploaded file nameLength: returns the file size in bytesCopyToAsync(): copies the file content to a provided stream, asynchronously
Types of File Upload Validation
There are several ways of ensuring the integrity of the uploaded file. Let’s kick things off with file-type validation.
First, let’s create a FileValidator class to contain all of our file validation methods.
Validate Uploaded File By Type
As mentioned before, some file types are very dangerous and should not be allowed access through our application. That is why we are starting from the most critical and potentially dangerous validation – file extension validation.
We can perform file type validation by checking the file’s content type on both the client and server sides, to prevent malicious uploads:
public static bool IsFileExtensionAllowed(IFormFile file, string[] allowedExtensions)
{
    var extension = Path.GetExtension(file.FileName);
    return allowedExtensions.Contains(extension);
}
Here, we’re using the FileName property, belonging to the IFormFile interface. Only specific types relevant to our application scope should be allowed.
This is how we can perform file name extension validation in the controller:
[HttpPost]
public IActionResult Upload(IFormFile file)
{
    if (file is null || file.Length == 0)
        return BadRequest("The file is null");

    if (!FileValidator.IsFileExtensionAllowed(file, [".pdf", ".doc", ".docx"]))
        return BadRequest("Invalid file type. Please upload a PDF, DOC, or DOCX file.");

    // Process the file.
    // ..
}
Firstly, we validate if the file is not empty. Next, we are checking if the file name extension is one of the following: pdf, doc, docx.
Always remember to perform server-side validation, as client-side validation can be bypassed.
Validate Uploaded File By Size
In many cases, the uploaded file’s size is unknown to the user. Hence, it is our responsibility to ensure that excessively large files are not uploaded, as they could potentially impact server performance and storage.
We can perform file size validation in various ways, depending on our specific needs. In ASP.NET Core we can achieve this by checking the value of the Length property from IFormFile:
public static bool IsFileSizeWithinLimit(IFormFile file, long maxSizeInBytes)
{
    return file.Length <= maxSizeInBytes;
}
Let’s say we want to limit the maximum file size to 1 MB:
[HttpPost]
public IActionResult Upload(IFormFile file)
{
    if (!FileValidator.IsFileSizeWithinLimit(file, 1024 * 1024))
        return BadRequest("File size exceeds the maximum allowed size (1 MB).");

    // Process the file
    // ...
}
Here, we’re checking if the file size is bigger than 1 MB. If so, we return BadRequest with the corresponding message.
RequestSizeLimit Attribute
Additionally, for file size validation, we can limit the HTTP request body size with the help of the RequestSizeLimit attribute class. It’s part of the Microsoft.AspNetCore.Mvc namespace and requires the maximum allowed size of the current request body in bytes as a parameter:
[RequestSizeLimit(1_000_000)] // Checking for 1 MB
[HttpPost(nameof(Upload))]
public IActionResult Upload(IFormFile file)
{
  // Additional logic
}
Here, we limit the whole request to 1 MB.
Duplicate File Validation
If a file already exists on our server, there is no need to re-upload it and occupy additional space.
On the server side, one option to check for file duplication is to calculate the hash value of the content and compare it with the hashes of existing files. Matching hashes suggest file duplication.
We can also check for duplicate files based on their filenames:
public static bool FileWithSameNameExists(IFormFile fileName)
{
    // Implement logic to check if a file with the same name exists in the system
    return false;
}
Usually, we would be reading the entries from a database, but since this is a simple example, we’ll just return a hardcoded value.
Here’s the use in the controller:
[HttpPost]
public IActionResult Upload(IFormFile file)
{
    if (!FileValidator.FileWithSameNameExists(fileName))
        return BadRequest("Duplicate file name detected. Please upload a file with a different name.");

    // Process the file
    // ...
}
Showcasing File Upload Validation
We’ll be uploading the files through Swagger.
Let’s see the complete UploadFile method of our controller:
[HttpPost(nameof(Upload))]
public IActionResult Upload(IFormFile file)
{
    if (file is null || file.Length == 0)
        return BadRequest("The file is null");

    if (!FileValidator.IsFileExtensionAllowed(file, [".pdf", ".doc", ".docx"]))
        return BadRequest("Invalid file type. Please upload a PDF, DOC, or DOCX file.");

    if (!FileValidator.IsFileSizeWithinLimit(file, 1024 * 1024))
        return BadRequest("File size exceeds the maximum allowed size (1 MB).");

    if (FileValidator.FileWithSameNameExists(file))
        return BadRequest("Duplicate file name detected. Please upload a file with a different name.");

    return Ok();
}
Let’s see what happens if we upload an image for example:
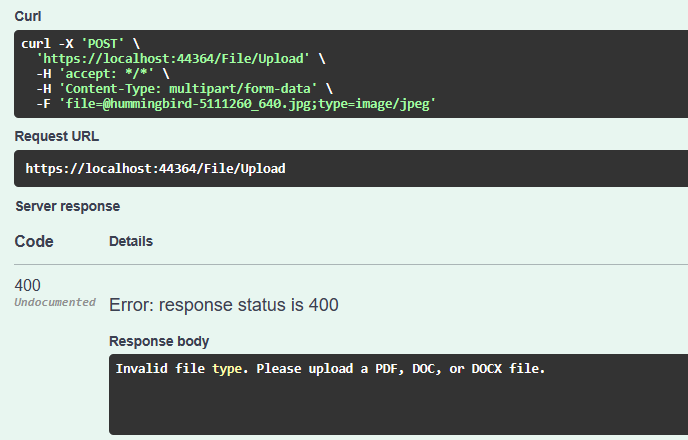
Here, we try to upload a file with a .jpg file name extension. And as expected, we received the HTTP 400 Bad Request response.
A Better Approach to Validate an Uploaded File
Even though the preview implementation is correct, there are a few issues with such an approach. Firstly, it has hardcoded checks in one controller method. Secondly, we can’t reuse validation methods for another controller method. Thirdly, we violate the single responsibility principle.
We could take things further with a cleaner approach by implementing an action filter. This would help us by adding a custom attribute on the controller action of our choice which would take care of the validation.
First, let’s move all of our validation methods to a separate static class:
public static class FileValidator
{
    public static bool IsFileExtensionAllowed(IFormFile file, string[] allowedExtensions)
    {
        var extension = Path.GetExtension(file.FileName);

        return allowedExtensions.Contains(extension);
    }

    public static bool IsFileSizeWithinLimit(IFormFile file, long maxSizeInBytes)
    {
        return file.Length <= maxSizeInBytes;
    }

    public static bool FileWithSameNameExists(IFormFile fileName)
    {
        // Implement logic to check if a file with the same name exists in the system
        return false;
    }
}
Next, let’s add our custom filter:
public class FileValidationFilter(string[] allowedExtensions, long maxSize) : ActionFilterAttribute
{
    public override void OnActionExecuting(ActionExecutingContext context)
    {
    }
}
Here, we define FileValidationFilter class with its primary constructor that accepts allowedExtensions and maxSize parameters. Note, that our class is inherited from the ActionFilterAttribute class.
Next, we override the OnActionExecuting() method:
public override void OnActionExecuting(ActionExecutingContext context)
{
    var param = context.ActionArguments.SingleOrDefault(p => p.Value is IFormFile);

    if (param.Value is not IFormFile file || file.Length == 0)
    {
        context.Result = new BadRequestObjectResult("File is null");
        return;
    }

    if (!FileValidator.IsFileExtensionAllowed(file, allowedExtensions))
    {
        var allowedExtensionsMessage = String.Join(", ", allowedExtensions).Replace(".", "").ToUpper();
        context.Result = new BadRequestObjectResult("Invalid file type. " +
            $"Please upload {allowedExtensionsMessage} file.");

        return;
    }

    if (!FileValidator.IsFileSizeWithinLimit(file, maxSize))
    {
        var mbSize = (double)maxSize / 1024 / 1024;
        context.Result = new BadRequestObjectResult($"File size exceeds the maximum allowed size ({mbSize} MB).");

        return;
    }

    if (FileValidator.FileWithSameNameExists(file))
    {
        context.Result = new BadRequestObjectResult("Duplicate file name detected. " +
            "Please upload a file with a different name.");

        return;
    }
}
Here, we encapsulated file validation logic inside the OnActionExecuting() method. Now, we can easily reuse this filter without the necessity to duplicate file validation logic. Note, that we add allowed file types and maximum file size as input parameters for the FileValidationFilter to make it generic.
Here’s how we can use our filter attribute:
[HttpPost(nameof(UploadFile))]
[FileValidationFilter([".pdf", ".doc", ".docx"], 1024 * 1024)]
public IActionResult UploadFile(IFormFile file)
{
    // Do something with the file
    return Ok();
}
If we check through Swagger, the result should be the same.
Conclusion
In conclusion, implementing robust file upload validation is crucial for ensuring the safety and integrity of our applications. In this article, we’ve learned the why and how to do it in ASP.NET Core in multiple ways by implementing a rudimentary validation and also a cleaner validation with the help of Action Filters.
