
In this article, we are going to learn how to implement an API Gateway using Ocelot.
Ocelot is an open-source API Gateway, designed for microservices architecture.
We already have an article about API Gateway, where we explained a lot about this subject. So, if you are not that familiar with the topic and microservices overall, we strongly suggest reading the linked article first.

Let’s start it.
VIDEO: Implementing API Gateway With Ocelot in ASP.NET Core.
Create the Solution
For this article, we are going to create three APIs to represent our microservices. When we finish with implementation, every microservice is going to be inside the same .NET Solution. That said, we need to create an empty solution that will be the container for all of our APIs.
Once the solution is ready, let’s create three folders:
- API gateway
- Article
- Writer
Create an Article Microservice
Now, let’s create our first microservice inside the Article folder. We are going to create an ASP.NET Core Web API project and name it Article.Api.
Secondly, let’s create an ArticlesController class with three endpoints:
[HttpGet]
public IActionResult Get()
{
    return Ok(_articleRepository.GetAll());
}

[HttpGet("{id}")]
public IActionResult Get(int id)
{
    var article = _articleRepository.Get(id);
    if (article is null)
        return NotFound();

    return Ok(article);
}

[HttpDelete("{id}")]
public IActionResult Delete(int id)
{
    var deletedId = _articleRepository.Delete(id);
    if (deletedId == 0)
        return NotFound();

    return NoContent();
}
The first endpoint is responsible for returning every article from the database.
The second is responsible for returning a single article based on the id we send as a parameter. If it doesn’t exist in the database, this endpoint is going to return a NotFoundResult (HTTP status code 404).
The third endpoint receives an id as a parameter and deletes this specific record from the database. In case this id doesn’t exist, this endpoint returns a NotFound (HTTP status 404).
Additionally, we have to create a model class:
public class Article
{
    public int Id { get; set; }
    public string? Title { get; set; }
    public DateTime LastUpdate { get; set; }
    public int WriterId { get; set; }
}
And a repository class that represents our database and the operations:
public class ArticleRepository : List<Models.Article>, IArticleRepository
{
    private readonly static List<Models.Article> _articles = Populate();

    private static List<Models.Article> Populate()
    {
        var result = new List<Models.Article>()
        {
            new Models.Article
            {
                Id = 1,
                Title = "First Article",
                WriterId = 1,
                LastUpdate = DateTime.Now
            },
            new Models.Article
            {
                Id = 2,
                Title = "Second title",
                WriterId = 2,
                LastUpdate = DateTime.Now
            },
            new Models.Article
            {
                Id = 3,
                Title = "Third title",
                WriterId = 3,
                LastUpdate = DateTime.Now
            }
        };

        return result;
    }

    public List<Models.Article> GetAll()
    {
        return _articles;
    }

    public Models.Article? Get(int id)
    {
        return _articles.FirstOrDefault(x => x.Id == id);
    }

    public int Delete(int id)
    {
        var removed = _articles.SingleOrDefault(x => x.Id == id);
        if (removed != null)
            _articles.Remove(removed);

        return removed?.Id ?? 0;
    }
}
To finish this initial project, let’s set up our application to run at localhost port 5001 and don’t start a swagger page:
"Profile": {
    "Article.Api": {
        "commandName": "Project",
        "dotnetRunMessages": true,
        "launchBrowser": false,
        "applicationUrl": "https://localhost:5001",
        "environmentVariables": {
            "ASPNETCORE_ENVIRONMENT": "Development"
        }
    }
}
Now that our Article.Api is ready, we should create our second API.
Create a Writer Microservice
Similar to the previous API, let’s create an API inside the writer folder and name it Writer.Api. Then, we are going to add a WritersController class and three endpoints.
The first and the second endpoint return every writer in the database and a single writer filtered by an id (very similar to the Article.Api). You can inspect that in our source code.
The third endpoint is responsible for inserting a new writer into the database:
[HttpPost]
public IActionResult Post([FromBody]Models.Writer writer)
{
    var result = _writerRepository.Insert(writer);

    return Created($"/get/{result.Id}", result);
}
Of course, we have to create the Writer class:
public class Writer
{
    public int Id { get; set; }
    public string? Name { get; set; }
}
Also, have to create a new Repository (WriterRepository) representing the database. You can find the implementation here.
In this class, we create a list of writers and the methods responsible for filtering and inserting writers.
To finalize, we should modify the launchSettings.json file to set up this microservice to start at port 5002 and to don’t use the swagger page (similar to the article API).
Creating the API Gateway
Finally, we are going to implement our API Gateway using Ocelot.
First, let’s create a new ASP.NET Core Web API project inside the ApiGateway folder and name it OcelotApiGateway.
Now, let’s install the Ocelot package into our project:
Install-Package Ocelot
Then, let’s change the LaunchSettings.json file to run at port 5003.
Once it is done, we are ready to create our configuration file.
Create the ocelot.json File
We need to create, at the root of our project, a new JSON file, and name it ocelot.json.
To start, let’s modify the file and define two keys, GlobalConfiguration and Routes (an array of objects):
{
  "GlobalConfiguration": {},
  "Routes": [
    {}
  ]
}
As a continuation, let’s configure our project to use the Ocelot.
Inside the Program class, in the builder section, let’s add the ocelot.json file and the Ocelot service to our application:
builder.Configuration.AddJsonFile("ocelot.json", optional: false, reloadOnChange: true);
builder.Services.AddOcelot(builder.Configuration)
Ocelot.json File Configuration
Inside the GlobalConfiguration key, we are going to set up our API Gateway host and port:
"GlobalConfiguration": {
    "BaseUrl": "https://localhost:5003"
  }
Next, inside the Routes key, let’s configure the endpoints of our application with some nested keys:
"Routes": [{
        "UpstreamPathTemplate": "/gateway/writers",
        "UpstreamHttpMethod": ["Get"],
        "DownstreamPathTemplate": "/api/writers",
        "DownstreamScheme": "https",
        "DownstreamHostAndPorts": [{
            "Host": "localhost",
            "Port": 5002
        }]
    },
    {
        "UpstreamPathTemplate": "/gateway/writers/{id}",
        "UpstreamHttpMethod": ["Get"],
        "DownstreamPathTemplate": "/api/writers/{id}",
        "DownstreamScheme": "https",
        "DownstreamHostAndPorts": [{
            "Host": "localhost",
            "Port": 5002
        }]
    },
    {
        "UpstreamPathTemplate": "/gateway/writers",
        "UpstreamHttpMethod": ["Post"],
        "DownstreamPathTemplate": "/api/writers",
        "DownstreamScheme": "https",
        "DownstreamHostAndPorts": [{
            "Host": "localhost",
            "Port": 5002
        }]
    },
    {
        "UpstreamPathTemplate": "/gateway/articles",
        "UpstreamHttpMethod": ["Get"],
        "DownstreamPathTemplate": "/api/articles",
        "DownstreamScheme": "https",
        "DownstreamHostAndPorts": [{
            "Host": "localhost",
            "Port": 5001
        }]
    },
    {
        "UpstreamPathTemplate": "/gateway/articles/{id}",
        "UpstreamHttpMethod": ["Get", "Delete"],
        "DownstreamPathTemplate": "/api/articles/{id}",
        "DownstreamScheme": "https",
        "DownstreamHostAndPorts": [{
            "Host": "localhost",
            "Port": 5001
        }]
    }
]
The UpstreamPathTemplate defines the URL of the API Gateway that receives the requests and then redirects to the microservice API (DownstreamPathTemplate).
The UpstreamHttpMethod defines the HTTP Methods (Get, Put, Post, Patch …) that the API Gateway uses to distinguish between the requests.
The DownstreamPathTemplate represents the endpoint at the microservice that is going to receive the request. In other words, it takes the request of the UpstreamPathTemplate and redirects to the DownstreamPathTemplate.
The DownstreamScheme represents the protocol to communicate with the microservice.
The DownstreamHostAndPorts defines the URL and the port from the microservices that are going to receive the requests.
Running the Application
Once all our APIs are inside the same .NET Solution, we need to configure the Visual Studio to run every API simultaneously.
To do that, let’s right-click on the solution and then, click Properties:
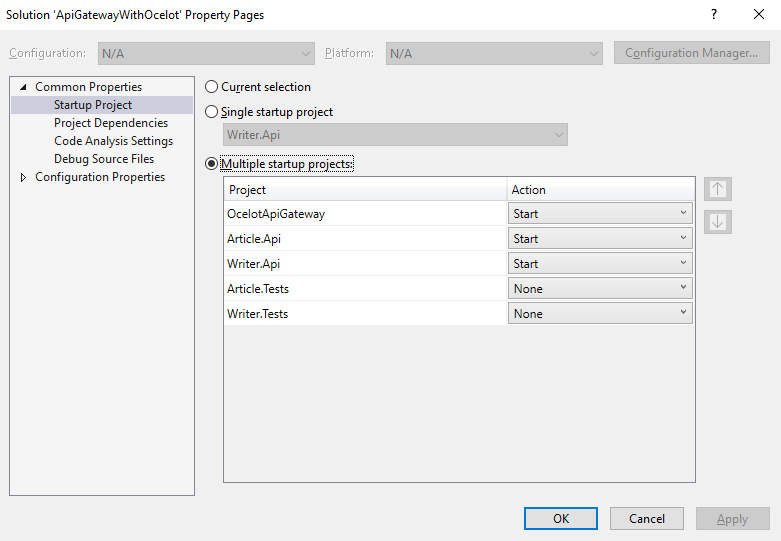
With the property window open, in the left menu, we choose the option Startup Project. Then, in the right section, we choose the Multiple startup projects option and change all microservices Action to Start.
Notice that, when we run the application, it is going to start all microservices we have in our solution.
Requesting Endpoints
Now, instead of requesting our microservices endpoints directly, we are going to gather all requests in the Ocelot API Gateway UpstreamPathTemplate.
To request every article from our database, let’s make a request to:
https://localhost:5003/gateway/articles
To get a specific writer from the database, let’s make a request to:
https://localhost:5003/gateway/writers/1
The localhost:5003 means that we are making requests to our Ocelot API Gateway. The /gateway/article and the /gateway/writers/1, represents the UpstreamPathTemplate we previously configured in our ocelot.json file from our API Gateway.
Ocelot Features
Ocelot has a bunch of features. In this article, we are going to implement two of them.
Using Rate Limiting
Rate limiting is the process of restricting the number of requests for a resource within a specific time window.
In this scenario, we are going to limit the number of requests for the /api/articles endpoint:
{
    "UpstreamPathTemplate": "/gateway/articles",
    "UpstreamHttpMethod": ["Get"],
    "DownstreamPathTemplate": "/api/articles",
    "DownstreamScheme": "https",
    "DownstreamHostAndPorts": [{
        "Host": "localhost",
        "Port": 5001
    }],
    "RateLimitOptions": {
        "EnableRateLimiting": true,
        "Period": "10s",
        "PeriodTimespan": 10,
        "Limit": 3
    }
}
In our current configuration, we need to add a new RateLimitOptions object with some properties.
First, we need to set the EnableRateLimiting property value to true.
The second property we need to set up is the Period. This property defines the specific time window that this rate limit is acting on.
The PeriodTimespan defines the number of seconds we need to wait to request this endpoint after we got the maximum number of requests within the Period. In this case, let’s set its value to 10 seconds.
The last property is the Limit. It defines the maximum number of requests within 10 seconds (Period property).
Once we request this UpstreamPathTemplate (/gateway/articles) more than 3 times within 10 seconds, the API Gateway is going to return a Too Many Request (HTTP status 429).
Using Cache With Ocelot
Caching is another easy-to-implement Ocelot feature.
First, we need to install the ocelot caching package:
Install-Package Ocelot.Cache.CacheManager
The second step is to add the cache manager to our services inside the Program class:
builder.Services.AddOcelot(builder.Configuration)
    .AddCacheManager(x =>
    {
        x.WithDictionaryHandle();
    });
Then, we need to add the FileCacheOptions object to the endpoint we want to cache and set the TtlSeconds:
{
  "UpstreamPathTemplate": "/gateway/writers",
  "UpstreamHttpMethod": [ "Get" ],
  "DownstreamPathTemplate": "/api/writers",
  "DownstreamScheme": "https",
  "DownstreamHostAndPorts": [
    {
      "Host": "localhost",
      "Port": 5002
    }
  ],
  "FileCacheOptions": {
    "TtlSeconds": 10
  }
}
The TtlSeconds (Time-to-live in seconds) means the time that the Ocelot is going to cache the data. After that time, Ocelot is going to discard the cache.
While the data is in the cache, the API Gateway doesn’t make an HTTP request to our microservice. That means we are saving resources from our microservice. Once the cache expires, the API Gateway requests the microservice once more and saves the data in the cache again.
As we said, Ocelot has a lot more features, and to learn more about it you can read the documentation.
Conclusion
In this article, we have talked about what Ocelot is and how to implement an API Gateway using Ocelot. We have implemented two APIs and learned how to implement and configure the Ocelot to redirect requests to these microservices.
We have learned how to configure Ocelot to store data in the cache and how to configure a Rate Limit.