Making websites multi-lingual allows users from around the globe to use our applications in their native language. In this article, we are going to see how ASP.NET Core provides us with the ability to enable localization to support different languages and cultures.
Let’s get started.
The Difference Between Globalization and Localization
Globalization and Localization are two very closely related terms, so let’s define and understand them.
Globalization is the process of designing applications to support different languages and cultures.
Localization, on the other hand, is the process of adjusting an application for a specific language/culture.
With these definitions in mind, let’s look at how we can design our applications for globalization by introducing localization for specific cultures.
Add Localization to an Application
We’ll start by creating an MVC application. This will allow us to look at the various ways we can localize our applications and serve content based on the user’s locale. Let’s open a command terminal and run dotnet new webapp -n Localization, or we can also use Visual Studio to create a new project.
Resource Files
Resource files are a specific file format (.resx) that allows us to define translations for any plaintext content we want to display in our application, in a key-value pair format. They allow us to separate the localized content from our code, meaning we can easily swap out different resource files for different languages without having to change our code.
File Naming Convention
By convention, resource files should be separated into a separate folder called Resources. When naming these files, they should follow the name of the class that will consume them, as well as include the language they represent.
We can either organize the files into separate folders, such as Resources/Controllers/LocalizationController.es.resx, or leave them in the root Resources folder, ensuring to name them appropriately, in this case Resources/Controllers.LocalizationController.es.resx.
Create Resource Files
For our application, we will follow the folder hierarchy for organizing our resource files. With that in mind, let’s create 2 resource files for the LocalizationController that we will create shortly. One will be in English and another in Spanish.
To start, let’s create a Resources folder, and in that, we’ll add another folder called Controllers.
Now, we add a file called LocalizationController.en.resx, and one called LocalizationController.es.resx.
Let’s open the LocalizationController.en.resx file first and add a new entry:
We’ll do the same for the Spanish resource file, making sure to use the same name:
Configure Supported Cultures
Before we can test out the localization of the application, we need to configure our application to register the required services. In the Program class, let’s add localization to our application:
builder.Services.AddLocalization(options => options.ResourcesPath = "Resources");
We need to set the ResourcesPath property to our Resources folder, so ASP.NET Core knows where to look for our resource files.
Also, we can configure the supported cultures for our application:
const string defaultCulture = "en-GB";

var supportedCultures = new[]
{
    new CultureInfo(defaultCulture),
    new CultureInfo("es")
};

builder.Services.Configure<RequestLocalizationOptions>(options => {
    options.DefaultRequestCulture = new RequestCulture(defaultCulture);
    options.SupportedCultures = supportedCultures;
    options.SupportedUICultures = supportedCultures;
});
Here, we define our default culture (en-GB) as well as another supported culture (es).
Finally, we need to tell our application to use these supported cultures:
app.UseRequestLocalization(app.Services.GetRequiredService<IOptions<RequestLocalizationOptions>>().Value);
With our resource files defined and our application configured for localization, let’s look at how we can use them in our application.
IStringLocalizer Interface for Localization
ASP.NET Core provides us with an easy-to-use interface for making our applications localized, IStringLocalizer<T>. This interface uses two classes, ResourceReader and ResourceManager which provides access to culture-specific resources at run-time. We can use dependency injection to gain access to this interface to make the localization of our applications much more straightforward.
Let’s look at how to use this interface in our application.
Controller Localization
Now that we have our resource files created, let’s create the accompanying controller:
public class LocalizationController : Controller
{
    private readonly IStringLocalizer<LocalizationController> _localizer;

    public LocalizationController(IStringLocalizer<LocalizationController> localizer)
    {
        _localizer = localizer;
    }

    public IActionResult Index()
    {
        ViewData["Greeting"] = _localizer["Greeting"];
        return View();
    }
}
We start by injecting the IStringLocalizer<LocalizationController> interface, which will give us access to our English and Spanish resource files.
In the Index() method, we set the ViewData dictionary value for Greeting from our resource file, which will be determined based on the culture of the user.
Finally, we return to our view, which we’ll create next.
In the Views folder, let’s create a new folder called Localization for our new controller, and create our Index view:
@{
    ViewData["Title"] = "IStringLocalizer";
}

<div class="text-center">
    <p>@ViewData["Greeting"]</p>
</div>
Here, we simply access the Greeting key of the ViewData dictionary.
If we run our application and navigate to /Localization, given that our culture is set to English, we will see the English variation of our Greeting message.
Let’s look at a couple of different methods for changing the culture so we can test whether our localization is working correctly.
Request Culture with Query String
We can manually specify the culture we wish to use by using the culture query string parameter. By default in ASP.NET Core, the QueryStringRequestCultureProvider is registered, allowing us to use this query string parameter in our application.
Let’s try it out. If we navigate to the Localization controller and pass the culture query parameter with the value set to es, we will see the Spanish variation of our greeting:
Accept-Language Request Header
The Accept-Language header is another method for specifying the locale the user wishes to use. This is set at a browser level and allows users to set multiple languages, which are weighted based on a quality value from 0-1, letting the browser know which language the user would prefer to use.
IHtmlLocalizer Interface for HTML Localization
What happens if we had some HTML markup in our resource files? Well, if we continued to use the IStringLocalizer interface, we would see the HTML markup unrendered:
This is not desirable. Fortunately, ASP.NET provides us with a way to render HTML in our resource files correctly, using the IHtmlLocalizer interface.
Let’s change our resource files to display our greeting as an h1:
We need to apply this change to both the English and Spanish resource files.
Now, in our LocalizationController, instead of injecting IStringLocalizer, we inject an IHtmlLocalizer:
public class LocalizationController : Controller
{
    private readonly IHtmlLocalizer<LocalizationController> _localizer;

    public LocalizationController(IHtmlLocalizer<LocalizationController> localizer)
    {
        _localizer = localizer;
    }

    public IActionResult Index()
    {
        ViewData["Greeting"] = _localizer["Greeting"];
        return View();
    }
}
To use the IHtmlLocalizer interface, we need to register it in our Program class:
builder.Services
    .AddControllersWithViews()
    .AddViewLocalization();
This time when we navigate to /Localization we will see our greeting rendered as an h1.
View Localization With IViewLocalizer
Instead of localizing at the controller level, we may wish to do so at the View level, which we can do with the IViewLocalizer interface. We can choose to localize strings within the view, similar to how we’ve previously done, or localize the entire view, creating multiple variations for different languages.
Let’s create a new view to demonstrate using the IViewLocalizer interface:
@using Microsoft.AspNetCore.Mvc.Localization

@inject IViewLocalizer ViewLocalizer

<div class="text-center">
    <p>@ViewLocalizer["ViewGreeting"]</p>
</div>
Here, we inject the IViewLocalizer interface from the Microsoft.AspNetCore.Mvc.Localization namespace. Then we retrieve the ViewGreeting value using the ViewLocalizer, which will retrieve it from the required resource file.
Next, we need to create new resource files, matching the name and location of this new view. Let’s create an English and Spanish resource file under the Resources/Views/Localization folder, called LocalizedView.en.resx and LocalizedView.es.resx respectively.
In the English file, we’ll add the ViewGreeting entry with a value of “Hello from a localized view!”. In the Spanish file, we’ll add the same entry, using “¡Hola desde una vista localizada!” for the value.
Running our application and navigating to /Localization/LocalizedView we will see the English variation of our ViewGreeting message. To test the Spanish variation, we can once again append the culture query parameter with a value of es.
Localizing Error Messages With Data Annotations
When we make use of ModelState validation in our applications, we can provide error messages whenever a given input does not meet the property requirements. Fortunately, the ASP.NET Core Localization package accounts for this and allows us to configure localization for our error messages from the Program class:
builder.Services
     .AddControllersWithViews()
     .AddViewLocalization()
     .AddDataAnnotationsLocalization();
Let’s create a model with some data annotations in the Models folder:
public class PersonViewModel
{
    [Display(Name = "FirstName")]
    [Required(ErrorMessage = "{0} is a required field")]
    public string FirstName { get; set; }

    [Display(Name = "LastName")]
    [Required(ErrorMessage = "{0} is a required field")]
    public string LastName { get; set; }

    [Display(Name = "Age")]
    [Range(1, 100, ErrorMessage = "{0} must be a number between {1} and {2}")]
    public int Age { get; set; }
}
Next, we’ll create the Spanish resource file for translating the error messages. In a new folder, Resources/Models, let’s create PersonViewModel.es.resx:
As English is the default language we used when creating the error messages, we don’t need to create an English-specific resource file.
Now we must create the View that will display the PersonViewModel:
@model PersonViewModel
@{
    ViewData["Title"] = "Data Annotations";
}

<div class="card">
    <div class="card-body">
        <form asp-action="DataAnnotationView" asp-route-culture=@ViewData["culture"]>
            <div class="row">
                <div class="col-md-6">
                    <div class="form-group">
                        <label asp-for="FirstName" class="lable-control"></label>
                        <input asp-for="FirstName" class="form-control" />
                        <span asp-validation-for="FirstName" class="text-danger"></span>
                    </div>
                </div>
            </div>
            <div class="row">
                <div class="col-md-6">
                    <div class="form-group">
                        <label asp-for="LastName" class="lable-control"></label>
                        <input asp-for="LastName" class="form-control" />
                        <span asp-validation-for="LastName" class="text-danger"></span>
                    </div>
                </div>
            </div>
            <div class="row">
                <div class="col-md-6">
                    <div class="form-group">
                        <label asp-for="Age" class="lable-control"></label>
                        <input asp-for="Age" class="form-control" />
                        <span asp-validation-for="Age" class="text-danger"></span>
                    </div>
                </div>
            </div>
            <div class="form-group">
                <button type="submit" class="btn btn-primary rounded-0 mt-2">Submit</button>
            </div>
        </form>
    </div>
</div>
Here, we create a simple form that is bound to our PersonViewModel, which will submit to an endpoint we will create next. We include a span for each field with the asp-validation-for attribute, which will display the error message we configured previously if the model is not valid.
As we are using the culture query parameter to determine the locale to use, we need to persist it in ViewData so that we return the same locale after posting the form to the server. We pass this back to the server by defining the asp-route-culture parameter on the form element.
Finally, we need to create the new endpoints that will return this new view:
public IActionResult DataAnnotationView([FromQuery] string? culture)
{
    ViewData["culture"] = culture;
    return View();
}

[HttpPost]
[ValidateAntiForgeryToken]
public IActionResult DataAnnotationView(PersonViewModel personViewModel, [FromQuery] string? culture)
{
    ViewData["culture"] = culture;
    if (!ModelState.IsValid)
    {
        return View();
    }

    return View();
}
The first endpoint is a simple GET endpoint. Here we add the culture value to ViewData, so it can be sent in the form submission if present.
Our second endpoint is a POST endpoint that will be used for form submission. Once again we pass the culture parameter to ViewData, and also check if the ModelState is valid. In this instance, we simply return the view, which will display the error messages.
Test Data Annotation Localization
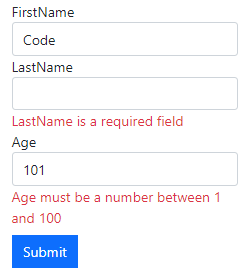
Now we are ready to test this out. If we navigate to /Localization/DataAnnotationView, enter some invalid fields and submit our form, we will see the default, English error messages:
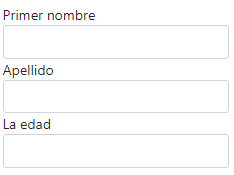
To test out the Spanish version, let’s add the culture query parameter to our URL with the value of es:
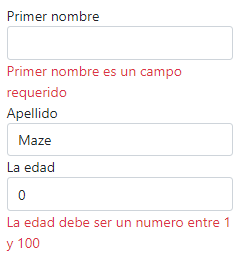
Entering some invalid values once again and submitting, we will see the Spanish variations of our error messages:
So far we have manually added the culture query parameter to determine the locale of the user. Let’s look at an alternative method using cookies.
Cookie-Based Localization Preferences
We can store a user’s locale in a Cookie which means we don’t have to pass it through the query parameter manually and allows us to set the culture programmatically. This would be the preferred method, as we can store the user’s locale between sessions, meaning they will return to the same locale each time.
Let’s start by creating a dropdown that we will add to our navigation bar to allow the user to select a language:
@using Microsoft.AspNetCore.Localization
@using Microsoft.Extensions.Options

@inject IOptions<RequestLocalizationOptions> LocalizationOptions

@{
    var requestCulture = Context.Features.Get<IRequestCultureFeature>();

    var cultureItems = LocalizationOptions.Value.SupportedUICultures
        .Select(c => new SelectListItem { Value = c.Name, Text = c.Name })
        .ToList();

    var returnUrl = string.IsNullOrEmpty(Context.Request.Path)
        ? "~/"
        : $"~{Context.Request.Path.Value}{Context.Request.QueryString}";
}

<div>
    <form asp-controller="Culture" asp-action="SetCulture" asp-route-returnUrl="@returnUrl"
          class="form-horizontal nav-link text-dark">
          <select name="culture"
                onchange="this.form.submit();"
                asp-for="@requestCulture.RequestCulture.UICulture.Name"
                asp-items="cultureItems">
          </select>
    </form>
</div>
First, we inject IOptions<RequestLocalizationOptions> which allows us to access the configured cultures for our application.
Then, in the code block, we get these supported cultures to bind them to our dropdown. Also, we define a returnUrl route, so that whenever we change the language, we return to the same page the user was currently on, and not the default page.
Finally, we add a form with our support languages dropdown that will submit to the SetCulture method of the Culture controller, which we will define shortly.
We must remember to add this partial view to _Layout.cshtml:
<div class="navbar-collapse collapse d-sm-inline-flex justify-content-between">
    <ul class="navbar-nav flex-grow-1">
        <li class="nav-item">
            @await Html.PartialAsync("_CulturePartial")
        </li>
    </ul>
</div>
Now it’s time to add the controller that will set the culture in the cookie. We’ll start by creating a new CultureController, along with the single method required:
public class CultureController : Controller
{
    [HttpPost]
    public IActionResult SetCulture(string culture, string returnUrl)
    {
        Response.Cookies.Append(
            CookieRequestCultureProvider.DefaultCookieName,
            CookieRequestCultureProvider.MakeCookieValue(new RequestCulture(culture)),
            new CookieOptions { Expires = DateTimeOffset.UtcNow.AddDays(30) }
        );

        return LocalRedirect(returnUrl);
    }
}
We have a single POST method, SetCulture() which is used from our dropdown when the value changes. In this method, we add a cookie to the Response with the selected culture, setting the expiry time to 30 days in the future. Then, we redirect the user to the returnUrl, which will be the URL they were currently on.
Test Cookie-Based Localization
Our cookie-based localization is now ready to test. If we run our application, we will see the dropdown on the navigation bar:
If we select es from the dropdown and navigating through the application again, we see all the language is returned in Spanish. We no longer have to manually set the culture by using a query parameter. The application remembers our preference when we navigate away from our application and return.
Conclusion
In this article, we’ve learned what Localization is in an ASP.NET application. We understood how to make our application multi-lingual by using resource files and various interfaces ASP.NET Core provides us. Localization is a powerful tool that enables us to reach a wider audience with our applications, providing each culture with a personalized experience suited to them. We’ve covered a lot of MVC features in this article.
If you’d like to learn more about MVC, check out our ASP.NET Core MVC Series.


