In this article, we are going to learn about ASP.NET Core Identity implementation in the ASP.NET Core project.
ASP.NET Core Identity is the membership system for web applications that includes membership, login and user data.
But, it is not just a user store, it is much more than that.
Instead of being just a simple database schema, it contains a great variety of helper functionalities that can aid us in the user management process. In this article, and through this series as well, we are going to learn more about the different functionalities this library provides.
To navigate through the entire series, visit the ASP.NET Core Identity series page.
VIDEO: User Registration with ASP.NET Core Web API and Identity.
Starting Project Overview
We are using the ASP.NET Core 3.1 web application project with no authentication template because we want to do it by ourselves, from scratch.
We use EF Core to communicate with the database, and if you want to learn more about it, we have a great series about Entity Framework Core that explains all the steps we’ve used in this application.
This application runs migrations automatically, so all you have to do is to start the project. We’ve also added the Employees action in the Home controller:
public async Task<IActionResult> Employees()
{
    var employees = await _context.Employees.ToListAsync();
    return View(employees);
}
And modified the _Layout view from the Privacy link to the Employees link:
<li class="nav-item">
    <a class="nav-link text-dark" asp-area="" asp-controller="Home"
    asp-action="Employees">Employees</a>
</li>
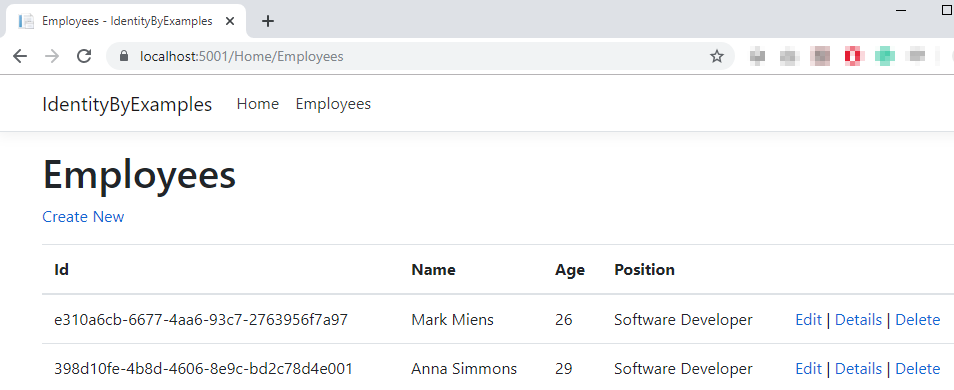
And, that is it. Once we start our project and navigate to the Employees link, we are going to see a list of employees:
ASP.NET Core Identity Implementation
The first thing we need to do is to install the Microsoft.AspNetCore.Identity.EntityFrameworkCore library:
This library is going to help us integrate ASP.NET Core Identity with the existing EF Core project.
After the installation finishes, let’s create a new User class in the Models folder:
public class User : IdentityUser
{
    public string FirstName { get; set; }
    public string LastName { get; set; }
}
Our class inherits from the IdentityUser class provided by the ASP.NET Core Identity. If we inspect the IdentityUser class, we can see that it inherits from the IdentityUser<string> class:
public class IdentityUser : IdentityUser<string>
{
    public IdentityUser();
    public IdentityUser(string userName);
}
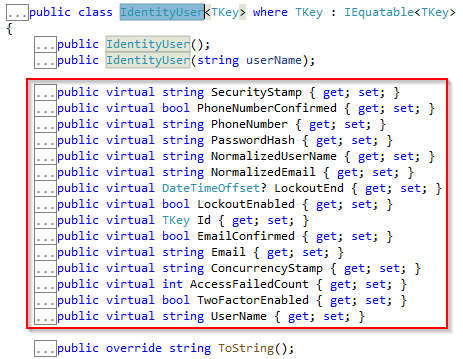
If we inspect the generic IdentityUser class as well, we are going to find all the different properties that will be added to our table in the database:
So basically, with the User class, we extend the IdentityUser class with two additional properties. These properties will be added to the database as well.
If you are satisfied with properties from the IdentityUser<TKey> class, you don’t have to create an additional User class. Otherwise, if you wish to extend it, this is a way to do it.
Now, let’s continue with the ApplicationContext class modification:
public class ApplicationContext : IdentityDbContext<User>
{
    public ApplicationContext(DbContextOptions options)
    : base(options)
    {
    }

    protected override void OnModelCreating(ModelBuilder modelBuilder)
    {
        base.OnModelCreating(modelBuilder);

        modelBuilder.ApplyConfiguration(new EmployeeConfiguration());
    }

    public DbSet<Employee> Employees { get; set; }
}
So, our class now inherits from the IdentityDbContext class and not DbContext because we want to integrate our context with Identity. Additionally, we call the OnModelCreating method from the base class. This is required for the migration to work properly.
A Bit More About Extending the Schema
At this point, we know how to extend the Identity schema but we should always think about it beforehand. It is quite a common process to add additional data to a user and there are two ways of doing that. By using claims and by adding additional properties in a class.
While using claims, we populate the Claim object by providing the type and the value properties of the string type (new Claim(string type, string value)). But if we have something more complex, we should use a custom property. Additionally, both ways are searchable but the custom properties are a way to go if we search a lot.
So for our example, we could have used the claims instead of adding the User class, but, we wanted to show you how to extend an Identity model in your project.
Now, let’s move to the configuration part.
ASP.NET Core Identity Configuration
We can register ASP.NET Core Identity with two extension methods: AddIdentityCore<TUser> and AddIdentity<TUser, TRole>.
The AddIdentityCore method adds the services that are necessary for user-management actions, such as creating users, hashing passwords, password validation, etc. If your project doesn’t require any additional features, then you should use this method for the implementation.
If your project requires those features and any additional ones like supporting Roles not only Users, supporting external authentication, and SingInManager, as our application does, you have to use the AddIdentity method.
Of course, we can achieve the same result with the AddIdentityCore method, but then we would have to manually register Roles, SignInManager, Cookies, etc.
That said, we are going to use the AddIdentity method for our registration in .NET 5 and previous versions:
public void ConfigureServices(IServiceCollection services)
{
    services.AddDbContext<ApplicationContext>(opts =>
        opts.UseSqlServer(Configuration.GetConnectionString("sqlConnection")));

    services.AddIdentity<User, IdentityRole>()
        .AddEntityFrameworkStores<ApplicationContext>();

    services.AddControllersWithViews();
}
In the .NET 6 and later versions, we have to modify the Program class:
builder.Services.AddDbContext<ApplicationContext>(opts =>
    opts.UseSqlServer(Configuration.GetConnectionString("sqlConnection")));

builder.Services.AddIdentity<User, IdentityRole>()
    .AddEntityFrameworkStores<ApplicationContext>();

builder.Services.AddControllersWithViews();
So, next to the AddIdentity method call, we add the AddEntityFrameworkStores method to register the required EF Core implementation of Identity stores.
Creating Additional ASP.NET Core Identity Tables
With all of these in place, we can add additional tables to the database. To do that, we are going to create a new migration:
PM> Add-Migration CreatingIdentityScheme
And apply it as well:
PM> Update-Database
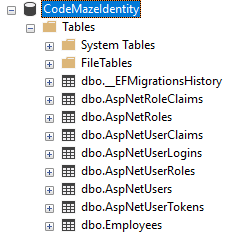
Once we have done that, we can check our database:
We can see the Employees table from the initial migration and all the other tables from the new migration. Additionally, if we expand the AspNetUsers table, we are going to find our additional properties:
Excellent job.
The one last thing, we have to do is insert some initial roles in the database.
Adding Roles to the Database
Having initial roles in the database is a quite common process, so let’s do that.
In the Configuration folder, we are going to create an additional class:
public class RoleConfiguration : IEntityTypeConfiguration<IdentityRole>
{
    public void Configure(EntityTypeBuilder<IdentityRole> builder)
    {
        builder.HasData(
        new IdentityRole
        {
            Name = "Visitor",
            NormalizedName = "VISITOR"
        },
        new IdentityRole
        {
            Name = "Administrator",
            NormalizedName = "ADMINISTRATOR"
        });
    }
}
And then modify the OnModelCreating method:
protected override void OnModelCreating(ModelBuilder modelBuilder)
{
    base.OnModelCreating(modelBuilder);

    modelBuilder.ApplyConfiguration(new EmployeeConfiguration());
    modelBuilder.ApplyConfiguration(new RoleConfiguration());
}
Finally, let’s create and apply the migration:
PM> Add-Migration InsertedRoles
PM> Update-Database
This is the result:
And just like that, we have prepared everything we need.
Conclusion
That is it for now. We have seen that ASP.NET Core Identity implementation is not such a complex thing, once we know how to do it.
Through this article, we’ve used the name ASP.NET Core Identity a lot and that’s because this is the name of this library, not Identity Server or Identity Framework or anything similar.
Additionally, it is important to mention that ASP.NET Core Identity is a different thing from the Identity Server. ASP.NET Core Identity is a user store whilst the Identity Server offers protocol support for Open ID Connect.
A lot of people mix these terms up.
In the next article, we are going to talk about the user registration process and how to change the rules which ASP.NET Core Identity provides out of the box.


