Selenium is a library that helps us automate browser behavior. We can use it for different purposes, but its primary use is for automated UI testing of web applications.
In this article, we are going to use Selenium to write automated UI tests and with that finish our testing series. Selenium has support for many different browsers and for this article, we are going to use the ChromeDriver. It also contains many different useful methods (Navigate, GoToUrl, FindElement, SendKees, Click…) which help us manipulate different HTML elements. These methods are going to be of great use in our examples.
For the complete navigation of this series, you can visit ASP.NET Core Testing.
So, let’s get down to business.
Selenium Installation in the Test Project
First thing first.
We are going to create a new xUnit test project and name it EmployeesApp.AutomatedUITests. After the creation process, we are going to rename the existing class to AutomatedUITests.
Now we can open the NuGet Package Manager window and install two required libraries, Selenium.WebDriver and Selenium.WebDriver.ChromeDriver:
PM> Install-Package Selenium.WebDriver
PM> Install-Package Selenium.WebDriver.ChromeDriver
That’s all it takes. We are now prepared to write automated UI tests.
Writing a Selenium Automation Test
Let’s open the AutomatedUITests class and modify it by implementing the IDisposable interface:
public class AutomatedUITests : IDisposable
{
    public void Dispose()
    {

    }
}
We are going to use the Dispose method to close a chrome window opened by the ChromeDriver and also to dispose of it.
To continue on, let’s create our driver:
public class AutomatedUITests : IDisposable
{
    private readonly IWebDriver _driver;

    public AutomatedUITests() => _driver = new ChromeDriver();

    public void Dispose()
    {
        _driver.Quit();
        _driver.Dispose();
    }
}
We instantiate the IWebDriver object by using the ChromeDriver class. In the Dispose method, we dispose of it. With that done, everything is ready for the first UI test with Selenium:
[Fact]
public void Create_WhenExecuted_ReturnsCreateView()
{
    _driver.Navigate()
        .GoToUrl("https://localhost:5001/Employees/Create");

    Assert.Equal("Create - EmployeesApp", _driver.Title);
    Assert.Contains("Please provide a new employee data", _driver.PageSource);
}
We use the Navigate method to instruct the driver to navigate the browser to another location and with the GoToUrl method, we provide that location. Once the browser navigates to the requested Url the _driver.Title and _driver.PageSource properties will be populated.
After using the Navigate method, we just make assertions on the mentioned properties to verify that we have actually navigated to the Create page.
Before we start the Test Explorer window, we need to start our application without debugging (CTRL+F5) because a running server is required for UI tests to pass.
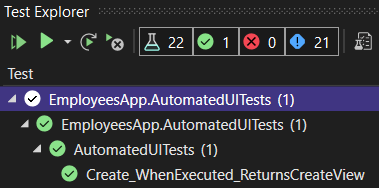
As soon as we run our test, we are going to see a new browser window opened and soon after that closed because we call the Quit method in the Dispose method. A little bit later, our test will pass:
Excellent!
We can shut down our app, and move on to the other Selenium tests.
Using Selenium to Manipulate Input Fields
Let’s write another test where we verify that the error message appears on the screen if we populate some input fields, not all of them, and click the Create button:
[Fact]
public void Create_WrongModelData_ReturnsErrorMessage()
{
    _driver.Navigate()
        .GoToUrl("https://localhost:5001/Employees/Create");

    _driver.FindElement(By.Id("Name"))
        .SendKeys("Test Employee");

    _driver.FindElement(By.Id("Age"))
        .SendKeys("34");

    _driver.FindElement(By.Id("Create"))
        .Click();

    var errorMessage = _driver.FindElement(By.Id("AccountNumber-error")).Text;

    Assert.Equal("Account number is required", errorMessage);
}
One more time, we navigate to the required location by using the Navigate and the GoToUrl methods. After that, we start populating our input fields. Of course, we have to find an element first. To achieve that we use the FindElement(By.Id("ElementId")) expression.
The FindElement method searches for the required element on the HTML page. It accepts a parameter of type By. The By class consists of the different methods which allow us to search different elements on our page (Id, ClassName, CssSelector, TagName, etc.).
Once we find the element, we use the SendKeys method to populate it. The same process is repeated for the Age element and the Create button, just for the Create button we use the Click method to click on it.
Finally, we extract the error message from the page and make an assertion.
If you want, you can debug this test code to see how our driver opens the page and manipulates the input fields and the button.
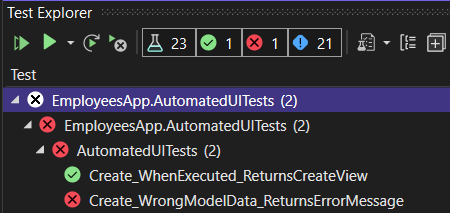
Let’s start our app without debugging again and run our test:
We can see that it fails, and the message explains it pretty well:
OpenQA.Selenium.NoSuchElementException : no such element: Unable to locate element: {"method":"css selector","selector":"#Create"}
The FindElement method can’t find our Create button because it is missing the id attribute.
To solve that, we can inspect our source page and look for a valid attribute or we can change our code a bit. We are going to change the code.
Let’s open the Create view in the main project and just add the id attribute to the button element:
<input type="submit" id="Create" value="Create" class="btn btn-primary" />
Now, let’s start the app and run the Test Explorer window – it passes now.
Testing the Create POST Action with Selenium
Let’s write one additional test where we populate all the fields, click the Create button, and then verify that the Index page is loaded with a new employee:
[Fact]
public void Create_WhenSuccessfullyExecuted_ReturnsIndexViewWithNewEmployee()
{
    _driver.Navigate()
        .GoToUrl("https://localhost:5001/Employees/Create");

    _driver.FindElement(By.Id("Name"))
        .SendKeys("Another Test Employee ");

    _driver.FindElement(By.Id("Age"))
        .SendKeys("34");

    _driver.FindElement(By.Id("AccountNumber"))
        .SendKeys("123-9384613085-58");

    _driver.FindElement(By.Id("Create"))
        .Click();

    Assert.Equal("Index - EmployeesApp", _driver.Title);
    Assert.Contains("Another Test Employee ", _driver.PageSource);
    Assert.Contains("34", _driver.PageSource);
    Assert.Contains("123-9384613085-58", _driver.PageSource);
}
We can see that there are small differences between this code and the previous one. Here, we just populate all the fields and make assertions on the page’s title and newly created data.
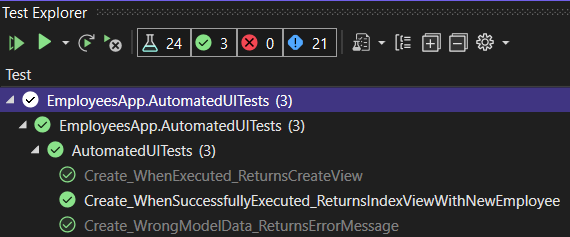
So, let’s try if this passes:
And it does.
Great job. Now, let’s refactor our code to eliminate repetitions and make it more readable.
Using Page Object Model Design Pattern to Make the Code Even Better
We can see that we have a lot of redundant code in our testing methods when we navigate to the URI or find different elements on the HTML page.
This is something we want to avoid.
This pattern, that we are going to use, is called Page Object Model Design Pattern. But, we are not going to use the PageFactory class (as you can see in many different examples) because it is not supported in .NET Core and it is getting obsolete in .NET Framework.
So, let’s start by creating a new EmployeePage class in the EmployeesApp.UITests project and modifying it:
public class EmployeePage
{
    private readonly IWebDriver _driver;
    private const string URI = "https://localhost:5001/Employees/Create";

    private IWebElement NameElement => _driver.FindElement(By.Id("Name"));
    private IWebElement AgeElement => _driver.FindElement(By.Id("Age"));
    private IWebElement AccountNumberElement => _driver.FindElement(By.Id("AccountNumber"));
    private IWebElement CreateElement => _driver.FindElement(By.Id("Create"));

    public string Title => _driver.Title;
    public string Source => _driver.PageSource;
    public string AccountNumberErrorMessage => _driver.FindElement(By.Id("AccountNumber-error")).Text;

    public EmployeePage(IWebDriver driver) => _driver = driver;

    public void Navigate() => _driver.Navigate()
            .GoToUrl(URI);

    public void PopulateName(string name) => NameElement.SendKeys(name);
    public void PopulateAge(string age) => AgeElement.SendKeys(age);
    public void PopulateAccountNumber(string accountNumber) => AccountNumberElement.SendKeys(accountNumber);
    public void ClickCreate() => CreateElement.Click();
}
This code is pretty easy to understand because we only extract the logic for finding HTML elements, add some methods to populate them, and click the Create button. Additionally, we extract the logic for the Title, Source, and error message properties.
After these changes, we can modify the AutomatedUITests class:
public class AutomatedUITests : IDisposable
{
    private readonly IWebDriver _driver;
    private readonly EmployeePage _page;

    public AutomatedUITests()
    {
        _driver = new ChromeDriver();
        _page = new EmployeePage(_driver);
        _page.Navigate();
    }

    [Fact]
    public void Create_WhenExecuted_ReturnsCreateView()
    {
        Assert.Equal("Create - EmployeesApp", _page.Title);
        Assert.Contains("Please provide a new employee data", _page.Source);
    }

    [Fact]
    public void Create_WrongModelData_ReturnsErrorMessage()
    {
        _page.PopulateName("New Name");
        _page.PopulateAge("34");
        _page.ClickCreate();
        Assert.Equal("Account number is required", _page.AccountNumberErrorMessage);
    }

    [Fact]
    public void Create_WhenSuccessfullyExecuted_ReturnsIndexViewWithNewEmployee()
    {
        _page.PopulateName("New Name");
        _page.PopulateAge("34");
        _page.PopulateAccountNumber("123-9384613085-58");
        _page.ClickCreate();
        Assert.Equal("Index - EmployeesApp", _page.Title);
        Assert.Contains("New Name", _page.Source);
        Assert.Contains("34", _page.Source);
        Assert.Contains("123-9384613085-58", _page.Source);
    }

    public void Dispose()
    {
        _driver.Quit();
        _driver.Dispose();
    }
}
And that is it. It is pretty obvious that this code is much cleaner and easier to read.
You can run the test explorer to verify that all tests pass as they did before.
Conclusion
And there we go. With this article, we have finished our Testing series.
Now you should have enough knowledge to do your own automated UI testing with Selenium and to explore testing features in ASP.NET Core more deeply.
We hope you have enjoyed this series as much as we did.


