In the previous article, we have created a basic setup for Entity Framework Core in our ASP.NET Core project. In this article, we are going to talk about the EF Core configuration and the different configuration approaches.
You can download the source code for this article on our GitHub repository.
To see all the basic instructions and complete navigation for this series, visit Entity Framework Core with ASP.NET Core Tutorial.
There are three approaches to configuring Entity Framework Core:
- By Convention
- Data Annotations
- Fluent API
We are going to work with migrations in the next part of this series, but for the clarity of configuration examples, we are going to show you configuration results in a database, as if we’ve already executed migrations.
EF Core Configuration By Convention
Configuration by convention means that EF Core will follow a set of simple rules on property types and names and configure the database accordingly. This approach can be overridden by using Data Annotations or Fluent API approach.
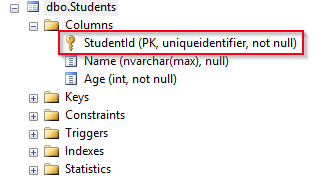
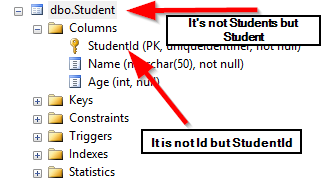
As we already mentioned, EF Core configures the primary key field from our Student model class by following the naming convention. This means that property is going to be translated as a primary key in the database if it has an “Id” property name or a combination <Name of a class> + Id (as it is a case with our StudentId property):
If we have a composite key in our class, we can’t use the configuration by Convention. Instead, we have to use either Data Annotations or Fluent API.
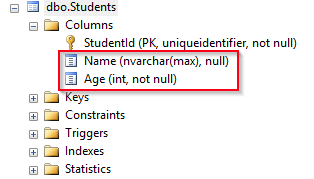
When using configuration by convention, the nullability of a column is based on the property type from our model class. When EF Core uses configuration by convention it will go through all the public properties and map them by their name and type. So, this means that the Name property can have a Null as a value (because the default value for a string type is null) but the Age cannot (because it is a value type):
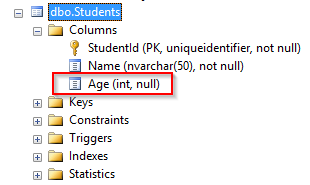
Of course, if we want the Age property to be nullable in a database, we can use the “?” suffix like so (int? Age) or we can use generic Nullable<T> like so (Nullable<int> Age):
EF Core Configuration via Data Annotations
Data Annotations are specific .NET attributes which we use to validate and configure the database features. There are two relevant namespaces from which we can get the annotation attributes: System.ComponentModel.DataAnnotations and System.ComponentModel.DataAnnotations.Schema. Attributes, from the first namespace, are mostly related to the property validation, while the attributes from the second namespace are related to the database configuration.
So, let’s see the Data Annotation configuration in action.
Let’s start by modifying the Student class, by adding some validation attributes:
public class Student
{
    public Guid StudentId { get; set; }

    [Required]
    [MaxLength(50, ErrorMessage = "Length must be less then 50 characters")]
    public string Name { get; set; }

    public int Age { get; set; }
}
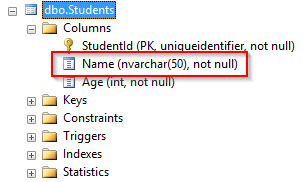
With the Required attribute, we are stating that the Name field can’t be nullable and with the MaxLengh property, we are limiting the length of that column in a database.
So, from this example, we can see how Data Annotations override configuration by Convention. Let’s see the result:
We can add additional modifications to the Student class, by adding the [Table] and [Column] attributes:
[Table("Student")]
public class Student
{
    [Column("StudentId")]
    public Guid Id { get; set; }

    [Required]
    [MaxLength(50, ErrorMessage = "Length must be less then 50 characters")]
    public string Name { get; set; }

    public int? Age { get; set; }
}
Table attribute
As you can see, by using the [Table] attribute, we are directing EF Core to the right table or schema to map to in the database. Right now, the name of the table in the database is Students because the DbSet<T> property is named Students in the ApplicationContext class. But the [Table] attribute is going to override that. So, if for any reason we need to change a class name, the [Table] attribute would prove to be quite useful.
If a table, that we are mapping to, belongs to the non-default schema, we can use the [Table(“TableName”, Schema=”SchemaName”)] attribute, to provide the information about the required schema.
Column attribute
The [Column] attribute provides EF Core with the information about what column to map to in the database. So, if we want to have the Id property instead of the StudentId in our class, but in the database, we still want to have StudentId name for our column the [Column] attribute helps us with that.
We can also provide the Order and the Database Type of the column with this attribute [Column(“ColumnName”, Order = 1, TypeName=”nvarchar(50)”)].
After these changes in our class, our table is going to have the same key field but a different name:
Using the Fluent API Approach
The Fluent API is a set of methods that we can use on the ModelBuilder class, which is available in the OnModelCreating method in our context (ApplicationContext) class. This approach provides a great variety of the EF Core configuration options that we can use while configuring our entities.
So, let’s create the OnModelCreating method in the ApplicationContext class and add the same configuration as we did with the Data Annotations approach:
protected override void OnModelCreating(ModelBuilder modelBuilder)
{
    modelBuilder.Entity<Student>()
        .ToTable("Student");
    modelBuilder.Entity<Student>()
        .Property(s => s.Id)
        .HasColumnName("StudentId");
    modelBuilder.Entity<Student>()
        .Property(s => s.Name)
        .IsRequired()
        .HasMaxLength(50);
    modelBuilder.Entity<Student>()
        .Property(s => s.Age)
        .IsRequired(false);
}
In the beginning, we are selecting the entity to configure and with the Property method, we are specifying which property we want to add the constraint on. All the other methods are pretty self-explanatory.
OnModelCreating is called the first time our application instantiates the ApplicationContext class. At that moment all three approaches are applied. As you can see, we haven’t used any method for the primary key, but our table has it nevertheless due to the naming convention:
Excluding Entities or Classes from the Mapping
We have been talking about how Entity Framework Core maps all the properties into the table columns. But sometimes we might have some properties that we need in our class but we don’t want it as a column inside a table. Let’s see how to do that with the Data Annotations approach:
public class Student
{
    [Column("StudentId")]
    public Guid Id { get; set; }

    [Required]
    [MaxLength(50, ErrorMessage = "Length must be less then 50 characters")]
    public string Name { get; set; }

    public int? Age { get; set; }

    [NotMapped]
    public int LocalCalculation { get; set; }
}
The [NotMapped] attribute allows us to exclude certain properties from the mapping and thus avoid creating that column in a table. We can exclude a class as well if we need to:
[NotMapped]
public class NotMappedClass
{
    //properties
}
Of course, we can do the same thing via the Fluent API approach:
modelBuilder.Entity<Student>()
    .Ignore(s => s.LocalCalculation);

modelBuilder.Ignore<NotMappedClass>();
As you can see, if we are ignoring a property, then the Ignore method is chained directly to the Entity method, not on the Property method, as we did in a previous configuration. But if we are ignoring a class, then the Ignore method is called with the modelBuilder object itself.
PrimaryKey Configuration with Data Annotations and Fluent API
We have seen, in one of the previous sections, that EF Core automatically sets the primary key in the database by using the naming convention. But the naming convention won’t work if the name of the property doesn’t fit the naming convention or if we have a composite key in our entity. In these situations, we have to use either the Data Annotations approach or the Fluent API.
So, to configure a PrimaryKey property via the Data Annotations approach, we have to use the [Key] attribute:
public class Student
{
    [Key]
    [Column("StudentId")]
    public Guid Id { get; set; }

    [Required]
    [MaxLength(50, ErrorMessage = "Length must be less then 50 characters")]
    public string Name { get; set; }

    public int? Age { get; set; }

    [NotMapped]
    public int LocalCalculation { get; set; }
}
If we want to use the Fluent API approach, we have to use the HasKey method:
modelBuilder.Entity<Student>()
    .HasKey(s => s.Id);
For the composite key, we have to use only the Fluent API approach because EF Core doesn’t support the Data Annotations approach for that.
Let’s add an additional property to the Student class, just for the example sake:
public Guid AnotherKeyProperty { get; set; }
Now, we can configure the composite key:
modelBuilder.Entity<Student>()
     .HasKey(s => new { s.Id, s.AnotherKeyProperty });
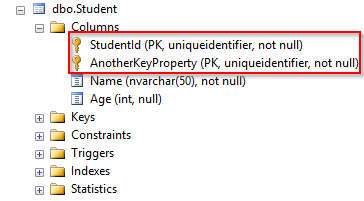
So, we are using the same HasKey method, but we create an anonymous object that holds both key properties. This is the result:
Working with Indexes and Default Values
We are going to use the Fluent API approach to add indexes to the tables because it is the only supported way.
To add an index to the required property, we can use a statement like this:
modelBuilder.Entity<Student>()
    .HasIndex(s => s.PropertyName);
For the multiple columns affected by index:
modelBuilder.Entity<Student>()
    .HasIndex(s => new { s.PropertyName1, s.PropertyName2 });
If we want to use a named index:
modelBuilder.Entity<Student>()
    .HasIndex(s => s.PropertyName)
    .HasName("index_name");
Adding unique constraint will ensure that a column has only unique values:
modelBuilder.Entity<Student>()
    .HasIndex(s => s.PropertyName)
    .HasName("index_name")
    .IsUnique();
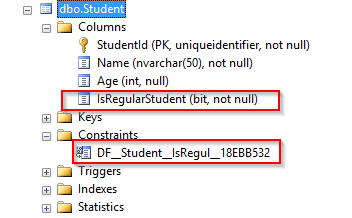
Additionally, we can configure our properties to have the default values whenever a new row is created. To show how this feature works, we are going to add an additional property to the Student class:
public bool IsRegularStudent { get; set; }
Now, we can configure its default value via the Fluent API:
modelBuilder.Entity<Student>()
    .Property(s => s.IsRegularStudent)
    .HasDefaultValue(true);
This should be the result:
Recommendations for Using EF Core’s Different Configuration Approaches
Entity Framework Core does an awesome job in configuring our database by using the rules that we provide. Since now we know three different configuration approaches it can get a bit confusing which one to use.
So, here are some recommendations.
By Convention
We should always start with the configuration by Convention. So, having the same class name as the table name, having a name for the primary key property that matches the naming convention and having the properties with the same name and type as the columns, should be our first choice. It is quite easy to prepare this type of configuration and it is time-saving as well.
Data Annotations
For the validation configuration, such as required or max length validation, you should always prefer the Data Annotations over Fluent API approach. And here’s why:
- It is easy to see which validation rule is related to which property because it is placed right above the property and it is quite self-explanatory
- Validations via Data Annotations can be used on the front end because as we’ve seen in the Student class, we can configure the error messages if validation fails
- We want to use these validation rules prior to the EF Core’s
SaveChangesmethod (we will talk about it in the following articles). This approach is going to make our validation code much simpler and easier to maintain
Fluent API
Let’s just say that we should use this approach for everything else. Of course, we must use this approach for the configuration that we can’t do otherwise or when we want to hide the configuration setup from the model class. So, indexes, composite keys, relationships are the things we should keep in the OnModelCreating method.
Conclusion
So, we have covered different configuration features that EF Core provides us with. Of course, there are additional configuration options related to Data Annotations and Fluent API, and the series is far from over, so we’re going to mention a few of them later on.
In the next part of the series, we are going to learn about Migrations in EF Core and the Migration features provided by EF Core. So, stay tuned.


