


Updated on
Deleting a resource from Angular is the simplest request in the series and the one that most needs a confirmation step. We load the owner by id, show its values as read-only text, and send a DELETE to the same address when the user confirms.
There is no form here. A delete screen shows rather than edits, so the component holds an owner object and the template renders it, and the only interactive elements are a Delete button and a Cancel button.
The server side is the delete action from part 6 of the series. The Angular side continues from Angular PUT Request to an ASP.NET Core Web API, where we sent the update.
For the complete navigation and all the basic instructions of the Angular series, check out: Introduction of the Angular series.
So, let’s dive right into it.
How Do We Route to the Delete Confirmation Page?
Let’s start by executing the Angular CLI command that creates the folder and the files for the new component:
ng g component owner/owner-delete --skip-tests
A standalone component names its own dependencies in its own imports array, so there is no owner.module.ts to register it in, and --skip-tests leaves out the spec file, the same flag the earlier parts used.
In addition, we have to modify the owner.routes.ts file to enable routing for this component:
export const routes: Routes = [
  { path: 'list', component: OwnerList },
  { path: 'details/:id', component: OwnerDetails },
  { path: 'create', component: OwnerCreate },
  { path: 'update/:id', component: OwnerUpdate },
  { path: 'delete/:id', component: OwnerDelete }
];
The delete/:id route joins the four the earlier parts added, and the file’s import list gains OwnerDelete beside them. That :id segment is how the component learns which owner it is about to remove.
Furthermore, let’s modify the owner-list.html file:
<td><button type="button" id="delete" class="btn btn-danger"
(click)="redirectToDeletePage(owner.id)">Delete</button></td>
And the owner-list.ts file to enable navigation to the delete page:
public redirectToDeletePage = (id: string) => {
  const deleteUrl: string = `/owner/delete/${id}`;
  this.router.navigate([deleteUrl]);
}
The button hands over the row’s id and the component turns it into the /owner/delete/<id> URL the new route matches.
How Do We Build a Delete Confirmation Page?
A delete screen shows rather than edits. There is no form and no FormGroup here, only the owner’s values rendered as text beside a Delete button and a Cancel button.
That difference is deliberate rather than a shortcut. Deleting cannot be undone from the client, so the page exists to let the user read what they are about to remove and change their mind.
The template writes {{owner()?.name}} and not {{owner().name}}. That question mark is the optional chaining operator, and it matters because the component renders before the GET response arrives. Without it the first render reaches into an object that is still undefined.
The Delete button calls deleteOwner() with no argument at all. The id it needs is already on the component from the load, so nothing has to be passed back down through the template.
To create the HTML part of the component, let’s start with the wrapper code:
<div class="container">
  <div class="row">
    <div class="col-md-10 card card-body bg-light mb-2 mt-2">

    </div>
  </div>
</div>
Inside the div element with the col-md-10 class, we are going to show all the details from the entity we want to delete:
<div class="row">
  <div class="col-md-3">
    <label for="name" class="control-label">Owners name:</label>
  </div>
  <div class="col-md-7">
    <span name="name">
      {{owner()?.name}}
    </span>
  </div>
</div>

<div class="row">
  <div class="col-md-3">
    <label for="dateOfBirth" class="control-label">Date of birth:</label>
  </div>
  <div class="col-md-7">
    <span name="dateOfBirth">
      {{owner()?.dateOfBirth | date: 'MM/dd/yyyy'}}
    </span>
  </div>
</div>

<div class="row">
  <div class="col-md-3">
    <label for="address" class="control-label">Address:</label>
  </div>
  <div class="col-md-7">
    <span name="address">
      {{owner()?.address}}
    </span>
  </div>
</div>
The component holds the owner in a signal, as the owner list has since part 10, so the template reads it by calling it: owner().
Right below the last div element, let’s add the buttons:
<br>
<div class="row">
  <div class="offset-md-3 col-md-1">
    <button type="submit" class="btn btn-info" (click)="deleteOwner()">Delete</button>
  </div>
  <div class="col-md-1">
    <button type="button" class="btn btn-danger" (click)="redirectToOwnerList()">Cancel</button>
  </div>
</div>
Our HTML part of the component is ready. All we have to do is to implement the business logic.
How Do We Send a DELETE Request From Angular?
Sending the delete takes two steps, and neither of them involves a request body.
We build the URL from the id the component already loaded with. DELETE addresses one specific resource, so the address is effectively the entire request: there is nothing to serialise and no content-type header to set.
Then we call the repository and subscribe. The success branch takes no parameter, because our API answers a successful DELETE with 204 No Content, exactly as it does for PUT in the previous part. That is why the code reads next: () =>.
On success we show the confirmation modal, and when the user dismisses it we route back to the owner list. Routing away matters more here than anywhere else in the series, because the record this page describes no longer exists, and staying would leave the user reading a screen about nothing.
Let’s start with the import statements in the owner-delete.ts file:
import { DatePipe } from '@angular/common';
import { Component, OnInit, inject, signal } from '@angular/core';
import { ActivatedRoute, Router } from '@angular/router';
import { BsModalRef, BsModalService, ModalOptions } from 'ngx-bootstrap/modal';

import { Owner } from '../../_interfaces/owner.model';
import { OwnerRepositoryService } from '../../shared/services/owner-repository.service';
import { SuccessModal } from '../../shared/modals/success-modal/success-modal';
Then, let’s declare the component’s properties and inject the services it needs:
export class OwnerDelete implements OnInit {
  owner = signal<Owner | undefined>(undefined);
  bsModalRef?: BsModalRef;

  private repository = inject(OwnerRepositoryService);
  private router = inject(Router);
  private activeRoute = inject(ActivatedRoute);
  private modal = inject(BsModalService);
}
The owner signal starts as undefined and the load fills it, and inject() takes the place of the constructor parameters the earlier parts used. There is no error-handling service among them, because since part 11 one functional interceptor handles every failure HttpClient produces.
Below the injected services, we are going to add the logic for fetching the owner and redirecting to the owner-list component:
ngOnInit(): void {
  this.getOwnerById();
}

private getOwnerById = () => {
  const ownerId: string = this.activeRoute.snapshot.params['id'];
  const apiUri: string = `api/owner/${ownerId}`;

  this.repository.getOwner(apiUri)
  .subscribe({
    next: (own: Owner) => this.owner.set(own)
  })
}

redirectToOwnerList = () => {
  this.router.navigate(['/owner/list']);
}
Everything here is familiar from our previous posts. The subscription carries only a next callback, because the interceptor deals with a failed GET before this component would ever see it.
Finally, let’s implement the delete logic:
deleteOwner = () => {
  const deleteUri: string = `api/owner/${this.owner()?.id}`;

  this.repository.deleteOwner(deleteUri)
  .subscribe({
    next: () => {
      const config: ModalOptions = {
        initialState: {
          modalHeaderText: 'Success Message',
          modalBodyText: `Owner deleted successfully`,
          okButtonText: 'OK'
        }
      };

      this.bsModalRef = this.modal.show(SuccessModal, config);
      this.bsModalRef.content?.redirectOnOk.subscribe(() => this.redirectToOwnerList());
    }
  })
}
That is it. We have finished the Angular part of this application. As a result, we have a fully functional application, and all that is left is to prepare the files for production and deploy it.
What Does the API Return After a Successful DELETE?
Our API answers a successful DELETE with 204 No Content. The record is gone, there is nothing left to describe, so the response carries a status line and no body.
That is why the subscription’s success branch takes no typed parameter. The observable still emits one value and then completes, so the callback runs exactly once and the modal appears exactly once.
The statuses worth thinking about separately are in the table below. A 404 on a delete screen almost always means somebody else removed the record between our GET and our DELETE, which is a different situation from an address that was never valid.
A 400 is what our own API sends when the owner still has accounts. The interceptor shows a modal for anything that is neither 404 nor 500, so that refusal reaches the user with the server’s own message.
That last one is worth trying before anything else. Our API refuses to delete an owner that still has accounts, and every owner the seed script inserts has at least one, so a seeded row answers 400 and the error modal shows the reason. The success path runs on an owner we made ourselves, with the form we built in part 13.
| Status | What it means | What our client does today |
|---|---|---|
204 No Content | Deleted, and there is nothing to send back | Shows the success modal, then routes to the owner list |
200 OK | Deleted, and the server chose to return a body | Same path; the body is available and unused |
202 Accepted | The delete was accepted but has not happened yet | Same path, which is why an API that queues deletes needs different handling |
400 Bad Request | The server refused the delete for a reason it can state | The status our own API sends when the owner still has accounts. The interceptor shows the error modal carrying the server's message |
404 Not Found | The id no longer resolves | The interceptor routes to the /404 page |
409 Conflict | The delete conflicts with the resource's current state, typically because something still references the record | The interceptor shows the error modal with the server's message |
500 Internal Server Error | The server failed | The interceptor routes to the /500 page |
The 404 row deserves one more thought than a lookup table gives it. The status on its own does not say whether the record is gone for good or missing for now, because RFC 9110, the specification that defines HTTP semantics, says “A 404 status code does not indicate whether this lack of representation is temporary or permanent”. On a delete confirmation page it almost always means somebody else removed the record while this page was open, and a generic not-found page tells the user nothing about that: a message saying the record is already gone, followed by a route back to the list, would serve them better.
Our application does not do this, and the change is not a local one, because the same interceptor sees every request the client makes. Handling the status in this component before the interceptor sees it, or teaching the interceptor which screen asked, are both decisions that belong with the interceptor that decides what the user sees.
Conclusion
The delete path is the shortest in the series and the one that needs the most care in the interface: one GET to show what is about to disappear, one DELETE to remove it, and a route away from a screen that now describes nothing.
In this post we have learned:
- How to route to a delete confirmation page and pass the owner’s id to it
- Why a delete screen shows values rather than editing them, and needs no form
- How the template reads a signal with optional chaining while the response is still on its way
- How to send the DELETE request, and what
204 No Contentmeans for the success callback - Which statuses a delete can answer with, and what our client does with each of them
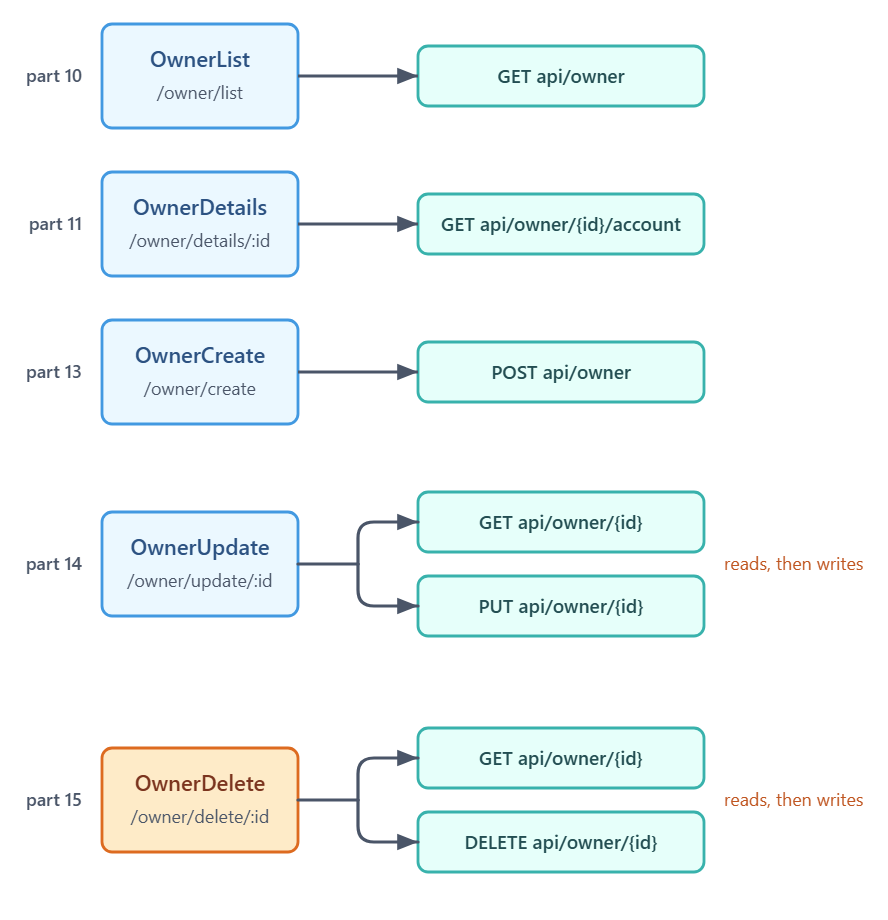
The figure below lines all five owner screens up against the requests they send, and the thing to notice is that update and delete both read before they write.
If the caller is a .NET application rather than a browser, we cover sending the same requests from a .NET client.
The last two parts of the series cover deployment: publishing to IIS on Windows, and then to Linux. For everything covered so far, the full series index has the complete list.
Tested with Angular 22.1.5, Angular CLI 22.1.7, ngx-bootstrap 22.0.0, Bootstrap 5.3.8, TypeScript 6.0.3 and Node 24.

hi another problem is that you disabled the save insert and delete buttons but never enabled them i enabled the, but they dont seem to work
This is very strange and weird at least. I really do not remember disabling these buttons and again if you inspect the source code of the owner-list.html file you will see this:
<tbody>
<tr *ngFor=”let owner of owners”>
<td>{{owner.name}}</td>
<td>{{owner.address}}</td>
<td>{{owner.dateOfBirth | date: ‘dd/MM/yyyy’}}</td>
<td><button type=”button” id=”details” class=”btn btn-primary”
(click)=”getOwnerDetails(owner.id)”>Details</button></td>
<td><button type=”button” id=”update” class=”btn btn-success”
(click)=”redirectToUpdatePage(owner.id)”>Update</button></td>
<td><button type=”button” id=”delete” class=”btn btn-danger”
(click)=”redirectToDeletePage(owner.id)”>Delete</button></td>
</tr>
</tbody>
So for each entity in the array, we display a new owner on the page with all the buttons enabled.
And they all work, they have to, I’ve tested this app so many times, and as you can see, I even updated it to Angular 13. So there is no way that I would update the article and the code without checking if it is working.
hi as i run the code for the last time it gives the error
Error: src/app/owner/owner-update/owner-update.component.ts:74:39 – error TS2345: Argument of type ‘OwnerUpdateInterface’ is not assignable to parameter of type ‘Owner’.
Property ‘id’ is missing in type ‘OwnerUpdateInterface’ but required in type ‘Owner’.
74 this.repository.updateOwner(apiUri, ownerForUpd)
~~~~~~~~~~~
src/app/_interfaces/owner.model.ts:3:3
3 id: string;
~~
‘id’ is declared here.
× Failed to compile.
like the error is that id is declared in owner module but not in owner update
Regarding this issue. If you carefully read our Update article (the previous one) you could find a place where we create the OwnerForUpdate interface and immediately modify the repository to accept this interface as a parameter instead of the Owner interface. If you do that, you won’t be getting this error, or at least I assume. We have provided our source code for each article so it is always a good practice to download it and compare it with yours.
Hi Marinko,
I have read ASP.NET CORE SERIES, I followed all the steps, but I think there is something missed in series if I’m right, and that is User authentication. It would be good if series contains Toke based authentication.
Although series is very helpful.
Thank you
Qamar
Hello Qamar. Thank you for your comment and suggestion. But please take a look at this article (http://34.65.74.140/authentication-aspnetcore-jwt-1/) this is a first part and in it you can find a link towards the second part. In there you will find well explained how to use token based authentication and authorization with .net core and angular. All the best.
Oh, Yes there is.
Sorry I missed it.
Thank you.
Hi Marinko,
Your article is like developer help books to beginner like me. I follow all the steps and able to create application. Can you add few more article in the series to flow like display list with edit delete buttons and based on edit delete show forms as well as for create seprate form.
May be models for create and update.
It will really help to us.
Thanks you.
Omkar.
Good Work