In this article, we are going to learn how to call JavaScript functions with C# methods in our Blazor WebAssembly application. We are going to cover different situations and different ways to interact with the JS code from our C# classes.
If you want to see complete navigation for this series, you can visit our Blazor WebAssembly Page and find all of the articles from this series and many other articles as well.
So, let’s dive right into the business.
Preparing the Starting Project
For this article and the others in JS Interop with the .NET series, we are going to use the .NET 5 framework RC2 and Visual Studio 16.8.0 to support that.
So, let’s start by creating a new Blazor WebAssembly project.
With that out of the way, we are going to remove all the links except the Home link from the NavMenu component:
<div class="@NavMenuCssClass" @onclick="ToggleNavMenu">
    <ul class="nav flex-column">
        <li class="nav-item px-3">
            <NavLink class="nav-link" href="" Match="NavLinkMatch.All">
                <span class="oi oi-home" aria-hidden="true"></span> Home
            </NavLink>
        </li>
    </ul>
</div>
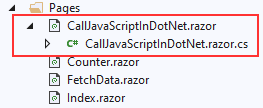
After that, let’s create two new files (CallJavaScriptInDotNet.razor and CallJavaScriptInDotNet.razor.cs) in the Pages folder:
Don’t forget to make the class partial.
Also, we are going to add a route to this component:
@page "/jsindotnet"

<h3>Call JavaScript In DotNet</h3>
Finally, let’s modify the Index component:
@page "/"

<h3>
    Use the following links to explore different examples
    of using a JS code with .NET in Blazor WebAssembly Project:
</h3>

<ul>
    <li>
        <a href="/jsindotnet">
            How to call JavaScript code from .NET
        </a>
    </li>
</ul>
This is going to be the starting point for our different examples. And we’ll store each section in a different component and create a new navigation link to it.
Now, we can move on.
Call JavaScript Functions from C# when JS Functions Return Void
Depending on the return type of our JavaScript functions, the code is going to be a bit different in our C# classes. So, we are going to explore different ways of calling JavaScript functions from C# in our examples.
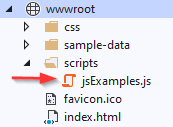
The first thing we are going to do is to create a new .js file in the wwwroot/scripts folder and name it jsExamples.js:
Now, let’s create a simple function that shows the alert message in our browser:
function showAlert(message) {
    alert(message);
}
This is a simple function that triggers the Javascript alert function, which shows the alert window with a custom message. Pay attention that with a function creation like this one, we are storing our showAlert function in the global window namespace. In the next section, we are going to see how to create a function but without storing it in the global window namespace.
Now, let’s import this file in the index.html file to be available in our project:
<body>
    <div id="app">Loading...</div>

    <div id="blazor-error-ui">
        An unhandled error has occurred.
        <a href="" class="reload">Reload</a>
        <a class="dismiss">🗙</a>
    </div>
    <script src="_framework/blazor.webassembly.js"></script>
    <script src="scripts/jsExamples.js"></script>
</body>
After that, let’s add new content in the CallJavaScriptInDotNet.razor file:
<div class="row">
    <div class="col-md-4">
        <h4>
            Example for calling a JS function returning void:
        </h4>
    </div>
    <div class="col-md-6">
        <button type="button" class="btn btn-info" @onclick="ShowAlertWindow">Show Alert Window</button>
    </div>
</div>
This is just a simple HTML to help us with the example.
Now, in the CallJavaScriptInDotNet.cs file, we are going to create the ShowAlertWindow method:
public partial class CallJavaScriptInDotNet
{
    [Inject]
    public IJSRuntime JSRuntime { get; set; }
    public async Task ShowAlertWindow()
    {
        await JSRuntime.InvokeVoidAsync("showAlert", "JS function called from .NET");
    }
}
Here, we first inject the IJSRuntime service, which we are going to use to invoke JavaScript functions. As you can see we are using the [Inject] attribute. For this to work we have to add two using directives:
using Microsoft.AspNetCore.Components;
using Microsoft.JSInterop;
Then, in the ShowAlertWindow method, we use the injected service to call the InvokeVoidAsync method. We have to pass the identifier, which is the name of the method, and the message parameter.
Now, we can start our app, navigate to this component, and press the button:
As you can see, we are able to call JavaScript functions with .NET with the small help of IJSRuntime service.
JavaScript Isolation in Blazor WebAssembly
From the .NET 5 (RC 1) version, we are able to isolate our JavaScript code as a standard JavaScript module.
This is beneficial because
- We no longer have to add our JS functions to the global window namespace
- We don’t have to manually import JavaScript files in the
index.htmlfile
So, let’s see how we can implement this in our example.
First, let’s remove the script code <script src="scripts/jsExamples.js"></script> from the index.html file.
Then, we have to modify our function in the jsExample.js file:
export function showAlert(message) {
    alert(message);
}
We use the export keyword to export this function from this file.
After that, we can modify the CallJavaScriptInDotNet.razor.cs file:
public partial class CallJavaScriptInDotNet
{
    [Inject]
    public IJSRuntime JSRuntime { get; set; }

    private IJSObjectReference _jsModule;

    protected override async Task OnInitializedAsync()
    {
        _jsModule = await JSRuntime.InvokeAsync<IJSObjectReference>("import", "./scripts/jsExamples.js");
    }

    public async Task ShowAlertWindow()
    {
        await _jsModule.InvokeVoidAsync("showAlert", "JS function called from .NET");
    }
}
In the OnInitializedAsync lifecycle method, we import our JavaScript module with the help of JsRuntime service. The import identifier is a special identifier that we use to import JS modules. Then, we can use the IJSObjectReference variable in the ShowAlertWindow method to call the function from our module.
Now, if we start our app one more time, navigate to the component and click the button, we are going to see the alert window again.
So with this approach, we can load the JS module when we need it and use it where we need it.
Sending Different Types of Parameters to JS Functions
While calling the showAlert function, we are passing a simple string message. But this communication supports more complex types as well.
To test this out, let’s modify the ShowAlertMessage method:
private async Task ShowAlertWindow() =>
    await _jsModule.InvokeVoidAsync("showAlert", new { Name = "John", Age = 35 });
Also, we are going to modify the showAlert function:
export function showAlert(obj) {
    const message = 'Name is ' + obj.name + ' Age is ' + obj.age;
    alert(message);
}
Now, we can repeat our testing steps and notify that our anonymous object was successfully sent to the JavaScript function:
Good.
Now, we can move on.
Using C# to Call JavaScript Functions that Return a Value
Up until now, we have seen how to call JavaScript functions with C# methods, when those JS functions don’t return a result. But of course, we don’t write only void functions, many of those return some values. So, let’s see how we can invoke these functions as well.
Let’s open our jsExample file, and add one more function:
export function emailRegistration(message) {
    const result = prompt(message);
    if (result === '' || result === null)
        return 'Please prvode an email'

    const returnMessage = 'Hi ' + result.split('@')[0] + ' your email: ' + result + ' has been accepted.';
    return returnMessage;
}
There’s nothing special in this snippet. We show the prompt with the message and accept the user’s response. If it is an empty string or null result we just return a default message. Otherwise, we create a return message and return it back to the .NET part of the application.
Now, let’s add a new HTML markup code in the CallJavaScriptInDotNet.razor file:
<div class="row">
    <div class="col-md-4">
        <h4>
            Example for calling a JS function returning result:
        </h4>
    </div>
    <div class="col-md-2">
        <button type="button" class="btn btn-info" @onclick="RegisterEmail">Register Email</button>
    </div>
    <div class="col-md-4">
        @_registrationResult
    </div>
</div>
Of course, we need to create our C# logic:
public partial class CallJavaScriptInDotNet
{
    [Inject]
    public IJSRuntime JSRuntime { get; set; }

    private IJSObjectReference _jsModule;
    private string _registrationResult;

    ...

    private async Task RegisterEmail() =>
        _registrationResult = await _jsModule.InvokeAsync<string>("emailRegistration", "Please provide your email");
}
This time, we use the InvokeAsync<string> method to call the JavaScript function that returns a string. Then, we just pass an identifier and an additional parameter. Also, we store the result in the _registrationResult field, which we show on the page.
To test this out, let’s start our app, navigate to the component, and click the Register Email button:
Once we click the OK button:
We can see the result on the right.
Note About Different Types
So, as you can see, we have to provide a type for the InvokeAsync method that corresponds to the return type from our JS function. Obviously, if our JS function returns an int or a boolean, we have to provide the appropriate type for the InvokeAsync function. That said, the same applies to objects. For example, if our JS function returns an object containing properties of the User class, the call to that function would be await _jsModule.InvokeAsync<User> where User is our C# class.
This means that Blazor automatically deserializes our JS object to a C# object, which is great.
We can see this in action if we create a new function in a .js file:
export function splitEmailDetails(message) {
    const email = prompt(message);
    if (email === '' || email === null)
        return null;

    const firstPart = email.substring(0, email.indexOf("@"));
    const secondPart = email.substring(email.indexOf("@") + 1);

    return {
        'name': firstPart,
        'server': secondPart.split('.')[0],
        'domain': secondPart.split('.')[1]
    }
}
Here, we extract different parts of an email address and return a new object with these properties. Of course, we assume that a user provides a valid email address (the validation is out of the scope of this article).
After that, we are going to create our EmailDetails helper class:
public class EmailDetails
{
    public string Name { get; set; }
    public string Server { get; set; }
    public string Domain { get; set; }
}
Then, let’s create a new method in our component’s class file:
public partial class CallJavaScriptInDotNet
{
    ...
    private string _detailsMessage;

    ...

    private async Task ExtractEmailInfo()
    {
        var emailDetails = await _jsModule.InvokeAsync<EmailDetails>("splitEmailDetails", "Please provide your email");

        if (emailDetails != null)
            _detailsMessage = $"Name: {emailDetails.Name}, Server: {emailDetails.Server}, Domain: {emailDetails.Domain}";
        else
            _detailsMessage = "Email is not provided.";
    }
}
In this method, we call the JS function and store the returned object inside the emailDetials variable. Then, we just populate the _detailsMessage field.
Finally, we have to add a new HTML markup:
<div class="row">
    <div class="col-md-4">
        <h4>
            Calling a JS function that returns an object:
        </h4>
    </div>
    <div class="col-md-2">
        <button type="button" class="btn btn-info" @onclick="ExtractEmailInfo">Email Details</button>
    </div>
    <div class="col-md-4">
        @_detailsMessage
    </div>
</div>
And that’s it.
We can start our application, navigate to the component, and click the Email Details button. Once the popup appears, let’s enter [email protected]. After we click the OK button:
We can see the result.
Conclusion
So, now we know how to call JavaScript functions with C# methods using JSInterop features. Also, we have learned how to isolate our JavaScript functions and how to register JS modules without using the <script> element in the index.html file. For now, we only have communication from .NET methods to JS functions, but, we will also cover communication the other way around in one of our next articles from this series.
In the next article, we are going to talk about using JSInterop with Blazor WebAssembly Lifecycle, how to pass HTML elements to JS functions, and how to handle JS errors.
See you there.


