In this article, we’re going to explore the Google Sheets API using the Google Sheets Client Library for .NET. We’ll start with configuring the Google Sheets API in the Google developer console. Then we’ll build an ASP.NET Core application that can read and write data into a google sheet.
Sounds interesting? Let’s get started.
Introduction to Google Sheets API
The Google API Client Libraries are available for different programming languages such as C#, Java, JavaScript, Python, etc. It exposes many Google services via the SDKs which we can consume from our applications.
Using the Google API Client Libraries, we can give our applications access to various Google services with the user’s authorization. Apart from providing better integration with various programming languages, the Google API client libraries offer improved security and enable making calls with user authorization.
In this example, we are going to use the Google Sheets Client Library for .NET, which offers a simple, yet flexible way to read and write Google Sheets data from .NET applications.
Configuring the Google Sheets API
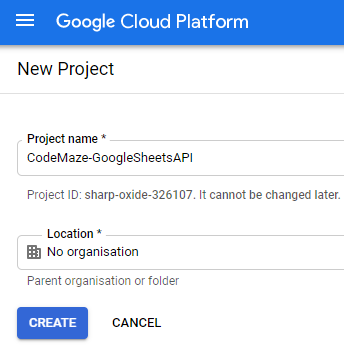
For accessing the Google Sheets API, first, we need to set up the API access in the google developer console. If we do not have any workspace projects created yet, we need to create one to get started:
Once the new project is created, it will take us to the project dashboard.
From the project dashboard, we need to navigate to the APIs Overview section by clicking on the Go to APIs Overview link on the APIs card.
This will take us to the APIs and Services section.
From there, we need to click on ENABLE APIS AND SERVICES button:
This will navigate us to the API Library screen and from there let us search for the Google Sheets API and navigate to it by clicking on the result.
Once we are in the Google Sheets API screen, we can enable it by clicking on the Enable button.
Having enabled the Google Sheets API in the Google Developer Console, let’s proceed to create the credentials.
Creating Credentials
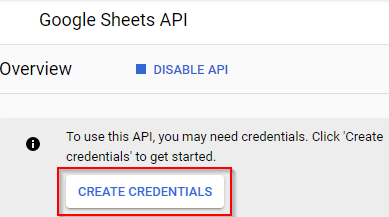
For connecting to Google Sheets API from our applications, we need to create the credentials. We can do that by clicking on the CREATE CREDENTIALS button:
In the next screen, we need to choose the credential type:
- Google Sheets API for Select an API
- Application Data for the type of data that we’ll be accessing and
- No, I’m not using them for whether we’re planning to use this API with google cloud services
After making these selections and clicking on the Next button, we need to create a service account.
Creating Service Account
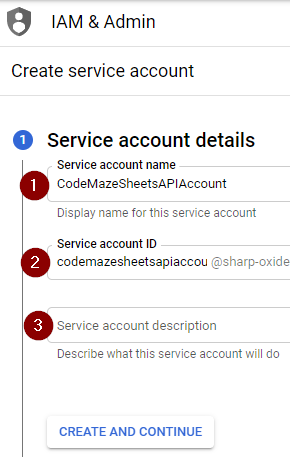
A service account is required for our application to access google sheets. We need to specify a few details for creating a service account:
- First, we need to give a Service Account Name
- We can use the auto-generated Service account ID, but remember to note it down as we will need it later.
- Optionally, we can give a Service account description
After giving these details, we can click on the CREATE AND CONTINUE button.
This will create a service account for us.
Generating Keys
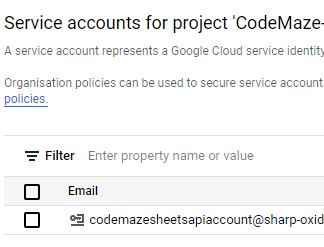
We can find the newly created Service Account in the Service Accounts section:
Now we need to generate keys for this service account which we can use from our application to connect with Google Sheets.
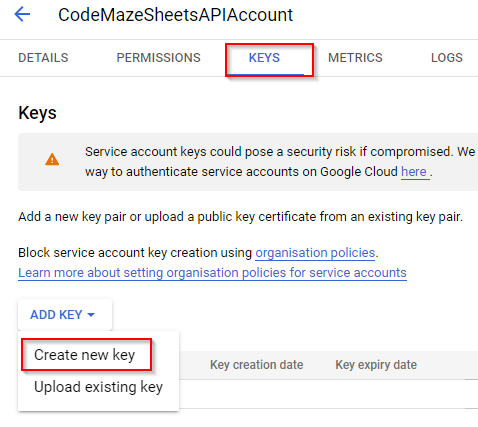
For that, first, we need to navigate to the service account by clicking on the service account email, then navigate to the Keys tab and select the Create new key option of the ADD KEY dropdown:
This will display a popup window on which we need to choose the JSON key type and click on the CREATE button.
In doing so, it will generate the JSON key file and save it to our system. We need to store this key file securely as it will be required when we need to connect our application to Google Sheets.
Additionally, remember to note down the service account email as we will need to give this account access to the Google Sheet that we are planning to use for this example.
Great!
We have completed all steps for configuring the google sheets API.
Setting up a Google Sheet with Data
Next, let’s create a Google Sheet for use in this example.
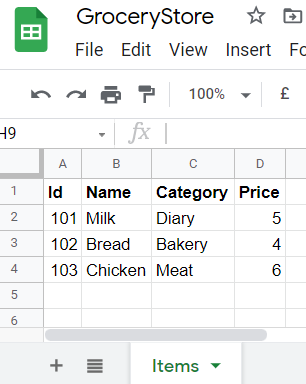
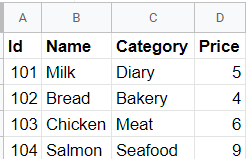
Let’s create a google spreadsheet named GroceryStore, add a sheet called Items, and populated it with some data:
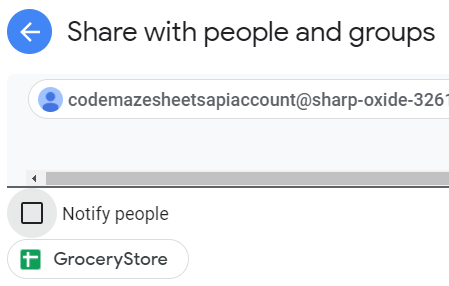
After that, we need to give the service account permission to access and edit this spreadsheet by using the share option:
Cool!
Our google sheet is ready with data and we have provided the service account access to it.
Now we can connect our application to this sheet using the service account.
Building an App that Connects with Google Sheets API
We are going to build an application and connect it with the google sheet that we created in the previous section. For that, first, let’s create an ASP.NET Core Web API project.
While creating the API project, make sure to leave the Enable OpenAPI support option checked. This will ensure that swagger is enabled by default for the API.
In case we’re using an older version of .NET where this option is not available, we can always Configure Swagger in ASP.NET Core Web API manually.
After creating the project, we need to add the JSON file that contains the key into it. Let’s rename the file to client_secrets.json.
The next step is to install the Google.Apis.Sheets.v4 NuGet package:
Install-Package Google.Apis.Sheets.v4
This package enables us to connect to and work with Google sheets from our application.
Creating the Helper Class
Now let’s create a helper class to work with Google Sheets API Client Library:
public class GoogleSheetsHelper
{
    public SheetsService Service { get; set; }
    const string APPLICATION_NAME = "GroceryStore";
    static readonly string[] Scopes = { SheetsService.Scope.Spreadsheets };

    public GoogleSheetsHelper()
    {
        InitializeService();
    }

    private void InitializeService()
    {
        var credential = GetCredentialsFromFile();
        Service = new SheetsService(new BaseClientService.Initializer()
        {
            HttpClientInitializer = credential,
            ApplicationName = APPLICATION_NAME
        });
    }

    private GoogleCredential GetCredentialsFromFile()
    {
        GoogleCredential credential;
        using (var stream = new FileStream("client_secrets.json", FileMode.Open, FileAccess.Read))
        {
            credential = GoogleCredential.FromStream(stream).CreateScoped(Scopes);
        }

        return credential;
    }
}
In this class, we have declared a property named Service which is of SheetsService type.
Additionally, we have declared a constant APPLICATION_NAME, which is just a name for representing our application, and a read-only variable Scopes, which specifies the scope for our credentials.
From the constructor, we invoke the InitializeService() method, which first gets the credential from the JSON key file and then initializes the SheetsService instance.
With that, the helper class is ready.
Next, let’s configure this as a singleton service in the ConfigureServices() method of the Startup file:
public void ConfigureServices(IServiceCollection services)
{
    ...
    services.AddSingleton(typeof(GoogleSheetsHelper));
}
Please note that if we are using a .NET 6 project template without a Startup class, we can do this in the Program class.
Cool!
Defining the Entity and Mapper
Next, let’s create an entity class to work with the google sheets data:
public class Item
{
    public string Id { get; set; }
    public string Name { get; set; }
    public string Category { get; set; }
    public string Price { get; set; }
}
While working with google sheets API, it represents each cell data as an object type. For representing a row of data, which is nothing but a collection of cells, it uses IList<object>. Similarly, it uses an IList<IList<object>> for representing a range of data consisting of multiple rows.
So, while working with sheet data, we need to convert our entity to and from these types. Let’s define a mapper class for handling these conversions:
public static class ItemsMapper
{
    public static List<Item> MapFromRangeData(IList<IList<object>> values)
    {
        var items = new List<Item>();

        foreach (var value in values)
        {
            Item item = new()
            {
                Id = value[0].ToString(),
                Name = value[1].ToString(),
                Category = value[2].ToString(),
                Price = value[3].ToString()
            };

            items.Add(item);
        }

        return items;
    }

    public static IList<IList<object>> MapToRangeData(Item item)
    {
        var objectList = new List<object>() { item.Id, item.Name, item.Category, item.Price };
        var rangeData = new List<IList<object>> { objectList };
        return rangeData;
    }
}
Here the MapFromRangeData() method accepts a range of spreadsheet data, which could represent one or more rows, and converts it into a collection of items. Similarly, the MapToRangeData() method converts an Item entity to spreadsheet data, ie IList<IList<object>> type.
Building the API Controller
Now let’s go ahead and build a controller class for performing the CRUD operations:
[Route("api/[controller]")]
[ApiController]
public class ItemsController : ControllerBase
{
    const string SPREADSHEET_ID = "143JhAuG7l_tSk5WMR4A1t1YuC-jL3r-DLmzw_WvC_bk";
    const string SHEET_NAME = "Items";

    SpreadsheetsResource.ValuesResource _googleSheetValues;

    public ItemsController(GoogleSheetsHelper googleSheetsHelper)
    {
        _googleSheetValues = googleSheetsHelper.Service.Spreadsheets.Values;
    }

    [HttpGet]
    public IActionResult Get()
    {
        var range = $"{SHEET_NAME}!A:D";

        var request = _googleSheetValues.Get(SPREADSHEET_ID, range);
        var response = request.Execute();
        var values = response.Values;

        return Ok(ItemsMapper.MapFromRangeData(values));
    }

    [HttpGet("{rowId}")]
    public IActionResult Get(int rowId)
    {
        var range = $"{SHEET_NAME}!A{rowId}:D{rowId}";
        var request = _googleSheetValues.Get(SPREADSHEET_ID, range);
        var response = request.Execute();
        var values = response.Values;

        return Ok(ItemsMapper.MapFromRangeData(values).FirstOrDefault());
    }

    [HttpPost]
    public IActionResult Post(Item item)
    {
        var range = $"{SHEET_NAME}!A:D";
        var valueRange = new ValueRange
        {
            Values = ItemsMapper.MapToRangeData(item)
        };

        var appendRequest = _googleSheetValues.Append(valueRange, SPREADSHEET_ID, range);
        appendRequest.ValueInputOption = AppendRequest.ValueInputOptionEnum.USERENTERED;
        appendRequest.Execute();

        return CreatedAtAction(nameof(Get), item);
    }

    [HttpPut("{rowId}")]
    public IActionResult Put(int rowId, Item item)
    {
        var range = $"{SHEET_NAME}!A{rowId}:D{rowId}";
        var valueRange = new ValueRange
        {
            Values = ItemsMapper.MapToRangeData(item)
        };

        var updateRequest = _googleSheetValues.Update(valueRange, SPREADSHEET_ID, range);
        updateRequest.ValueInputOption = UpdateRequest.ValueInputOptionEnum.USERENTERED;
        updateRequest.Execute();

        return NoContent();
    }

    [HttpDelete("{rowId}")]
    public IActionResult Delete(int rowId)
    {
        var range = $"{SHEET_NAME}!A{rowId}:D{rowId}";
        var requestBody = new ClearValuesRequest();

        var deleteRequest = _googleSheetValues.Clear(requestBody, SPREADSHEET_ID, range);
        deleteRequest.Execute();

        return NoContent();
    }
}
In the controller, first, we have declared constants for SPREADSHEET_ID and SHEET_NAME. We can get the spreadsheet Id from the URL of the google sheet and the sheet name is the name of the sheet that we’re working with.
After that, we have declared a _googleSheetValues variable which is of SpreadsheetsResource.ValuesResource type. This enables us to work with spreadsheet values.
Then, we inject the google sheets helper class into the controller, and using that, we set the spreadsheet values.
The Action Methods
We have defined two GET methods in this controller- one for fetching all the rows of data and the second one for fetching a specific row of data. In the first method, we just need to specify the column range whereas, in the second method, we pass the row number as an argument, and using that we build the cell range corresponding to that specific row of data.
Once we have the data range, we can request data from the google Sheets service using the Get operation by specifying the spreadsheet Id and data range.
As soon as we receive the response from the google sheet service, we need to convert it to our entity type using the mapper method before returning it.
Similarly, for the POST method, first, we have to convert the item type to the data range format supported by google sheets. After that, we need to make a call to the sheets service by specifying the spreadsheet id and column range. For inserting new rows, we can use the Append operation on spreadsheet values and we need to specify the type of new values as USERENTERED.
For the PUT method, we pass the row number as an argument to the action method, and using that we build the row data range. Then we convert the item to spreadsheet data format. Note that here we use the Update operation on spreadsheet values, but sets the type as the same-USERENTERED.
For deleting a row of data, we clear a range of values in the spreadsheet using the Clear operation and specifying the row data range. Additionally, we specify the request body as ClearValuesRequest.
That’s it. The API controller is ready.
Testing the App
Now it’s time to test the application.
Let’s run the application and invoke the GET endpoint without specifying any arguments first:
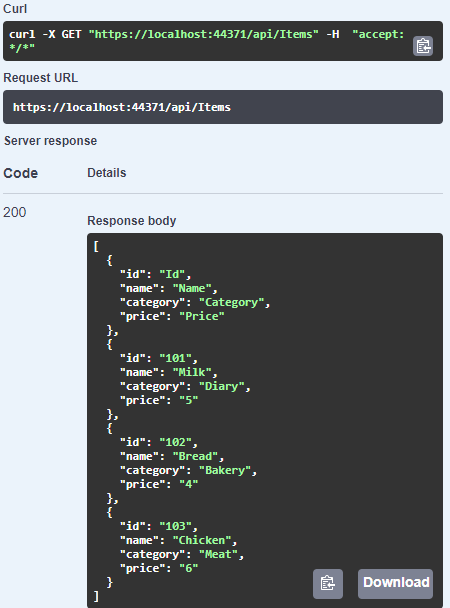
This will list all the rows that we have on the sheet.
Great!
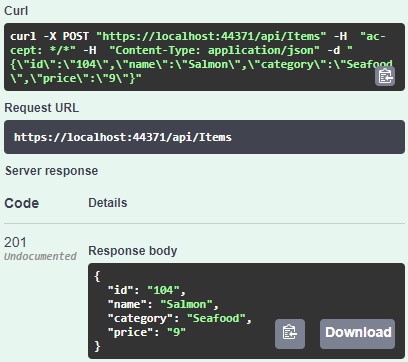
Next, let’s try to create a new row by invoking the POST endpoint and supplying the data:
Cool! We can see that the request is successful.
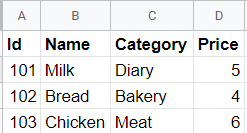
Let’s check the google sheet for new data:
We can see that it creates a new row of data.
Excellent!
Now let’s try to update the price column of this new record by invoking the PUT endpoint.
Once this request completes, we can verify the changes by invoking the GET request once again, but this time by supplying the row number as well so that we can fetch just that row of data:
We can see that our changes are reflected in the sheet.
Finally, let’s try to delete this row of data by invoking the DELETE endpoint.
The successful operation indicates that it deleted the specified row of data.
Let’s verify this in the google sheets:
We can see that the row is now deleted.
Conclusion
In this article, we have learned how to work with Google Sheets API using .NET Core.
We have learned the following topics:
- Google Sheets API & Client Libraries
- Configuring the Google Sheets API
- Building a .NET Core application to work with Google Sheets
Until the next article.
All the best.


