Email Confirmation is quite an important part of the user registration process. It allows us to verify the registered user is indeed an owner of the provided email. But why is this important?
Well, let’s imagine a scenario where two users with similar email addresses want to register in our application. Michael registers first with [email protected] instead of [email protected] which is his real address. Without an email confirmation, this registration will execute successfully. Now, Michel comes to the registration page and tries to register with his email [email protected]. Our application will return an error that the user with that email is already registered. So, thinking that he already has an account, he just resets the password and successfully logs in to the application.
We can see where this could lead, and what problems it could cause.
VIDEO: Improve User Registration Logic With Verify/Confirm Email Flow - ASP.NET Core Identity and Web API.
To navigate through the entire series, visit the ASP.NET Core Identity series page.
Enabling Email Confirmation in a Project
To enable Email Confirmation in ASP.NET Core Identity, we have to modify the configuration part:
opt.Password.RequiredLength = 7;
opt.Password.RequireDigit = false;
opt.Password.RequireUppercase = false;

opt.User.RequireUniqueEmail = true;

opt.SignIn.RequireConfirmedEmail = true;
We use the SignIn property from the IdentityOptions class and then initialize the RequireConfirmedEmail to true. By doing that, we specify that SigninManager checks if the email is confirmed before successfully signing in the user.
If we check our database, we are going to see that our user doesn’t have a confirmed email address:
![]()
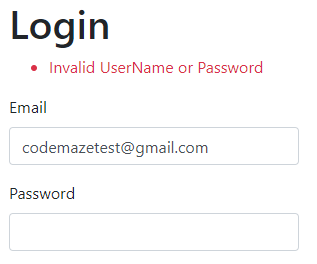
Now, let’s see what’s going to happen when this user tries to log in:

As we can see, we get the Invalid UserName or Password error message, even though we provide valid credentials. But this is just because we haven’t modified the Login logic to support the email confirmation functionality. If we inspect the console log though, we are going to see the real reason for the login failure:

Of course, our users won’t look at the console to understand what went wrong, so we have to adjust the Login action.
Modifying the Login Action to Support Email Confirmation
As we said, we don’t want to see an „Invalid Username or Password“ message if an email is not confirmed. We can change that message to something generic like „Invalid Login Attempt“:
public async Task<IActionResult> Login(UserLoginModel userModel, string returnUrl = null)
{
    //Code removed for clarity reasons
    if (result.Succeeded)
    {
        return RedirectToLocal(returnUrl);
    }
    else
    {
        ModelState.AddModelError("", "Invalid Login Attempt");
        return View();
    }
}
Additionally, if we explicitly want to notify our user about email confirmation error, we can use the helper method from UserManager:
await _userManager.IsEmailConfirmedAsync(User user)
Now, if we test the Login functionality again, we are going to see a new message on the form.
Implementing Email Confirmation in the Registration Process
To Implement Email Confirmation in our project, we have to modify the POST Register action and to add an additional action as well.
So, let’s start with the modification first:
[HttpPost]
[ValidateAntiForgeryToken]
public async Task<IActionResult> Register(UserRegistrationModel userModel)
{
    if (!ModelState.IsValid)
    {
        return View(userModel);
    }

    var user = _mapper.Map<User>(userModel);

    var result = await _userManager.CreateAsync(user, userModel.Password);
    if (!result.Succeeded)
    {
        foreach (var error in result.Errors)
        {
            ModelState.TryAddModelError(error.Code, error.Description);
        }

        return View(userModel);
    }

    var token = await _userManager.GenerateEmailConfirmationTokenAsync(user);
    var confirmationLink = Url.Action(nameof(ConfirmEmail), "Account", new { token, email = user.Email }, Request.Scheme);

    var message = new Message(new string[] { user.Email }, "Confirmation email link", confirmationLink, null);
    await _emailSender.SendEmailAsync(message);

    await _userManager.AddToRoleAsync(user, "Visitor");

    return RedirectToAction(nameof(SuccessRegistration));
}
As with the ForgotPassword action, we create a token but with a different helper method: GenerateEmailConfirmationTokenAsync(TUser). Then, we create a confirmation link and send a message to the user. Of course, we have to create two additional actions that we call in this action: ConfirEmail and SuccessRegistration.
Additional Actions and Views
First, let’s create these actions:
[HttpGet]
public async Task<IActionResult> ConfirmEmail(string token, string email)
{
    return View();
}

[HttpGet]
public IActionResult SuccessRegistration()
{
    return View();
}
And views as well:
<h1>ConfirmEmail</h1>

<div>
    <p>
        Thank you for confirming your email.
    </p>
</div>
<h1>SuccessRegistration</h1>
<p>
Please check your email for the verification action.
</p>
Now, all we have to do is to implement the ConfirmEmail action:
[HttpGet]
public async Task<IActionResult> ConfirmEmail(string token, string email)
{
    var user = await _userManager.FindByEmailAsync(email);
    if (user == null)
        return View("Error");

    var result = await _userManager.ConfirmEmailAsync(user, token);
    return View(result.Succeeded ? nameof(ConfirmEmail) : "Error");
}
Well, we check if the user exists in the database by email. If it’s not, we return an error view. Otherwise, we use the ConfirmEmailAsync method to confirm received email and depending on the result, return either ConfirmEmail or Error view.
So, let’s just add the Error action and create the Error view:
[HttpGet]
public IActionResult Error()
{
    return View();
}
<h1 class="text-danger">Error.</h1>
<h2 class="text-danger">An error occurred while processing your request.</h2>
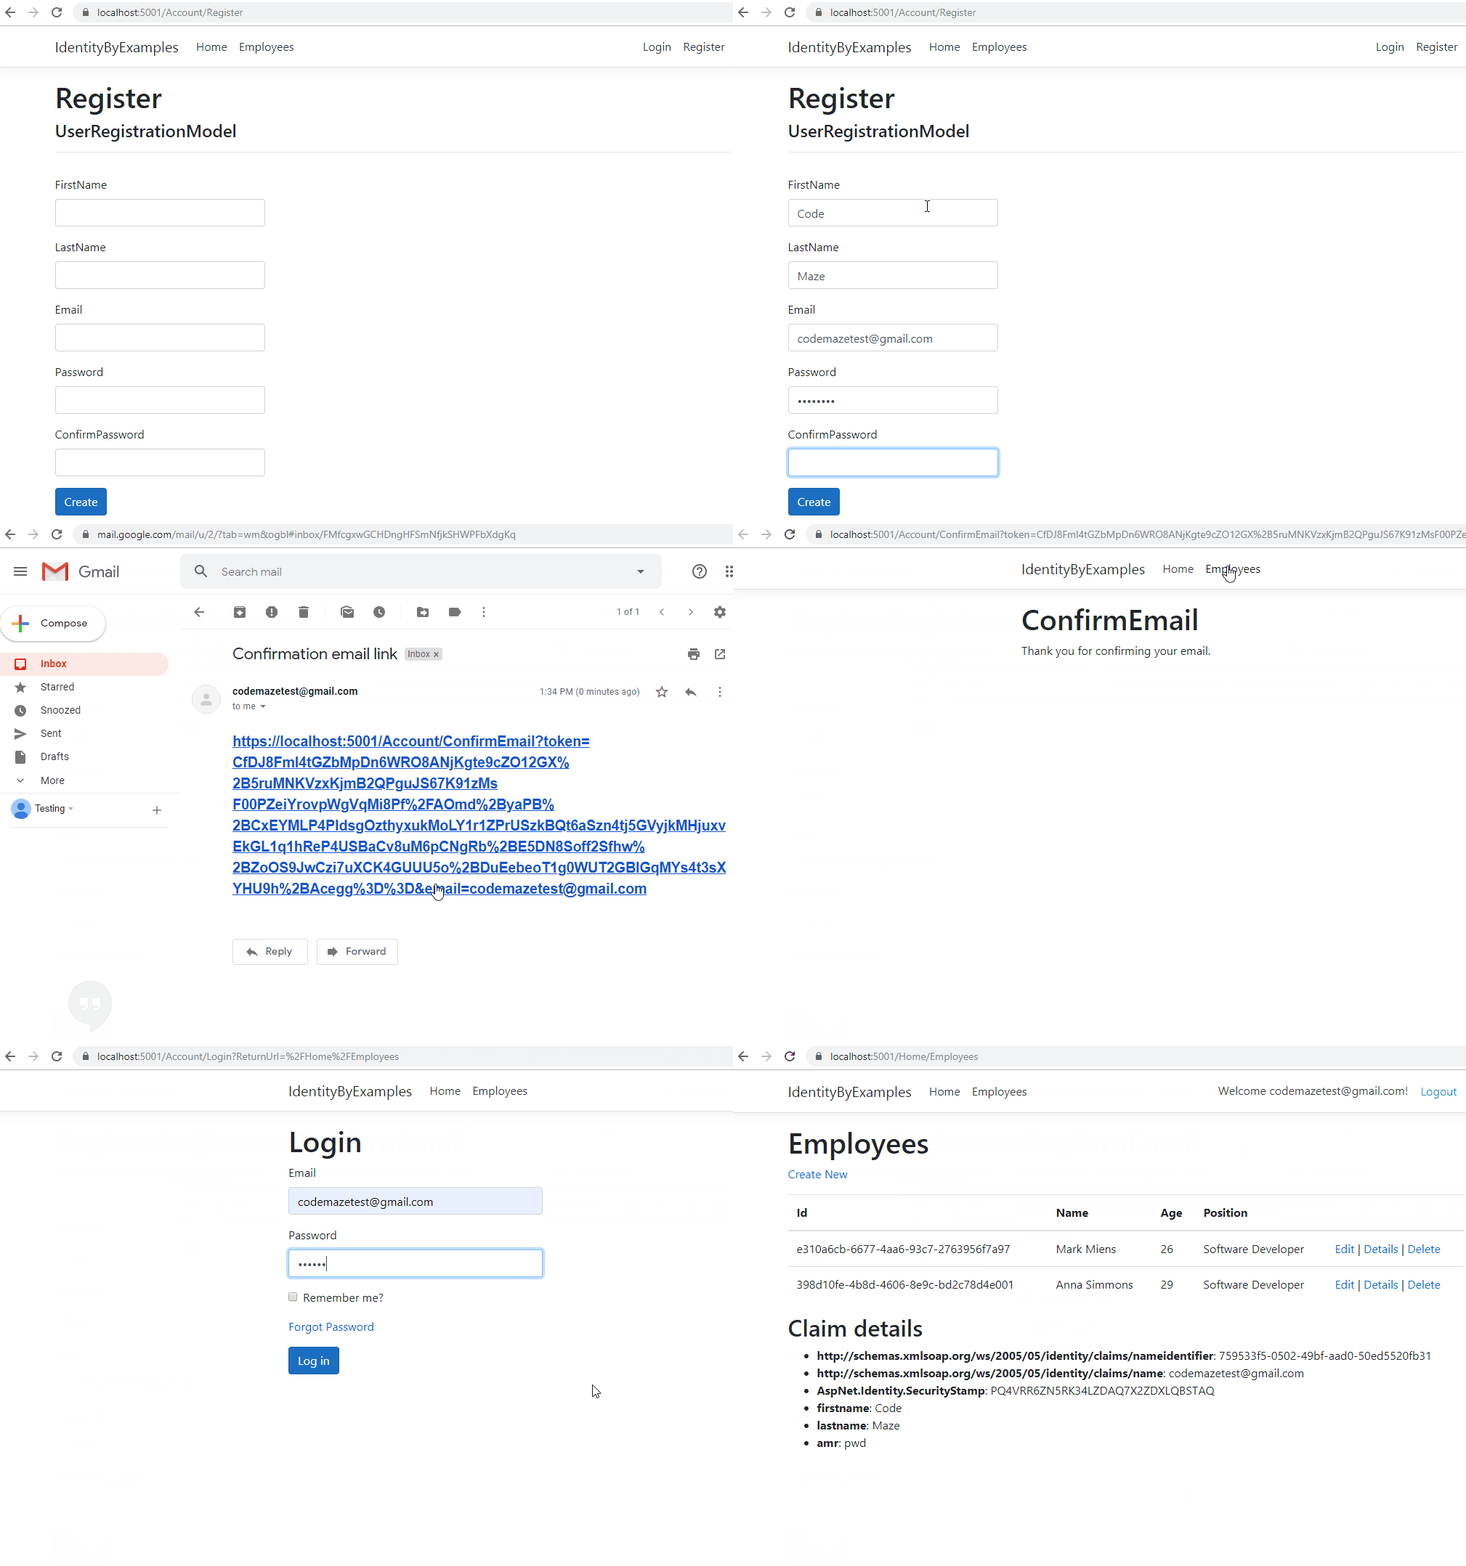
With all that in place, we are ready for the test. We are going to delete an existing user from the database and create the same one again:

Let’s check our database to see what we did:

Excellent.
But still not completed.
Modifying Lifespan of the Email Token
Now, if we check the ConfigureServices method, we are going to see that this token will last for two hours as well as the reset password token.
DataProtectionTokenProviderOptions class.But, we don’t want our email token to last two hours – usually, it should last longer. For the reset password functionality, a short period of time is quite ok, but for the email confirmation, it is not. A user could easily get distracted and come back to confirm its email after one day for example. Thus, we have to increase a lifespan for this type of token.
To do that, we have to create a custom token provider.
Let’s create the CustomTokenProviders folder with the EmailConfirmationTokenProvider class:
namespace IdentityByExamples.CustomTokenProviders
{
    public class EmailConfirmationTokenProvider<TUser> : DataProtectorTokenProvider<TUser> where TUser : class
    {
        public EmailConfirmationTokenProvider(IDataProtectionProvider dataProtectionProvider,
            IOptions<EmailConfirmationTokenProviderOptions> options,
            ILogger<DataProtectorTokenProvider<TUser>> logger)
            : base(dataProtectionProvider, options, logger)
        {
        }
    }

    public class EmailConfirmationTokenProviderOptions : DataProtectionTokenProviderOptions
    {

    }
}
And that’s all we have to do. Create a class that implements DataProtectionTokenProvider and override its constructor with the custom token provider options class.
Now, we can modify the configuration. Of course, for .NET 6 and later, the code is completely the same. Just we have to use builder.Services property instead of the services parameter:
services.AddIdentity<User, IdentityRole>(opt =>
{
    opt.Password.RequiredLength = 7;
    opt.Password.RequireDigit = false;
    opt.Password.RequireUppercase = false;

    opt.User.RequireUniqueEmail = true;

    opt.SignIn.RequireConfirmedEmail = true;

    opt.Tokens.EmailConfirmationTokenProvider = "emailconfirmation";
})
 .AddEntityFrameworkStores<ApplicationContext>()
 .AddDefaultTokenProviders()
 .AddTokenProvider<EmailConfirmationTokenProvider<User>>("emailconfirmation");

 services.Configure<DataProtectionTokenProviderOptions>(opt =>
     opt.TokenLifespan = TimeSpan.FromHours(2));

 services.Configure<EmailConfirmationTokenProviderOptions>(opt =>
     opt.TokenLifespan = TimeSpan.FromDays(3));
So, in the AddIdentity method, we state that we want our EmailConfirmationTokenProvider to use the provider with the name „emailconfirmation“. Then, we register our custom token provider with the AddTokenProvider<T> method, and finally, configure its life span to three days.
And we’ve finished our job.
Conclusion
We did a great job here. We have covered all the things we require for a successful email confirmation.
In the next article, we are going to learn how to implement lockout functionality in our project.


