

In this article, we are going to discuss the topic of source code documentation. We’ll discuss why generating source code documentation is important and how DocFx helps with this task.
Let’s start with the basics: why we need to document code.
Why We Need to Document Code
As developers, our main job is to write code. But we often neglect the fact that in order to write the correct code, we need to understand how the code works, what the standards are in the codebase, and have the right information presented in a concise way in order to make the right decisions. Otherwise, we’ll likely lean on past experiences or the most appropriate reference point in the area of code we are touching.
This is why we need to ensure we have a well-documented codebase. This extends beyond class definitions, project structure, and basic commenting. It means having a single source of truth to help guide developers through the task of enhancing the code.
Let’s dive into a few specific needs for good documentation:
- Onboarding: when new developers join our team, it’s critical they understand how our code works so they can be productive as soon as possible.
- Engineering guidelines: up front, we should clearly document how we like to format code and what design patterns we’d like to apply, to save countless hours of debate during a particular task.
- Keeping things in sync: once we have documentation in place, we need to automatically keep it in sync with the code instead of relying on developers to manually update them.
These are some of the needs that DocFx does a great job of addressing. Let’s dig into how DocFx helps.
Intro to DocFx
DocFx is an open-source source code documentation tool developed by Microsoft. It was initially released a number of years ago but has come leaps and bounds in recent times.
The main features of DocFx are:
- Enables us to generate documentation based on XML comments in code or markdown files
- Includes static site generation, meaning it can be hosted anywhere
- It runs as a standalone tool, meaning we can also run on CI/CD
- We are easily able to customize the output
We’ll touch on each of these features throughout the article. But first off, let’s look at setting up DocFx.
Setting up DocFx
There are a few ways to set up DocFx. The simplest is to install it via Chocolatey, so let’s run the command:
choco install docfx -y.
This command will install DocFx for us, and add it to the PATH variable, meaning we can run DocFx from anywhere.
Now that we are good to go, in the next section let’s create a basic documentation site using DocFx.
Creating a Simple Documentation Site
The first step in creating a DocFx site is to initialize our site using the docfx init command. This will create the structure for us necessary to host the site.
In this article, let’s assume the app we have is a basic Calculator, and we are going to add some basic documentation around it.
Let’s create a folder called CalculatorDocumentation, open a command prompt and run the docfx init -q command.
This will create the docfx_project folder for us, with default settings. The -q option simply means to generate the project “quietly”, that is to keep the defaults. If we want to customize the behavior, we can explore the options using the docfx init command, but for now, let’s keep the defaults.
After we execute our command, we will be able to find several folders docfx has created for us:
api: this is where DocFx creates documentation based on source code, e.g XML comments or csproj filesapidoc: this one contains Markdown files where we can override the XML comment defaultsarticles: this is non-code documentation, for example, how-to guides or engineering guidelinesimages: if we want to add images to our Markdown files, we can add them heresrc: this is where we can place our CSPROJ project files used to generate source code
Let’s now highlight each important file:
docfx.json:this is the DocFx configuration file. We can use it to make general configuration articles, which we’ll do later in the articleindex.md:the main page, written in markdowntoc.yml:the table of contents for our documentation site
Running our Site
Now that we have our site scaffolded, we can build and run it.
Let’s run the command:
docfx docfx_project/docfx.json
This tells DocFx to create our site, based on the folder and configuration file we created. We can notice a _site folder, which is our documentation site.
From this point, we can host this site anywhere. For the moment, we can use DocFx’s built-in web server to preview our site locally using the command:
docfx serve docfx_project/_site
Let’s now open localhost:8080 in a browser, and notice our new documentation site:

We can click the “Articles” header option and see an Introduction page. This is where we’d start our onboarding documentation. We can click the “Api Documentation” header option and see a placeholder article. This is where our auto-generated source code documentation goes.
Now that we’ve done the basic site, let’s add some meaningful documentation in the next section.
Adding Technical Documentation
In order to add some technical documentation, of course, we need some code! So in the src folder that DocFx created for us, let’s create the Calculator class library, and replace the Class1 default class with the App class:
namespace Calculator;

/// <summary>
/// This is our Calculator app, which performs basic mathmatical operations.
/// </summary>
public static class App
{
    /// <summary>
    /// Takes two numbers and adds them together
    /// </summary>
    /// <param name="one">The first number</param>
    /// <param name="two">The second number</param>
    /// <returns>int</returns>
    public static int Add(int one, int two)
        => one + two;

    /// <summary>
    /// Subtracts the second number from the first number
    /// </summary>
    /// <param name="one">The first number</param>
    /// <param name="two">The second number</param>
    /// <returns>int</returns>
    public static int Subtract(int one, int two)
        => one - two;
}
Nothing too much to our class here. We are creating a couple of basic methods, which we can soon add documentation around. The important thing to notice here is we are adding basic XML documentation around the class name and the two methods. This is what will form the heart of the DocFx documentation. This is a very familiar approach to us, as since we are good developers we should already be using XML documentation 🙂
Now we can run the docfx command from the docfx_project folder. Since we are in the proper folder, we don’t need to provide a path to the docfx.json file as before.
Immediately after that command, let’s run docfx serve docfx_project/_siteagain, and notice our new documentation for our calculator class:
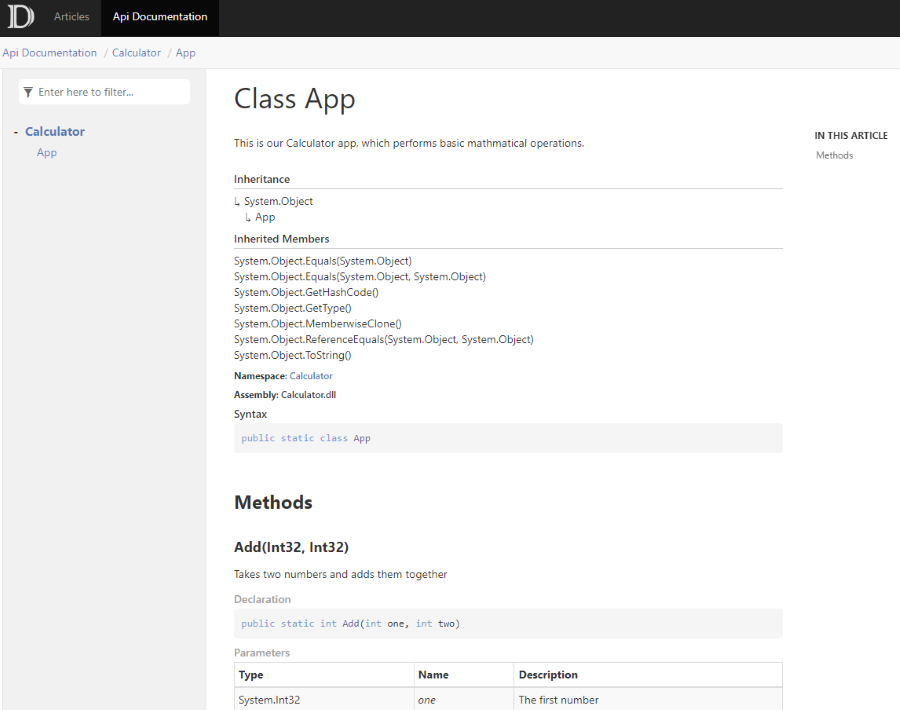
As expected, DocFx generates some nice documentation for us based on our minimal XML documentation. We can go much further and add more classes, and more methods and they will show up here in our API documentation section.
If we think about what we have achieved here, we are enabling people to understand what our code is doing without browsing the source code. This is very similar to how Microsoft does its official documentation.
Adding Swagger Documentation
DocFx supports adding Swagger documentation automatically. That is, we just need to add the swagger.json file, update our config, and DocFx will enable the documentation.
We can head over to https://petstore.swagger.io/v2/swagger.json and download this file to the restapi folder in our project.
Then, we can add a toc.md file:
# [Pet Store API](petstore.json)
Update our build section in our config:
{
    "files": [
        "articles/**.md",
        "articles/**/toc.yml",
        "toc.yml",
        "*.md",
        "restapi/**"
    ]
}
And finally, modify our toc.yml:
- name: Coding Guidelines
  href: articles/
- name: Source Code
  href: api/
  homepage: api/index.md
- name: REST API
  href: restapi/
After these changes, we can build and run our site again we’ll see that we now have the PetStore swagger UI:
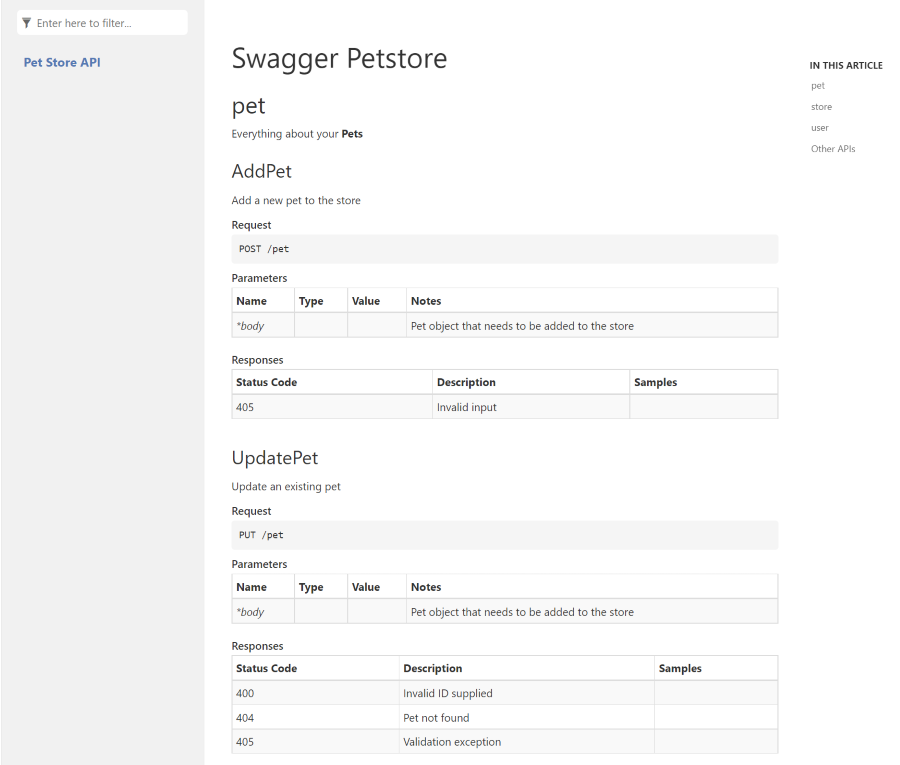
This of course isn’t like the fully-fledged interactive version of Swagger UI, but it’s great for quickly browsing API documentation. We’ve referenced an external Swagger JSON file here for the purposes of this article, but in reality, we would be using our own one, perhaps written to disk as part of a build step.
Customizing the Website
So far all we have is a default intro page and a single Calculator documentation app. Let’s now go a bit further and customize some basic bits.
First off, let’s update the header to be more realistic to our use case.
Adding Coding Guidelines
Let’s open toc.yml and make some adjustments:
- name: Coding Guidelines
  href: articles/
- name: Source Code
  href: api/
  homepage: api/index.md
We simply change the name property for our two header links to be relevant to what a documentation site would normally contain. We’ve kept the href property as is, but if we wanted to change this we could, and just change the folder structure.
Let’s open the toc.yml file in the articlesfolder, and replace with:
- name: C# Engineering Guidelines
  href: csharp-guidelines.md

- name: Testing
  href: testing.md
Let’s then add a csharp-guidelines.md markdown file:
# C# Guidelines
## General
- Use four spaces of indentation (no tabs!)
- Avoid `this`, unless necessary
- Use async/await for any operations that include I/O (e.g reading/writing to a disk, database/network calls, etc)

## Validation
- Use FluentValidation to guard client input (e.g on API's)
- Use built-in argument checks for all method parameters

## Commenting
- Use XML comments on all classes and public methods
- Don't use comments for obvious logic
The content here is obviously irrelevant to this article, we are just demonstrating how to create a static guidelines page, which we can use to onboard our developers before they write code.
To continue, let’s add a testing.md markdown file:
# Testing
## Unit tests
- All methods should be unit tested
- Test the happy path and some failing paths
- Use code coverage tools to validate your work

## Integration tests
- All database calls should be tested
- Use an inmemory database where possible
If we build and run our site again, we have our two new documentation pages, including the navigation on the left-hand menu:
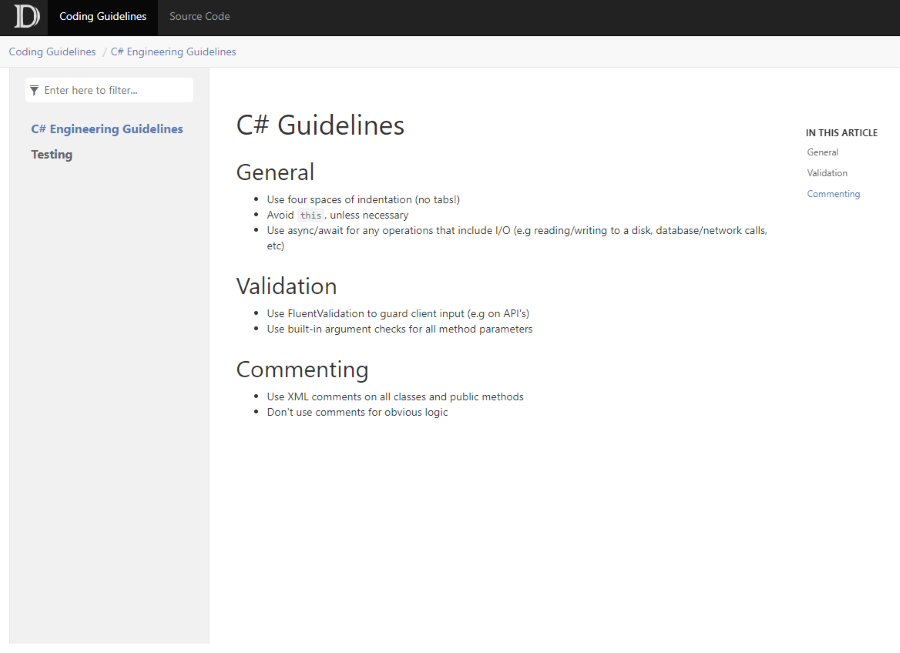
This is now looking like a real documentation site.
Customizing the Theme
To make our site feel even nicer, let’s change the look and feel to match our needs.
If our company/project had some assets/themes, this would be the opportunity to integrate things. DocFx works off the concept of templates. That is, when we executed the docfx init -q command at the beginning of the article, we generated our site using the default template shipped with DocFx. We can however override this template to suit our needs, so let’s go ahead and do that.
Overriding the Default Template
First off, we need to export the default template at the root of our project:
docfx template export default
Next, we need to create our own template folder at the root of our project folder. Let’s call that templates, and in that folder create a new mytemplate folder.
We should end up with this structure:
<root>_exported_templatesdocfx_projecttemplatesmytemplate
What we are able to now do is take any of the content in the default template located in _exported_templates/default and place it in our mytemplate folder to override it.
For example, let’s create the main.css file and add it to a new styles folder in our mytemplate folder:
body {
    font-family:Arial, Helvetica, sans-serif;
    color: blue;
}

h1 {
    color: red;
}
Here are we simply changing the font for our site, and setting some colors.
To make DocFx use our new template, we can make a small change to the template section of docfx.json:
"template": [
    "default",
    "templates/mytemplate"
],
This lets DocFx know that we have a template we’d like to use in addition to the default one. The templates are applied sequentially. That is, the default template is the base, and we are overriding things with our template mytemplate.
If we build and serve our site again, we’ll see the new styles.
This is just a small demonstration of what we can override. We can go further and override the default images, favico.ico, and other assets. But for the purposes of this article, let’s stop here.
Building and Hosting DocFx in CI/CD
Because DocFx is a command line tool, it makes things a great candidate for build environments.
Wouldn’t be nice if when our development team wrote code, it would automatically update on a website? Well, we can do exactly that.
Adding Our Site to GitHub Pages
GitHub Pages are a great way to host static pages without any complex ceremony. It’s free for public repositories, so perfect for our use case.
To start things off, let’s add the contents of the _site folder to a new public docfx_project repository on GitHub.
Once we’ve done that, let’s head over to the repository settings, and under the “Pages” section, we can enable our repository to run as a GitHub Page:
If we then head over to https://<your-github-username>.github.io/docfx_project/ in a web browser, we see our documentation site.
Anytime we push to this repository, we’ll now see the live updates. This means we can share this website around with our team, and they’ll have access to our documentation. We can even put a custom domain in front, and add extra things like security, but that is out of the scope of this article.
Automatically Updating Our Documentation Site
We don’t want our developers to have to remember to update our GitHub Pages site. It should be done automatically when they make code changes.
We can do this via a basic GitHub Actions build.
Let’s add a YML docfx.yml file to the .github/workflows folder:
on:
  push

jobs:
  generate-docs:
    runs-on: windows-latest

    steps:
    - uses: actions/checkout@v2

    - name: Setup .NET 6.0
      uses: actions/setup-dotnet@v1
      with:
        dotnet-version: 6.0.x

    - name: Setup DocFX
      uses: crazy-max/ghaction-chocolatey@v1
      with:
        args: install docfx

    - name: DocFX Build
      run: docfx .\docfx.json
      continue-on-error: false

    - name: Publish
      uses: peaceiris/actions-gh-pages@v3
      with:
        github_token: ${{ secrets.GITHUB_TOKEN }}
        publish_dir: _site
        force_orphan: true
On a push to this repository, the build will get the code, install .NET, install DocFx, do a build, then publish to GitHub pages. We can also now remove the _sitefolder from our repository since this will automatically be created on the build.
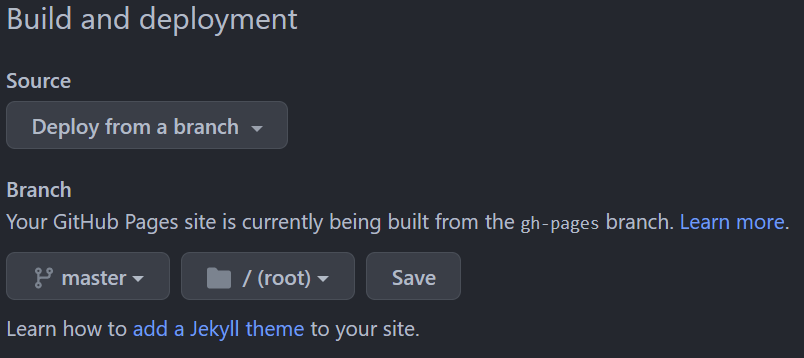
If we push this YML file up to GitHub, a build will kick off, and if we head over to https://<your-github-username>.github.io/docfx_project/ again, we’ll get an error. This is because the action by default pushes to a branch called gh-pages.
Easy fix, let’s head over to our repository settings again and change the branch to gh-pages in the Pages section, and hit save.
If we refresh the browser again, we can see our documentation site!
To prove this is working, let’s add a new method to our class:
/// <summary>
/// Multiplies two numbers together
/// </summary>
/// <param name="one">The first number</param>
/// <param name="two">The second number</param>
/// <returns>int</returns>
public static int Multiply(int one, int two)
    => one * two;
If we commit and push this up, we’ll see after the build is finished the site is updated.
We’ve now achieved a great goal: anytime our code is updated, so is our documentation. No manual developer intervention is required. Of course, if we need to change things like the Engineering Guidelines, this would need to be a manual change by the developer on the markdown file. But this is still partially automated since once it’s pushed to the repository it will be available live on the site.
Conclusion
In this article, we discussed the importance of source code documentation, and how the open-source tool DocFx is a great choice. By having a “live coding guide” of sorts, we can enable rapid onboarding of developers and enable us to keep things in sync whenever code changes. All of this will maximize developer productivity. Also, note we’ve only touched on the basics of DocFx, and we encourage you to head over to the repository for more advanced usage.
