

In this article, we are going to learn about Blazor Routing and how to enable navigation between different sections in our application. We are going to explain how to use the @page directive to support routing and how to create dynamic navigation from the code. Additionally, we are going to learn about parameters in routes and how/when to use the NavLinks component.
For the complete navigation for this series, you can visit the Blazor Series page.
About @page Directive in Blazor Routing
To be able to create the routes in our application, we have to use the routing rules. These rules help us define which component should appear for the required URL. In the Blazor application, we can set up the Blazor routing rules using the @page directive. With it, we define the routes for our components.
So, let’s inspect this directive by opening the Index.razor file:
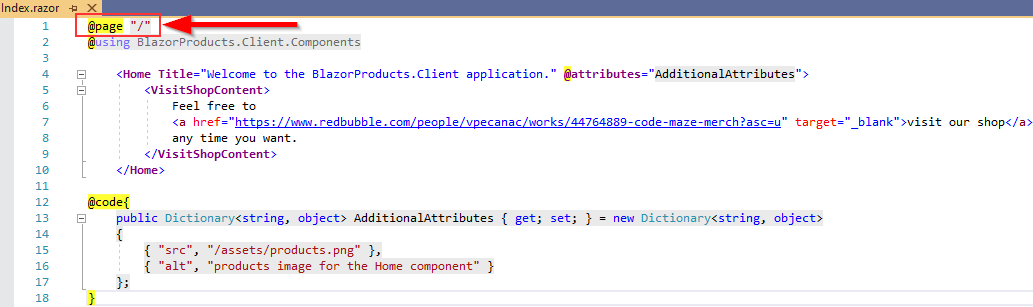
As you can see, if we want to set up the route in the component, we have to use the @page directive followed by the route itself. For the Index page, the route is /, which means it is the starting point for our application (the root). From the previous articles, we could’ve seen that as soon as we start our application, it navigates to https://localhost:5001 and shows the Index page.
The component is not restricted to only one routing rule, we can add multiple rules as well. Let’s try that by adding a new route in the Index component:
@page "/"
@page "/index"
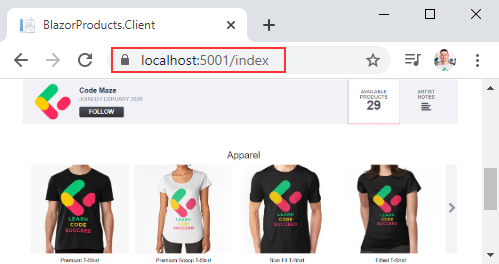
We can start the application and it will navigate to the localhost:5001 route. And if we add /index to it, the route will work as well:
All routes must start with the / sign. Without it, the application will report an error:

From this message, it is pretty obvious what the compiler is complaining about.
App.razor File and the NotFound Component
Let’s start our application one more time and as soon as it starts, let’s try to navigate to localhost:5001/something:
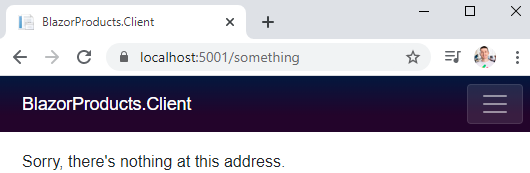
We can see there is no component related to our route but, the application still shows a component with the generic message.
Where does this message come from?
If we take a look at the Solution Explorer window, we are going to find the App.razor file. Let’s open it:
<Router AppAssembly="@typeof(Program).Assembly" PreferExactMatches="@true">
    <Found Context="routeData">
        <RouteView RouteData="@routeData" DefaultLayout="@typeof(MainLayout)" />
    </Found>
    <NotFound>
        <LayoutView Layout="@typeof(MainLayout)">
            <p>Sorry, there's nothing at this address.</p>
        </LayoutView>
    </NotFound>
</Router>
We see the Router component that handles all the routing logic in our application. Inside it, there are two components: Found and NotFound. The Found component handles all the existing components with the valid routes, and the NotFound component will trigger if the component doesn’t exist. Additionally, we can see both components using the same Layout file – MainLayout.
Now, let’s create a new CustomNotFound component in the Pages folder:
@page "/404"

<div class="card customNotFound">
    <div class="card-body">
        <div class="row">
            <div class="col">
                We are sorry, but we couldn't find the page you are looking for!!!
            </div>
        </div>
    </div>
</div>

@code {

}
We use the bootstrap classes in this file, except for the customNotFound class, which is a custom class. To support this, we can use the CSS Isolation feature.
From the .NET Preview 8, Blazor WebAssembly has support for CSS Isolation. So, if we have a .css file specific just for the CustomNotFound component, we can create the CustomNotFound.razor.css file in the Pages folder, and place our CSS code inside it. That way, our files will be better organized and the scope of the CSS file would be aimed just at the specific component. To read more about CSS Isolation, how it works, how to use it with a preprocessor, you can read our CSS Isolation in Blazor Applications article.
So, let’s create a new CustomNotFound.razor.css file in the Pages folder, and add the required class:
.customNotFound {
    text-align: center;
    color: red;
    font-size: 35px;
    box-shadow: 1px 1px 1px grey;
}
Then, let’s modify the App.razor file:
@using BlazorProducts.Client.Pages;

<Router AppAssembly="@typeof(Program).Assembly">
    <Found Context="routeData">
        <RouteView RouteData="@routeData" DefaultLayout="@typeof(MainLayout)" />
    </Found>
    <NotFound>
        <LayoutView Layout="@typeof(MainLayout)">
            <CustomNotFound />
        </LayoutView>
    </NotFound>
</Router>
Now, we can start our application and try to navigate to /404 address:
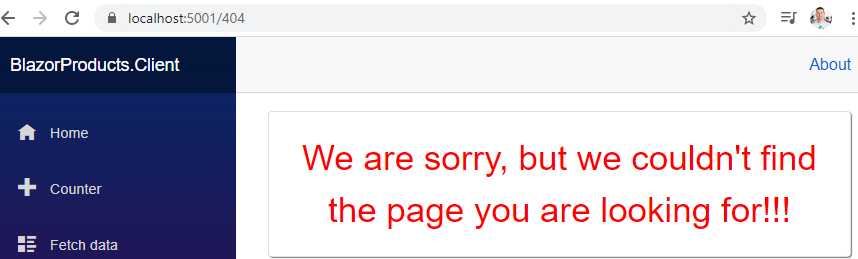
Additionally, if we try to navigate to the /something route, we are going to get the same result.
Using NavigationManager
It is clear how we can use links to navigate the user from one page to another. But sometimes, we want to use the code to navigate the user to other pages in the application. We can do that with the help of the NavigationManager service.
Let’s modify the CustomNotFound page by adding a new button below the current content:
@page "/404"

<div class="card customNotFound">
    <div class="card-body">
        <div class="row">
            <div class="col">
                We are sorry, but we couldn't find the page you are looking for!!!
            </div>
        </div>
    </div>
</div>
<div class="row">
    <div class="col text-md-center m-5 text-primary">
        <button type="button" class="btn btn-primary" @onclick="NavigateToHome">Navigate to the Home Page</button>
    </div>
</div>
And, let’s create a new partial class for this component to create the required method in:
public partial class CustomNotFound
{
    [Inject]
    public NavigationManager NavigationManager { get; set; }

    public void NavigateToHome()
    {
        NavigationManager.NavigateTo("/");
    }
}
When we look at this class, we see one big difference between the Blazor and regular ASP.NET Core applications. We have to use the [Inject] attribute to inject our services in the class and not the constructor. Once we inject the service, we use the NavigateTo method to navigate to the provided URI.
Now, if we start our application, navigate to the non-existing page and then click the button (once the not found page appears), the application is going to direct us to the Home page. Moreover, if we want to preserve the URI of the page we are currently on, before the redirection action, we can do that by using the Uri property:
NavigationManager.Uri
Excellent.
Let’s continue by showing how to pass parameters while navigating to a different page.
Route Parameters in Blazor Routing
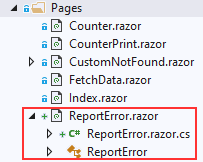
To show that, we are going to create new files for the ReportError page in the Pages folder:
Now, we can modify the razor file first:
@page "/reportError/{errorCode:int}/{errorDescription}"

<h3>
    The error with the @ErrorCode code and @ErrorDescription description has been reported.
</h3>
<p>
    Click <a href="/">here</a> to navigate to the Home page.
</p>
So, we create our route for this component with two parameters. The first parameter is of type int and the second one of type string. We can see that for the string parameter we don’t have to assign the type. Furthermore, in the h3 tag, we use two properties that will accept the values from our route parameters.
That said, let’s create them in the .cs file:
public partial class ReportError
{
    [Parameter]
    public int ErrorCode { get; set; }

    [Parameter]
    public string ErrorDescription { get; set; }
}
Finally, we have to modify the CustomNotFound component:
@page "/404"

<div class="card customNotFound">
    <div class="card-body">
        <div class="row">
            <div class="col">
                We are sorry, but we couldn't find the page you are looking for!!!
            </div>
        </div>
    </div>
</div>
<div class="row">
    <div class="col text-md-center m-5 text-primary">
        <button type="button" class="btn btn-primary" @onclick="NavigateToHome">Navigate to the Home Page</button>
    </div>
</div>
<div class="row">
    <div class="col">
        If you want, you can report this error by clicking the following link: <a href="/reportError/404/The page is missing">Report an error</a>
    </div>
</div>
After all of the changes, we can test our application.
Let’s start it, navigate to the non-existing page, and click the “Report an error” link:
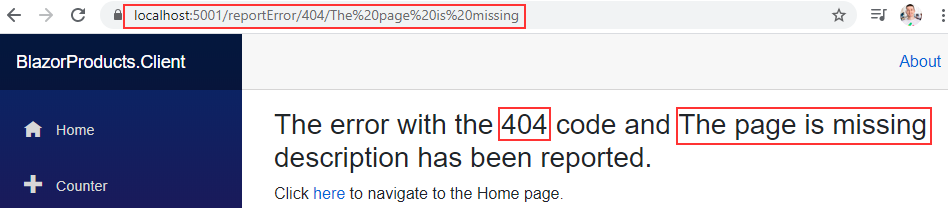
And there we go. We can see the URI with two parameters and also both parameter values assigned to the respective properties.
If we click the here link, we are going to be directed to the Home page.
NavLinks
Let’s talk a bit about the NavLink component.
As soon as we navigate to any of our menu items, that item is going to be highlighted. So, let’s inspect the current link, to see what is going on there:
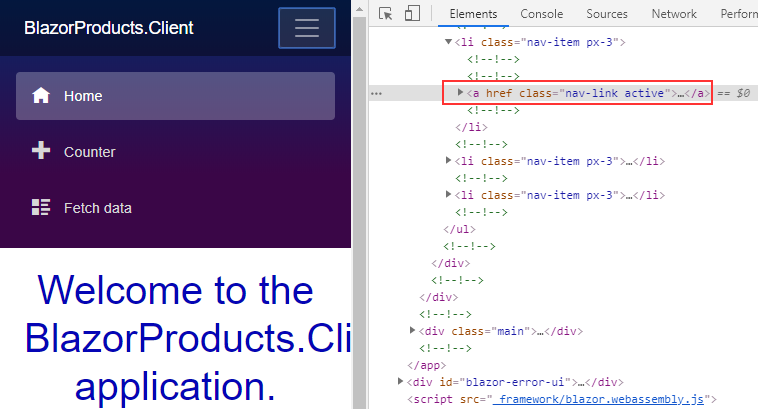
We can see the Home component is the active one and in the Dev tools window, we can see that the link has the nav-link and active classes assigned. The NavLink component toggles that active class to our menu item links. If the link is active the class will be present. It is important to mention that we should use the NavLink component only for the navigation menu and not for the links inside the content of the page.
Moreover, let’s open the NavMenu file and inspect the code:

We can see the NavLink component in each of our links and the nav-link class but without the active class. The NavLink component adds this class dynamically to our active link. Furthermore, we can see the Match attribute. NavLink uses this attribute to configure the match options. There are two options for that:
- NavLinkMatch.All,
- And NavLinkMatch.Prefix
With the first option, the link will be active only if it matches the entire URL. With the second option, which is the default one, the link will be active if it matches any prefix of the current URL. So, if we inspect the counter link, we can see that it doesn’t have the Match attribute. This means the link is going to be active whether the route to this page is https://localhost:5001/counter or https://localhost:5001/counter/something.
Conclusion
Excellent.
We have learned:
- How to create routes in our application
- The way to use the NavigationManager to navigate dynamically from the code
- How to pass parameters through the routes
- And more about the NavLink component in Blazor WebAssembly
In the next article, we are going to learn about HTTP calls and how to fetch data with Blazor WebAssembly from the WebAPI server.

