

In this article, we are going to learn how to run a .NET application as a Linux service.
So let’s get started.
.NET Support for Linux Service
Linux operating system contains a service manager called Systemd. The Systemd acts as an initialization system and controls what programs and services run when the system boots up. While working with Linux, we can make use of Systemd to manage our services.
.NET supports hosting applications as a Systemd service using the Microsoft.Extensions.Hosting.Systemd NuGet package. Once we integrate our application with Systemd using this package, Systemd becomes aware of the application events like application start, stop, etc. Additionally, this configures the application logs to be sent to the Journald, which is the logging system of Systemd and it even understands the log priorities.
With that said, let’s proceed to create a Systemd service in .NET and see it in action.
Creating the Project
Let’s start by following the same steps that we explained for creating a worker service project in the Running .NET Core Applications as a Windows Service article. We can create a new worker service project using the dotnet new worker command:
dotnet new worker --name <project name>
As discussed in the linked article, the worker template will create a project with 2 files – the Program class and the Worker class. These classes will contain the default code that comes as part of the worker service template. But don’t worry, in the next section, we are going to learn and apply the changes required to make this worker service run as a Linux Systemd service.
Configuring the Project
Once we create the project, the next step is to add the Microsoft.Extensions.Hosting.Systemd NuGet package:
dotnet add package Microsoft.Extensions.Hosting.Systemd
This NuGet package provides the support for hosting the application as a Linux Systemd service.
After adding the package, we need to call the AddSystemd() method in the Program class:
var builder = Host.CreateApplicationBuilder(args);

builder.Services.AddSystemd();
builder.Services.AddHostedService<Worker>();

IHost host = builder.Build();
await host.RunAsync();
The AddSystemd() method will prepare the worker service for running as a Linux Systemd service by making a few changes to it:
- It will set the host lifetime to
SystemdLifetime. - This will provide notification messages for events like the application start, stop, etc to the
Systemd. - Additionally, this will configure the console logging in the
Systemdformat as well.
However, remember that these settings are context-aware and will only activate if it detects that the process is running as a Systemd service.
After that, let’s modify the ExecuteAsync() method of the Worker class to add some logging. In this example, for illustration purposes, let’s log an Information, Warning, and Error:
protected override async Task ExecuteAsync(CancellationToken stoppingToken)
{
    while (!stoppingToken.IsCancellationRequested)
    {
        _logger.LogInformation("Code-Maze Service running at: {time}", DateTimeOffset.Now);
        _logger.LogWarning("A warning from Code-Maze Service at: {time}", DateTimeOffset.Now);
        _logger.LogError("An error from Code-Maze Service at: {time}", DateTimeOffset.Now);
        await Task.Delay(1000, stoppingToken);
    }
}
This will help us later to understand how the Linux system captures and differentiates different types of logs while this worker service runs as a Systemd service.
With that, our application is ready to run as a Linux Systemd service.
Publishing the Service
For publishing the worker service, we can follow the same steps that we performed while publishing the application in the Running .NET Core Applications as a Windows Service article.
The only change that we need to do here is to change the Target Runtime to linux-x64 as we are planning to host this service in a Linux system. For all other settings, let’s keep the same values that we provided in the linked article. After providing the settings, let’s publish the service to a local folder.
Once the publish succeeds, it will produce a self-contained output file that is compatible with the Linux system. Now we can create a Linux service using this output file.
Creating the Linux Service
For creating a Linux Service, first, we need to create the configurations in a Systemd unit file. A Systemd unit file will contain the information regarding the unit, which is a service in this case. This unit file for services should have the .service extension and contain the information about the service and how to run it, etc. Let’s create a plain text file and name it codemaze-worker.service:
[Unit]
Description=codemaze-worker

[Service]
Type=notify
ExecStart=/usr/sbin/CodeMazeLinuxWorker

[Install]
WantedBy=multi-user.target
The [Unit] section defines the metadata for the service. In this example, we have provided a name for the service using the Description directive.
The [Service] section provides configurations that are specific to services. The Type=notify indicates that the service will provide a notification when it starts, stops, etc. The ExecStart specifies the full path and the arguments of the command to be executed to start the process. Remember that we should copy the published output file of our worker service to this path.
The [Install] section defines the behavior of a unit like whether it is enabled or disabled. The WantedBy directive specifies how a unit should be enabled. In this example, we just set the Systemd service to start in a multi-user environment, which will be the most common scenario.
After creating the Systemd unit file, we need to place it in the /etc/systemd/system Linux system’s directory.
Assigning Permissions for the Linux Service
Let’s make some quick tweaks to our worker service file to ensure everything runs smoothly.
First, we are going to make the worker service file executable so that we can run it as a program:
sudo chmod +x /usr/sbin/CodeMazeLinuxWorker
The chmod command stands for change mode and we can use it to manage file and directory permissions on Linux.
Next, let’s make sure that the current user has permission on the worker service file:
sudo chown <currentuser> /usr/sbin/CodeMazeLinuxWorker
The chown command stands for change owner and we can use it to give the ownership of a file or directory to the specified user.
Remember that to run system commands in Linux, we must delegate a system administrator privilege using the sudo command.
Once we create the service unit file and copy the published service to the ExecStart path specified inside it, we need to reload the Systemd services using the systemctl daemon-reload command:
sudo systemctl daemon-reload
With that, our service is up and running. Now we are going to verify it.
Verifying the Linux Service
We can use the systemctl status command and pass the service name as the argument to verify the service:
For verifying the service, we can use the systemctl status command and pass the service name as the argument:
sudo systemctl status codemaze-worker
This will provide a similar output indicating that the service is loaded, but in a disabled state:
● codemaze-worker.service - codemaze-worker
   Loaded: loaded (/etc/systemd/system/codemaze-worker.service; disabled; vendor preset: disabled)
   Active: inactive (dead)
To start the service, we can use the systemctl start command and pass the service name as the argument:
sudo systemctl start codemaze-worker
Since we specified Type=notify for the service, the Systemd will be notified when the service starts. Let’s check the status once again using the systemctl status command:
sudo systemctl status codemaze-worker
This will produce a similar result which contains logs from the service:
● codemaze-worker.service - codemaze-worker
   Loaded: loaded (/etc/systemd/system/codemaze-worker.service; disabled; vendor preset: disabled)
   Active: active (running) since Wed 2022-07-13 06:12:57 UTC; 44s ago
 Main PID: 8487 (CodeMazeLinuxWo)
   CGroup: /system.slice/codemaze-worker.service
           └─8487 /usr/sbin/CodeMazeLinuxWorker

Jul 13 06:13:38 service-test-linux CodeMazeLinuxWorker[8487]: CodeMazeLinuxWorker.Worker[0] An error from Code-Maz...:00Jul 13 06:13:39 service-test-linux CodeMazeLinuxWorker[8487]:
...
Some lines were ellipsized, use -l to show in full.
Note that the log messages may be trimmed and for seeing the full message, we can append the -l argument at the end:
sudo systemctl status codemaze-worker -l
This will show the full output from the service:
● codemaze-worker.service - codemaze-worker
   Loaded: loaded (/etc/systemd/system/codemaze-worker.service; disabled; vendor preset: disabled)
   Active: active (running) since Wed 2022-07-13 06:12:57 UTC; 1min 20s ago
 Main PID: 8487 (CodeMazeLinuxWo)
   CGroup: /system.slice/codemaze-worker.service
           └─8487 /usr/sbin/CodeMazeLinuxWorker

Jul 13 06:14:14 service-test-linux CodeMazeLinuxWorker[8487]: CodeMazeLinuxWorker.Worker[0] An error from Code-Maze Service at: 07/13/2022 06:14:14 +00:00
Jul 13 06:14:15 service-test-linux CodeMazeLinuxWorker[8487]: CodeMazeLinuxWorker.Worker[0] Code-Maze Service running at: 07/13/2022 06:14:15 +00:00
Jul 13 06:14:15 service-test-linux CodeMazeLinuxWorker[8487]: CodeMazeLinuxWorker.Worker[0] A warning from Code-Maze Service at: 07/13/2022 06:14:15 +00:00
...
Alternately, we can use the journalctl utility for querying and displaying logs from the system journal. One of the benefits of using Systemd is the centralized logging into the system journal that we can access with journalctl command. While using this utility, we can provide the -u argument to specify the name of the service as the unit:
sudo journalctl -u codemaze-worker
This will display all the logs from the service codemaze-service:
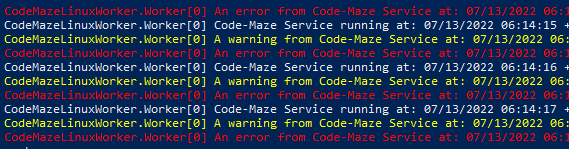
The logging provided by journalctl is different from the one that we get from the terminal and is well formatted with each message shown on different lines. Also, note that it highlights the warnings in yellow and errors in red.
It is also possible to filter the messages based on priority using the -p argument. For instance, we can filter just the errors by using priority 3:
sudo journalctl -p 3 -u codemaze-worker
Similarly, we can use priority 4 for filtering warnings, 6 for information, etc.
Conclusion
In this article, we learned how to create a .NET worker service that is optimized for running as a Linux Service. Additionally, we looked at how to configure it as a Linux Service and verified its behavior and logging capabilities.

I have followed these instructions. This has been tested in visual studio and runs as expected. I have created a Self Contained services for linux -64 named LinuxService.
I have deploy it to a REHL7 Linux server using FTP and moving it to the folder
the services file named example.service
however when I run
I get
Any ideas on what I am doing incorrectly?
Hi,
Can you check for any logs using journalctl command while the service fails to startup?
Unfortunately that’s the only way I can think of for investigating this issue.
This code doesn’t work with net core 6.0. What i must modify?
Hi,
The source code that is linked for this article is developed in .NET 6 (please refer the github repo link) and it has worked fine for us. What issue do you face BTW? Are you getting any errors?
After add Systemd package, and insert “.UseSystemd();” in Program.cs code, appears the error:
Severity Code Description Project File Line Suppression State
Error CS0266 Cannot implicitly convert type ‘Microsoft.Extensions.Hosting.IHostBuilder’ to ‘Microsoft.Extensions.Hosting.IHost’. An explicit conversion exists (are you missing a cast?) LinuxWorker E:\VisualStudioTests\LinuxWorker\LinuxWorker\LinuxWorker\Program.cs 7 Active
Whai i’m doing wrong?
Ps: i created a worker template from visual studio 2022 in windows 10.
Apologies for late reply, I missed this comment. Hope you got this resolved.
If not, here are couple of things to check for:
Odd I used the same template in VS 2022 did the necessary (as outlined the tutorial) and no issues I hope you get your issues sorted
I created an application with the same conditions, but I get the following error:
(code=dumped, signal=ABRT)
Hi Amin,
I’m not sure about this error as we did not encounter this, but please check if these links helps:
Great! Thx!
You’re welcome Flo.