

In this article, we are going to discuss how to implement Output Caching in ASP.NET. Output Caching is a first-class feature in ASP.NET Core 7. Previously we needed to implement these features ourselves, so it’s beneficial that Microsoft has now built this functionality for us.
OutputCaching is a very different technique from Response Caching, and we’ll discuss the differences between the two later in the article.
First off, let’s define the basics of Output Caching.
What is Output Caching?
Output Caching is a technique that we can apply in ASP.NET Core to cache frequently accessed data, mainly to improve performance. By preventing excessive calls to resource-heavy dependencies (for example a database or network call), we can dramatically improve the response times of our application, which is one of the keys to scaling applications.
Differences Between Output Caching and Response Caching
Before we dive into how Output Caching works, let’s identify the main differences between Output Caching and Response Caching:
- Responsibility: response caching pushes the cache responsibility to the clients (or intermediary proxy servers), by setting cache headers. Output Caching places responsibility on the server (or a set of servers, as we discuss later).
- Storage medium: response caching is stored in memory, whereas output caching has a variety of options to customize the storage that we discuss later
- Eviction: because we control output caching on the server, we have options to evict these cache entries. Response caching however is very difficult, since we don’t control how the clients can behave.
- Revalidation: output caching can return a 304 Not Modified response code instead of the cached response body. This can save on bandwidth
These differences do not make one better than the other, as each has different use cases. As we follow this article, let’s learn some of the features of Output Caching and understand why each aspect is important.
Setting up Output Caching
Let’s start by setting up the most basic Output Caching example. In Visual Studio, were are going to create an ASP.NET Core Web API project using the default template, and then make two small changes to Program.cs:
var builder = WebApplication.CreateBuilder(args);

builder.Services.AddControllers();
builder.Services.AddEndpointsApiExplorer();
builder.Services.AddSwaggerGen();
builder.Services.AddOutputCache();

var app = builder.Build();

if (app.Environment.IsDevelopment())
{
    app.UseSwagger();
    app.UseSwaggerUI();
}

app.UseHttpsRedirection();
app.UseAuthorization();
app.MapControllers();
app.UseOutputCache();

app.Run();
We add the output caching middleware to the service collection and request pipeline respectively.
Before we add the basic caching, let’s run our app and hit the default Weather Forecast route at https://localhost:7205/WeatherForecast. We notice that each time we refresh, we get a different result. This is due to the default code randomizing the results.
However, let’s see what happens if we decorate our action method with the [OutputCache] attribute:
[HttpGet(Name = "GetWeatherForecast")]
[OutputCache]
public IEnumerable<WeatherForecast> Get()
{
    return Enumerable.Range(1, 5).Select(index => new WeatherForecast
    {
        Date = DateOnly.FromDateTime(DateTime.Now.AddDays(index)),
        TemperatureC = Random.Shared.Next(-20, 55),
        Summary = Summaries[Random.Shared.Next(Summaries.Length)]
    })
    .ToArray();
}
If we execute the same URL and refresh the page the result stays the same. This is due to the attribute we just added, which by default caches the response for 1 minute. This is a basic example, but consider if the action method included a database or external network call, we have just saved those resources and processing time on the server for any calls during that 1-minute window.
As we continue in this article, we’ll learn how to decide on the length of the cache and how to vary the cache configuration.
Output Caching Policies
In our previous example, we used the default configuration.
But, how can we control how things are cached?
Let’s make use of output caching policies to help us. We can easily configure caching on the attribute itself, however, a better solution is to set up this configuration centrally in our program.
So, let’s modify our Program.cs file and add some policies:
builder.Services.AddOutputCache(options =>
{
    options.AddBasePolicy(builder =>
        builder.Expire(TimeSpan.FromSeconds(5)));

    options.AddPolicy("CacheForTenSeconds", builder =>
        builder.Expire(TimeSpan.FromSeconds(10)));
});
Here, we add two policies:
- A base policy that makes all endpoints cache for 5 seconds by default
- A policy called
CacheForTenSecondswhich makes any endpoints that utilize this policy cache for 10 seconds
If we remove the [OutputCache] attribute from our action method, we see that the response is cached for 5 seconds.
If we then add the attribute back and specify the policy:
[HttpGet(Name = "GetWeatherForecast")]
[OutputCache(PolicyName = "CacheForTenSeconds")]
public IEnumerable<WeatherForecast> Get()
{
    return Enumerable.Range(1, 5).Select(index => new WeatherForecast
    {
        Date = DateOnly.FromDateTime(DateTime.Now.AddDays(index)),
        TemperatureC = Random.Shared.Next(-20, 55),
        Summary = Summaries[Random.Shared.Next(Summaries.Length)]
    })
    .ToArray();
}
After we hit the URL again, we can see that the response is being cached for 10 seconds now.
These cache policies allow us to define our cache strategies in a central place away from the logic itself, letting the action methods focus on fulfilling the request and not worrying about caching (separation of concerns).
It’s also worth noting that the default cache configuration makes some opinionated decisions. These include only caching 200 responses, only caching GET / HEAD responses, and not caching authenticated or cookie requests. We can override this behavior with a custom output cache policy, but it’s an advanced topic outside the scope of this article. For most scenarios, the default configuration is sufficient.
Cache Keys
By default, the cache key for an endpoint is the full URL.
In our example, this is https://localhost:7205/WeatherForecast. If we added two query string parameters called a and b, it would also include those and cache the items separately. But what if we also wanted to have more control over how the cache key is created? For this purpose, we can specify the cache key.
Vary by Query
Let’s modify our CacheForTenSecond policy:
options.AddPolicy("CacheForTenSeconds", builder =>
    builder.Expire(TimeSpan.FromSeconds(10))
            .SetVaryByQuery("city"));
Here we specify that we want to vary the cache key by the query string parameter called city.
Let’s hit a few URLs multiple times and observe the behavior:
- https://localhost:7205/WeatherForecast
- https://localhost:7205/WeatherForecast?city=Manhattan
- https://localhost:7205/WeatherForecast?city=Miami
- https://localhost:7205/WeatherForecast?someOtherParam=value
What’s interesting is that the first three results return unique responses, and each is cached for 10 seconds. However, the last URL shares the responsibility of the first endpoint. This is because we are now explicitly instructing the cache configuration to only vary by the city query string parameter. Since the last URL has a query string parameter with a different name, it’s not treated differently from the URL without the query string parameter.
This can be useful if we want to be explicit about how results are varied by parameters and ensure the cache isn’t abused by different query string parameters that we don’t handle differently.
Vary by Header
Let’s modify our CacheForTenSeconds policy again:
options.AddPolicy("CacheForTenSeconds", builder =>
    builder.Expire(TimeSpan.FromSeconds(10))
           .SetVaryByQuery("city")
           .SetVaryByHeader("X-Client-Id"));
Here we set that we would like the cache varied by the value of the X-Client-Id header.
If we hit the URL with Postman, and set different values for this header, we notice that the responses are cached differently than we expect. The most common use case here is during Content Negotiation, where we vary by the Accept header. For example, we might want to cache JSON and XML responses differently, due to the effort in processing these requests on the server.
We’ve now explored the two main ways to vary the cache key. There is also VaryByValue which is a more complex configuration that allows us to vary the key by a custom value on the server. For this article, let’s just focus on the query and header for now.
Cache Revalidation
So far, we have noticed that when the responses are cached, the full response body is returned, even though it’s identical to the previous response. What if we could instruct our clients in a simple manner, and save on bandwidth to the server and processing on the client? That’s where cache revalidation comes in.
To demonstrate, let’s add another endpoint using minimal APIs in Program.cs:
app.MapGet("/etag", async (context) =>
{
    var etag = $"\"{Guid.NewGuid():n}\"";
    context.Response.Headers.ETag = etag;
    await context.Response.WriteAsync("hello");

}).CacheOutput();
Here we are setting a special response header called ETag, with a value of a GUID.
If we execute the URL in Postman we notice the header, the response is 200 (OK), and the response body is “hello”.
Let’s see what happens if we hit the request with a special If-None-Match header with the value of the ETag we just received:
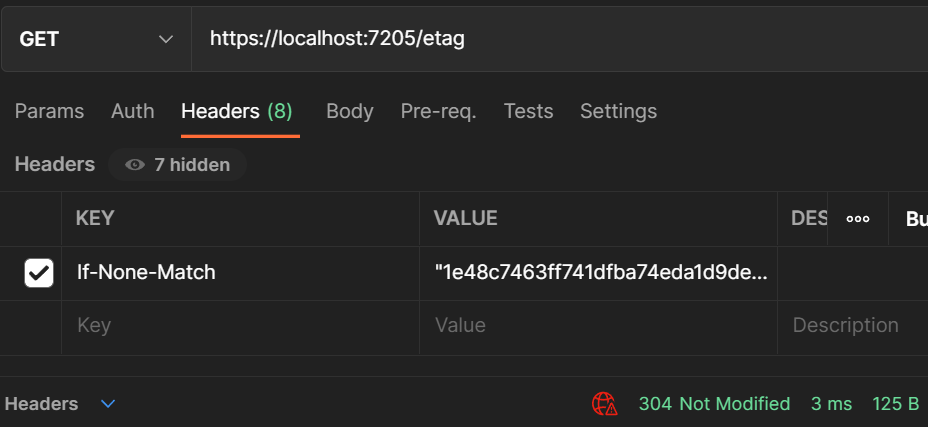
Note that you need to do this quickly, as the cache expires in 5 seconds and there is a new ETag.
The response is 304 and the body is empty. This is because the client has instructed the server that it already has a copy of the response with that ETag value, so if it hasn’t changed, don’t bother sending the content again, just instruct that fact with the response code 304.
If we hit the URL again, it’s 200 (OK) again with the “hello” body and a different ETag. This is a very powerful way to reduce processing on both the client and the server.
In the next section, we see how we can evict the cache items using tags.
Cache Eviction
We are now caching data aggressively to improve performance, but let’s imagine the data that we cache changes. We have two options here: make sure the clients understand that the data could be stale for a given period, or programmatically refresh the cache by evicting the cache items. The former is usually fine for short cache periods (like in our current configuration), but not for longer cache periods.
To demonstrate this, let’s add another simple endpoint:
[HttpGet("database")]
[OutputCache(PolicyName = "Expensive")]
public string GetDatabase() => $"Expensive database call processed at: {DateTime.Now:hh:mm:ss}";
Let’s add the policy:
options.AddPolicy("Expensive", builder =>
    builder.Expire(TimeSpan.FromMinutes(1))
            .Tag("tag-expensive"));
This time we are setting the expiry to 1 minute due to it being an expensive operation, and also assigning a tag called tag-expensive. We’ll get to what that means in a moment.
Let’s also add a tag to our default policy:
options.AddBasePolicy(builder =>
    builder.Expire(TimeSpan.FromSeconds(5))
            .Tag("tag-all"));
We are tagging all endpoints with the tag-all tag.
Let’s hit the https://localhost:7205/WeatherForecast/database endpoint; the response is in the cache for 1 minute. This is a simulated endpoint, and in the real world, we would be fetching a record from a database.
Now, what happens if we needed to evict these cache entries? Maybe the database changed? Well, the clients hold onto the stale data for at least 1 minute. However, there is a way out! We can evict these cache entries by using the tags we just set up.
Evicting by Tag
Let’s add another endpoint:
[HttpDelete("cache/{tag}")]
public async Task DeleteCache(IOutputCacheStore cache, string tag) => await cache.EvictByTagAsync(tag, default);
This endpoint takes a special dependency called IOutputCacheStore, and calls a method EvictByTagAsync, passing in the tag value from the URL. Simply put, it clears the cache for the items matching those tags.
So, let’s inspect the results:
- DELETE
https://localhost:7205/WeatherForecast/cache/tag-expensive: the cache for our expensive endpoint is flushed - DELETE
https://localhost:7205/WeatherForecast/cache/tag-all: all cache items are flushed
This is very powerful as we have the best of both worlds: our data is in the cache and processing reduced, but when the item becomes stale it is refreshed and then cached again.
In our case, we are exposing this functionality via an endpoint, but this isn’t the best practice as we shouldn’t allow clients to flush the cache. A better solution, in this case, would be to call the EvictByTagAsync method during a Save operation for the database records affected by the cache.
Conclusion
In this article, we discussed how to set up OutputCache in ASP.NET. For most of our scenarios, we utilized the defaults, including using memory cache as the default storage. However, as we scale out our servers, this becomes less ideal. As we discussed in the Distributed Caching article, there are better options, including choosing a tool like Redis. This allows us to utilize the performance benefits of caching while freeing up memory resources on our servers. It’s outside the scope of this article, but something worth considering once the applications we build need to scale.
Remember that Output Caching is very different from Response Caching. With Output Caching most of our effort is on the server, ensuring items are cached based on various options, and, if needed, evicted from the cache. This serverside control is at the heart of Output Caching, with clients having minimal control. In contrast, Response Caching is about how to instruct the clients to cache as the server doesn’t hold any state at all. Ideally, we should combine both techniques to have a well-performing application.

