


Updated on
IdentityUser gives us a user with a name, an email, a password hash and a lockout state, and no place to put a column of our own. The fix is to subclass it: ApplicationUser : IdentityUser, our properties on the subclass, and ApplicationUser everywhere the framework asked for IdentityUser.
Two things follow from that one line. If we change the key type at the same time, every other Identity table follows the user’s key. And once the column exists, we still have to decide whether the value belongs in a column at all, or in a claim.
What Is IdentityUser in ASP.NET Core?
IdentityUser is the class ASP.NET Core Identity maps to the AspNetUsers table. It carries the user name, the email, the password hash, the phone number, the lockout state, the two-factor flag, a security stamp and a concurrency stamp, and nothing application specific.
It has no extension point for our own columns. We subclass it instead, put the properties we need on the subclass, and use that subclass everywhere the framework asked for IdentityUser.
Two forms exist. IdentityUser is the one most projects start from, and Microsoft describes it as the default implementation of IdentityUser<TKey> that uses a string as a primary key. IdentityUser<TKey> is the generic form, and choosing a different TKey is how the key type changes.
That string key catches people out. The parameterless constructor assigns Id = Guid.NewGuid().ToString(), so a new user’s id looks exactly like a GUID while being a string that holds one. The column stores text, comparisons are text comparisons, and the database enforces nothing about the shape.
We start from a default project that already implements Identity, and the whole setup is covered in our ASP.NET Core Identity series. The password hash in that list is a subject of its own, and how the default password hasher works is where we take it apart.
To add our custom properties to the default IdentityUser, let’s create a class that inherits from it:
public class ApplicationUser : IdentityUser
{
}
From now on, we should use ApplicationUser everywhere in our code instead of IdentityUser.
If we take a look at the IdentityUser implementation, we can see that it inherits from the generic IdentityUser<TKey> class and uses string as the type parameter. Its parameterless constructor gives every new user an id immediately, and that id is a Guid converted to text rather than a Guid:
public IdentityUser()
{
    Id = Guid.NewGuid().ToString();
    SecurityStamp = Guid.NewGuid().ToString();
}
That is why the default AspNetUsers.Id column holds text: it stores GUID characters, and nothing but our own code keeps them in that shape.
How Do We Change the IdentityUser Primary Key to a Guid?
Derive from IdentityUser<Guid> instead of IdentityUser. That is the entire change to the user class.
It is not the entire change to the project. IdentityDbContext<TUser, TRole, TKey> constrains TUser to IdentityUser<TKey> and TRole to IdentityRole<TKey>, then hands the same TKey to IdentityUserClaim, IdentityUserRole, IdentityUserLogin, IdentityRoleClaim and IdentityUserToken. One type parameter fixes the key type of all seven Identity tables.
The context declaration moves with it, and the service registration follows the context.
Do this before the first migration. Switching the key type rewrites the primary key and every foreign key pointing at it, eight columns across the seven tables, and Entity Framework warns that the change may lose data. On a database that already holds users, plan a data migration.
The payoff shows up at the database rather than in C#. The Id column becomes uniqueidentifier instead of a text column, so the storage engine, not our code, guarantees the shape.
To change the type of the Id property, let’s make our ApplicationUser class inherit from the generic IdentityUser<TKey> and pass the Guid as the type parameter:
public class ApplicationUser : IdentityUser<Guid>
{
}
This is the only thing that we have to change in our domain model, however, we are not ready yet.
Why Does One Key Type Change Everything Else?
Once that is done, we should update the ApplicationDbContext and the dependency injection registration to be able to utilize our ApplicationUser class.
Firstly, if we inspect the IdentityDbContext class, we will notice that it has many generic parameters. By changing the primary key type of the ApplicationUser, we essentially have to change all other identity-related primary key types too.
Let’s inspect the IdentityDbContext class:
public class IdentityDbContext<TUser, TRole, TKey> : IdentityDbContext<TUser, TRole, TKey,
                               IdentityUserClaim<TKey>, IdentityUserRole<TKey>, IdentityUserLogin<TKey>,
                               IdentityRoleClaim<TKey>, IdentityUserToken<TKey>>
    where TUser : IdentityUser<TKey>
    where TRole : IdentityRole<TKey>
    where TKey : IEquatable<TKey>
{
    public IdentityDbContext(DbContextOptions options) : base(options) { }
    protected IdentityDbContext() { }
}
One type parameter reaches every Identity entity.
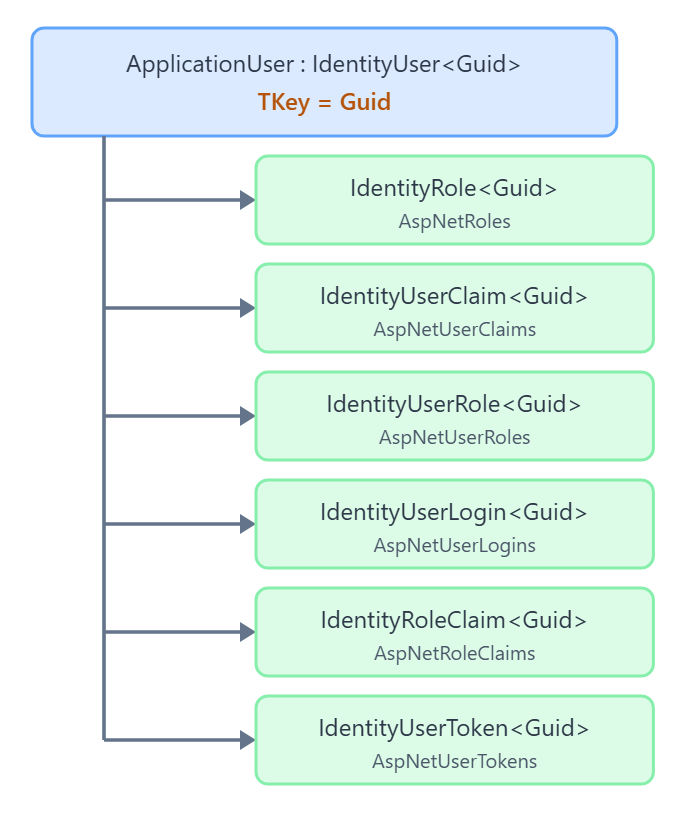
It has three generic parameters, the first two are the TUser and TRole parameters and the third is the TKey parameter. From the generic parameter constraints we can see, that both TUser and TRole types must have the same TKey type. Moreover, all the other identity-related classes, such as IdentityUserClaim<TKey> or IdentityUserRole<TKey> will use the same TKey as our ApplicationUser class. So all in all, changing the ApplicationUser class to have a Guid id we made everything else have a Guid id too.
Now, let’s change our ApplicationDbContext to inherit from the correct IdentityDbContext:
public class ApplicationDbContext : IdentityDbContext<ApplicationUser, IdentityRole<Guid>, Guid>
{
    public ApplicationDbContext(DbContextOptions<ApplicationDbContext> options)
        : base(options)
    {
    }
}
We pass the ApplicationUser class as the TUser parameter. Because we don’t plan on extending roles the way we did with users, we pass the default IdentityRole class with Guid type parameter as TRole. And finally, we specify TKey as Guid too.
As the last step, let’s configure the dependency injection registration of ASP.NET Core Identity:
builder.Services.AddDefaultIdentity<ApplicationUser>(options => options.SignIn.RequireConfirmedAccount = true)
    .AddEntityFrameworkStores<ApplicationDbContext>();
We change the type parameter of the AddDefaultIdentity() method to use our ApplicationUser class. This way, UserManager will be able to work with our custom user class.
AddDefaultIdentity() wires up a UserManager, the cookie handlers and the default UI, and it stops there. It registers no RoleManager and no role store, so the AspNetRoles and AspNetUserRoles tables our context just created have nothing driving them. The documentation for AddIdentityCore, which is what AddDefaultIdentity() calls, says so plainly: “Role services are not added by default but can be added with AddRoles<TRole>().” If we want roles, we add them explicitly:
builder.Services.AddDefaultIdentity<ApplicationUser>(options => options.SignIn.RequireConfirmedAccount = true)
    .AddRoles<IdentityRole<Guid>>()
    .AddEntityFrameworkStores<ApplicationDbContext>();
With AddIdentity<TUser, TRole>() the role services come as standard, but it brings no default UI, so on a scaffolded Identity project AddDefaultIdentity() plus AddRoles<TRole>() is the smaller change.
How Do We Add Custom Properties to ApplicationUser?
With the infrastructure configured, let’s proceed by adding some custom properties to our user class.
From now on, adding and configuring custom properties is almost the same process as when we add them to any other entity. Let’s start with some primitive properties.
Custom Primitive Properties on IdentityUser
Let’s add two primitive custom properties to the ApplicationUser class:
public class ApplicationUser : IdentityUser<Guid>
{
    public required string DisplayName { get; set; }
    public DateTime LastLoginDateTime { get; set; }
}
Here, we add the DisplayName and the LastLoginDateTime properties to our class. Now, let’s see how to apply database constraints to the DisplayName property.
Let’s override the OnModelCreating() method of the ApplicationDbContext:
protected override void OnModelCreating(ModelBuilder builder)
{
    base.OnModelCreating(builder);
    builder.Entity<ApplicationUser>(b =>
    {
        b.Property(u => u.DisplayName).IsRequired().HasMaxLength(100);
    });
}
We should make sure not to forget to call the base method as it will configure the rest of the identity framework’s database. Then we can add our configuration as usual.
We configure DisplayName to be required and be at most 100 characters long. We could configure constraints on properties of the IdentityUser class too, for example, introduce length constraints for UserName or change column names.
Custom Navigation Properties on IdentityUser
Now, let’s introduce a more complex scenario, where we’d like to extend ApplicationUser with related entities.
Let’s imagine that users can create posts on their page and each post can consist of a title and some text content.
Now, in order to bring this concept to life, let’s proceed by creating a Post entity:
public class Post
{
    public Guid Id { get; set; }
    public required string Title { get; set; }
    public required string Text { get; set; }
}
To continue, let’s configure this entity in the OnModelCreating() method:
builder.Entity<Post>(b =>
{
    b.HasKey(e => e.Id);
    b.Property(e => e.Title).IsRequired().HasMaxLength(256);
    b.Property(e => e.Text).IsRequired();
});
We inform Entity Framework about the key property, mark everything required and set the max length of the Title property to 256 characters.
Next, let’s add a Post collection to our ApplicationUser:
public class ApplicationUser : IdentityUser<Guid>
{
    public required string DisplayName { get; set; }
    public DateTime LastLoginDateTime { get; set; }
    public List<Post> Posts { get; set; } = [];
}
Once we have the Posts property added, let’s configure the relationship in the OnModelCreating() method:
builder.Entity<ApplicationUser>(b =>
{
    b.Property(u => u.DisplayName).IsRequired().HasMaxLength(100);
    b.HasMany(u => u.Posts).WithOne();
});
We set up the relationship to be a one-to-many without explicit foreign key properties.
How Do We Create the Migration for the New Schema?
Now that Entity Framework is configured, we can move forward with creating the migration.
When using the default MVC project with scaffolded identity and SQL Server, dotnet will automatically create the first migration for us. However, since we changed the primary key’s type, we should remove that migration and create our own first migration. To do this using the dotnet CLI, let’s issue the command from the project’s directory:
dotnet ef migrations remove
We can see, that the 00000000000000_CreateIdentitySchema migration has been removed, so now let’s add our new CreateIdentitySchema migration:
dotnet ef migrations add CreateIdentitySchema
By examining the generated migration, we can confirm that the custom properties and foreign keys are generated correctly:
protected override void Up(MigrationBuilder migrationBuilder)
{
    migrationBuilder.CreateTable(
        name: "AspNetUsers",
        columns: table => new
        {
            Id = table.Column<Guid>(type: "uniqueidentifier", nullable: false),
            DisplayName = table.Column<string>(type: "nvarchar(100)", maxLength: 100, nullable: false),
            LastLoginDateTime = table.Column<DateTime>(type: "datetime2", nullable: false),
        },
        constraints: table =>
        {
            table.PrimaryKey("PK_AspNetUsers", x => x.Id);
        });

    migrationBuilder.CreateTable(
        name: "Post",
        columns: table => new
        {
            Id = table.Column<Guid>(type: "uniqueidentifier", nullable: false),
            Title = table.Column<string>(type: "nvarchar(256)", maxLength: 256, nullable: false),
            Text = table.Column<string>(type: "nvarchar(max)", nullable: false),
            ApplicationUserId = table.Column<Guid>(type: "uniqueidentifier", nullable: true)
        },
        constraints: table =>
        {
            table.PrimaryKey("PK_Post", x => x.Id);
            table.ForeignKey(
                name: "FK_Post_AspNetUsers_ApplicationUserId",
                column: x => x.ApplicationUserId,
                principalTable: "AspNetUsers",
                principalColumn: "Id");
        });
}
In this example, some parts of the migration are omitted to simplify the process of verifying the accurate generation of both primitive properties and the relationship with the related entity for the AspNetUsers table. Now we just have to issue the final command to apply the migration to the database:
dotnet ef database update
When checking the table structure, we will see that we have successfully extended the AspNetUsers table with our custom properties.
To learn more about the commands we just ran, check out our article on Entity Framework Core migrations and seed data.
How Do We Read and Update a Custom Property at Runtime?
Everything goes through UserManager<ApplicationUser>. Ask it for the user, set the property, hand the user back.
GetUserAsync() resolves the signed-in principal to an entity, and FindByIdAsync() does the same from an id. Set DisplayName or LastLoginDateTime on the object it returns, then call UpdateAsync().
UpdateAsync() validates the user, refreshes the normalized user name and email, then passes it to the store. The Entity Framework store attaches the entity, assigns it a fresh ConcurrencyStamp, and saves. Our custom columns ride along with the built-in ones, and they need nothing extra.
Check the result. ConcurrencyStamp is mapped as a concurrency token, so a stale copy of the user comes back as a failed IdentityResult rather than an exception, and code that ignores result.Succeeded loses the write silently.
Navigation properties are the exception. UserManager lookups never eager-load them, so Posts comes back unpopulated unless we query the DbContext ourselves with Include().
Let’s record the moment a user signs in:
public async Task<IdentityResult> RecordSignIn(ClaimsPrincipal principal)
{
    var user = await _userManager.GetUserAsync(principal);
    if (user is null)
    {
        return IdentityResult.Failed();
    }

    user.LastLoginDateTime = DateTime.UtcNow;

    return await _userManager.UpdateAsync(user);
}
We resolve the principal to an ApplicationUser, write the timestamp and hand the entity back, and the returned IdentityResult is what tells us whether the write landed. Putting that behaviour under test is a subject of its own, and we cover it in unit testing UserManager and RoleManager.
Should Extra User Data Be a Property or a Claim?
Both hold data about a user, and they behave nothing alike.
A custom property is a column on AspNetUsers. Reading it means loading the user, which is a database call on every request that needs the value.
A claim is a row in AspNetUserClaims. At sign-in the framework copies a user’s claims into the ClaimsPrincipal next to the id, the user name, the email and the security stamp, and that principal becomes the authentication cookie. So User.FindFirst() reads a claim with no database call at all.
Freshness is what that costs. A claim is fixed at sign-in and changes only when the principal is reissued, which happens at the next sign-in or on the security stamp validator’s schedule.
The rule of thumb follows from that. Data we query, sort or report on belongs in a property. A small, stable value checked on every request belongs in a claim.
Getting at those claims once they are in the principal is a short job in its own right, and we walk through reading claims off the current user separately.
Custom property on ApplicationUser | Claim in AspNetUserClaims |
|
|---|---|---|
| Where it lives | A typed column on AspNetUsers | One row per claim, keyed by UserId |
| How we add it | A property on the subclass, then a migration | UserManager.AddClaimAsync(user, claim) |
| Schema change needed | Yes | No |
| How we read it | UserManager.GetUserAsync(), then the property | User.FindFirst("type")?.Value |
| Database call to read | Yes, on every request that needs it | No, it travels in the auth cookie |
| Queryable from SQL | Yes, it is a column with a type | Only as text in a key and value pair, both nvarchar(max) |
| Goes stale | No, every read is fresh | Yes, until the principal is reissued |
| Suits | Profile data we query, sort or report on | Small, stable values checked per request |
To put a custom property into the cookie, register a UserClaimsPrincipalFactory<ApplicationUser> subclass that overrides GenerateClaimsAsync() and adds the claim there.
Conclusion
In this article, we’ve learned about extending IdentityUser with custom properties step by step. We created a descendant class and configured the identity framework to use this new class instead of IdentityUser. Then we added our custom properties and configured Entity Framework to store them correctly.
We also looked at changing the type of the primary key for our custom ApplicationUser, making the Guid persistence unique at the database level.
We also saw how to write a custom property back through UserManager, and when the value belongs in a claim instead of a column.
All in all, we can say that Microsoft did a great job in terms of extensibility with ASP.NET Core Identity, it is a fairly simple task to extend or completely change classes used by the Identity Framework.
Tested with .NET 10.0.10 and Microsoft.AspNetCore.Identity.EntityFrameworkCore 10.0.12.