One of the common practices in user account management is to provide a possibility for the users to change their passwords if they forget it. The password reset process shouldn’t involve application administrators because the users themselves should be able to go through the entire process on their own. Usually, the user is provided with the Forgot Password link on the login page and that is going to be the case for this article as well.
So let’s explain how the Password Reset process should work in a nutshell.
A user clicks on the Forgot password link and gets directed to the view with the email field. After a user populates that field, an application sends a valid link to that email. An email owner clicks on the link and gets redirected to the reset password view with the generated token. After populating all the fields in the form, the application resets the password and the user gets redirected to the Login (or Home) page.
VIDEO: Forgot/Reset Password With Identity in Web API.
To navigate through the entire series, visit the ASP.NET Core Identity series page.
Including the Email Service in the Project
Sending an email from ASP.NET Core is not this article’s topic, therefore, we won’t be explaining that.
In this project, we are going to reuse the email service we’ve created in that article.
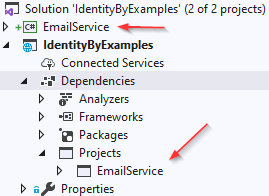
So, to start things off, let’s add an existing project to our solution and add the reference to the main project:

Next, we are going to add a configuration for the email service in the appsettings.json file:
"EmailConfiguration": {
    "From": "[email protected]",
    "SmtpServer": "smtp.gmail.com",
    "Port": 465,
    "Username": "[email protected]",
    "Password": "app password"
  }
We strongly suggest reading our article linked above to see how to enable the Application password feature for Gmail to be able to send emails with less secure apps. You can’t use your own passwords anymore as Google has blocked the usage of less secure apps in Gmail.
And let’s register our Email Service in the Startup class in the ConfigureServices method for .NET 5 or previous versions:
var emailConfig = Configuration
    .GetSection("EmailConfiguration")
    .Get<EmailConfiguration>();
services.AddSingleton(emailConfig);
services.AddScoped<IEmailSender, EmailSender>();
Or in .NET 6, we have to modify the Program class:
var emailConfig = Configuration .GetSection("EmailConfiguration")
  .Get<EmailConfiguration>();

builder.Services.AddSingleton(emailConfig);
builder.Services.AddScoped<IEmailSender, EmailSender>();
Finally, we have to inject this service in the Account controller:
private readonly IEmailSender _emailSender;

public AccountController(IMapper mapper, UserManager<User> userManager, SignInManager<User> signInManager, IEmailSender emailSender)
{
    _mapper = mapper;
    _userManager = userManager;
    _signInManager = signInManager;
    _emailSender = emailSender;
}
Email service is prepared and ready to use. Therefore, we can move on.
Forgot Password Functionality
Let’s start with the ForgotPasswordModel class:
public class ForgotPasswordModel
{
    [Required]
    [EmailAddress]
    public string Email { get; set; }
}
The Email property is the only one we require for the ForgotPassword view. Let’s continue by creating additional actions:
[HttpGet]
public IActionResult ForgotPassword()
{
    return View();
}

[HttpPost]
[ValidateAntiForgeryToken]
public async Task<IActionResult> ForgotPassword(ForgotPasswordModel forgotPasswordModel)
{
    return View(forgotPasswordModel);
}

public IActionResult ForgotPasswordConfirmation()
{
    return View();
}
This is a familiar setup. The first action is just for the view creation, the second one is for the main logic and the last one just returns confirmation view. Of course, we have to create these views:
@model IdentityByExamples.Models.ForgotPasswordModel

<h1>ForgotPassword</h1>

<div class="row">
    <div class="col-md-4">
        <form asp-action="ForgotPassword">
            <div asp-validation-summary="ModelOnly" class="text-danger"></div>
            <div class="form-group">
                <label asp-for="Email" class="control-label"></label>
                <input asp-for="Email" class="form-control" />
                <span asp-validation-for="Email" class="text-danger"></span>
            </div>
            <div class="form-group">
                <input type="submit" value="Submit" class="btn btn-primary" />
            </div>
        </form>
    </div>
</div>

@section Scripts {
    @{await Html.RenderPartialAsync("_ValidationScriptsPartial");}
}
And another one:
<h1>ForgotPasswordConfirmation</h1>

<p>
    The link has been sent, please check your email to reset your password.
</p>
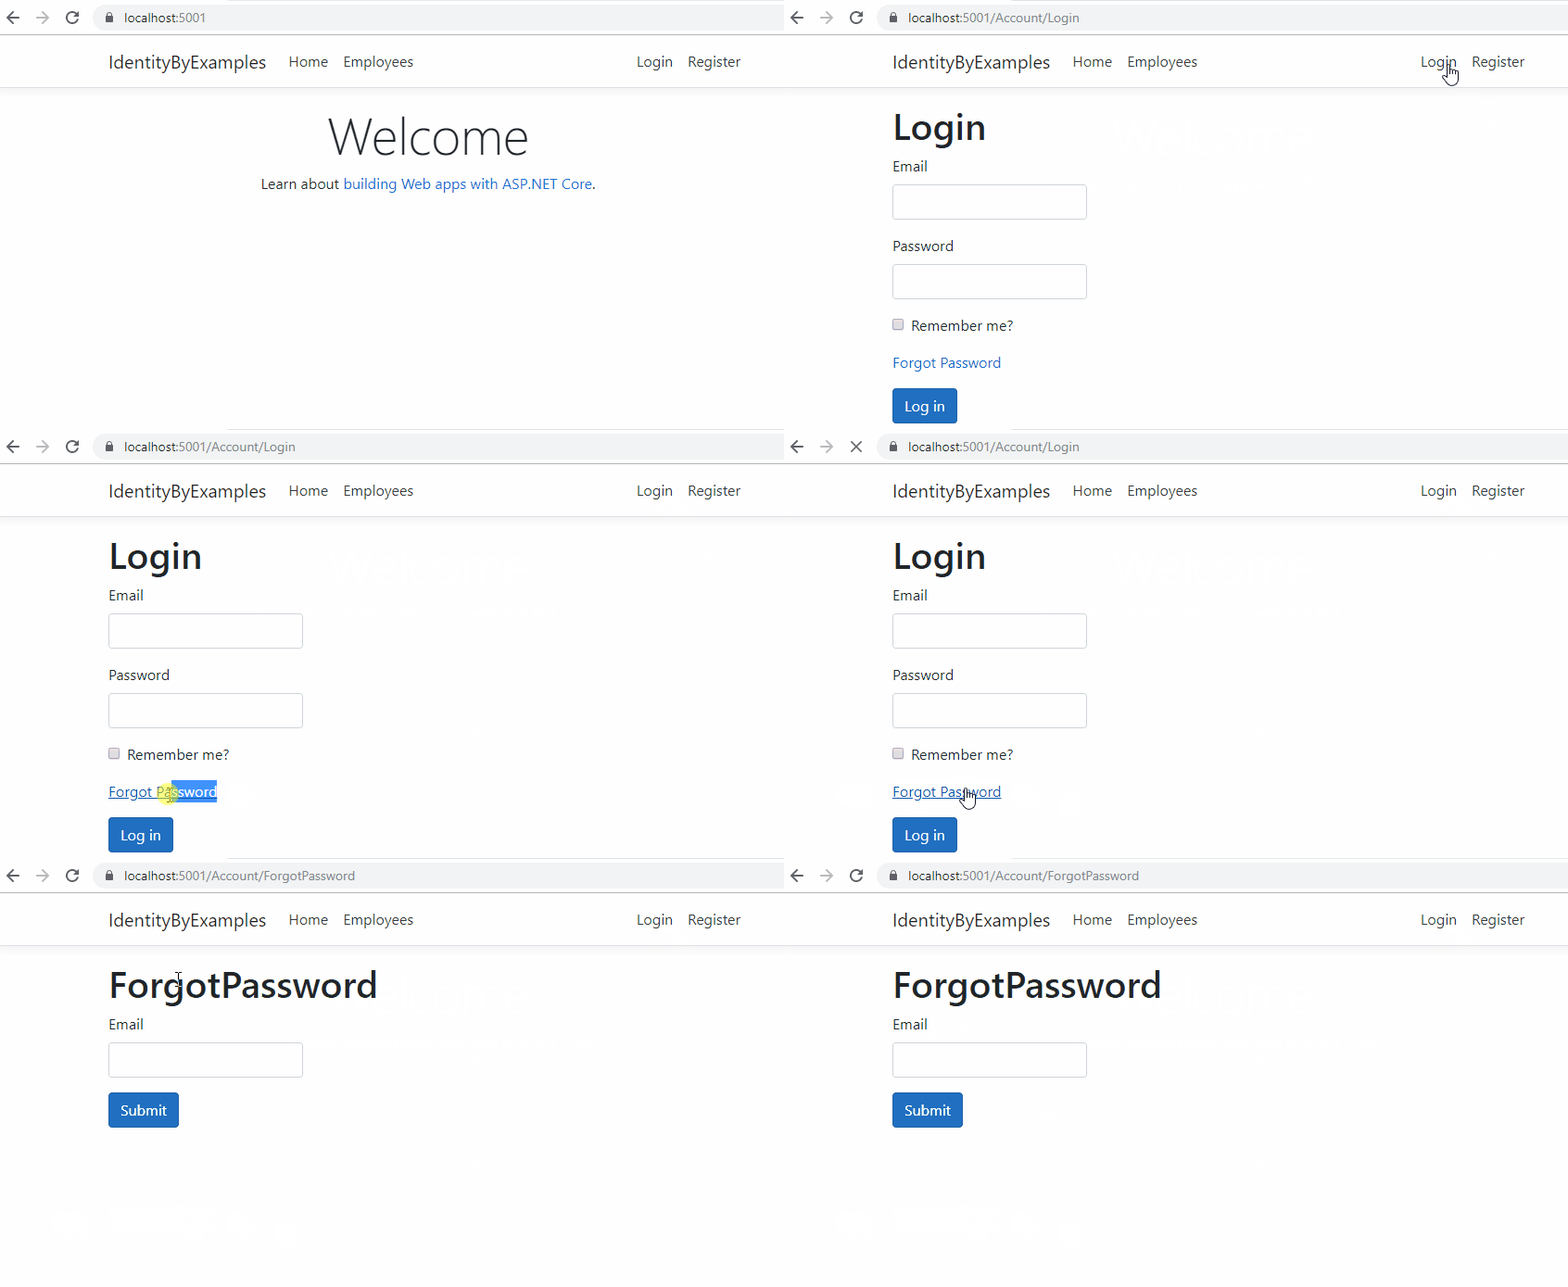
If we want to navigate to the ForgotPassword view, we have to click on the forgot password link in the Login view. So, let’s add it there:
<div class="form-group">
    <a asp-action="ForgotPassword">Forgot Password</a>
</div>
And test it:

Now we can modify the POST action:
[HttpPost]
[ValidateAntiForgeryToken]
public async Task<IActionResult> ForgotPassword(ForgotPasswordModel forgotPasswordModel)
{
    if (!ModelState.IsValid)
        return View(forgotPasswordModel);

    var user = await _userManager.FindByEmailAsync(forgotPasswordModel.Email);
    if (user == null)
        return RedirectToAction(nameof(ForgotPasswordConfirmation));

    var token = await _userManager.GeneratePasswordResetTokenAsync(user);
    var callback = Url.Action(nameof(ResetPassword), "Account", new { token, email = user.Email }, Request.Scheme);

    var message = new Message(new string[] { user.Email }, "Reset password token", callback, null);
    await _emailSender.SendEmailAsync(message);

    return RedirectToAction(nameof(ForgotPasswordConfirmation));
}
So, if the model is valid we get the user from the database by its email. If they don’t exist, we just redirect that user to the confirmation page instead of creating a message that the user doesn’t exist.
This is a good practice for security reasons.
If they exist, we generate a token with the GeneratePasswordResetTokenAsync method and create a callback link to the action we are going to use for the reset logic. Finally, we send an email message to the provided email address and redirect the user to the ForgotPasswordConfirmation view.
With this setup, we are missing two important things. The token can’t be created and we don’t have the ResetPassword actions. So, let’s fix that.
Enabling Token Generation
We can’t create our token because we haven’t registered the token provider for our application at all. So to do that, we have to modify the configuration:
services.AddIdentity<User, IdentityRole>(opt =>
{
    opt.Password.RequiredLength = 7;
    opt.Password.RequireDigit = false;
    opt.Password.RequireUppercase = false;

    opt.User.RequireUniqueEmail = true;
})
 .AddEntityFrameworkStores<ApplicationContext>()
 .AddDefaultTokenProviders();
And that’s all it takes. The AddDefaultTokenProviders extension method will do exactly that, add the required token providers to enable the token generation in our project. But there is one more thing we have to configure.
What we want for our password reset token is to be valid for a limited time, for example, 2 hours. So to do that, we have to configure a token life span as well:
services.Configure<DataProtectionTokenProviderOptions>(opt =>
   opt.TokenLifespan = TimeSpan.FromHours(2));
In .NET 6 and later:
builder.Services.Configure<DataProtectionTokenProviderOptions>(opt =>
   opt.TokenLifespan = TimeSpan.FromHours(2));
Excellent. We can move on.
Reset Password Functionality
Before we start with the ResetPassword actions, we have to create a ResetPasswordModel class:
public class ResetPasswordModel
{
    [Required]
    [DataType(DataType.Password)]
    public string Password { get; set; }

    [DataType(DataType.Password)]
    [Compare("Password", ErrorMessage = "The password and confirmation password do not match.")]
    public string ConfirmPassword { get; set; }

    public string Email { get; set; }
    public string Token { get; set; }
}
Now, let’s create the required actions in the Account controller:
[HttpGet]
public IActionResult ResetPassword(string token, string email)
{
    var model = new ResetPasswordModel { Token = token, Email = email };
    return View(model);
}

[HttpPost]
[ValidateAntiForgeryToken]
public async Task<IActionResult> ResetPassword(ResetPasswordModel resetPasswordModel)
{
    return View();
}

[HttpGet]
public IActionResult ResetPasswordConfirmation()
{
    return View();
}
This is a similar setup as we had with the ForgotPassword actions. The HttpGet ResetPassword action will accept a request from the email, extract the token and email values, and create a view. The HttpPost ResetPassword action is here for the main logic. And the ResetPasswordConfirmation is just a helper action to create a view for a user to get some confirmation about the action.
With that in place, let’s create our views. First the ResetPassword view:
@model IdentityByExamples.Models.ResetPasswordModel

<h1>ResetPassword</h1>

<div class="row">
    <div class="col-md-4">
        <form asp-action="ResetPassword">
            <div asp-validation-summary="All" class="text-danger"></div>
            <div class="form-group">
                <label asp-for="Password" class="control-label"></label>
                <input asp-for="Password" class="form-control" />
                <span asp-validation-for="Password" class="text-danger"></span>
            </div>
            <div class="form-group">
                <label asp-for="ConfirmPassword" class="control-label"></label>
                <input asp-for="ConfirmPassword" class="form-control" />
                <span asp-validation-for="ConfirmPassword" class="text-danger"></span>
            </div>
            <input type="hidden" asp-for="Email" class="form-control" />
            <input type="hidden" asp-for="Token" class="form-control" />
            <div class="form-group">
                <input type="submit" value="Create" class="btn btn-primary" />
            </div>
        </form>
    </div>
</div>
Pay attention that Email and Token are hidden fields, we already have these values.
After this view, we have to create one more for the confirmation:
<h1>ResetPasswordConfirmation</h1>

<p>
    Your password has been reset. Please <a asp-action="Login">click here to log in</a>.
</p>
Excellent.
Now we can modify the POST action:
[HttpPost]
[ValidateAntiForgeryToken]
public async Task<IActionResult> ResetPassword(ResetPasswordModel resetPasswordModel)
{
    if (!ModelState.IsValid)
        return View(resetPasswordModel);

    var user = await _userManager.FindByEmailAsync(resetPasswordModel.Email);
    if (user == null)
        RedirectToAction(nameof(ResetPasswordConfirmation));

    var resetPassResult = await _userManager.ResetPasswordAsync(user, resetPasswordModel.Token, resetPasswordModel.Password);
    if(!resetPassResult.Succeeded)
    {
        foreach (var error in resetPassResult.Errors)
        {
            ModelState.TryAddModelError(error.Code, error.Description);
        }

        return View();
    }

    return RedirectToAction(nameof(ResetPasswordConfirmation));
}
So, the first two actions are the same as in the ForgotPassword action. We check the model validity and also if the user exists in the database. After that, we execute the password reset action with the ResetPasswordAsync method. If the action fails, we add errors to the model state and return a view. Otherwise, we just redirect the user to the confirmation page.
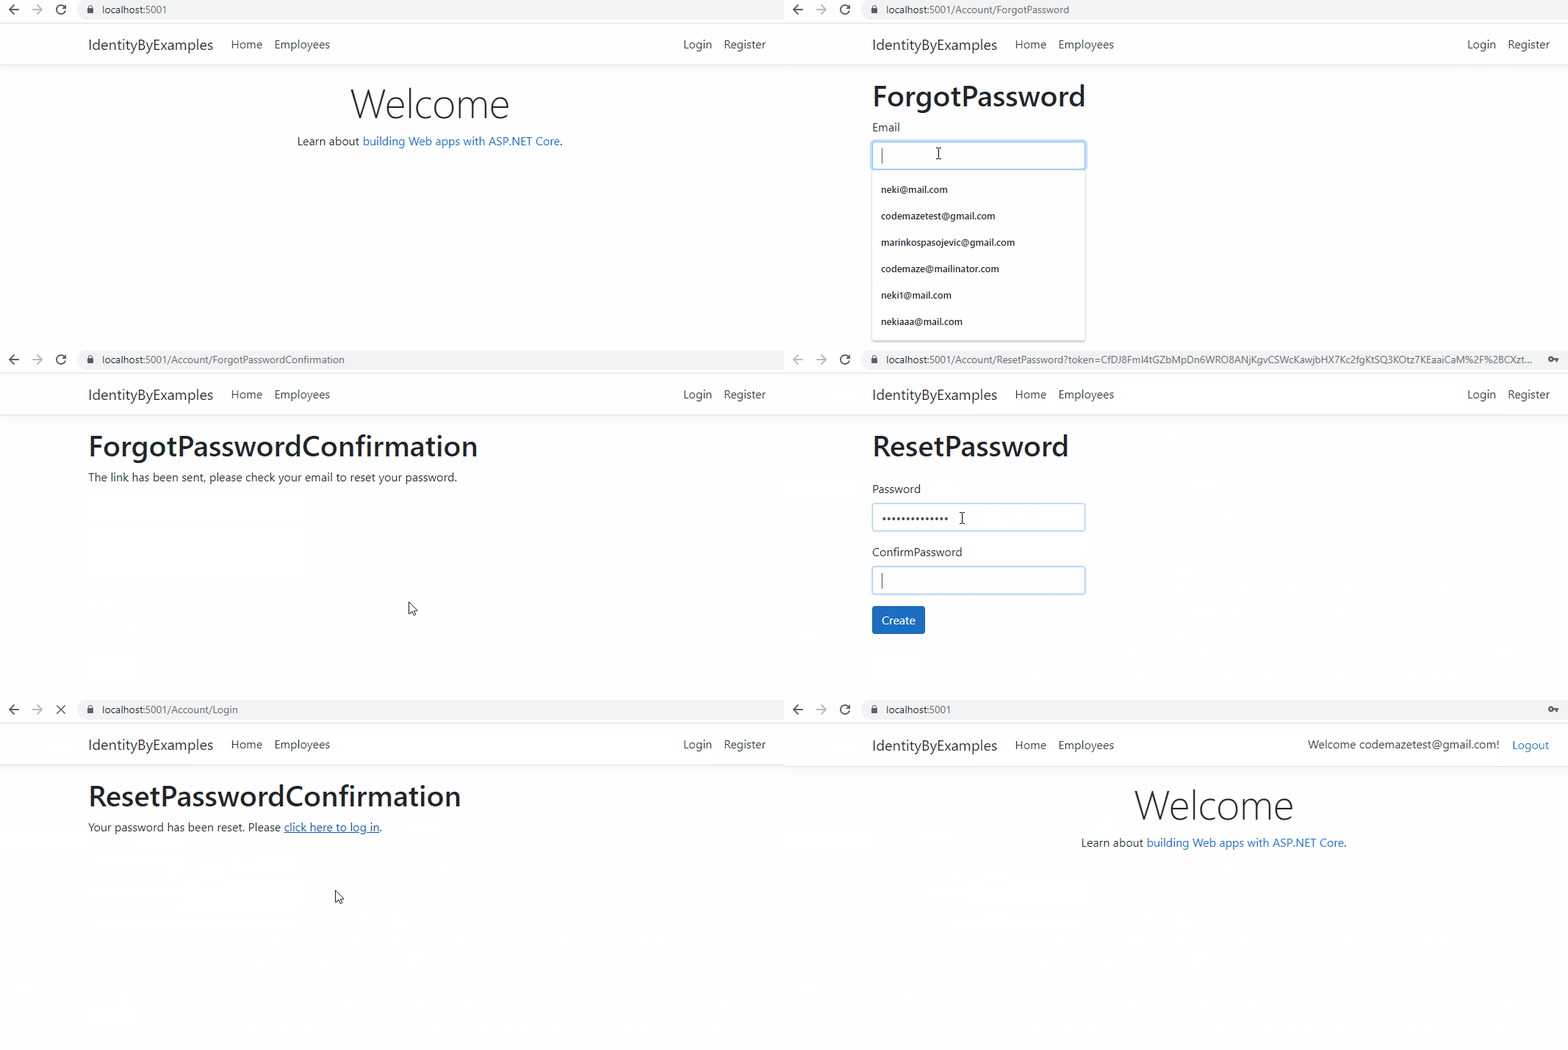
We can see this in practice:

As you can see, everything works as expected, and we can confirm that by comparing two hashed passwords in the database:

Conclusion
We did an excellent job here. Everything is working as expected and we can sum this article up.
So, we have learned:
- About injecting external email service into an existing project
- How to implement forgot password functionality
- The way to register token providers and to set up the life span of a token
- How to implement reset password functionality
In the next article, we are going to talk about email confirmation during the registration process.


