

In this article, we are going to learn about integrating Keycloak authentication in a Blazor WebAssembly (WASM) frontend and a .NET Web API backend. With this setup, we will enable secure user authentication across both applications.
Keycloak is an open-source identity and access management solution that provides authentication, authorization, and user management out of the box. It supports industry-standard protocols like OpenID Connect and OAuth2, making it a great choice for securing applications.
Initial projects where the Blazor WebAssembly (with individual accounts authentication type selected) client app consumes Web API are already prepared. We will use those throughout this article.
So, let’s start.
VIDEO: Keycloak Authentication With ASP.NET Core Web API and Blazor WASM.
Installing Keycloack Using Docker
We assume you already have a Docker Desktop installed since it is the easiest way to work with Docker. If you don’t have it installed, just use the provided link and install it, it is simply as that.
We can open the docker desktop app and then run this command in the CMD or PowerShell window:
docker run -p 8080:8080 -e KC_BOOTSTRAP_ADMIN_USERNAME=admin -e KC_BOOTSTRAP_ADMIN_PASSWORD=admin quay.io/keycloak/keycloak:26.1.1 start-dev
This will download the image and install the required container mapping the port 8080, and providing the username and admin parameters.
With the image downloaded, we can see that the container is already running, and let’s navigate to localhost:8080/admin to be redirected to the login popup.
Let’s use credentials: admin, admin.
Preparing Keycloak Authentication With a Realm, Clients, and Users
So, the first thing we are going to do is to create a new realm. A realm in Keycloak is an isolated authentication and authorization space where users, roles, clients, and identity providers are managed. It acts as a container for everything related to identity and access management.
By default, a master realm is created, but we need a new one:
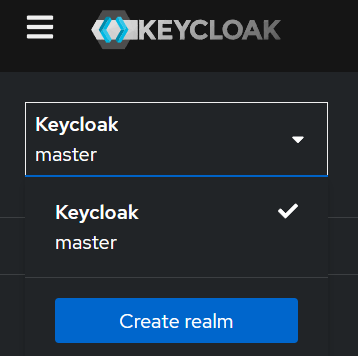
So, we need to:
- Click on the master realm and once the menu appears click on the
Create realmbutton - Add a name for our realm – BlazorWebApiRealm
- Click the
Createbutton
With this, we create a new realm and navigate directly there.
Create Web API Client For Keycloak Authentication
So, we need to register both clients (Web API and Blazor WASM), and let’s start with the Web API client.
To do that, let’s open the Clients menu and click the Create client button:
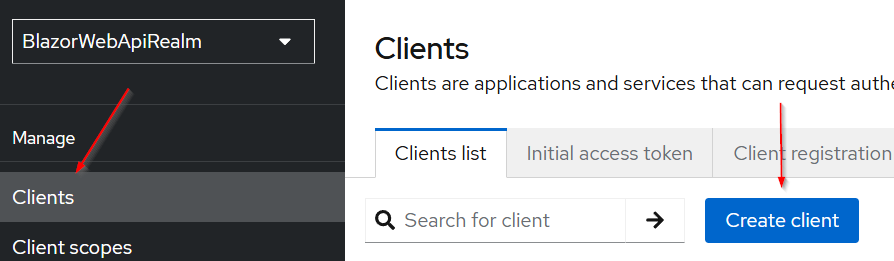
Once the “Create client” page opens, we can populate the required fields:
- The Client type is OpenID Connect which is set by default
- Client ID: web-api (you can add the Name and Description if you want)
- Client Authentication: Off
- Authorization: Off
- Standard Flow Enabled: Off
- Direct Access Grants Enabled: Off
- Both Root and Home URLs are blank
- Click Save.
Since the Web API client is our server app, we don’t need to populate anything except the Client ID field.
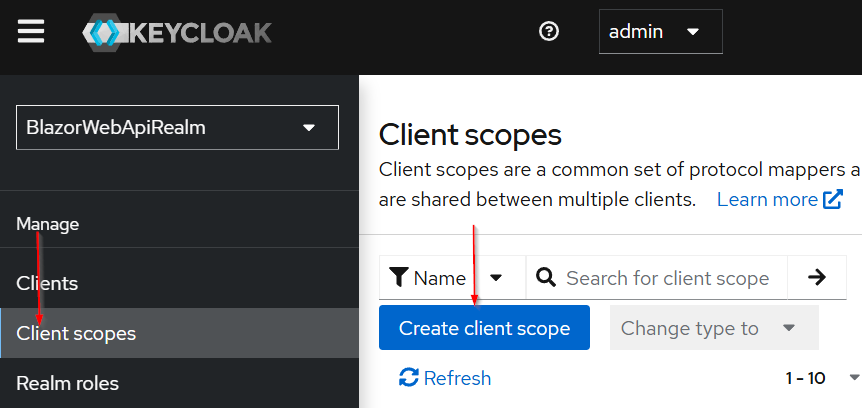
Mapping to Correct Audience
We need to map a correct Audience for the Web API client because without this step the aud claim will be just an “account”, which we don’t want.
To do that, let’s open the Client scopes menu and hit the Create client scope button:
Once the page opens
- Then, we need to populate the Name:
blazor_api_scope, and add some description - Also, let’s turn on
Include in token scopeso that the scope is included in the generated access token (if you need it) - Finally, let’s click the
Savebutton
After we are done with the scope creation, we will see a new page with the Mappers tab. We need to open that tab and:
- Click the
Configure new mapperbutton - Chose
Audiencefrom the table – this will be aMapper type - Add any meaningful name like
blazor_api audience - Select the
web-apiclient in theIncluded Client AudienceDDL - Click the
Savebutton
This ensures any time the blazor_api_scope is requested and granted, the blazor_api_audience will be added to the access token.
Create Blazor Client For Keycloak Authentication
So, as we did with the previous client, we have to navigate to the Clients menu and hit the Create client button.
Now, we can populate the required fields
- Client type is by default OpenID Connect
- Client ID: blazor-client (you can provide a name and a description if you want)
- Client Type: Public – client authentication is set to off because Blazor WASM apps are considered public clients
- We should select the Standard flow only
- Valid Redirect URIs:
https://localhost:5000/authentication/login-callback - Logout Redirect:
https://localhost:5000/authentication/logout-callback - Click the
Savebutton to save changes
Once we save changes, we can see the Web origins populated automatically for CORS. Also, pay attention that our app is running on localhost:5000 – if yours is running on a different port, you should provide that one.
Additionally, we need to allow our front-end app to request the client scope we created earlier. That’s how it can get access tokens with the correct audience.
So, from the current screen:
- Open the
Client scopestab and click theAdd client scopebutton - Select the previously created scope
blazor_api_scope - Add-Optional as we want the client to request it and not add it by default
Great.
We should be able to locate blazor_api_scope in the scope list right after the address and basic scopes.
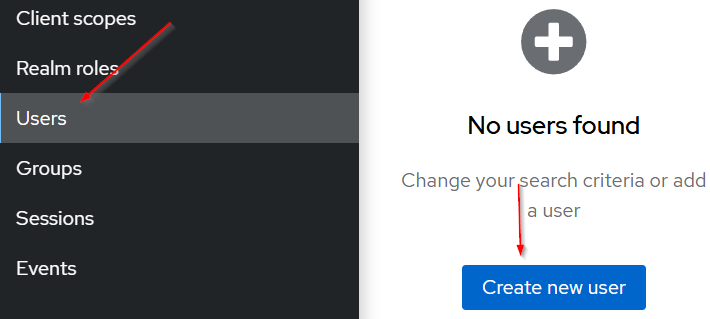
Create a User
To create a new user in Keycloak, let’s navigate to the Users menu and hit a Create new user button:
Once on the form, let’s populate the necessary fields:
- Username: codemaze
- Email: [email protected]
- First name: Code
- Last name: Maze
- Click the
Createbutton to create a new user
This user needs a password to log in. So, to set the initial password:
- Click
Credentialsat the top of the page - Click the
Set passwordbutton and populate the form with a password - Toggle Temporary to Off so the user does not need to update this password at the first login
- Hit the
Savebutton
Excellent.
With all the previous steps, we have prepared a Keycloak authentication with the Keycloak’s dashboard, and now we can do some coding.
Configure Web API For the Keycloak Authentication
Inside the Web API project, we first need to install the package: Microsoft.AspNetCore.Authentication.JwtBearer
It will help us with the authentication process.
Then, in the Program.cs class, let’s add the required code for the authentication:
using Microsoft.AspNetCore.Authentication.JwtBearer;
using Microsoft.IdentityModel.Tokens;

var builder = WebApplication.CreateBuilder(args);

builder.Services.AddCors(policy =>
{
    policy.AddPolicy("CorsPolicy", opt => opt
        .AllowAnyOrigin()
        .AllowAnyHeader()
        .AllowAnyMethod());
});

builder.Services.AddAuthentication(JwtBearerDefaults.AuthenticationScheme)
    .AddJwtBearer(options =>
    {
        options.Authority = "http://localhost:8080/realms/BlazorWebApiRealm";
        options.Audience = "web-api";
        options.RequireHttpsMetadata = false;
        options.TokenValidationParameters = new TokenValidationParameters
        {
            ValidateIssuer = true,
            ValidateAudience = true,
            ValidateLifetime = true,
            ValidateIssuerSigningKey = true
        };
    });
builder.Services.AddAuthorization();

builder.Services.AddControllers();

var app = builder.Build();

app.UseHttpsRedirection();
app.UseCors("CorsPolicy");

app.UseAuthentication();
app.UseAuthorization();

app.MapControllers();

app.Run();
So, with the AddAuthentication method, we register JWT Bearer Authentication as the authentication scheme. It ensures that incoming requests must include a valid JWT token.
Then, with options.Authority we specify the Keycloak realm endpoint (/realms/BlazorWebApiRealm). It can be found on the Realm Settings menu -> OpenID Endpoint Configuration link. It will open a new page with the authority (issuer) as the first element.
We also provide the correct audience, which is the client ID of the Web API client.
Additionally, we disable the requirement for HTTPS in local development. In production, this should be true to enforce secure communication.
Then, we provide validation parameters to ensure the valid issuer, audience, token expiration, and token signature.
Finally, we call the AddAuthorization() method to add the authorization policy services and also call the UseAuthentication() method to enable authentication middleware.
Blazor WASM Configuration.
Ok, after we are done with the server app, we can continue with the Blazor WebAssembly app and configure the Keycloak authentication there.
We must have this package: Microsoft.AspNetCore.Components.WebAssembly.Authentication installed. Since we use the Blazor WASM app with Individual Users for Authentication, it should already be installed.
Now, let’s modify the Program.cs class:
builder.Services.AddOidcAuthentication(options =>
{
    options.ProviderOptions.Authority = "http://localhost:8080/realms/BlazorWebApiRealm";
    options.ProviderOptions.ClientId = "blazor-client";
    options.ProviderOptions.ResponseType = "code";
    options.ProviderOptions.DefaultScopes.Add("blazor_api_scope");
});
Here, we modify the existing AddOidcAuthentication() method, and provide information about the authority (realm), client ID, the response type, and we explicitly ask for the mapped scope.
Then, let’s modify the HttpClient configuration to include the access token:
builder.Services.AddHttpClient("WeatherAPI", client => client.BaseAddress = new Uri("https://localhost:5001/"))
    .AddHttpMessageHandler(sp =>
    {
        var handler = sp.GetRequiredService<AuthorizationMessageHandler>()
            .ConfigureHandler(authorizedUrls: ["https://localhost:5001"]);

        return handler;
    });

builder.Services.AddScoped(sp => sp.GetRequiredService<IHttpClientFactory>().CreateClient("WeatherAPI"));
For this to work, we need to install the Micrososft.Extensions.Http package.
Here, we configure an HTTP client to securely communicate with a protected Web API. With the AddHttpClient() method, we register an HTTP client named “WeatherAPI” with a base address. We also attach an AuthorizationMessageHandler, which ensures that authentication tokens are included when making requests to the specified authorized URLs.
Then, we use the AddScoped() method to register a scoped service that retrieves the named HTTP client (WeatherAPI) from the IHttpClientFactory, allowing it to be injected into Blazor components or services. With this, the client app automatically handles authentication and authorization when making API requests.
Ok, let’s protect the Blazor’s Weather page:
@page "/weather"
@inject HttpClient Http
@using Microsoft.AspNetCore.Authorization
@attribute [Authorize]
This will require an authorized user to access this page.
Finally, in the @code section of the same page, we need to modify the Http call:
forecasts = await Http.GetFromJsonAsync<WeatherForecast[]>("weatherforecast");
Test Keycloak Authentication With the Blazor Client App
Let’s run both API and Blazor applications. Once that is done, we will see the Login link in the upper-right corner, so let’s click on it:
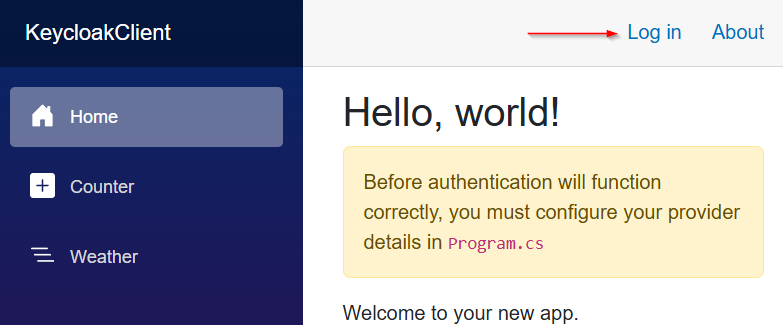
Once we do that, the Keycloak Authentication popup will appear where we need to use the credentials of our created user. You can also see the “Hello” message and the Log out button.
Now, we can navigate to the Weather page, and we should get the data:
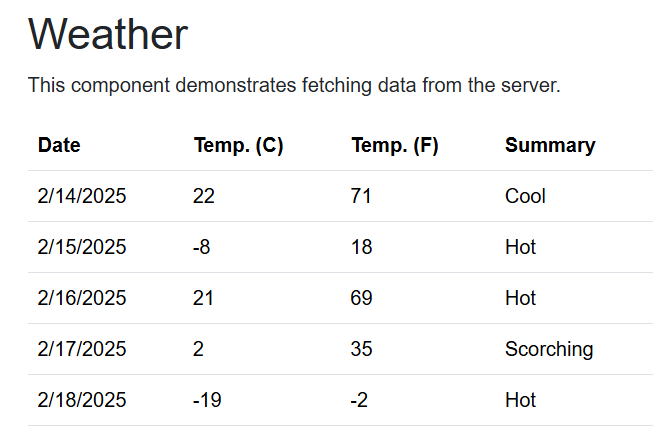
However, the API endpoint is not authorized.
We can click the Log out button, and we will be logged out.
Authorizing Web API and Testing Again
So, first, we need to add the Authorize attribute to our controller:
[HttpGet]
[Authorize]
public IEnumerable<WeatherForecast> Get()
Again, we can run both apps, authenticate, and fetch the data. Everything should work.
Inspecting the Token
To inspect the scope and the token, we can open the dev tools -> applications tab.
There, under the Session storage menu, we can find the third “oidc” key:
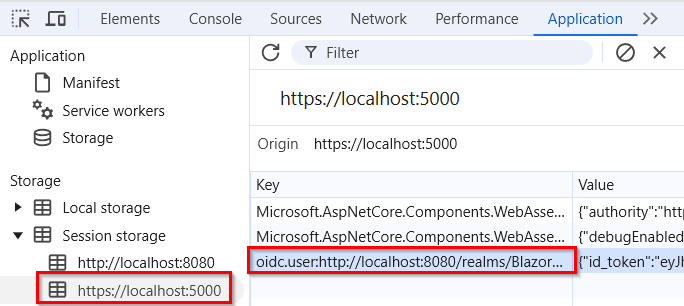
We can copy the access token (bottom-right of the screen), which we can inspect on the jwt.io site. There, we will see what are the values for the issuer and audience properties, and those should match our configuration:
{
  "exp": 1739446851,
  "iat": 1739446551,
  "auth_time": 1739446549,
  "jti": "c1e7e9a7-8bf0-4766-b694-7105c6894a02",
  "iss": "http://localhost:8080/realms/BlazorWebApiRealm",
  "aud": [
    "web-api",
    "account"
  ],
  ...
}
Conclusion
By integrating Keycloak authentication with Blazor WebAssembly and a .NET Web API, we provide a secure and scalable identity management solution. With the OpenID Connect and OAuth2 support, we ensure that only authenticated users can access protected resources. The Web API validates JWT tokens issued by Keycloak, while the Blazor WASM app handles authentication and API requests using an AuthorizationMessageHandler.
In the next article, we will learn about Role-Based Authorization between Blazor WASM and Web API apps, using Keycloak.

