

Orchard Core, a multipurpose open-source platform built upon ASP.NET Core, offers strong support for multi-tenancy. This article explores the installation and configuration of Orchard Core for multitenancy .NET applications, as well as the setup of multitenancy through its admin dashboard and framework.
Additionally, we’ll look into the integration of features and modules to extend our application’s functionalities and dynamically create new tenants using the Orchard Core framework.
What is a Multitenancy Application?
Multitenant applications are software that efficiently shares resources and databases among multiple tenants, which allows an instance of the software and its infrastructure to serve multiple customers simultaneously. For more on multitenant applications, see our article on How to Build a Multitenant Application with ASP.NET Core
What is Orchard Core?
As described on the Orchard Core GitHub page, Orchard Core is designed to be modular and support multi-tenancy, making it adaptable to various web application needs.
There are two primary targets in Orchard Core.
Orchard Core Framework
This aspect of Orchard Core functions as an application framework, which provides us with a way to build modular and multi-tenant applications on ASP.NET Core. Hence, it offers a flexible architecture that enables us to create solutions to fit specific project requirements.
Orchard Core CMS
Orchard Core CMS provides out-of-the-box content management capabilities. It is a Web Content Management System (CMS) that sits on the Orchard Core Framework as its base. It offers powerful content management features, allowing us to create, edit, and publish content easily.
Installing and Configuring Orchard Core Application
We can install Orchard Core through two primary methods: manual installation via NuGet packages or code generation using dotnet new templates. While both approaches have their merits, we’ll focus on the manual method in this guide to gain a deeper understanding of the installation process.
Alright, let’s begin by launching a command prompt, and create a new ASP.NET Core Web App (Razor Pages) project, and name it MyOrchardCoreCMS with this command:
dotnet new webapp -o MyOrchardCoreCMS
Also, let’s add the Orchard Core CMS NuGet package to the project:
dotnet add package OrchardCore.Application.Cms.Targets
Alternatively, if we prefer a minimal setup with only TheAdmin theme included, we can use OrchardCore.Application.Cms.Core.Targets instead. For this demo, we’ll go with the former.
Let’s make the necessary adjustments to the Program.cs class to integrate Orchard Core into our application:
var builder = WebApplication.CreateBuilder(args);

builder.Services.AddOrchardCms();

var app = builder.Build();

if (!app.Environment.IsDevelopment())
{
    app.UseExceptionHandler("/Error");
    app.UseHsts();
}

app.UseStaticFiles();
app.UseOrchardCore();

app.Run();
First, the AddOrchardCms() method adds all the necessary services, modules, and configurations to enable Orchard Core CMS into our application. This includes services for content management, authentication, authorization, media library, themes, and more.
Likewise, UseOrchardCore() method sets up the middleware and modules that Orchard Core needs to handle incoming HTTP requests like routing, authentication, authorization, and other functionalities managed by Orchard Core CMS.
Launching and Setting Up Orchard Core CMS
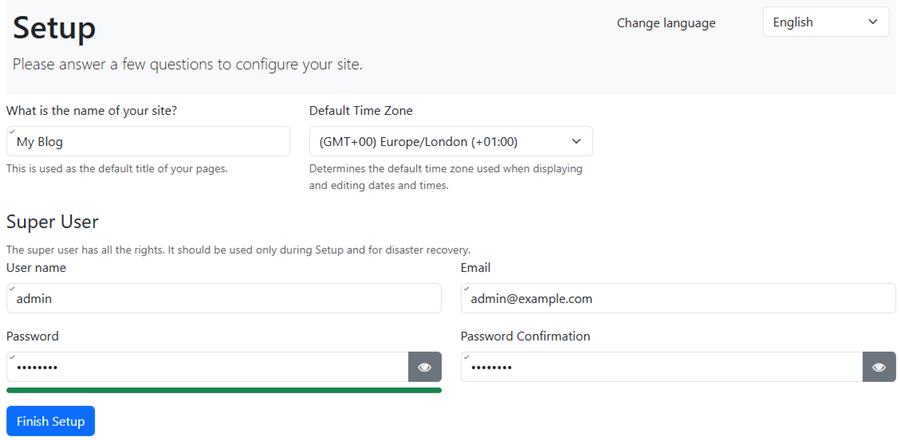
Let us build and run the project to launch our Orchard Core CMS website. Upon launching, the setup screen will display for us to fill in the necessary information:
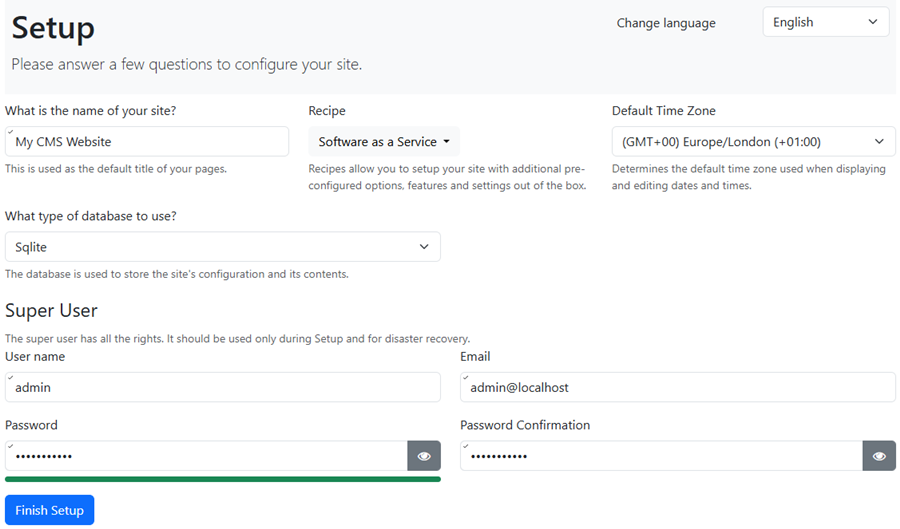
After filling in the required information and clicking the ‘Finish Setup’ button to finalize the configuration, our website will be created and ready for us to start multitenant websites. Let’s see that.
Configuring Multitenancy With Orchard Core Admin Dashboard
Orchard Core makes it easy to create multitenant websites through its admin dashboard. Let’s see how we can get into configuring multitenancy:
We’ll begin by navigating to /admin of the CMS website base address. This will redirect us to the login page. We’ll land on the admin dashboard after successful authentication with our login details.
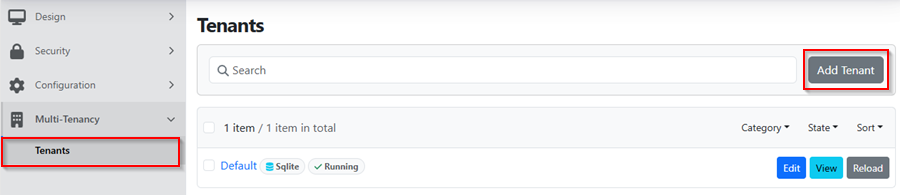
To add a new tenant, let’s expand the ‘Multi-Tenancy’ menu and select ‘Tenants’. Currently, we have only the default tenant.
Let’s go ahead and add another tenant by clicking the ‘Add Tenant’ button to start the creation process:
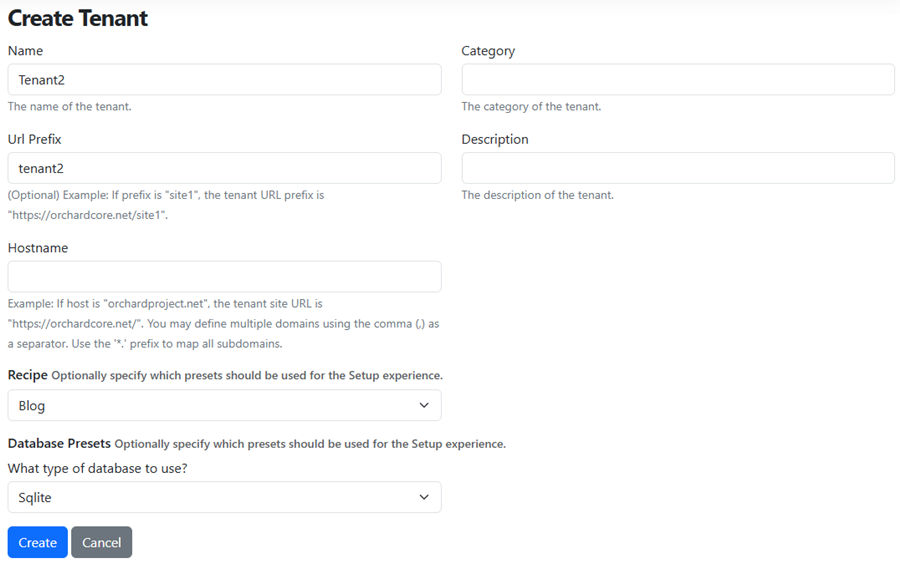
Let’s fill in some of the fields to define the new tenant and click the ‘Create Tenant’ button to complete this stage of the tenant creation process using the Create Tenant page:
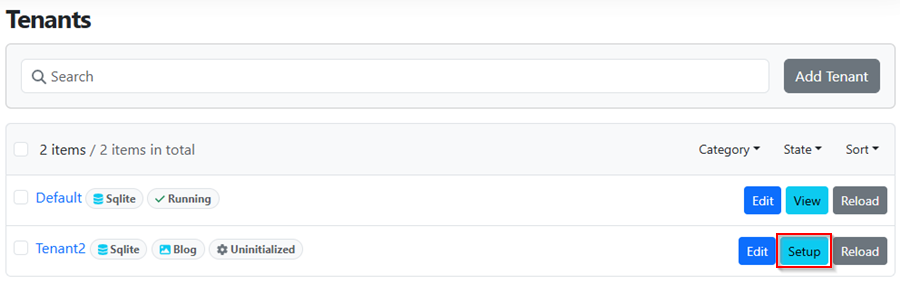
However, note that the new tenant isn’t yet publicly accessible. We need to complete the setup before Orchard Core starts running the tenant.
Finally, let’s finish the setup by clicking the ‘Setup’ button for our new Blog tenant. Here, let’s fill in the required information and submit the form:
Orchard Core tenant setup page:
Upon completion, Orchard Core will redirect us to the new tenant’s homepage.
Configuring Multitenancy with Orchard Core Framework
As we have seen, the Orchard Core CMS framework offers a solid solution for developing applications that serve multiple tenants.
However, what if we want to implement multitenancy in an ASP.NET Core application without the overhead of integrating the entire Orchard Core CMS framework? Fortunately, the Orchard Core framework provides a multitenancy feature that can be seamlessly integrated into ASP.NET Core applications without using the CMS.
Setting up Multitenancy
To demonstrate how to configure multitenancy with Orchard Core in an ASP.NET Core application, let’s create a new project ASP.NET Core Web App with Razor Pages with the name MultiTenantApp.
Additionally, we need to add the Orchard Core MVC NuGet package to our project:
dotnet add package OrchardCore.Application.Mvc.Targets
This package provides the necessary functionality for integrating Orchard Core into our ASP.NET Core application.
Again, let’s modify the Program.cs class with the necessary codes to integrate Orchard Core multitenancy functionalities into our application:
var builder = WebApplication.CreateBuilder(args);

builder.Services.AddOrchardCore().AddMvc().WithTenants();

var app = builder.Build();

if (!app.Environment.IsDevelopment())
{
    app.UseExceptionHandler("/Error");
    app.UseHsts();
}

app.UseHttpsRedirection();
app.UseStaticFiles();
app.UseOrchardCore();

app.Run();
We call the AddOrchardCore() method to register the core Orchard Core services required by Orchard Core to our application’s dependency injection container.
Furthermore, we also use the WithTenants() method to configure our application to support multiple tenancy functionalities. Finally, the UseOrchardCore() method adds Orchard Core middleware to our application’s middleware pipeline for handling requests.
Configuring Tenants and Tenant-Specific Settings
Now that our application is set up to use Orchard Core’s multitenancy feature, let’s configure it in the appSettings.json file:
"OrchardCore": {
    "Default": {
      "State": "Running",
      "RequestUrlHost": null,
      "RequestUrlPrefix": null,
      "CustomTitle": "Default Tenant",
      "CustomSetting": "Custom setting for Default tenant"
    },
    "CustomerA": {
      "State": "Running",
      "RequestUrlHost": null,
      "RequestUrlPrefix": "customer-a",
      "CustomTitle": "Customer A",
      "CustomSetting": "Custom setting for Customer A"
    },
    "CustomerB": {
      "State": "Running",
      "RequestUrlHost": null,
      "RequestUrlPrefix": "customer-b",
      "CustomTitle": "Customer B",
      "CustomSetting": "Custom setting for Customer B"
    }
}
Orchard Core extends ASP.NET Core IConfiguration through IShellConfiguration, enabling configuration specific to individual tenants in the global application configuration. Essentially, Orchard Core automatically accesses the OrchardCore section in appSettings.json, eliminating the need for us to write custom code for this purpose.
Here is what is happening in this configuration:
- OrchardCore: This top-level section contains all Orchard Core-related settings.
- Default, CustomerA, and CustomerB: These represent different tenants of the application, each with its configuration settings.
- State: Indicates the state of each tenant, with all tenants set to “Running” in this example.
- RequestUrlHost: Specifies the host part of the URL for each tenant. It’s set to null, meaning it will inherit from the parent host.
- RequestUrlPrefix: Specifies a prefix to use in the URL for each tenant. For example, “customer-a” and “customer-b” prefixes are defined for CustomerA and CustomerB tenants respectively.
- CustomTitle: Custom title for each tenant, which can be displayed in the application UI or used for identification purposes.
- CustomSetting: Additional custom settings specific to each tenant, allowing for fine-grained configuration
Understanding Features and Modules of Orchard Core
In Orchard Core, features and modules serve as foundational concepts that enable modular and scalable application development. Features represent units of functionality within Orchard Core, bundling together related components or functionalities that can be enabled or disabled independently.
Specifically, each feature typically contributes a unique aspect or capability to the application, which contains various components that furnish different functionalities to the system. Orchard Core simplifies feature management by providing administrative dashboard controls within the Orchard Core CMS as we’ve seen, alongside configuration options in appSettings.json or programmatically through the Orchard Core API.
On the other hand, Modules act as the base elements of an Orchard Core application. These are Class Library applications containing code, templates, assets, and other necessary resources to expand the application’s capabilities.
For example, modules can define one or more features and provide implementations for those features, thereby encapsulating specific functionalities or reusable components that integrate with an Orchard Core application.
Integrating Features and Modules in Tenants
Currently, our application has three tenants, Default, CustomerA and CustomerB. Let’s assume we want to extend our application with the capability of sending email and SMS. That’s where Orchard Core modules come in.
However, these features are not going to be available for all customers. CustomerA will have only the email feature enabled, while CustomerB will have both the email and SMS features available.
To begin, let’s create two separate Orchard Core modules: one for handling email functionality and another for managing SMS capabilities.
Let’s create a new Class Library project, and name it EmailModule. Next, let’s add the OrchardCore Module NuGet package to the EmailModule project:
dotnet add package OrchardCore.Module.Targets
The OrchardCore.Module.Targets NuGet package serves as a way to indicate to Orchard Core that this library functions as an Orchard Core module.
Next, we’ll create a class and name it Startup.cs in the EmailModule project. Orchard Core will read this class during the initialization of the module:
public void Configure(IEndpointRouteBuilder endpoints)
{
    endpoints.MapGet("/Email", async context => { await context.Response.WriteAsync("Welcome to Email module"); });
}
We set up an endpoint route to handle HTTP GET requests to the “/Email” path of the email module.
Class Library project and name it SmsModule and then, implement the Startup.cs class:public void Configure(IEndpointRouteBuilder endpoints)
{
endpoints.MapGet("/Sms", async context => { await context.Response.WriteAsync("Welcome to SMS module"); });
}
Next, let’s open and update the appSettings.json in the MultiTenantApp project:
"CustomerA": {
  "State": "Running",
  "RequestUrlHost": null,
  "RequestUrlPrefix": "customer-a",
  "Features": [ "EmailModule" ],
  "CustomTitle": "Customer A",
  "CustomSetting": "Custom setting for Customer A"
},
"CustomerB": {
  "State": "Running",
  "RequestUrlHost": null,
  "RequestUrlPrefix": "customer-b",
  "Features": [ "SmsModule", "EmailModule" ],
  "CustomTitle": "Customer B",
  "CustomSetting": "Custom setting for Customer B"
}
The Features section lists the specific modules enabled for each tenant. For instance, CustomerA has the EmailModule enabled exclusively, whereas CustomerB enjoys both SmsModule and EmailModule functionalities enabled.
To access the email module for CustomerA we would send a request to localhost:7290/customer-a/Email, where the server responds with the message “Welcome to Email module”.
Alternatively, to access the Email module for CustomerB, we would replace customer-a in the URL with customer-b URL prefix.
However, if we try to access the SMS module from CustomerA tenant, the request will fail with an HTTP 404 error message.
Creating Tenant Dynamically
Orchard Core Framework supports dynamically adding tenants, which makes it easy to create and configure new tenants without manual intervention.
To begin, let’s create a new Class Library project and name it DynamicTenantModule. Within this project, we’ll add OrchardCore.Module.Targets:
dotnet add package OrchardCore.Module.Targets
Also, we need to add OrchardCore.Tenants:
dotnet add package OrchardCore.Tenants
OrchardCore.Tenants supports dynamic additions of tenants, allowing for on-the-fly creation and configuration of new tenants without requiring manual intervention.
Additionally, within the DynamicTenantModule project, let’s create a class with the name DynamicTenantSetup. This class will be responsible for the actual creation of new tenants:
public class DynamicTenantSetup(IShellHost shellHost, IShellSettingsManager shellSettingsManager)
{
    public async Task CreateTenant(string tenantName, string urlPrefix)
    {
        var shellSettings = new ShellSettings
        {
            Name = tenantName,
            RequestUrlHost = null,
            RequestUrlPrefix = urlPrefix,
            State = TenantState.Uninitialized,
        };

        shellSettings["customProperty"] = $"Custom settings for '{tenantName}'";

        await shellSettingsManager.SaveSettingsAsync(shellSettings);

        shellSettings.State = TenantState.Running;

        await shellHost.UpdateShellSettingsAsync(shellSettings);
    }
}
In the CreateTenant() method, we initialize a ShellSettings instance to configure settings for the new tenant. Key properties such as Name, RequestUrlPrefix, and custom properties are set from the tenantName and urlPrefix parameters, accordingly.
Finally, we call shellHost.UpdateShellSettingsAsync() to update the shell settings with the newly configured settings for the tenant.
ShellSettings is a class that holds the configuration settings for a tenant. In Orchard Core, each tenant is represented by a ShellSettings instance.
IShellHost is responsible for managing tenants. It acts as a gateway to a specific tenant’s resources. Also, it provides ways to interact with an individual tenant’s services and manage its lifecycle.
Next, let’s add the Startup.cs class for this module:
public class Startup
{
    public void ConfigureServices(IServiceCollection services)
    {
        services.AddScoped<DynamicTenantSetup>();
    }
}
Additionally, let’s create a TenantsController class to handle HTTP requests for creating new tenants dynamically:
[ApiController, Route("api/tenants")]
public class TenantsController(DynamicTenantSetup tenantSetup) : Controller
{
    public IActionResult Index()
    {
        return Ok("Tenant controller home");
    }

    [HttpPost("create")]
    [IgnoreAntiforgeryToken]
    public async Task<IActionResult> Create(string tenantName, string urlPrefix)
    {
        await tenantSetup.CreateTenant(tenantName, urlPrefix);

        return Ok($"Tenant '{tenantName}' created");
    }
}
To make the DynamicTenantModule available to the Default tenant, we’ll add it to the Default tenant’s section by modifying the appSettings.json in the MultiTenantApp project:
"Default": {
    "State": "Running",
    "RequestUrlHost": null,
    "RequestUrlPrefix": null,
    "Features": ["DynamicTenantModule"],
    "CustomTitle": "Default Tenant",
    "CustomSetting": "Custom setting for Default tenant"
}
Finally, to ensure the module is available to our application, we reference the DynamicTenantModule in the MultiTenantApp project.
Ultimately, our application is now able to create new tenants dynamically. For example, to dynamically create a new tenant, we’ll send a POST request to https://localhost:7290/api/tenants/create, providing the tenantName and urlPrefix arguments, respectively.
Conclusion
Multitenancy applications provide efficient solutions for sharing resources among multiple tenants, particularly in Software-as-a-Service (SaaS) delivery. Conversely, Orchard Core is a versatile platform that supports application framework and content management system (CMS) functionalities, built upon ASP.NET Core.
In other words, through its modular architecture and support for multitenancy, Orchard Core enables us to develop scalable and customizable multi-tenant applications.
Moreover, Orchard Core simplifies the integration of features and modules, enabling us to easily extend our application capabilities dynamically. By leveraging features and modules, we can enhance application functionalities using the inbuilt modular application capabilities Orchard Core provides us.
Additionally, the Orchard Core framework offers support for dynamically creating tenants, which eliminates the need for manual intervention in setting up new tenants. Through the DynamicTenantModule, we saw how we can automate the process of tenant creation.
