
In this article, we are going to learn how to create a .NET Core Worker Service and run it as a Windows Service.
So let’s get started.
VIDEO: Create Windows Service Applications in .NET.

Windows Services in .NET Core
We may want to create long-running background services in .NET in specific scenarios. For instance, we might want to perform some processor-intensive tasks, queue some operations in the background or schedule some operations to execute at a later time. For all these purposes, we can make use of the BackgroundService class in .NET, which implements the IHostedService interface.
For implementing long-running services, we can create a class inheriting from the BackgroundService abstract class. Along with that, we’ll have to provide an implementation for the ExecuteAsync() method, which runs when the service starts. While implementing the ExecuteAsync() method, it should return a Task that represents the lifetime of the long-running operation. There is also an option to create our custom background service class by implementing the IHostedService interface if we wish to have more control over the background service functionality.
The background services that we create in .NET are cross-platform and support the inbuilt .NET features like logging, configuration, dependency injection, etc.
Creating the Project
For creating background services, we can use the Worker Service Template that is available with both the .NET CLI and Visual Studio. Worker Services allows for running background services through the use of a hosted service.
While creating a new project in Visual Studio, we can choose the Worker Service template.
On the other hand, If we are using the dotnet CLI, we can use the dotnet new command and specify the project type as worker:
dotnet new worker --name <project name>
Both these approaches will create a new project using the worker service template. Let’s examine the project in detail.
The Worker Service Template in .NET
A project we create using the worker service template will consist of 2 files – the Program class and the Worker class.
The Program class will contain the code to add the Worker class as a hosted service and run it:
var builder = Host.CreateApplicationBuilder(args);
builder.Services.AddHostedService<Worker>();

var host = builder.Build();
host.Run();
As we mentioned while explaining the windows services, any service that we implement should either inherit from the BackgroundService class or a custom implementation of it. Here, the Worker class contains the code for the service and it inherits from the BackgroundService class, which in turn implements the IHostedService interface:
public class Worker : BackgroundService
{
    private readonly ILogger<Worker> _logger;

    public Worker(ILogger<Worker> logger)
    {
        _logger = logger;
    }

    protected override async Task ExecuteAsync(CancellationToken stoppingToken)
    {
        while (!stoppingToken.IsCancellationRequested)
        {
            if (_logger.IsEnabled(LogLevel.Information))
            {
                _logger.LogInformation("Worker running at: {time}", DateTimeOffset.Now);
            }
            await Task.Delay(1000, stoppingToken);
        }
    }
}
An instance of ILogger is injected into the Worker class for the logging support. Additionally, there is the ExecuteAsync() method, which runs when the service starts. The default implementation of this method in the project template runs in a loop every second, logging the current date and time.
The Worker Service Template will provide the code for a simple background service and we can modify it to suit our requirements.
Configuring the Project
To have the support to host our application as a Windows service, first, we need to install the Microsoft.Extensions.Hosting.WindowsServices NuGet package:
dotnet add package Microsoft.Extensions.Hosting.WindowsServices
After that, we need to modify the Program class by adding the AddWindowsService() class:
var builder = Host.CreateApplicationBuilder(args);
builder.Services.AddWindowsService(options =>
{
    options.ServiceName = "Code-Maze Service";
});

LoggerProviderOptions.RegisterProviderOptions<EventLogSettings, EventLogLoggerProvider>(builder.Services);

builder.Services.AddHostedService<Worker>();

builder.Logging.AddConfiguration(
    builder.Configuration.GetSection("Logging"));

var host = builder.Build();
host.Run();
The AddWindowsService() extension method configures the application to work as a windows service. Along with that, we have set the service name using the options.ServiceName property. Notice that we have configured the EventLogLoggerProvider as well.
Similarly, let’s modify the ExecuteAsync() method of the Worker class to customize the log message:
protected override async Task ExecuteAsync(CancellationToken stoppingToken)
{
    while (!stoppingToken.IsCancellationRequested)
    {
        _logger.LogInformation("Code-Maze Service running at: {time}", DateTimeOffset.Now);
        await Task.Delay(60000, stoppingToken);
    }
}
Along with that, we change the logging interval to 1 minute as well. Now the service will log the message once every minute.
By default, the Windows service will write logs into the Application Event Log and we can use the Event Viewer tool for viewing those. Also, by default, a Windows service will write only logs of severity Warning and above into the Event Log. That said, we can configure this behavior in the appsettings file:
{
  "Logging": {
    "LogLevel": {
      "Default": "Information",
      "Microsoft.Hosting.Lifetime": "Information"
    },
    "EventLog": {
      "LogLevel": {
        "Default": "Information"
      }
    }
  }
}
By adding a new section for the Event Log, we can change the default Log Level to Information, which will log the information as well.
With that, our windows service project is ready.
Publishing the Project
The next step is publishing the app.
For publishing the app, we can right-click the project in the solution explorer and then click on the Publish option. For this example, we can choose to publish our app to a local folder. This will create a Publish Profile and we can provide the following settings:
- For the Configuration setting, we can choose
Release|Any CPU - We can choose the appropriate .NET version for the Target Framework setting
- From a portability standpoint, it is better to choose Deployment Mode as
Self-Contained - We can choose the appropriate Target Runtime. In this example, since we are using a 64-bit Windows system, we can choose
win-x64 - By using the Target Location setting, we can specify where to publish the output
In the File Publish Options, we are going to check several checkboxes:
- Produce Single File – This will produce the output combined into a single file
- Enable ReadyToRun Compilation – This will produce the output in Ready-to-Run format
After providing these settings, we can leave any other setting with the default values. Now we can publish the project by clicking the Publish button.
This will produce a standalone executable output of the service in the specified folder location.
Creating the Windows Service
For creating a Windows Service, we can use the Windows Service Control Manager (sc.exe) tool. The service control manager operations require higher permissions as we are working directly with the operating system and hence we need to run the commands in a Windows PowerShell console with Administrator privilege.
In the PowerShell console, we can use the sc.exe create command and provide the service name and path as arguments:
sc.exe create "Code-Maze Service" binpath="C:\service\CodeMazeWorkerService.exe"
Once the command executes successfully, it will create a new windows service with the name Code-Maze Service and return the output:
[SC] CreateService SUCCESS
We can verify the newly created service in the Windows Service Management Console:
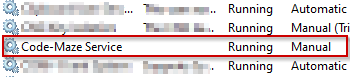
By default, the service might be in the stopped state and we will have to start it manually by using the sc.exe start command:
sc.exe start "Code-Maze Service"
Once the command executes successfully, it will provide an output similar to this one:
SERVICE_NAME: Code-Maze Service
        TYPE               : 10  WIN32_OWN_PROCESS
        STATE              : 2  START_PENDING
                                (NOT_STOPPABLE, NOT_PAUSABLE, IGNORES_SHUTDOWN)
        WIN32_EXIT_CODE    : 0  (0x0)
        SERVICE_EXIT_CODE  : 0  (0x0)
        CHECKPOINT         : 0x0
        WAIT_HINT          : 0x7d0
        PID                : 6720
        FLAGS
This will start the Windows service and it will continue to run in the background.
Verifying the Windows Service
Now we are going to verify that the Windows service works as expected. For that, let’s open the Event Viewer.
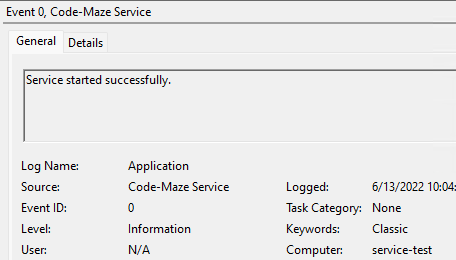
Remember that we implemented the service to write a log once every minute. Within the Event Viewer, we can find the logs in the Windows Logs -> Application node. We are going to see a bunch of events related to our service there:

As soon as the service starts, the Windows Service Manager logs an event with the source as the service name. The first event with the source name Code-Maze Service corresponds to that. We can verify this by opening that event. The event details will contain the corresponding message and details:
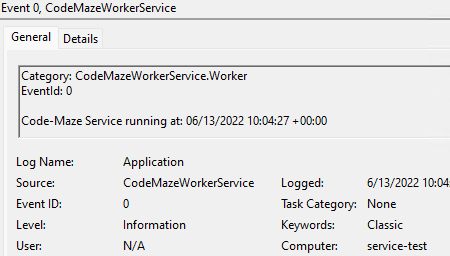
Apart from that, while the service is running, it logs an event every minute with the source matching the app’s namespace. All the subsequent events with the source name CodeMazeWorkerService correspond to those. We can verify this by opening those events. Those events will contain the message that the service logs:
Great! We have verified that the windows service works as expected.
Removing the Windows Service
Once we create a Windows service, it keeps on running in the background. To remove a Windows service from the system, we have to first stop it and then delete it.
To stop a Windows service, we can use the sc.exe stop command:
sc.exe stop "Code-Maze Service"
This will stop the service and provide a similar response:
SERVICE_NAME: Code-Maze Service
        TYPE               : 10  WIN32_OWN_PROCESS
        STATE              : 3  STOP_PENDING
                                (STOPPABLE, NOT_PAUSABLE, ACCEPTS_SHUTDOWN)
        WIN32_EXIT_CODE    : 0  (0x0)
        SERVICE_EXIT_CODE  : 0  (0x0)
        CHECKPOINT         : 0x0
        WAIT_HINT          : 0x0
Even though this will stop the service, we can still find the service in the Services Console. This is particularly useful when we just need to stop the service temporarily and may want to start it later.
On the other hand, if we no longer need the service, we can delete it using the sc.exe delete command:
sc.exe delete "Code-Maze Service"
This will remove the service from the system and give the response:
[SC] DeleteService SUCCESS
Now if we check the Services Console, we cannot find the service as it will be completely removed from the system.
Conclusion
In this article, we discussed the Worker Service template in .NET Core and how to create a Windows Service Project using it. Additionally, we learned how to create and configure a Windows Service.