

Within the .NET ecosystem, Swagger stands out as an essential tool, enabling developers to produce interactive and comprehensive API documentation. Header parameters play a crucial role in carrying important metadata in HTTP requests. Specifically, this metadata includes information like authentication tokens and custom configurations, shaping how clients and services interact. In this article, we explore adding a custom header parameter to all API endpoints with a focus on Swagger.
For more information on using Swagger, visit our article Configuring and Using Swagger UI in ASP.NET Core Web API.
Understand Header Parameter in Swagger
Header parameters are more than just additional information, they are crucial elements conveyed as headers in HTTP requests. Furthermore, these headers carry a wealth of vital metadata, including everything from authentication tokens and content types to custom identifiers.
Understanding the significance of header parameters becomes important as we aim to craft comprehensive API documentation. They define how clients should interact with API endpoints and help ensure security and proper usage.
Furthermore, by specifying and documenting these parameters in Swagger, we can seamlessly integrate various services and clients into the ecosystem. This integration becomes even smoother as these headers encapsulate other essential details, such as API versions and custom configurations. Consequently, this approach ultimately enhances the clarity and usability of the API, making it more intuitive and user-friendly for developers and end-users.
A simple example of this could be an Authorization header, like a Bearer Token used for authentication purposes.
Add a Global Header Parameter in Swagger
Let’s create a simple application with Swagger, using the dotnet new command, integrating a custom header for authentication. We will globally configure and apply this header to all the endpoints within our application.
After that, we create our custom header filter by implementing the IOperationFilter interface:
public class CustomHeaderParameter : IOperationFilter
{
    public void Apply(OpenApiOperation operation, OperationFilterContext context)
    {
        operation.Parameters =
        [
            new OpenApiParameter
            {
                Name = "X-Custom-Header",
                In = ParameterLocation.Header,
                Description = "Custom header for authentication",
                Required = true
            },
        ];
    }
}
Here, we create the CustomHeaderParameter class, in which we implement the Apply() method, creating a custom header X-Custom-Header. These operation parameters are globally applied to all endpoints. The In property indicates the location of the parameter, which, in this case, we set to ParameterLocation.Header to signify that it’s a header parameter. We also set a custom description and specify that this OpenApiParameter is required.
In our Program class we need to configure this header for our endpoints:
var builder = WebApplication.CreateBuilder(args);

builder.Services.AddEndpointsApiExplorer();
builder.Services.AddSwaggerGen(c =>
{
    c.SwaggerDoc("v1", new Microsoft.OpenApi.Models.OpenApiInfo { Title = "Global Header Example", Version = "v1" });
    c.OperationFilter<CustomHeaderParameter>();
});
Within the AddSwaggerGen() method delegate, we use the OperationFilter() method to configure our custom header.
Next, we can test the new header:
var app = builder.Build();

app.MapGet("/api/sample", (HttpContext httpContext) =>
{
    if (!httpContext.Request.Headers.TryGetValue("X-Custom-Header", out var headerValue) || headerValue != "secret-key")
    {
        return Results.Unauthorized();
    }

    return Results.Ok("Successfully authenticated with custom header!");
});
Now that we have created a sample endpoint in Swagger that uses a required custom header for authentication, we can visit the Swagger page. Subsequently, we see that the X-Custom-Header appears as a required header:
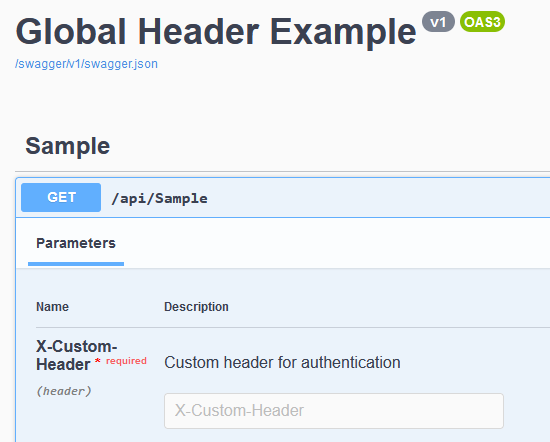
By adding this Operation Filter we ensure that all endpoints use our CustomHeaderParameter.
Testing and Validating the Header Parameter
After setting up our Swagger API and defining our custom header using the CustomHeaderParameter class, the next step is to validate its functionality to authenticate API requests using Swagger’s interactive UI to validate this custom header parameter.
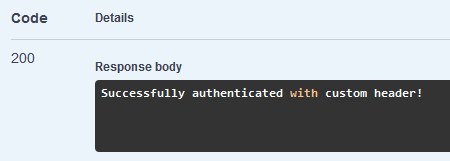
Here, we can test the api/sample endpoint requiring the X-Custom-Header for authentication. Additionally, for a comprehensive approach, we can incorporate some other API endpoints to guarantee that they uniformly utilize the header. By sending requests with the correct X-Custom-Header value, such as “secret-key,” we can verify that the API correctly authenticates and processes the requests.
By specifying our custom header with the correct secret key, we receive a successful response:
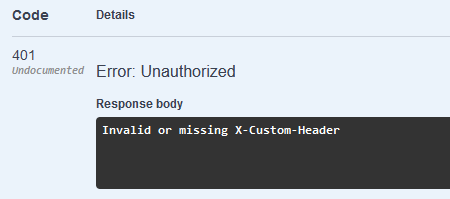
The result of a wrong header value is an Unauthorized 401 HTTP Status Code:
This testing process ensures we correctly implement our custom header parameter across all API endpoints, providing clarity and security for developers interacting with our API.
Conclusion
Correctly adding a custom header parameter in Swagger for all APIs in C# .NET ensures consistency, security, and clarity in API documentation and usage. This comprehensive and global approach streamlines authentication and parameter handling across endpoints, simplifying developer interaction, testing, and integration with the API.
In addition, properly documented and validated header parameters enhance the reliability and usability of the API. This meticulous approach fosters trust and facilitates seamless communication between services and clients, ultimately elevating the user experience.
