In ASP.NET Core, directory browsing is a feature that allows a web application to present a list of files in a specified directory to the user.
For security, however, directory browsing is disabled by default to prevent unauthorized users from accessing a website’s directory structure and files. But, there are times when enabling it can be helpful during development, for debugging, or to satisfy some additional requirement. Enabling it allows us to obtain a list of files in a specified directory.
So let’s dive in and see how we can use directory browsing in our ASP.NET Core applications!
Enable Directory Browsing in ASP.NET Core
Enabling directory browsing requires the AddDirectoryBrowser() and UseDirectoryBrowser() methods.
The AddDirectoryBrowser() method adds the directory browser middleware service to our project, while the UseDirectoryBrowser() method enables directory browsing at a specified path.
Setup and Configuration
Let’s look at how to view the wwwroot directory in a browser using the Program class:
builder.Services.AddDirectoryBrowser();
var fileProvider = new PhysicalFileProvider(builder.Environment.WebRootPath);
app.UseDirectoryBrowser(new DirectoryBrowserOptions
{
    FileProvider = fileProvider,
    RequestPath = "/wwwroot"
});
Firstly, we register the Directory Browser service via the AddDirectoryBrowser() services method. We then initialize the PhysicalFileProvider instance with the root directory where the web resource files are stored. Finally, we use the app.UseDirectoryBrowser() to add the middleware to the application’s request processing pipeline.
The UseDirectoryBrowser() method accepts a DirectoryBrowserOptions object as a parameter.
The FileProvider property specifies the PhysicalFileProvider instance and the RequestPath property, specifies the request path when accessing the directory in the browser.
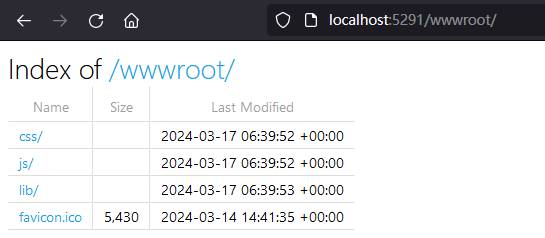
We can browse files in the web root directory by accessing the /wwwroot path:
Customizing Directory Listings
In ASP.NET Core, we can customize the appearance and functionality of the directory view through custom view templates. This involves creating a custom view template to render the directory’s content.
Let’s define a CustomDirectoryFormatter class, which implements a custom directory browser page:
public class CustomDirectoryFormatter : IDirectoryFormatter
{
    public async Task GenerateContentAsync(HttpContext context, IEnumerable<IFileInfo> contents)
    {
        var html = new StringBuilder();
        html.Append("<h1>Browse the Catalogue</h1>");
        html.Append("<ul>");
        foreach (var item in contents)
        {
            html.Append("<li>");
            if (item.IsDirectory)
            {
                html.Append($"<a href=\"./{item.Name}/\">{item.Name}</a>");
            }
            else
            {
                html.Append($"{item.Name}");
            }
            html.Append("</li>");
        }
        html.Append("</ul>");

        var response = context.Response;
        response.ContentType = "text/html; charset=utf-8";

        await response.WriteAsync(html.ToString());
    }
}
Our CustomDirectoryFormatter class implements the IDirectoryFormatter interface, and in the GenerateContentAsync() method, we define the HTML for the page.
Now, let’s use our CustomDirectoryFormatter in the app.UseDirectoryBrowser() method:
app.UseDirectoryBrowser(new DirectoryBrowserOptions
{
    FileProvider = fileProvider,
    RequestPath = "/wwwroot",
    Formatter = new CustomDirectoryFormatter()
});
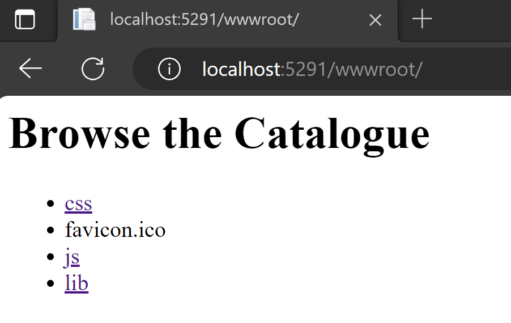
The Formatter property allows us complete control over the appearance and behavior of the page. Here we assign an instance of our CustomDirectoryFormatter class to the Formatter property.
Finally, let’s run the project and visit http://localhost:<port>/wwwroot/ to see the custom directory view:
Conclusion
In this article, we’ve looked at how to enable browsing a directory in ASP.NET Core web applications. We’ve also delved into leveraging custom formatters to customize the default directory view to gain complete control over the appearance and functionality of the directory browsing experience.


