
In this article, I will present you the basics of HTTP.
Why should I read about the HTTP you may ask yourself?
Well, if you are a software developer, you will understand how to write better applications by learning how they communicate. If you are system architect or network admin, you will get deeper knowledge on designing complicated network architectures.
The REST, which is very important architectural style nowadays is relying completely upon utilizing HTTP features, so that makes HTTP even more important to understand. If you want to make great RESTful applications, you must understand HTTP first.
So are you willing to pass on the chance to understand and learn the fundamental concepts behind World Wide Web and network communication?
I hope not 🙂
The focus of the article will be on explaining the most important parts of HTTP as simply as humanly possible. The idea is to organize all the useful information about HTTP in one place, to save you the time of going through books and RFCs to find the information you need.
This is the first article of the HTTP series. It will give you a short introduction of the most important concepts of the HTTP.
You will learn about:
Without further ado, let’s dive in.
The founder of HTTP is Tim Berners-Lee (the guy also considered to be the inventor of the World Wide Web). Among other names important to the development of the HTTP is also Roy Fielding, who is also the originator of the REST architectural style.
The Hypertext Transfer Protocol is the protocol that applications use to communicate with each other. In essence, the HTTP is in charge of delegating all of the internets media files between clients and servers. That includes HTML, images, text files, movies and everything in between. And it does this quickly and reliably.
HTTP is the application protocol and not the transport protocol because it is used for the communication in the application layer. To jog your memory here is how the Network Stack looks like.
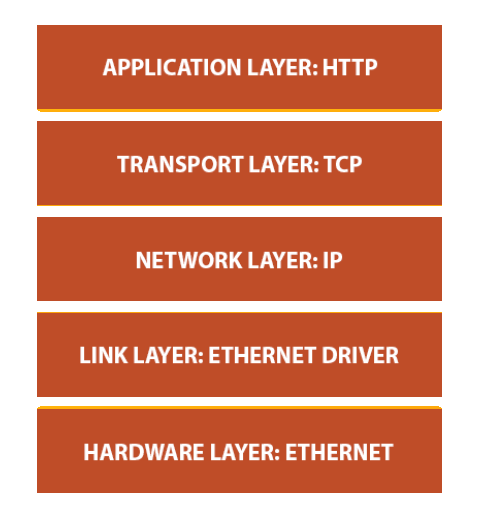
From this image, you can clearly see the that the HTTP is the application protocol and that TCP works on the transport layer.

Everything on the internet is a resource, and the HTTP works with resources. That includes files, streams, services and everything else. HTML page is a resource, a youtube video is a resource, your spreadsheet of daily tasks on a web application is a resource… You get the point.
And how do you differentiate one resource from another?
By giving them URLs (Uniform resource locators).
URL points to the unique location where your browser can find the resource.
Every piece of content, every resource lives on some Web server (HTTP server). These servers are expecting an HTTP request to provide those resources.
But how do you request a resource from a Web server?
You need an HTTP client of course 🙂
You are using an HTTP client right now to read this article. Web browsers are HTTP clients. They communicate with HTTP servers to retrieve the resources to your computer. Some of the most popular clients are Google’s Chrome, Mozilla’s Firefox, Opera, Apple’s Safari, and unfortunately still infamous Internet Explorer.
So how does the HTTP message look like?
Without talking too much about it, here are some examples of HTTP messages:
GET request
GET /repos/CodeMazeBlog/ConsumeRestfulApisExamples HTTP/1.1
Host: api.github.com
Content-Type: application/json
Authorization: Basic dGhhbmtzIEhhcmFsZCBSb21iYXV0LCBtdWNoIGFwcHJlY2lhdGVk
Cache-Control: no-cache
POST request
POST /repos/CodeMazeBlog/ConsumeRestfulApisExamples/hooks?access_token=5643f4128a9cf974517346b2158d04c8aa7ad45f HTTP/1.1
Host: api.github.com
Content-Type: application/json
Cache-Control: no-cache

{
  "url": "http://www.example.com/example",
  "events": [
    "push"
  ],
  "name": "web",
  "active": true,
  "config": {
    "url": "http://www.example.com/example",
    "content_type": "json"
  }
}
Here is the example of one GET and one POST request. Let’s go quickly through the different parts of these requests.
The first line of the request is reserved for the request line. It consists of request method name, request URI, and HTTP version.
Next few lines represent the request headers. Request headers provide additional info to the requests, like content types request expects in response, authorization information etc,
For the GET request, the story ends right there. POST request can also have a body and carry additional info in the form of a body message. In this case, it is a JSON message with additional info on how the GitHub webhook should be created for the given repo specified in the URI. That message is required for the webhook creation so we are using POST request to provide that information to the GitHub API.
Request line and request headers must be followed by <CR><LF> (carriage return and line feed \r\n), and there is a single empty line between message headers and message body that contains only CRLF.
Reference for HTTP request: https://www.w3.org/Protocols/rfc2616/rfc2616-sec5.html
And what do we get as a response to these requests?
Response message
HTTP/1.1 200 OK
Server: GitHub.com
Date: Sun, 18 Jun 2017 13:10:41 GMT
Content-Type: application/json; charset=utf-8
Transfer-Encoding: chunked
Status: 200 OK
X-RateLimit-Limit: 5000
X-RateLimit-Remaining: 4996
X-RateLimit-Reset: 1497792723
Cache-Control: private, max-age=60, s-maxage=60

[
  {
    "type": "Repository",
    "id": 14437404,
    "name": "web",
    "active": true,
    "events": [
      "push"
    ],
    "config": {
      "content_type": "json",
      "insecure_ssl": "0",
      "url": "http://www.example.com/example"
    },
    "updated_at": "2017-06-18T12:17:15Z",
    "created_at": "2017-06-18T12:03:15Z",
    "url": "https://api.github.com/repos/CodeMazeBlog/ConsumeRestfulApisExamples/hooks/14437404",
    "test_url": "https://api.github.com/repos/CodeMazeBlog/ConsumeRestfulApisExamples/hooks/14437404/test",
    "ping_url": "https://api.github.com/repos/CodeMazeBlog/ConsumeRestfulApisExamples/hooks/14437404/pings",
    "last_response": {
      "code": 422,
      "status": "misconfigured",
      "message": "Invalid HTTP Response: 404"
    }
  },
]
The response message is pretty much structured the same as the request, except the first line that is called the status line, which surprising as it is, carries information about the response status. 🙂
The status line is followed by the response headers and response body.
Reference for HTTP response: https://www.w3.org/Protocols/rfc2616/rfc2616-sec6.html
MIME types are used as a standardized way to describe the file types on the internet. Your browser has a list of MIME types and same goes for web servers. That way files can be transferred the same way regardless of the operating system.
Fun fact is that MIME stands for Multipurpose Internet Mail Extension because they were originally developed for the multimedia email. They were adapted to be used for HTTP and several other protocols since.
Every MIME type consists of a type, subtype and a list of optional parameters in the following format: type/subtype; optional parameters.
Here are a few examples:
Content-Type: application/json
Content-Type: text/xml; charset=utf-8
Accept: image/gif
You can find the list of commonly used MIME types and subtypes in the HTTP reference.
HTTP request methods (referred to also as “verbs”) define the action that will be performed on the resource. HTTP defines several request methods of which the most commonly known/used are GET and POST methods.
A request method can be idempotent or not idempotent. This is just a fancy term for explaining that method is safe/unsafe to be called several times on the same resources. In other words, that means that GET method, that has a sole purpose of retrieving information, should by default be idempotent. Calling GET on the same resource over and over should not result with a different response. On the other hand POST method is not an idempotent method.
Prior to HTTP/1.1, there were just three methods: GET, POST and HEAD, and the specification of the HTTP/1.1 brought a few more in the play: OPTIONS, PUT, DELETE, TRACE and CONNECT.
Find more what each one of these methods does in the HTTP Reference.
Header fields are colon-separated name-value fields you can find just after the first line of request or response message. They provide more context to the HTTP messages and ensure clients and servers are appropriately informed about the nature of the request or response.
There are five types of headers in total:
You can find the list of commonly used request and response headers in the HTTP Reference.

The status code is a three digit number that denotes the result of a request. It is followed by the reason phrase which is humanly readable status code explanation.
Some examples include:
The status codes are classified by the range in five different groups.
Both status code classification and the entire list of status codes and their meaning can be found in the HTTP Reference.
Phew, that was a lot of information.
The knowledge you gain by learning HTTP is not the kind that helps you to solve some problem directly. But it gives you the understanding the underlying principle of the internet communication which you can apply to almost every other problem on the higher level than HTTP. Whether it is REST, APIs, web application development or network, you can now be at least a bit more confident while solving these kinds of problems.
Of course, HTTP is a pretty large topic to talk about and there is still a lot more to it than the basic concepts.
Read about the architectural aspects of HTTP in part 2 of the HTTP series.
Was this article helpful to you? Please leave the comment and let me know.
_______________________________________________
In the first article of the series, we talked about the basic concepts of the HTTP. Now that we have some foundation to build upon, we can talk about some of the architectural aspects of the HTTP. There is more to HTTP than just sending and receiving data.
HTTP cannot function by itself as an application protocol. It needs infrastructure in form of a hardware and software solutions that provide different services and make the communication over the World Wide Web possible and efficient.
This is what we have learned so far, and where we are now:
In this article, you will learn more about:
These are an integral part of our internet life, and you will learn exactly what the purpose of each one of these is, and how it works. This knowledge will help you connect the dots from the first article, and understand the flow of the HTTP communication even better.
So let’s start.
As the first article explained, the primary function of a Web server is to store the resources and to serve them upon receiving requests. You access the Web server using a Web client (aka Web browser) and in return get the requested resource or change the state of existing ones. Web servers can be accessed automatically too, using Web crawlers, that we will talk about later in the article.

Some of the most popular Web servers out there and probably the ones you heard of are Apache HTTP Server, Nginx, IIS, Glassfish…
Web servers can vary from the very simple and easy to use, to sophisticated and complicated pieces of software. Modern Web servers are capable of performing a lot of different tasks. Basic tasks that Web server should be able to do:
I will break up the basic flow of the Web server in a few different Phases. These phases represent a very simplified version of the Web server flow.
When Web client wants to access the Web server, it must try to open a new TCP connection. On the other side, the server tries to extract the IP address of the client. After that, it is up to the server to decide to open or close the TCP connection to that client.
If the server accepts the connection, it adds it to the list of existing connections and watches the data on that connection.
It can also close the connection if the client is not authorized or blacklisted (malicious).
The server can also try to identify the hostname of the client by using the “reverse DNS”. This information can help when logging the messages, but hostname lookups can take a while, slowing the transactions.
When parsing the incoming requests, Web servers parse the information from the message request line, headers, and body (if provided). One thing to note is that the connection can pause at any time, and in that case, the server must store the information temporarily until it receives the rest of the data.
High-end Web servers should be able to open many simultaneous connections. This includes multiple simultaneous connections from the same client. A typical web page can request many different resources from the server.
Since Web servers are primarily the resource providers, they have multiple ways to map and access the resources.
The simplest way is to map the resource is to use the request URI to find the file in the Web server’s filesystem. Typically, the resources are contained in a special folder on the server, called docroot. For example, docroot on the Windows server can be located on F:\WebResources\. If a GET request wants to access the file on the /images/codemazeblog.txt, the server translates this to F:\WebResources\images\codemazeblog.txt and returns that file in the response message. When more than one website is hosted on a Web server, each one can have its separate docroot.
If a Web server receives a request for a directory instead of a file, it can resolve it in a few ways. It can return an error message, return default index file instead of the directory or scan the directory and return the HTML file with contents.
The server may also map the request URI to the dynamic resource – a software application that generates some result. There is a whole class of servers called application servers which purpose is to connect web servers to the complicated software solutions and serve dynamic content.
Once the server identified the resource it needs to serve, it forms the response message. The response message contains the status code, response headers, and response body if one was needed.
If the body is present in the response, the message usually contains the Content-Length header describing the size of the body and the Content-Type header describing the MIME type of the returned resource.
After generating the response, the server chooses the client it needs to send the response to. For the nonpersistent connections, the server needs to close the connection when the entire response message is sent.
When the transaction is complete, the server logs all the transaction information in the file. Many servers provide logging customizations.
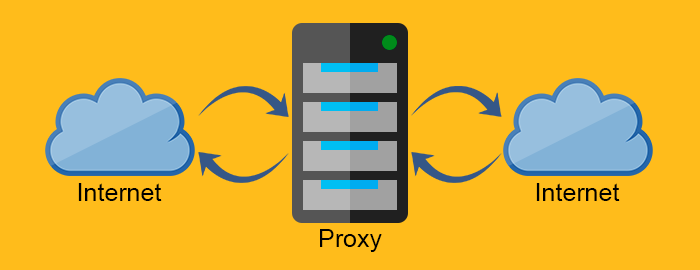
Proxy servers (proxies) are the intermediary servers. They are often found between the Web server and Web client. Due to their nature, proxy servers need to behave both like Web client and Web server.
But why do we need Proxy servers? Why don’t we just communicate directly between Web clients and Web servers? Isn’t that much simpler and faster?
Well, simple it may be, but faster, not really. But we will come to that.
Before explaining what proxy servers are used for, I need to get one thing out of the way. That is the concept of reverse proxy or the difference between the forward proxy and reverse proxy.
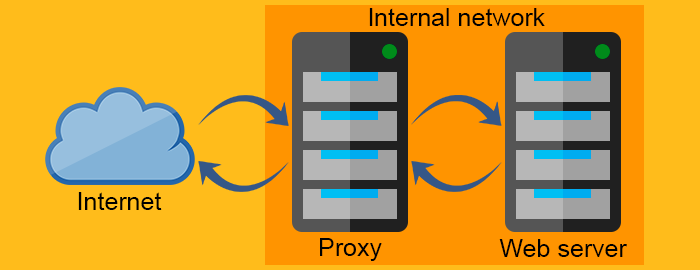
The forward proxy acts as a proxy for the client requesting the resource from a Web server. It protects the client by filtering requests through the firewall or hiding the information about the client. The reverse proxy, on the other hand, works exactly the opposite way. It is usually placed behind the firewall and protects the Web servers. For all the clients know, they talk to the real Web server and remain unaware of the network behind the reverse proxy.
Proxy server
Reverse proxy server
Proxies are very useful and their application is pretty wide. Let’s go through some of the ways the proxy servers are used.
As you can see, proxies can be very versatile and flexible.
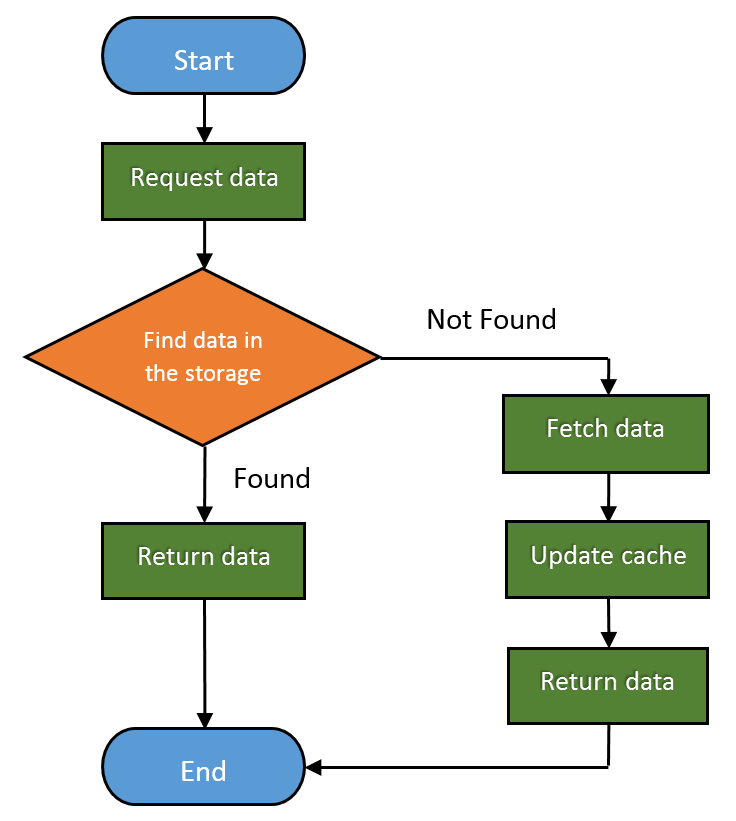
Web caches are devices that automatically make copies of the requested data and save them in the local storage.
By doing this, they can:
So you can clearly say that Web caches improve both user experience and Web server performance. And of course, potentially save a lot of money.
The fraction of the requests served from the cache is called Hit Rate. It can range from 0 to 1, where 0 is 0% and 1 is 100% request served. The ideal goal is of course to achieve 100%, but the real number is usually closer to 40%.
Here is how the basic Web cache workflow looks like:
In time, as the HTTP matured, people found many different ways to use it. HTTP became useful as a framework to connect different applications and protocols.
Let’s see how.
Gateways refer to pieces of hardware that can enable HTTP to communicate with different protocols and applications by abstracting a way to get a resource. They are also called the protocol converters and are far more complex than routers or switches due to the usage of multiple protocols.
You can, for example, use a gateway to get the file over FTP by sending an HTTP request. Or you can receive an encrypted message over SSL and convert it to HTTP (Client-Side Security Accelerator Gateways) or convert HTTP to more secure HTTPs message (Server-Side Security Gateways).
Tunnels make use of the CONNECT request method. Tunnels enable sending non-HTTP data over HTTP. The CONNECT method asks the tunnel to open a connection to the destination server and to relay the data between client and server.
CONNECT request:
CONNECT api.github.com:443 HTTP/1.0
User-Agent: Chrome/58.0.3029.110
Accept: text/html,application/xhtml+xml,application/xml
CONNECT response:
HTTP/1.0 200 Connection Established
Proxy-agent: Netscape-Proxy/1.1
The CONNECT response doesn’t need to specify the Content-Type unlike a normal HTTP response would.
Once the connection is established, the data can be sent between client and server directly.
Relays are the outlaws of the HTTP world and they don’t need to abide by the HTTP laws. They are dumbed-down versions of proxies that relay any information they receive as long as they can establish a connection using the minimal information from the request messages.
They sole existence stems from the need to implement a proxy with as little trouble as possible. That can also potentially lead to trouble, but its use is very situational and there is certainly a risk to benefit ratio to consider when implementing relays.

Or popularly called spiders, are bots that crawl over the World Wide Web and index its contents. The Web crawler is the essential tool of Search engines and many other websites.
The web crawler is a fully automated piece of software and it doesn’t need human interaction to work. The complexity of web crawlers can vary greatly, and some of the web crawlers are pretty sophisticated pieces of software (like the ones search engines use).
Web crawlers consume the resources of the website they are visiting. For this reason, public websites have a mechanism to tell the crawlers which parts of the website to crawl, or to tell them not to crawl anything at all. This can be done by using the robots.txt (robots exclusion standard).
Of course, since it is just a standard, robots.txt cannot prevent uninvited web crawlers to crawl the website. Some of the malicious robots include email harvesters, spambots, and malware.
Here are a few examples of the robots.txt files:
User-agent: *
Disallow: /
This one tells all the crawlers to stay out.
User-agent: *
Disallow: /somefolder/
Disallow: /notinterestingstuff/
Disallow: /directory/file.html
And this one refers only to these two specific directories and a single file.
User-agent: Googlebot
Disallow: /private/
You can disallow a specific crawler, like in this case.
Given the vast nature of the World Wide Web, even the most powerful crawlers ever made cannot crawl and index the entirety of it. That’s why they use selection policy to crawl the most relevant parts of it. Also, the WWW changes frequently and dynamically, so the crawlers must use the freshness policy to calculate whether to revisit websites or not. And since crawlers can easily overburden the servers by requesting too much too fast, there is a politeness policy in place. The most of the know crawlers use the intervals of 20 seconds to 3-4 minutes to poll the servers to avoid generating the load on the server.
You might have heard the news of the mysterious and evil deep web or dark web. It is nothing more than the part of the web, that is intentionally not indexed by search engines to hide the information.
This wraps it up for this part of the HTTP series. You should now have an even better picture of how the HTTP works, and that there is a lot more to it than requests, responses and status codes. There is a whole infrastructure of different hardware and software pieces that HTTP utilizes to achieve its potential as an application protocol.
Every concept I talked about in this article is large enough to cover the whole article or even a book. My goal was to roughly present you with the different concepts so that you know how it all fits together, and what to look for when needed.
If you found some of the explanations a bit short and unclear and you missed my previous articles, be sure to visit part 1 of the series and the HTTP reference where I talk about basic concepts of the HTTP.
Thank you for reading and stay tuned for part 3 of the series where I explain different ways servers can use to identify the clients.
Please leave a comment below if you found this article useful, or you need something cleared up.
_______________________________________________
Up until now, you learned about the basic concepts and some of the architectural aspects of HTTP. This leads us to the next important subject to the HTTP: client identification.
In this article, you’ll learn why client identification is important and how can Web servers identify you (your Web client). You will also get to see how that information is used and stored.
This is what we have learned so far, and where we are now:
In this article, you will learn more about:
First, let’s see why would websites need to identify you.
As you are most definitely aware, every website, or at least those that care enough about you and your actions, include some form of content personalization.
What do I mean by that?
Well, that includes suggested items if you visit e-commerce website, or “the people you might know/want to connect with” on social networks, recommended videos, ads that almost spookily know what you need, news articles that are relevant to you and so on.
This effect feels like a double edged sword. On one hand, it’s pretty nifty having personalized, custom content delivered to you. On the other hand, it can lead to Confirmation bias that can result in all kinds stereotypes and prejudice. There is an excellent Dilbert comic that touches upon Confirmation bias.
Yet, how can we live without knowing how our favorite team scored last night, or what celebrities did last night?
Either way, content personalization has become part of our daily lives we can’t and we probably don’t even want to do anything about it.
Let’s see how the Web servers can identify you to achieve this effect.

There are several ways that a Web server can identify you:
Let’s go through each one. HTTP authentication is described in more detail in part 4 of the HTTP series.
Web servers have a few ways to extract information about you directly from the HTTP request headers.
Those headers are:
In theory, the From header would be ideal to uniquely identify the user, but in practice, this header is rarely used due to the security concerns of email collection.
The user-agent header contains the information like the browser version, operating system. While this is important for customizing content, it doesn’t identify the user in a more relevant way.
The Referer header tells the server where the user is coming from. This information is used to improve the understanding of the user behavior, but less so to identify it.
While these headers provide some useful information about the client, it is not enough to personalize content in a meaningful way.
The remaining headers offer more precise mechanisms of identification.
The method of client identification by IP address has been used more in the past when IP addresses weren’t so easily faked/swapped. Although it can be used as an additional security check, it just isn’t reliable enough to be used on its own.
Here are some of the reasons why:
It is not that uncommon to see websites utilize URLs to improve the user experience. They add more information as the user browses the website until URLs look complicated and illegible.
You can see what the long URL looks like by browsing Amazon store.
https://www.amazon.com/gp/product/1942788002/ref=s9u_psimh_gw_i2?ie=UTF8&fpl=fresh&pd_rd_i=1942788002&pd_rd_r=70BRSEN2K19345MWASF0&pd_rd_w=KpLza&pd_rd_wg=gTIeL&pf_rd_m=ATVPDKIKX0DER&pf_rd_s=&pf_rd_r=RWRKQXA6PBHQG52JTRW2&pf_rd_t=36701&pf_rd_p=1cf9d009-399c-49e1-901a-7b8786e59436&pf_rd_i=desktop
There are several problems when using this approach.
The best client identification method up to date excluding the authentication. Developed by Netscape, but now every browser supports them.
There are two types of cookies: session cookies and persistent cookies. A session cookie is deleted upon leaving the browser, and persistent cookies are saved on disk and can last longer. For the session cookie to be treated as the persistent cookie, Max-Age or Expiry property needs to be set.
Modern browsers like Chrome and Firefox can keep background processes working when you shut them down so you can resume where you left off. This can result in the preservation of the session cookies, so be careful.
So how do the cookies work?
Cookies contain a list of name=value pairs that server sets using Set-Cookie or Set-Cookie2 response header. Usually, the information stored in a cookie is some kind of client id, but some websites store other information as well.
The browser stores this information in its cookie database and returns it when the user visits the page/website next time. The browser can handle thousands of different cookies and it knows when to serve each one.
Here is example flow.
1. User Agent -> Server
POST /acme/login HTTP/1.1
[form data]
User identifies itself via form input
2. Server -> User Agent
HTTP/1.1 200 OK
Set-Cookie2: Customer="WILE_E_COYOTE"; Version="1"; Path="/acme"
The server sends the Set-Cookie2 response header to instruct the User Agent (browser) to set the information about the user in a cookie.
3. User Agent -> Server
POST /acme/pickitem HTTP/1.1
Cookie: $Version="1"; Customer="WILE_E_COYOTE"; $Path="/acme"
[form data]
The user selects the item to the shop basket.
4. Server -> User Agent
HTTP/1.1 200 OK
Set-Cookie2: Part_Number="Rocket_Launcher_0001"; Version="1"; Path="/acme"
Shopping basket contains an item.
5. User Agent -> Server
POST /acme/shipping HTTP/1.1
Cookie: $Version="1"; Customer="WILE_E_COYOTE"; $Path="/acme";
        Part_Number="Rocket_Launcher_0001";
[form data]
The user selects the shipping method.
6. Server -> User Agent
HTTP/1.1 200 OK
Set-Cookie2: Shipping="FedEx"; Version="1"; Path="/acme"
New cookie reflects shipping method.
7. User Agent -> Server
POST /acme/process HTTP/1.1
Cookie: $Version="1";
        Customer="WILE_E_COYOTE"; $Path="/acme";
        Part_Number="Rocket_Launcher_0001"; $Path="/acme";
        Shipping="FedEx"; $Path="/acme"
[form data]
That’s it.
There is one more thing I want you to be aware of. The cookies are not perfect either. Besides security concerns, there is also a problem with cookies colliding with REST architectural style. (The section about misusing cookies).
You can learn more about cookies in the RFC 2965.
This wraps it up for this part of the HTTP series.
You have learned about the strengths of content personalization as well as it’s potential pitfalls. You are also aware of the different ways that servers can use to identify you. In part 4 of the series, we will talk about the most important type of client identification: authentication.
If you found some of the concepts in this part unclear, refer to the part 1 and part 2 of the HTTP series.
Thank you for reading and feel free to leave the comment below.
_______________________________________________
In the previous part, we’ve talked about the different ways that websites can use to identify the visiting user.
But identification itself represents just a claim. When you identify yourself, you are claiming that you are someone. But there is no proof of that.
Authentication, on the other hand, is showing a proof that you are what you claim to be, like showing your personal id or typing in your password.
More often than not, the websites need that proof to serve you sensitive resources.
HTTP has its own authentication mechanisms that allow the servers to issue challenges and get the proof they need. You will learn about what they are and how they work. We’ll also cover the pros and cons of each one and find out if they are really good enough to be used on their own (spoiler: they are not).
This is what we have learned so far:
In this article, you will learn more about:
Before venturing deeper into the concrete HTTP authentication mechanisms, let’s explore what the HTTP authentication is.
Authentication is a way to identify yourself to the Web server. You need to show proof that you have the right to access the requested resources. Usually, this is done by using a combination of username and password (key and secret) which the server validates and then decides if you can access the resource.
HTTP offers two authentication protocols:
Before learning more about each one, let’s go through some of the basic concepts.
1. HTTP uses a challenge/response authentication framework
What does this mean?
It means that when someone sends a request, instead of responding to it immediately, the server sends authentication challenge. It challenges the user to provide the proof of identity by entering the secret information (username and password).
After that, the request is repeated using the provided credentials, and if they are correct, the user gets the expected response. In case the credentials are wrong, the server can reissue the challenge or just send the error message.
2. Authentication related request/response headers
The server issues the challenge by utilizing the WWW-Authenticate response header. It contains the information about the authentication protocol and the security realm.
After the client inputs the credentials, the request is sent again. This time with the Authorization header containing the authentication algorithm and the username/password combination.
If the credentials are correct, the server returns the response and additional info in an optional Authentication-Info response header.
3. Security realms
Security realms provide the way to associate different access right to different resource groups on the server. These are called protection spaces.
What this means effectively is that depending on the resource you want to access, you might need to enter different credentials.
The server can have multiple realms. For example, one would be for website statistics information that only website admins can access, and another for website images that other users can access and upload images to.
/admin/statistics/financials.txt -> Realm=”Admin Statistics”
/images/img1.jpg -> Realm = “Images”
When you try to access the financials.txt you will be challenged by the server and the response from would look like this:
HTTP/1.0 401 Unauthorized
WWW-Authenticate: Basic realm="Admin Statistics"
More about security realms: https://tools.ietf.org/html/rfc7235#section-2.2
Simple HTTP authentication example
Now let’s connect the dots by looking at the simplest HTTP authentication example (Basic authentication, explained below):
1. User Agent -> Server
The user requests access to some image on the server.
GET /gallery/personal/images/image1.jpg HTTP/1.1
Host: www.somedomain.com
2. Server -> User Agent
The server sends the authentication challenge to the user.
HTTP/1.1 401 Access Denied
WWW-Authenticate: Basic realm="gallery"
3. User Agent -> Server
The user identifies itself via form input.
GET /gallery/personal/images/image1.jpg HTTP/1.1
Authorization: Basic Zm9vOmJhcg==
4. Server -> User Agent
The server checks the credentials and sends the 200 OK status code and the image data.
HTTP/1.1 200 OK
Content-type: image/jpeg
...<image data>
Not that complicated, right?
Now let’s drill down and look into basic authentication.
The most prevalent and supported authentication protocol out there. It has been around since the HTTP/1.0 and every major client implements it.
The example above depicts how to authenticate by using Basic authentication. It’s rather simple to implement and use, but it has some security flaws.
Before going to the security issues, let’s see how the Basic authentication deals with username and password.
Basic authentication packs the username and password into one string and separates them using the colon (:). After that, it encodes them using the Base64 encoding. Despite what it looks like, the scrambled sequence of characters is not secure and it’s easily decoded. The purpose of the Base64 encoding is not to encrypt, but to make the username and password HTTP compatible because international characters are not allowed in HTTP headers.
GET /gallery/personal/images/image1.jpg HTTP/1.1
Authorization: Basic Zm9vOmJhcg==
The “Zm9vOmJhcg==” from this example is nothing more than Base64 encoded “foo:bar” string.
So anyone listening to the requests can easily decode and use the credentials.
Even worse than that, encoding the username and password wouldn’t help. A malicious third party could still send the scrambled sequence to achieve the same effect.
There is also no protection against proxies or any other type of attack that changes the request body and leaves the request headers intact.
So, as you can see, Basic authentication is less than perfect mechanism.
Still, despite that, it can be used to prevent accidental access to protected resources and to offer a degree of personalization.
To make it more secure and useable, Basic authentication can be implemented by using HTTPS over SSL which we talk about in part 5 of the series.
Some would argue it’s only as secure as your transport mechanism.
Digest authentication was made as a more secure and reliable alternative to simple but insecure Basic authentication.
So, how does it work?
Digest authentication uses MD5 cryptographic hashing combined with the usage of nonces to hide the password information and prevent different kinds of malicious attacks.
This might sound a bit complicated, but it will get clearer when you see how it works on a simple example.
Example
1. User Agent -> Server
GET /dir/index.html HTTP/1.0
Host: localhost
The client sends a unauthenticated request.
2. Server -> User Agent
HTTP/1.0 401 Unauthorized
WWW-Authenticate: Digest realm="[email protected]",
                        qop="auth,auth-int",
                        nonce="cmFuZG9tbHlnZW5lcmF0ZWRub25jZQ",
                        opaque="c29tZXJhbmRvbW9wYXF1ZXN0cmluZw"
Content-Type: text/html
Content-Length: 153

<!DOCTYPE html>
<html>
  <head>
    <meta charset="UTF-8" />
    <title>Error</title>
  </head>
  <body>
    <h1>401 Unauthorized.</h1>
  </body>
</html>
The server challenges the client to authenticate using the Digest authentication and sends the required information to the client.
3. User Agent -> Server
GET /dir/index.html HTTP/1.0
Host: localhost
Authorization: Digest username="Gandalf",
                     realm="[email protected]",
                     nonce="cmFuZG9tbHlnZW5lcmF0ZWRub25jZQ",
                     uri="/dir/index.html",
                     qop=auth,
                     nc=00000001,
                     cnonce="0a4f113b",
                     response="5a1c3bb349cf6986abf985257d968d86",
                     opaque="c29tZXJhbmRvbW9wYXF1ZXN0cmluZw"
The client calculates the response value and sends it together with username, realm, URI, nonce, opaque, qop, nc and cnonce. A lot of stuff.
Let’s define these:
The response attribute is calculated in the following way:
HA1 = MD5("Gandalf:[email protected]:Lord Of The Rings")
       = 681028410e804a5b60f69e894701d4b4

HA2 = MD5("GET:/dir/index.html")
       = 39aff3a2bab6126f332b942af96d3366

Response = MD5( "681028410e804a5b60f69e894701d4b4:
                 cmFuZG9tbHlnZW5lcmF0ZWRub25jZQ:
                 00000001:0a4f113b:auth:
                 39aff3a2bab6126f332b942af96d3366" )
         = 5a1c3bb349cf6986abf985257d968d86
If you are interested in learning how to compute the response depending on qop, you can find it in the RFC 2617.
4. Server -> User Agent
HTTP/1.0 200 OK
Content-Type: text/html
Content-Length: 2345
... <content data>
The server computes the hash on its own and compares the two. If they match it serves the client with the requested data.
As you can see the Digest authentication is more complicated to understand and implement.
It is also more secure than Basic authentication, but still vulnerable to man-in-the-middle attack. RFC 2617 recommends that Digest authentication is used instead of the Basic authentication since it remedies some of its weaknesses. It also doesn’t hide the fact that Digest authentication is still weak by modern cryptographic standards and that its strength largely depends on the implementation.
So in summary digest authentication:
Some of the weaknesses:
Due to these facts, the Digest authentication still hasn’t gained major traction. The Basic authentication is much simpler and combined with SSL still more secure than the Digest authentication.
This’s it for this part of the HTTP series.
We’ve gone through different authentication mechanisms that HTTP offers by default and talked about their advantages and disadvantages.
These concepts are hopefully not just the letters on the screen anymore, and the next time you hear about them you will know precisely what they are and when to apply them.
You are also aware that there are security risks that haven’t been solved by these mechanisms and that’s why the concepts like HTTPS and SSL/TLS exist. We talk more about security risks and how to solve them in the next part of the series.
If you found some of the concepts in this part unclear, refer to the part 1, part 2, and part 3 of the HTTP series.
If you reached this far I guess you liked the article 🙂 Even if you didn’t, please do leave a comment in the comments section below and let me know how you feel about it.
_______________________________________________
If you followed along the HTTP series, you are ready now to embark on a journey of HTTP security. And a journey it will be, I promise 🙂
Many companies have been a victim to security breaches. To name just a few prominent ones: Dropbox, Linkedin, MySpace, Adobe, Sony, Forbes and many others were on the receiving end of malicious attacks. Many accounts were compromised and the chances are, at least one of those was yours 🙂
You can actually check that on Have I Been Pwned.
My email address was found on 4 different websites that were victims of a security breach.
There are many aspects of the Web application security, too much to cover in one article, but let’s start right from the beginning. Let’s learn how to secure our HTTP communication first.
This is what we have learned so far:
In this article, you will learn more about:
There is a lot to cover, so let’s go right into it.
You might be thinking: “Surely not all websites need to be protected and secured”. If a website doesn’t serve sensitive data or doesn’t have any form submissions, it would be overkill to buy certificates and slow the website down, just to get the little green mark at the URL bar that says “Secured”.
If you own a website, you know it is crucial that it loads as fast as possible, so you try not to burden it with unnecessary stuff.
Why would you willingly go through the painful process of migration to the HTTPS just to secure the website that doesn’t need to be protected in the first place? And on top of that, you even need to pay for that privilege.
Let’s see if it’s worth the trouble.
In the previous part of the HTTP series I talked about different HTTP authentication mechanisms and their security flaws. The problem that both Basic and Digest authentication cannot solve is the Man in the middle attack. Man in the middle represents any malicious party that inserts itself between you and the website you are communicating with. Its goal is to intercept the original messages both ways and hide its presence by forwarding the modified messages.
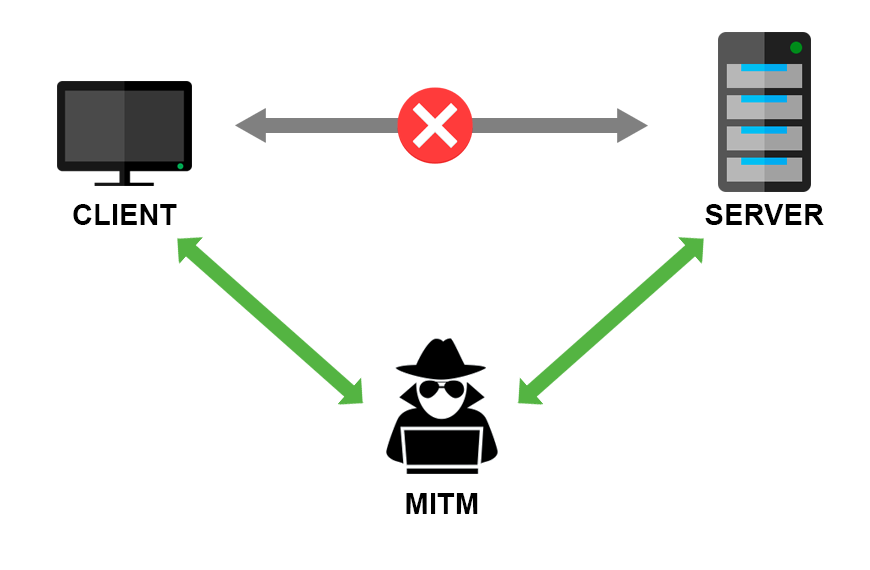
Original participants of the communication might not be aware that their messages are being listened to.
HTTPS solves the MITM attacks problem by encrypting the communication. Now, that doesn’t mean that your traffic cannot be listened to anymore. It does mean that anyone that listens and intercepts your messages, won’t be able to see its content. To decrypt the message you need the key. We will learn how that works exactly a bit later on.
Let’s move on.
Not that recently, Google made HTTPS a ranking signal.
What does that mean?
It means that if you are a webmaster, and you care about your Google ranking, you should definitely implement the HTTPS on your website. Although it’s not as potent as some others signals like quality content and backlinks, it definitely counts.
By doing this, Google gives incentive to webmasters to move to HTTPS as soon as possible and improve the overall security of the internet.
To enable HTTPS (SSL/TLS) for a website you need a certificate issued by a Certificate Authority. Until recently, certificates were costly and had to be renewed every year.
Thanks to the folks at Let’s encrypt you can get very affordable certificates now ($0!). Seriously, they are completely free.
Let’s encrypt certificates are easily installed, have a major companies support and a great community of people. Take a look at the Major sponsors and see for yourself the list of companies that support them. You might recognize a few 🙂
Let’s encrypt issues DV (domain validation) certificates only and have no plan of issuing organizational (OV) or extended validation (EV) certificates. The certificate lasts for 90 days and is easily renewed.
Like any other great technology, it has a down side too. Since certificates are easily available now, they are being abused by Phishing websites.
Many people associate HTTPS with additional speed overhead. Take a quick look at the httpvshttps.com.
Here are my results for the HTTP and HTTPS:
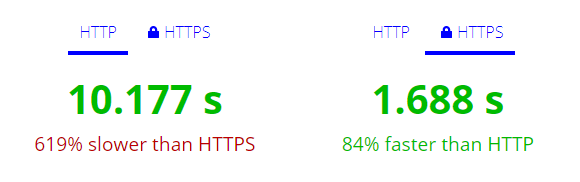
So what happened there? Why is HTTPS so much faster? How is that possible?
HTTPS is the requirement for using the HTTP 2.0 protocol.
If we look at the network tab, we will see that in the HTTPS case, the images were loaded over h2 protocol. And the waterfall looks very different too.
The HTTP 2.0 is the successor of the currently prevalent HTTP/1.1.
It has many advantages over HTTP/1.1:
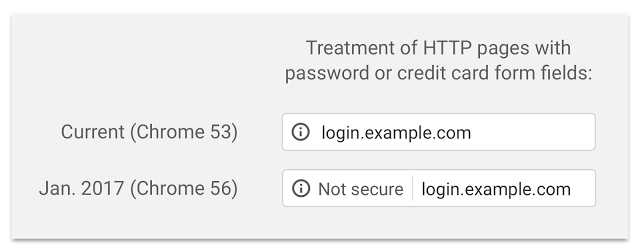
If you are not convinced by now, you should probably know, that some browsers started waging war against unencrypted content. Google has published a blog last September that clearly explains how will Chrome treat insecure websites.
Here is how it looked before and after Chrome version 56.
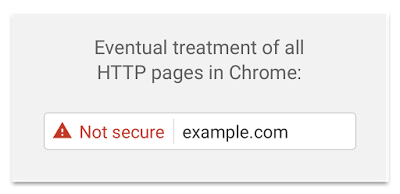
And here is how it will look eventually.
Are you convinced yet? 😀
This is also the relic of the past times. While moving to HTTPS might be harder for the websites that exist for a long time because of the sheer amount of resources uploaded to over HTTP, the hosting providers are generally trying to make this process easier.
Many hosting providers offer automatic migration to HTTPS. It can be as easy as clicking one button in the options panel.
If you plan to setup your website over HTTPS, check if the hosting provider offers HTTPS migration first. Or if it has shell access, so you can do it yourself easily with let’s encrypt and a bit of server configuration.
So, these are the reasons to move to HTTPS. Any reason not to?
Hopefully, by now, I convinced you of the HTTPS value and you passionately want to move your website to HTTPS and understand how it works.
HTTPS stands for Hypertext Transfer Protocol Secure. This effectively means that client and server communicate through HTTP but over the secure SSL/TLS connection.
In the previous parts of the series, we’ve learned how HTTP communication works, but what does the SSL/TLS part stand for and why do I use both SSL and TLS?
Let’s start with that.
Terms SSL (Secure Socket Layer) and TLS (Transport Layer Security) are used interchangeably, but in fact, today, when someone mentions SSL they probably mean TLS.
SSL was originally developed by Netscape but version 1.0 never saw the light of the day. Version 2.0 was introduced in 1995 and version 3.0 in 1996, and they were used for a long time after that (at least what is considered long in IT), even though their successor TLS already started taking traction. Up until 2014. fallback from TLS to SSL was supported by servers, and that was the main reason the POODLE attack was so successful.
After that, the fallback to SSL was completely disabled.
If you check yours or any other website with Qualys SSL Labs tool, you will probably see something like this:
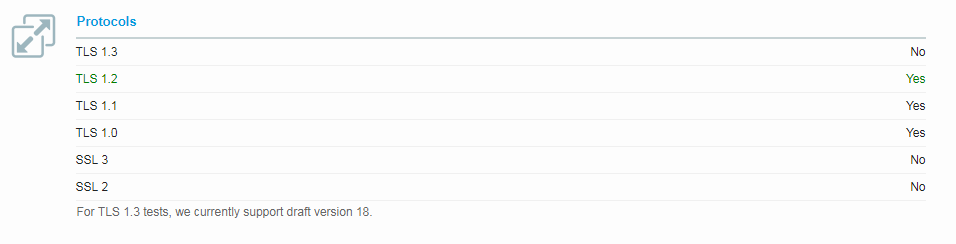
As you can see, SSL 2 and 3 are not supported at all, and TLS 1.3 hasn’t still taken off.
But, because SSL was so prevalent for so long, it became a term that most people are familiar with and now it’s used for pretty much anything. So when you hear someone using SSL instead of TLS it is just for historical reasons, not because they really mean SSL.
Now that we got that out of the way, I will use TLS from now on since it’s more appropriate.
So, how do client and server establish a secure connection?
Before the real, encrypted communication between the client and server starts, they perform what is called the “TLS handshake”.
Here is how it works (very simplified, additional links below).
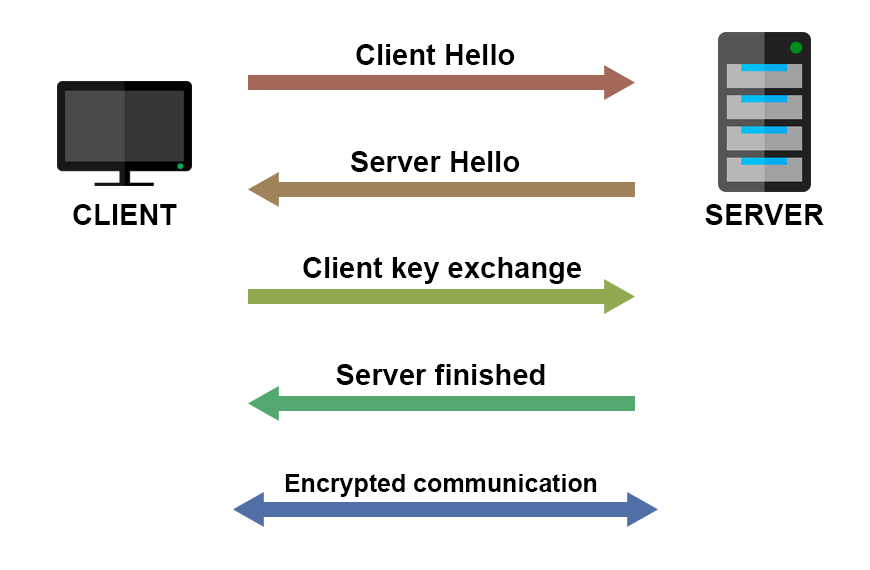
The encrypted communication starts after the connection is established.
The actual mechanism is much complicated than this, but to implement the HTTPS, you don’t need to know all the actual details of the handshake implementation.
What you need to know is that there is an initial handshake between the client and the server, in which they exchange keys and certificates. After that handshake, encrypted communication is ready to start.
If you want to know exactly how it works, you can look it up in the RFC 2246.
In the TLS handshake image, certificates are being sent, so let’s see what a certificate represents and how it’s being issued.
Certificates are the crucial part of the secure communication over HTTPS. They are issued by one of the trusted Certification Authorities.
A digital certificate allows the users of the website to communicate in the secure fashion when using a website.
For example, the certificate you are using when browsing through my blog looks like this:

If you are using Chrome, for example, you can inspect certificates yourself by going to the Security tab in Developer Tools (F12).
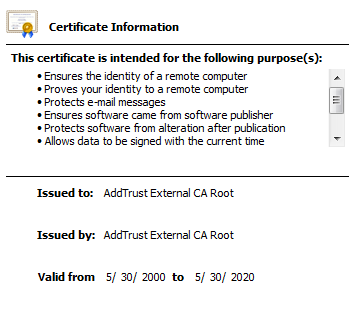
I would like to point out two things. In the first red box, you can see what the real purpose of the certificate is. It just ensures that you are talking to the right website. If someone was to for example impersonate the website you think you are communicating with, you would certainly get notified by your browser.
That would not prevent malicious attackers to steal your credentials if they have a legitimate domain with a legitimate certificate. So be careful. Green “Secure” in the top left just means that you are communicating with the right website. It doesn’t say anything about the honesty of that website’s owner 🙂
Extended validation certificates, on the other hand, prove that the legal entity is controlling the website. There is an ongoing debate whether EV certs are all that useful to the typical user of the internet. You can recognize them by the custom text left of your URL bar. For example, when you browse twitter.com you can see:
![]()
That means they are using EV certificate to prove that their company stands behind that website.
So why would your browser trust the certificate that server sends back? Any server can send a piece of digital documentation and claim it is what you want it to be.
That’s where root certificates come in. Typically certificates are chained and the root certificate is one your machine implicitly trusts.
For my blog it looks like this:
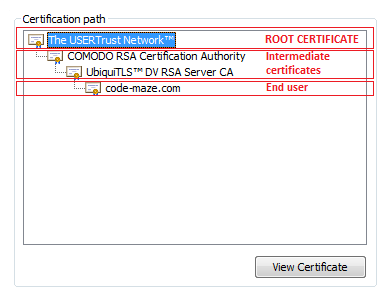
Lowest one is my domain certificate, which is signed by the certificate above it and so on… Until the root certificate is reached.
But who signs the root certificate you might wonder?
Well, it signs itself 😀
Issued to: AddTrust External CA Root, Issued by: AddTrust External CA Root.
And your machine and your browsers have a list of trusted root certificates which they rely upon to ensure the domain you are browsing is trusted. If the certificate chain is broken for some reason (happened to me because I enabled CDN for my blog), your site will be displayed as insecure on some machines.
You can check the list of trusted root certificates on Windows by running the certificate manager by pressing windows button + R and typing certmgr.msc. You can then find machine trusted certificates in the Trusted Root Certification Authorities section. This list is used by Windows, IE, and Chrome. Firefox, on the other hand, manages its own list.
By exchanging certificate, client and server know that they are talking to the right party and can begin encrypted message transfer.
HTTPS can provide a false sense of security if site backend is not properly implemented. There are a plethora of different ways to extract customer information, and many sites are leaking data even if they are using HTTPS. There are many other mechanisms besides MITM to get sensitive information from the website.
Another potential problem that the websites can have HTTP links even though they run over HTTPS. This can be a chance for MITM attack. While migrating websites to HTTPS, this might get by unnoticed.
And here is another one as a bonus: login forms accessed through an insecure page could potentially be at risk even though they are loaded on a secure page. So it’s best to keep entire website secure to avoid this one.
That wraps up entire HTTP series. I hope you got something useful out of it and understood some concepts you didn’t or couldn’t before.
I know I had fun writing it and learned a bunch of new things in the process. Hopefully, it was as much fun reading (or at least close). 🙂
Feel free to let me know what you think about this article or the series in the comments section. Also, share the love with some friends or colleagues that could find it useful!
_______________________________________________
This article contains all the reference for my HTTP series. This reference could be helpful if you need to quickly find what some HTTP status code means. It is also some kind of cheat sheet for myself because there is a lot of information to remember by heart. So I hope it is helpful to you too.
You can find the reference to the HTTP:
List of HTTP Request methods (verbs).
[table id=10 /]
These two tables define status code ranges (classification) and describe all the status codes.
[table id=1 /]
[table id=2 /]
Reference: https://www.w3.org/Protocols/rfc2616/rfc2616-sec10.html
Both HTTP request and HTTP response can contain header fields. These two tables describe those fields and provide simple examples.
[table id=3 /]
[table id=4 /]
Reference: https://www.w3.org/Protocols/rfc2616/rfc2616-sec14.html
Because of the sheer quantity of Internet Media Types, just the most commonly used ones are listed here.
[table id=8 /]
[table id=5 /]
[table id=6 /]
[table id=7 /]
References: https://www.iana.org/assignments/media-types/media-types.xhtml
Everything mentioned in this reference article can be found in more detail in the HTTP1.1 spec document:
http://www.ietf.org/rfc/rfc2616.txt
_______________________________________________