

In this article, we are going to learn about Onion architecture and what are its advantages. We will build a RESTful API that follows the Onion architecture, with ASP.NET Core and .NET.
The Onion architecture is also commonly known as the “Clean architecture” or “Ports and adapters”. These architectural approaches are just variations of the same theme.
Let’s get started!

VIDEO: Onion Architecture in ASP.NET Core Web API.
What is the Onion Architecture?
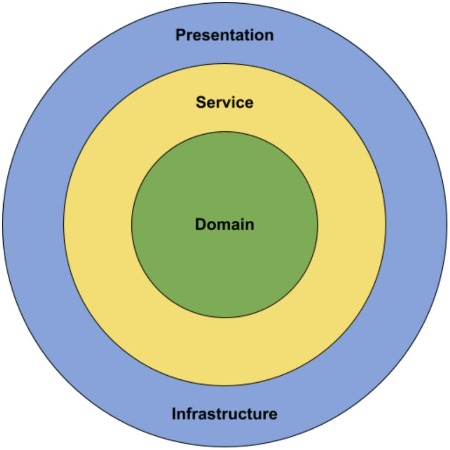
The Onion architecture is a form of layered architecture and we can visualize these layers as concentric circles. Hence the name Onion architecture. The Onion architecture was first introduced by Jeffrey Palermo, to overcome the issues of the traditional N-layered architecture approach.
There are multiple ways that we can split the onion, but we are going to choose the following approach where we are going to split the architecture into 4 layers:
- Domain Layer
- Service Layer
- Infrastructure Layer
- Presentation Layer
Conceptually, we can consider that the Infrastructure and Presentation layers are on the same level of the hierarchy.
Now, let us go ahead and look at each layer with more detail to see why we are introducing it and what we are going to create inside of that layer:
Advantages of the Onion Architecture
Let us take a look at what are the advantages of Onion architecture, and why we would want to implement it in our projects.
All of the layers interact with each other strictly through the interfaces defined in the layers below. The flow of dependencies is towards the core of the Onion. We will explain why this is important in the next section.
Using dependency inversion throughout the project, depending on abstractions (interfaces) and not the implementations, allows us to switch out the implementation at runtime transparently. We are depending on abstractions at compile-time, which gives us strict contracts to work with, and we are being provided with the implementation at runtime.
Testability is very high with the Onion architecture because everything depends on abstractions. The abstractions can be easily mocked with a mocking library such as Moq. To learn more about unit testing your projects in ASP.NET Core check out this article Testing MVC Controllers in ASP.NET Core.
We can write business logic without concern about any of the implementation details. If we need anything from an external system or service, we can just create an interface for it and consume it. We do not have to worry about how it will be implemented. The higher layers of the Onion will take care of implementing that interface transparently.
Flow of Dependencies
The main idea behind the Onion architecture is the flow of dependencies, or rather how the layers interact with each other. The deeper the layer resides inside the Onion, the fewer dependencies it has.
The Domain layer does not have any direct dependencies on the outside layers. It is isolated, in a way, from the outside world. The outer layers are all allowed to reference the layers that are directly below them in the hierarchy.
We can conclude that all the dependencies in the Onion architecture flow inwards. But we should ask ourselves, why is this important?
The flow of dependencies dictates what a certain layer in the Onion architecture can do. Because it depends on the layers below it in the hierarchy, it can only call the methods that are exposed by the lower layers.
We can use lower layers of the Onion architecture to define contracts or interfaces. The outer layers of the architecture implement these interfaces. This means that in the Domain layer, we are not concerning ourselves with infrastructure details such as the database or external services.
Using this approach, we can encapsulate all of the rich business logic in the Domain and Service layers without ever having to know any implementation details. In the Service layer, we are going to depend only on the interfaces that are defined by the layer below, which is the Domain layer.
Enough theory, let us see some code. We have already prepared a working project for you and we’re going to be looking at each of the projects in the solution, and talking about how they fit into the Onion architecture.
Solution Structure
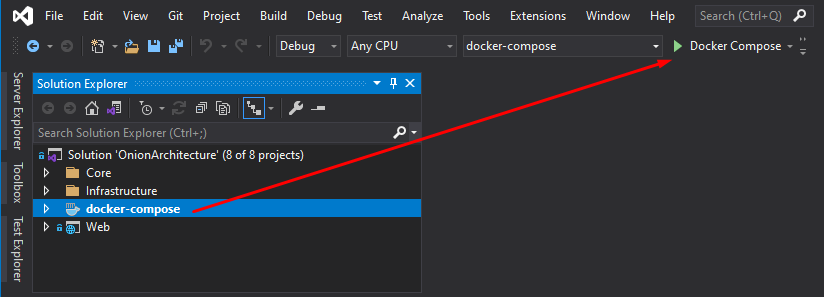
Let’s take a look at the solution structure we are going to be using:

As we can see, it consists of the Web project, which is our ASP.NET Core application, and six class libraries. The Domain project will hold the Domain layer implementation. The Services and Services.Abstractions are going to be our Service layer implementation. The Persistence project will be our Infrastructure layer, and the Presentation project will be the Presentation layer implementation.
Domain Layer
The Domain layer is at the core of the Onion architecture. In this layer, we are typically going to define the core aspects of our domain:
- Entities
- Repository interfaces
- Exceptions
- Domain services
These are just some of the examples of what we could define in the Domain layer. We can be more or less strict, depending on our needs. We have to realize that everything is a tradeoff in software engineering.
Let’s start by looking at the entity classes Owner and Account, under the Entities folder:
public class Owner
{
    public Guid Id { get; set; }

    public string Name { get; set; }

    public DateTime DateOfBirth { get; set; }

    public string Address { get; set; }

    public ICollection<Account> Accounts { get; set; }
}
public class Account
{
    public Guid Id { get; set; }

    public DateTime DateCreated { get; set; }

    public string AccountType { get; set; }

    public Guid OwnerId { get; set; }
}
The entities defined in the Domain layer are going to capture the information that is important for describing the problem domain.
At this point, we should ask ourselves what about the behavior? Isn’t an anemic domain model a bad thing?
It depends. If you have very complex business logic, it would make sense to encapsulate it inside of our domain entities. But for most applications, it is usually easier to start with a simpler domain model, and only introduce complexity if it is required by the project.
Next, we are going to look at the IOwnerRepository and IAccountRepository interfaces inside of the Repositories folder:
public interface IOwnerRepository
{
    Task<IEnumerable<Owner>> GetAllAsync(CancellationToken cancellationToken = default);

    Task<Owner> GetByIdAsync(Guid ownerId, CancellationToken cancellationToken = default);

    void Insert(Owner owner);

    void Remove(Owner owner);
}
public interface IAccountRepository
{
    Task<IEnumerable<Account>> GetAllByOwnerIdAsync(Guid ownerId, CancellationToken cancellationToken = default);

    Task<Account> GetByIdAsync(Guid accountId, CancellationToken cancellationToken = default);

    void Insert(Account account);

    void Remove(Account account);
}
To learn more about the Repository pattern and how to implement it asynchronously, be sure to check out Implementing Asynchronous Generic Repository in ASP.NET Core.
Inside the same folder, we can also find the IUnitOfWork interface:
public interface IUnitOfWork
{
    Task<int> SaveChangesAsync(CancellationToken cancellationToken = default);
}
Notice that we are setting the CancellationToken argument as an optional value, and giving it the default value. With this approach, if we don’t provide an actual CancellationToken value a CancellationToken.None will be provided for us. By doing this, we can ensure that our asynchronous calls that use the CancellationToken will always work.
Domain Exceptions
Now, let’s look at some of the custom exceptions that we have inside the Exceptions folder.
There is an abstract BadRequestException class:
public abstract class BadRequestException : Exception
{
    protected BadRequestException(string message)
        : base(message)
    {
    }
}
And the abstract NotFoundException class:
public abstract class NotFoundException : Exception
{
    protected NotFoundException(string message)
        : base(message)
    {
    }
}
There are also a couple of exception classes that inherit from the abstract exceptions to describe specific scenarios that can occur in the application:
public sealed class AccountDoesNotBelongToOwnerException : BadRequestException
{
    public AccountDoesNotBelongToOwnerException(Guid ownerId, Guid accountId)
        : base($"The account with the identifier {accountId} does not belong to the owner with the identifier {ownerId}")
    {
    }
}
public sealed class OwnerNotFoundException : NotFoundException
{
    public OwnerNotFoundException(Guid ownerId)
        : base($"The owner with the identifier {ownerId} was not found.")
    {
    }
}
public sealed class AccountNotFoundException : NotFoundException
{
    public AccountNotFoundException(Guid accountId)
        : base($"The account with the identifier {accountId} was not found.")
    {
    }
}
These exceptions will be handled by the higher layers of our architecture. We are going to use them in a global exception handler that will return the proper HTTP status code based on the type of exception that was thrown.
If you’re interested in learning more about how to implement global exception handling, be sure to take a look at Global Error Handling in ASP.NET Core Web API.
At this point, we know how to define the Domain layer. That said, we can move on to the Service layer and see how to use it to implement the actual business logic.
Service Layer
The Service layer sits right above the Domain layer, which means that it has a reference to the Domain layer. The Service layer is split into two projects, Services.Abstractions and Services.
In the Services.Abstractions project you can find the definitions for the service interfaces that are going to encapsulate the main business logic. Also, we are using the Contracts project to define the Data Transfer Objects (DTO) that we are going to consume with the service interfaces.
Let’s first look at the IOwnerService and IAccountService interfaces:
public interface IOwnerService
{
    Task<IEnumerable<OwnerDto>> GetAllAsync(CancellationToken cancellationToken = default);

    Task<OwnerDto> GetByIdAsync(Guid ownerId, CancellationToken cancellationToken = default);

    Task<OwnerDto> CreateAsync(OwnerForCreationDto ownerForCreationDto, CancellationToken cancellationToken = default);

    Task UpdateAsync(Guid ownerId, OwnerForUpdateDto ownerForUpdateDto, CancellationToken cancellationToken = default);

    Task DeleteAsync(Guid ownerId, CancellationToken cancellationToken = default);
}
public interface IAccountService
{
    Task<IEnumerable<AccountDto>> GetAllByOwnerIdAsync(Guid ownerId, CancellationToken cancellationToken = default);

    Task<AccountDto> GetByIdAsync(Guid ownerId, Guid accountId, CancellationToken cancellationToken);

    Task<AccountDto> CreateAsync(Guid ownerId, AccountForCreationDto accountForCreationDto, CancellationToken cancellationToken = default);

    Task DeleteAsync(Guid ownerId, Guid accountId, CancellationToken cancellationToken = default);
}
Additionally, we can see that there is an IServiceManager interface that acts as a wrapper around the two interfaces that we created previously:
public interface IServiceManager
{
    IOwnerService OwnerService { get; }

    IAccountService AccountService { get; }
}
Next, we are going to look at how to implement these interfaces inside of the Services project.
Let’s start with the OwnerService:
internal sealed class OwnerService : IOwnerService
{
    private readonly IRepositoryManager _repositoryManager;

    public OwnerService(IRepositoryManager repositoryManager) => _repositoryManager = repositoryManager;

    public async Task<IEnumerable<OwnerDto>> GetAllAsync(CancellationToken cancellationToken = default)
    {
        var owners = await _repositoryManager.OwnerRepository.GetAllAsync(cancellationToken);

        var ownersDto = owners.Adapt<IEnumerable<OwnerDto>>();

        return ownersDto;
    }

    public async Task<OwnerDto> GetByIdAsync(Guid ownerId, CancellationToken cancellationToken = default)
    {
        var owner = await _repositoryManager.OwnerRepository.GetByIdAsync(ownerId, cancellationToken);

        if (owner is null)
        {
            throw new OwnerNotFoundException(ownerId);
        }

        var ownerDto = owner.Adapt<OwnerDto>();

        return ownerDto;
    }

    public async Task<OwnerDto> CreateAsync(OwnerForCreationDto ownerForCreationDto, CancellationToken cancellationToken = default)
    {
        var owner = ownerForCreationDto.Adapt<Owner>();

        _repositoryManager.OwnerRepository.Insert(owner);

        await _repositoryManager.UnitOfWork.SaveChangesAsync(cancellationToken);

        return owner.Adapt<OwnerDto>();
    }

    public async Task UpdateAsync(Guid ownerId, OwnerForUpdateDto ownerForUpdateDto, CancellationToken cancellationToken = default)
    {
        var owner = await _repositoryManager.OwnerRepository.GetByIdAsync(ownerId, cancellationToken);

        if (owner is null)
        {
            throw new OwnerNotFoundException(ownerId);
        }

        owner.Name = ownerForUpdateDto.Name;
        owner.DateOfBirth = ownerForUpdateDto.DateOfBirth;
        owner.Address = ownerForUpdateDto.Address;

        await _repositoryManager.UnitOfWork.SaveChangesAsync(cancellationToken);
    }

    public async Task DeleteAsync(Guid ownerId, CancellationToken cancellationToken = default)
    {
        var owner = await _repositoryManager.OwnerRepository.GetByIdAsync(ownerId, cancellationToken);

        if (owner is null)
        {
            throw new OwnerNotFoundException(ownerId);
        }

        _repositoryManager.OwnerRepository.Remove(owner);

        await _repositoryManager.UnitOfWork.SaveChangesAsync(cancellationToken);
    }
}
Then let’s inspect the AccountService class:
internal sealed class AccountService : IAccountService
{
    private readonly IRepositoryManager _repositoryManager;

    public AccountService(IRepositoryManager repositoryManager) => _repositoryManager = repositoryManager;

    public async Task<IEnumerable<AccountDto>> GetAllByOwnerIdAsync(Guid ownerId, CancellationToken cancellationToken = default)
    {
        var accounts = await _repositoryManager.AccountRepository.GetAllByOwnerIdAsync(ownerId, cancellationToken);

        var accountsDto = accounts.Adapt<IEnumerable<AccountDto>>();

        return accountsDto;
    }

    public async Task<AccountDto> GetByIdAsync(Guid ownerId, Guid accountId, CancellationToken cancellationToken)
    {
        var owner = await _repositoryManager.OwnerRepository.GetByIdAsync(ownerId, cancellationToken);

        if (owner is null)
        {
            throw new OwnerNotFoundException(ownerId);
        }

        var account = await _repositoryManager.AccountRepository.GetByIdAsync(accountId, cancellationToken);

        if (account is null)
        {
            throw new AccountNotFoundException(accountId);
        }

        if (account.OwnerId != owner.Id)
        {
            throw new AccountDoesNotBelongToOwnerException(owner.Id, account.Id);
        }

        var accountDto = account.Adapt<AccountDto>();

        return accountDto;
    }

    public async Task<AccountDto> CreateAsync(Guid ownerId, AccountForCreationDto accountForCreationDto, CancellationToken cancellationToken = default)
    {
        var owner = await _repositoryManager.OwnerRepository.GetByIdAsync(ownerId, cancellationToken);

        if (owner is null)
        {
            throw new OwnerNotFoundException(ownerId);
        }

        var account = accountForCreationDto.Adapt<Account>();

        account.OwnerId = owner.Id;

        _repositoryManager.AccountRepository.Insert(account);

        await _repositoryManager.UnitOfWork.SaveChangesAsync(cancellationToken);

        return account.Adapt<AccountDto>();
    }

    public async Task DeleteAsync(Guid ownerId, Guid accountId, CancellationToken cancellationToken = default)
    {
        var owner = await _repositoryManager.OwnerRepository.GetByIdAsync(ownerId, cancellationToken);

        if (owner is null)
        {
            throw new OwnerNotFoundException(ownerId);
        }

        var account = await _repositoryManager.AccountRepository.GetByIdAsync(accountId, cancellationToken);

        if (account is null)
        {
            throw new AccountNotFoundException(accountId);
        }

        if (account.OwnerId != owner.Id)
        {
            throw new AccountDoesNotBelongToOwnerException(owner.Id, account.Id);
        }

        _repositoryManager.AccountRepository.Remove(account);

        await _repositoryManager.UnitOfWork.SaveChangesAsync(cancellationToken);
    }
}
And finally the ServiceManager:
public sealed class ServiceManager : IServiceManager
{
    private readonly Lazy<IOwnerService> _lazyOwnerService;
    private readonly Lazy<IAccountService> _lazyAccountService;

    public ServiceManager(IRepositoryManager repositoryManager)
    {
        _lazyOwnerService = new Lazy<IOwnerService>(() => new OwnerService(repositoryManager));
        _lazyAccountService = new Lazy<IAccountService>(() => new AccountService(repositoryManager));
    }

    public IOwnerService OwnerService => _lazyOwnerService.Value;

    public IAccountService AccountService => _lazyAccountService.Value;
}
The interesting part with the ServiceManager implementation is that we are leveraging the power of the Lazy class to ensure the lazy initialization of our services. This means that our service instances are only going to be created when we access them for the first time, and not before that.
What is the motivation for splitting the Service layer?
Why are we going through so much trouble to split our service interfaces and implementations into two separate projects?
As you can see, we mark the service implementations with the internal keyword, which means they will not be publicly available outside of the Services project. On the other hand, the service interfaces are public.
Do you remember what we said about the flow of dependencies?
With this approach, we are being very explicit about what the higher layers of the Onion can and can not do. It is easy to miss here that the Services.Abstractions project does not have a reference to the Domain project.
This means that when a higher layer references the Services.Abstractions project it will only be able to call methods that are exposed by this project. We are going to see why this is very useful later on when we get to the Presentation layer.
Infrastructure Layer
The Infrastructure layer should be concerned with encapsulating anything related to external systems or services that our application is interacting with. These external services can be:
- Database
- Identity provider
- Messaging queue
- Email service
There are more examples, but hopefully, you get the idea. We are hiding all the implementation details in the Infrastructure layer because it is at the top of the Onion architecture, while all of the lower layers depend on the interfaces (abstractions).
First, we are going to look at the Entity Framework database context in the RepositoryDbConext class:
public sealed class RepositoryDbContext : DbContext
{
    public RepositoryDbContext(DbContextOptions options)
        : base(options)
    {
    }

    public DbSet<Owner> Owners { get; set; }

    public DbSet<Account> Accounts { get; set; }

    protected override void OnModelCreating(ModelBuilder modelBuilder) =>
        modelBuilder.ApplyConfigurationsFromAssembly(typeof(RepositoryDbContext).Assembly);
}
As you can see, the implementation is extremely simple. However, in the OnModelCreating method, we are configuring our database context based on the entity configurations from the same assembly.
Next, we are going to look at the entity configurations that are implementing the IEntityTypeConfiguration<T> interface. We can find them inside of the Configurations folder:
internal sealed class OwnerConfiguration : IEntityTypeConfiguration<Owner>
{
    public void Configure(EntityTypeBuilder<Owner> builder)
    {
        builder.ToTable(nameof(Owner));

        builder.HasKey(owner => owner.Id);

        builder.Property(account => account.Id).ValueGeneratedOnAdd();

        builder.Property(owner => owner.Name).HasMaxLength(60);

        builder.Property(owner => owner.DateOfBirth).IsRequired();

        builder.Property(owner => owner.Address).HasMaxLength(100);

        builder.HasMany(owner => owner.Accounts)
            .WithOne()
            .HasForeignKey(account => account.OwnerId)
            .OnDelete(DeleteBehavior.Cascade);
    }
}
internal sealed class AccountConfiguration : IEntityTypeConfiguration<Account>
{
    public void Configure(EntityTypeBuilder<Account> builder)
    {
        builder.ToTable(nameof(Account));

        builder.HasKey(account => account.Id);

        builder.Property(account => account.Id).ValueGeneratedOnAdd();

        builder.Property(account => account.AccountType).HasMaxLength(50);

        builder.Property(account => account.DateCreated).IsRequired();
    }
}
Great, now that the database context is configured, we can move on to the repositories.
We are going to look at the repository implementations inside of the Repositories folder. The repositories are implementing the interfaces that we defined in the Domain project:
internal sealed class OwnerRepository : IOwnerRepository
{
    private readonly RepositoryDbContext _dbContext;

    public OwnerRepository(RepositoryDbContext dbContext) => _dbContext = dbContext;

    public async Task<IEnumerable<Owner>> GetAllAsync(CancellationToken cancellationToken = default) =>
        await _dbContext.Owners.Include(x => x.Accounts).ToListAsync(cancellationToken);

    public async Task<Owner> GetByIdAsync(Guid ownerId, CancellationToken cancellationToken = default) =>
        await _dbContext.Owners.Include(x => x.Accounts).FirstOrDefaultAsync(x => x.Id == ownerId, cancellationToken);

    public void Insert(Owner owner) => _dbContext.Owners.Add(owner);

    public void Remove(Owner owner) => _dbContext.Owners.Remove(owner);
}
internal sealed class AccountRepository : IAccountRepository
{
    private readonly RepositoryDbContext _dbContext;

    public AccountRepository(RepositoryDbContext dbContext) => _dbContext = dbContext;

    public async Task<IEnumerable<Account>> GetAllByOwnerIdAsync(Guid ownerId, CancellationToken cancellationToken = default) =>
        await _dbContext.Accounts.Where(x => x.OwnerId == ownerId).ToListAsync(cancellationToken);

    public async Task<Account> GetByIdAsync(Guid accountId, CancellationToken cancellationToken = default) =>
        await _dbContext.Accounts.FirstOrDefaultAsync(x => x.Id == accountId, cancellationToken);

    public void Insert(Account account) => _dbContext.Accounts.Add(account);

    public void Remove(Account account) => _dbContext.Accounts.Remove(account);
}
To learn how to implement the repository pattern with Entity Framework Core you can check out this article ASP.NET Core Web API – Repository Pattern.
Great, we are done with the Infrastructure layer. Now we only have one more layer left to complete our Onion architecture implementation.
Presentation Layer
The purpose of the Presentation layer is to represent the entry point to our system so that consumers can interact with the data. We can implement this layer in many ways, for example creating a REST API, gRPC, etc.
We are using a Web API built with ASP.NET Core to create a set of RESTful API endpoints for modifying the domain entities and allowing consumers to get back the data.
However, we are going to do something different from what you are normally used to when creating Web APIs. By convention, the controllers are defined in the Controllers folder inside of the Web application.
Why is this a problem? Because ASP.NET Core uses Dependency Injection everywhere, we need to have a reference to all of the projects in the solution from the Web application project. This allows us to configure our services inside of the Startup class.
While this is exactly what we want to do, it introduces a big design flaw. What is preventing our controllers from injecting anything they want inside the constructor? Nothing!
Clean Controllers
With the standard ASP.NET Core approach, we can’t prevent anyone from injecting whatever they need inside a controller. So how can we impose some more strict rules about what the controllers can do?
Do you remember how we split the Service layer into the Services.Abstractions and Services projects? That was one piece of the puzzle.
We are creating a project called Presentation and giving it a reference to the Microsoft.AspNetCore.Mvc.Core NuGet package so that it has access to the ControllerBase class. Then we can create our controllers inside this project.
Let’s look at the OwnersController inside the project’s Controllers folder:
[ApiController]
[Route("api/owners")]
public class OwnersController : ControllerBase
{
    private readonly IServiceManager _serviceManager;

    public OwnersController(IServiceManager serviceManager) => _serviceManager = serviceManager;

    [HttpGet]
    public async Task<IActionResult> GetOwners(CancellationToken cancellationToken)
    {
        var owners = await _serviceManager.OwnerService.GetAllAsync(cancellationToken);

        return Ok(owners);
    }

    [HttpGet("{ownerId:guid}")]
    public async Task<IActionResult> GetOwnerById(Guid ownerId, CancellationToken cancellationToken)
    {
        var ownerDto = await _serviceManager.OwnerService.GetByIdAsync(ownerId, cancellationToken);

        return Ok(ownerDto);
    }

    [HttpPost]
    public async Task<IActionResult> CreateOwner([FromBody] OwnerForCreationDto ownerForCreationDto)
    {
        var ownerDto = await _serviceManager.OwnerService.CreateAsync(ownerForCreationDto);

        return CreatedAtAction(nameof(GetOwnerById), new { ownerId = ownerDto.Id }, ownerDto);
    }

    [HttpPut("{ownerId:guid}")]
    public async Task<IActionResult> UpdateOwner(Guid ownerId, [FromBody] OwnerForUpdateDto ownerForUpdateDto, CancellationToken cancellationToken)
    {
        await _serviceManager.OwnerService.UpdateAsync(ownerId, ownerForUpdateDto, cancellationToken);

        return NoContent();
    }

    [HttpDelete("{ownerId:guid}")]
    public async Task<IActionResult> DeleteOwner(Guid ownerId, CancellationToken cancellationToken)
    {
        await _serviceManager.OwnerService.DeleteAsync(ownerId, cancellationToken);

        return NoContent();
    }
}
And let’s also take a look at the AccountsController:
[ApiController]
[Route("api/owners/{ownerId:guid}/accounts")]
public class AccountsController : ControllerBase
{
    private readonly IServiceManager _serviceManager;

    public AccountsController(IServiceManager serviceManager) => _serviceManager = serviceManager;

    [HttpGet]
    public async Task<IActionResult> GetAccounts(Guid ownerId, CancellationToken cancellationToken)
    {
        var accountsDto = await _serviceManager.AccountService.GetAllByOwnerIdAsync(ownerId, cancellationToken);

        return Ok(accountsDto);
    }

    [HttpGet("{accountId:guid}")]
    public async Task<IActionResult> GetAccountById(Guid ownerId, Guid accountId, CancellationToken cancellationToken)
    {
        var accountDto = await _serviceManager.AccountService.GetByIdAsync(ownerId, accountId, cancellationToken);

        return Ok(accountDto);
    }

    [HttpPost]
    public async Task<IActionResult> CreateAccount(Guid ownerId, [FromBody] AccountForCreationDto accountForCreationDto, CancellationToken cancellationToken)
    {
        var response = await _serviceManager.AccountService.CreateAsync(ownerId, accountForCreationDto, cancellationToken);

        return CreatedAtAction(nameof(GetAccountById), new { ownerId = response.OwnerId, accountId = response.Id }, response);
    }

    [HttpDelete("{accountId:guid}")]
    public async Task<IActionResult> DeleteAccount(Guid ownerId, Guid accountId, CancellationToken cancellationToken)
    {
        await _serviceManager.AccountService.DeleteAsync(ownerId, accountId, cancellationToken);

        return NoContent();
    }
}
By now it should be obvious that the Presentation project will only have a reference to the Services.Abstraction project. And since the Services.Abstractions project does not reference any other project, we have imposed a very strict set of methods that we can call inside of our controllers.
The obvious advantage of the Onion architecture is that our controller’s methods become very thin. Just a couple of lines of code at most. This is the true beauty of the Onion architecture. We moved all of the important business logic into the Service layer.
Great, we have seen how to implement the Presentation layer.
But how are we going to use the controller if it is not in the Web application? Well, let us move on to the next section to find out.
Constructing the Onion
Congratulations if you made it this far. We’ve shown you how to implement the Domain layer, Service layer, and Infrastructure layer. Also, we’ve shown you the Presentation layer implementation by decoupling the controllers from the main Web application.
There is only one little problem remaining. The application does not work at all! We did not see how to wire up any of our dependencies.
Configuring the Services
Let’s look at how all of the required service dependencies are registered inside of the Startup class for .NET 5 in the Web project. We are going to take a look at the ConfigureServices method:
public void ConfigureServices(IServiceCollection services)
{
    services.AddControllers()
        .AddApplicationPart(typeof(Presentation.AssemblyReference).Assembly);

    services.AddSwaggerGen(c =>
        c.SwaggerDoc("v1", new OpenApiInfo { Title = "Web", Version = "v1" }));

    services.AddScoped<IServiceManager, ServiceManager>();

    services.AddScoped<IRepositoryManager, RepositoryManager>();

    services.AddDbContextPool<RepositoryDbContext>(builder =>
    {
        var connectionString = Configuration.GetConnectionString("Database");

        builder.UseNpgsql(connectionString);
    });

    services.AddTransient<ExceptionHandlingMiddleware>();
}
For .NET 6, we would add a slightly modified code inside the Program class:
builder.Services.AddControllers()
    .AddApplicationPart(typeof(Presentation.AssemblyReference).Assembly);

builder.Services.AddSwaggerGen(c =>
    c.SwaggerDoc("v1", new OpenApiInfo { Title = "Web", Version = "v1" }));

builder.Services.AddScoped<IServiceManager, ServiceManager>();

builder.Services.AddScoped<IRepositoryManager, RepositoryManager>();

builder.Services.AddDbContextPool<RepositoryDbContext>(builder =>
{
    var connectionString = Configuration.GetConnectionString("Database");
    builder.UseNpgsql(connectionString);
});

builder.Services.AddTransient<ExceptionHandlingMiddleware>();
The most important part of the code is:
builder.Services.AddControllers()
    .AddApplicationPart(typeof(Presentation.AssemblyReference).Assembly);
Without this line of code, the Web API would not work. This line of code will find all of the controllers inside of the Presentation project and configure them with the framework. They are going to be treated the same as if they were defined conventionally.
Great, we saw how we wired up all of the dependencies of our application. However, there are still a couple of things to take care of.
Creating a Global Exception Handler
Remember that we have two abstract exception classes BadRequestException and NotFoundException inside of the Domain layer? Let’s see how we can make good use of them.
We are going to look at the global exception handler ExceptionHandlingMiddleware class, which can be found inside of the Middlewares folder:
internal sealed class ExceptionHandlingMiddleware : IMiddleware
{
    private readonly ILogger<ExceptionHandlingMiddleware> _logger;

    public ExceptionHandlingMiddleware(ILogger<ExceptionHandlingMiddleware> logger) => _logger = logger;

    public async Task InvokeAsync(HttpContext context, RequestDelegate next)
    {
        try
        {
            await next(context);
        }
        catch (Exception e)
        {
            _logger.LogError(e, e.Message);

            await HandleExceptionAsync(context, e);
        }
    }

    private static async Task HandleExceptionAsync(HttpContext httpContext, Exception exception)
    {
        httpContext.Response.ContentType = "application/json";

        httpContext.Response.StatusCode = exception switch
        {
            BadRequestException => StatusCodes.Status400BadRequest,
            NotFoundException => StatusCodes.Status404NotFound,
            _ => StatusCodes.Status500InternalServerError
        };

        var response = new
        {
            error = exception.Message
        };

        await httpContext.Response.WriteAsync(JsonSerializer.Serialize(response));
    }
}
Notice that we create a switch expression around the exception instance and then perform a pattern matching based on the exception type. Then, we are modifying the response HTTP status code depending on what the specific exception type is.
To learn more about the switch expression, and other useful C# features, be sure to check out C# Tips to Improve Code Quality and Performance.
Next, we have to register the ExceptionHandlingMiddleware with the ASP.NET Core middleware pipeline for this to work correctly:
...

app.UseMiddleware<ExceptionHandlingMiddleware>();

...
We also have to register our middleware implementation inside of the ConfigureService method of the Startup class:
services.AddTransient<ExceptionHandlingMiddleware>();
Or in .NET 6:
builder.Services.AddTransient<ExceptionHandlingMiddleware>();
Without registering the ExceptionHandlingMiddleware with the dependency container, we would get a runtime exception, and we do not want that to happen.
Taking Care of Database Migrations
We are going to look at one last improvement to the project, which makes it easier to use for everyone, and then we are done.
To make it straightforward to download the application code and be able to run the application locally we are using Docker. With Docker we are wrapping our ASP.NET Core application inside of a Docker container. We are also using Docker Compose to group our Web application container with a container running the PostgreSQL database image. That way, we won’t need to have PostgreSQL installed on our system.
However, since the Web application and the database server will be running inside of containers, how are we going to create the actual database for the application to use?
We could create an initialization script, connect to the Docker container while it is running the database server, and execute the script. But this is a lot of manual work, and it is error-prone. Luckily, there is a better way.
To do this elegantly, we are going to use Entity Framework Core migrations and we are going to execute the migrations from our code when the application starts. To see how we achieved this, take a look at the Program class in the Web project:
public class Program
{
    public static async Task Main(string[] args)
    {
        var webHost = CreateHostBuilder(args).Build();

        await ApplyMigrations(webHost.Services);

        await webHost.RunAsync();
    }

    private static async Task ApplyMigrations(IServiceProvider serviceProvider)
    {
        using var scope = serviceProvider.CreateScope();

        await using RepositoryDbContext dbContext = scope.ServiceProvider.GetRequiredService<RepositoryDbContext>();

        await dbContext.Database.MigrateAsync();
    }

    public static IHostBuilder CreateHostBuilder(string[] args) =>
        Host.CreateDefaultBuilder(args)
            .ConfigureWebHostDefaults(webBuilder => webBuilder.UseStartup<Startup>());
}
The great thing about this approach is that the migrations will be automatically applied when we create new migrations, further down the road. We do not have to think about it going forward. To learn more about migrations and how to seed data with EF Core in both .NET check out this article Migrations and Seed Data with Entity Framework Core.
Running the Application
Amazing job! We have connected all of our Onion architecture implementation layers, and our application is now ready for use.
We can start the application by clicking the Docker Compose button from Visual Studio. Make sure the docker-compose project is set as your startup project. This will automatically spin up the web application and database server containers for us:
We can then open the browser at the https://localhost:5001/swagger address, where we can find the Swagger user interface:
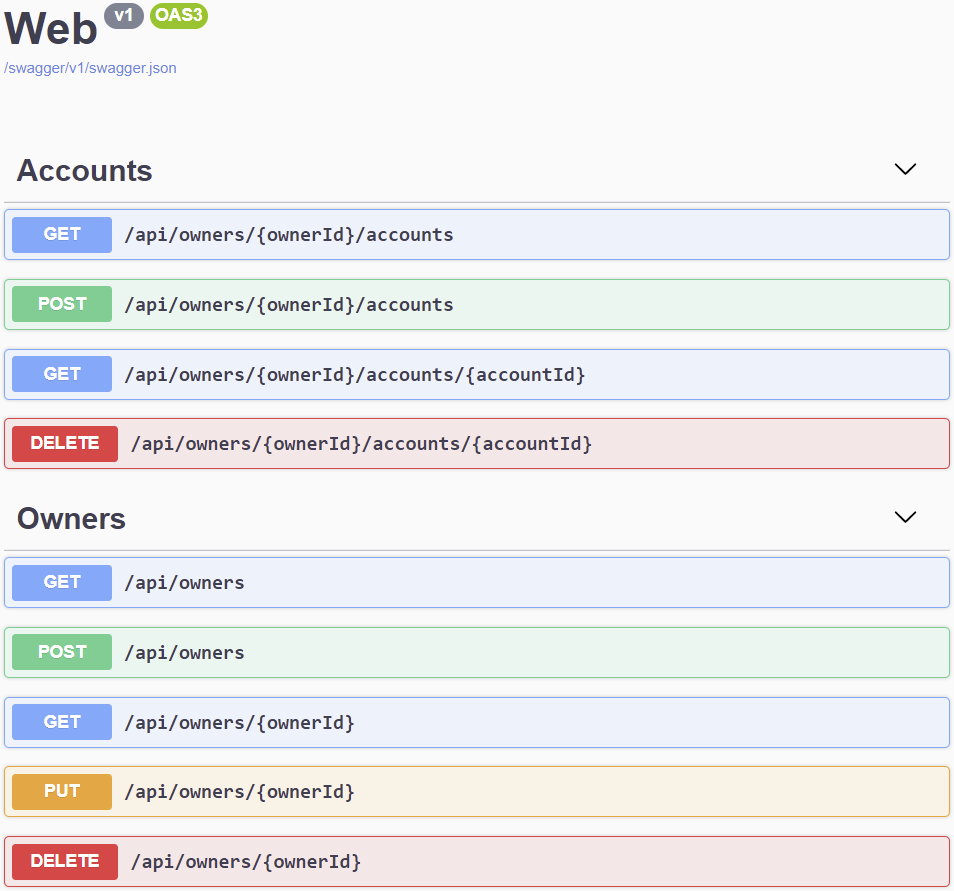
Here we can test out our API endpoints and check if everything is working properly.
Conclusion
In this article, we have learned about Onion architecture. We have explained our take on the architecture by splitting it into the Domain, Service, Infrastructure, and Presentation layers.
We started with the Domain layer, where we saw the definitions for our entities and repository interfaces and exceptions.
Then we saw how the Service layer was created, where we are encapsulating our business logic.
Next, we looked at the Infrastructure layer, where the implementations of the repository interfaces are placed, as well as the EF database context.
And finally, we saw how our Presentation layer is implemented as a separate project by decoupling the controllers from the main Web application. Then, we explained how we can connect all of the layers using an ASP.NET Core Web API.
Until the next article,
All the best.
Amazing article, been using your example repository as a basis for refactoring my current project.
Could you help me understand the choice behind adding validation logic to some of the DTOs in the Contracts solution? I thought that DTOs shouldn’t have behaviour attached to them.
Shouldn’t there be a folder for ViewModals within the presentation layer, at least for MVC with a front end side to it? These are then validated in the controllers, mapped to a DTO -> sent to the service layer to again be mapped to the domain objects for the repositories to send them to the datastore?
Would love to hear your opinion on this.
Hi Sam. If you refer to ForCreation and ForUpdate DTOs, then those are validated with the attributes because we use them inside the request in our actions. There is no need for any additional validation layer because your API will automatically validate these DTOs as they reach your actions and return proper error responses to the client if the request body is invalid.
Thanks for the reply Marinko. The problem I’m facing is there is I have a lot of additional validation that often requires calling a service. For example if one of the DTO in the view takes in say a ProductID I might want to call _productService.Get(id) to verify it’s an existing product, and if not, add in a custom ModelState error message. So while I can do simple validation automatically with attributes I often need to do a lot more in the controller before I’m happy passing those user supplied data into the Service layer.
Well, that’s a completely different thing, something like that shouldn’t be placed inside a DTO, but a simple request validation is perfectly fine.
Thank you for this tutorial! I am currently implementing Onion Architecture in an ASP.NET Core app that uses Identity Framework. I see you have mentioned that an “Identity” project would be included under the “Infrastructure” layer. Part of my “Presentation” project, the part focusing on user account functionality such as login/logout/confirm password, will use the “Microsoft.AspNetCore.Identity” package to access the “UserManager” and “SignInManager” objects. Would you recommend abstractions be created to prevent a dependency on the “Microsoft.AspNetCore.Identity” package within the “Presentation” layer? And, do you recommend that “Identity” is it’s own project?
Hi Zenka. Your presentation layer shouldn’t have any contact with the Identity lib. You can extract it as a separate project and have all the work there, but also, as we did in our book, you can extract all the work to the service layer by creating another service class, and then the Presentation layer can communicate with the service layer with the service interfaces (abstractions).
Marinko, I see in the book that the Identity functionality is extracted into an “AuthenticationService”. However, this service returns and “IdentityResult” in its “RegisterUser” method. It looks like the controller “RegisterUser” method uses the “var” keyword when retrieving the result to get around the dependency on Identity Framework. What are your opinions on creating an adapter for the “IdentityResult”, such that your “AuthenticationService” returns an “IResult”, or something, and then you can be more explicit about the type of result in your controller method?
Yes, basically the complete Identity business logic is extracted into a service layer and we accept only the result back inside the action. It is the easiest way to handle those situations without introducing additional complexity to the project. For me, having that additional complexity is not necessary thus the solution is as is. But if you want it, you can create that adapter and process the result before even returning it to the presentation layer.
Makes complete sense. Thank you!
Hi
I wish to create this project and class libraries, but using .NET 7.0.
There is no longer a Startup.cs file generated since .NET 6.0.
Instead of in memory, I will be using a database – Adventureworks 2017.
What issues do I need to be aware of please ?
Well, there is nothing that special. Just, you don’t have those ConfigureServiecs and Configure methods, but a builder object that you use to access the Services collection or to register a middleware inside the pipeline. Our Web API book is completely updated with .NET 7, using Onion Architecture, with the SQL database, so you might give it a look, it will help you for sure.
Where would you put AutoMapper Profiles in this architecture?
Which layer is appropriate for that and why?
I use most of Map() methods within Controllers’ actions.
To be honest, this is not an important part that could affect any of the layers. But of course, you don’t want to keep it in the Repository as there you hardly want to map something, you want to work with entities. So, you can have it either in the main project or in the service. If you use mappings in both the main project and the service layer, then having it in the main projects is a better option. After all, it is a single file. In our API book, we keep it in the main.
Thank you for fast reply but I’m still confused. What do you mean by “main”? Web or Presentation where i hold Controllers or anything else? Where should I install AutoMapper nuget package?
The main project, not the Presentation layer. Also, since you reference a service layer in the main project and if you use mappings in the service layer as well, then install it in the service layer. This really depends on your project structure. But, I think, you shouldn’t be doing any mappings inside the Presentation layer (controllers). Keep all the mappings in the service layer and return the required results to your controllers.
Hi.
I have question about complex queries that you want to return fields of multiple tables. for example you want to return models of product based on modelid and lang also want to join it with some other tables to have some other useful properties.
1 – So what repository you choose to put this query and what domain model you pick for it to return?
2- also what service you pick for it?
Hi. Both for 1 and 2 choose the repo/servise of the main entity from your response.
If I have a class A and a class B, where class A contains a collection of class B, and this is created from the information of A, to comply with the single responsibility principle, who should I assign responsibility for create B?
To the controller of A, at the service of A.
Thank you in advance for your help!
Thanks for the article and the detailed explanation. The coding is very clean. I have a query though, why the scope of ExceptionHandlingMiddleware is transient and not scoped?
Hi Purba B. To be honest, you can register that service in any way you fill like it would fit your application. The author has chosen to register it as a transient service, but I am pretty sure you won’t make any mistake if you do the same but as a scoped service.
Could you share source code for this?
Please check the beginning of the article.
Oh, I removed all of the EF nastiness and Repository Junk. I use NHibernate so makes sense 🙂
Very Cool.
I threw in a DI Layer for AutoFac works great.
builder.Host.UseServiceProviderFactory(new AutofacServiceProviderFactory())
    .ConfigureContainer<ContainerBuilder>(containerBuilder =>
    {


        DI.AutoFac.AutoFacDiLoader.BuildContainer(containerBuilder, applicationConfiguration.DefaultConnection);


        /* All of these dependencies are tied to ASP.NET  */
        containerBuilder.RegisterType<ApplicationConfiguration>().As<IApplicationConfiguration>().InstancePerLifetimeScope();
        containerBuilder.RegisterType<EmailConfiguration>().As<IEmailConfiguration>().InstancePerLifetimeScope();
        containerBuilder.RegisterType<HttpContextAccessor>().As<IHttpContextAccessor>().SingleInstance();
        containerBuilder.RegisterType<ViewRenderService>().As<IViewRenderService>().SingleInstance();
    });
public static class AutoFacDiLoader { public static ContainerBuilder BuildContainer(ContainerBuilder containerBuilder, string? connectionString) { /* AutoFac Module Registration */ containerBuilder.RegisterModule(new NHibernateModule { ConnectionString = connectionString, }); containerBuilder.RegisterType<EmailConfiguration>().As<IEmailConfiguration>().InstancePerLifetimeScope(); containerBuilder.RegisterType<AccountManager>().As<IAccountManager>().InstancePerLifetimeScope(); containerBuilder.RegisterType<UserService>().As<IUserService>().InstancePerLifetimeScope(); containerBuilder.RegisterType<ProfileService>().As<IProfileService>().InstancePerLifetimeScope(); containerBuilder.RegisterType<RoleService>().As<IRoleService>().InstancePerLifetimeScope(); containerBuilder.RegisterType<EmailService>().As<IEmailService>().InstancePerLifetimeScope(); containerBuilder.RegisterType<Argon2PasswordHasher>().As<IArgon2PasswordHasher>().InstancePerLifetimeScope(); return containerBuilder; } }Which time use this pattern in the projects?
What projects is this pattern suitable for?
Thanks.
Well, we used it for small/large projects and it always worked. So, I can’t say use this architecture only with “that” type of project or anything similar.
A very comprehensive and pragmatic approach to implement a robust architecture. The inclusion of some new features of C# and net core 6 besides tips for using middlewares and docker solutions made the essay very useful and elegant.
Great work!
Thanks a lot. It is always great to hear something like that from a reader. I’m glad you find it useful.
Thanks for writing this article.
How to use service in other services for example use account service in owner service?
You shouldn’t be doing that. Use the Account repository to fetch what you need in the Owner service class and add the business logic you need. Or, for example, if you need any result from the Account service in your Owner service, you can always call that method first in the controller, and then pass it to the method inside the Owner service. After all, in your controllers, you should be calling your service layer methods.
Thanks for helping me.
Is it wrong to new the service in another service as well?
because I can’t use the above suggestions for me
Well, let me put it this way. It is not the best practice to do so as you should get access to your services through the IServiceManager interface. But if there is no other way in your app, you’ll do what you have to do.
Regarding the step of implmenting “Clean Controllers” , where you divied the Presentation (UI) Layer into 2 project . how can i do the same for Razor Pags as (Presentation Layer)?
To be honest, I didn’t use Razor Pages a lot, almost none, so I am really not sure how to do it there. Probably there is a way, but as I didn’t do it personally, I can’t provide an answer to your question.
Thank you Marinko , really appreciate your reply
Hi, would it be possible to get an example unit test with MOQed IServiceManager and ICustomerService so I can test against the controllers?
Hi. We have couple of articles about testing. I even think that one of those are about testing repo from the project similar to this one, so you can just reuse the knowledge. Just search for testing articles in the search box
Hi MarinkoSpasojevic, thank you SO much for the speedy reply!! It’s for an assignment and i’m up against it. I’ve used your other examples, but they don’t seem to work with this hierarchy. Its the MOQ of IServiceManager and the Lazy loaded CustomerService I can’t get to work – please help!
Try using this article: https://code-maze.com/testing-repository-pattern-entity-framework/ You also have the source code there. If you have issues with lazy-loaded elements, just instantiate them as you will see in the linked article, but I am not sure why that would be the case at all. The bottom line is that in the same way you mock repo, you can do with the service layer as they follow the same implementation.
Great article. I learned a lot from this! One thing I don’t quite understand is why the interface of repository is put in the domain layer, and that the Infrastructure directly references the domain layer because of that? Shouldn’t the infrastructure repository layer only reference the one layer below it which is the service layer?
Hi,
Thanks for the article.
I dont’t use Entity Framework (like many other people I know). I use Dapper as my favourite Orm; I always design the database prior to start programming also. Since you’re using RepositoryDbContext (EF), creating a tecnology dependency through the whole project (that’s my humble opinion), how would I implement a ‘RepositoryDapperDbContext’? Does it make any sense, or do I need to read the article more closely?
Thanks in advance,
Fausto
Hello Fausto Luis. Let’s just first explain this: “creating a technology dependency through the whole project” – this is not correct. The very purpose of this architecture is to have different layers that know only what they need to know. That said, only the repository layer has an idea about the EF Core and the context object. No other layer knows anything about that. So I wouldn’t agree that we create dependency throughout the whole project. The service layer is consuming the repository layer but knows nothing about the ef core and how the repository layer fetches the data from db. Also, the presentation layer has no idea about the repo layer so it knows nothing about the EF Core implementation. So as you can see, the EF is used only in a single layer and it stays there.
Now regarding your question about DapperContext, you may want to read our Dapper with ASP.NET Core Web API article. I didn’t create a repository as complex as this one, but it serves the purpose, so it might give you an idea.
Also, when you say that you always create the db first, I have nothing against that, whatsoever I even support that, for me, this is equally good as using migrations. But just to be clear here, you can use migrations with dapper as well, and you can read more about that in our Migration with Dapper and Fluent Migrator article.
I hope, I’ve provided some useful info for you here.
BR.
Hi Marinko,
Thank you for your clarifications.
I will read the articles you proposed, for better enlightment.
My past experience with EF was not the best, hence perhaps the animosity I may have shown. I should have read the article more carefully.
My apologies for that.
Have a nice day.
Fausto.
Hi Fausto. You have nothing to apologize for. You didn’t insult anyone, you’ve just shared your opinion and question. I did the same. EF Core is now a pretty good tool (well to be more precise it is a great tool and it is like that for a while now), it is fast – with every new version even faster. But I understand that developers like to write their own SQL queries, and I have nothing against that, whatsoever I support that idea a lot. Just, we have been doing a lot of work with EF Core and it proved to be a great tool for us, so we are using it mostly in our articles and our books.
Dear Marinko,
Thanks for the perfect information you have sharing, the question is, (maybe it is the amateur question) is this helpful architecture for the MVC project as well?
Thanks
To be honest, I didn’t use this architecture, in this very form, with MVC. But I really believe that the idea could be used in the MVC apps as well. Maybe that presentation part would be a slight issue, maybe not, as I said I didn’t use it. But overall, it could be used in any type of app.
Hi Marinko, thank you for this article.
I see you put Update method (Task UpdateAsync) in service layer.
Why you did not put in the Repository ?
Hello Freesix. This is more of an EF Core thing. It is about tracking changes. You can read more about it here: https://code-maze.com/efcore-modifying-data/
Amazing article, Thanks
You are most welcome. I’m glad you like it.
How to implement logging in the service layer. for ex, I want to add logging to OwnerService.
But since OwnerService is wrapped with ServiceManager class, How I can inject ILogger<OwnerService> in the OwnerService constructor from ServiceManager class?
Just inject it into the Service Manager class. For example like we do it in our Web API book:
public ServiceManager(IRepositoryManager repositoryManager, ILoggerManager logger, IMapper mapper) { _companyService = new Lazy<ICompanyService>(() => new CompanyService(repositoryManager, logger, mapper)); _employeeService = new Lazy<IEmployeeService>(() => new EmployeeService(repositoryManager, logger, mapper)); }Hi Marinko,
I am getting the following exception if I inject generic ILogger to the OwnerService class.
My Code:
public ServiceManager(IRepositoryManager repositoryManager,ILogger logger )
{
_lazyOwnerService = new Lazy<IOwnerService>(() => new OwnerService(logger, repositoryManager));
}
Exception:
cannot convert from ‘Microsoft.Extensions.Logging.ILogger’ to ‘Microsoft.Extensions.Logging.ILogger<Services.OwnerService>’
public ServiceManager(IRepositoryManager repositoryManager, ILogger<OwnerService> logger)
Just modify the access level of the OwnerService if it is internal in your app.
Hi Marinko,
OwnerService class has following Constructor:
public OwnerService (ILogger<OwnerService > logger, IRepositoryManager repositoryManager)
{
_logger = logger;
_repositoryManager = repositoryManager;
}
Service Manager Class:
public ServiceManager(ILogger logger, IRepositoryManager repositoryManager)
{
_lazyOwnerService = new Lazy<IOwnerService>(() => new OwnerService(logger, repositoryManager));
_lazyAccountService = new Lazy<IAccountService>(() => new AccountService(logger, repositoryManager));
}
If you can see I need to inject the specific Logger into the Individual Service classes like OwnerService and AccountService from the Service Manager class.
Issue is with the ServiceManager class. If we directly consume the individual Service i.e. OwnerService then DI will work smoothly but since there is additional abstraction of ServiceManager, I could not inject specific logger.
Any solutoin on it?
Yes, I can see, and I showed it exactly how to do it in the service manager class. Your code, the one you’ve shown in the last comment is not the one I presented in my reply. Also, you have another option to create a custom logger, which I always prefer doing since I have better control over logging: https://code-maze.com/net-core-web-development-part3/ Then you can inject it easily for any service. This is the same approach that we use in our book.
I have a one question. Can I use DTOs classes in my Blazor wasm project? Or is it better for me to create models?
Since Blazor WASM is a client app, you should be using DTOs.
thanks.
How could .net core identity be implemented in this architecture?
Of course, it can. In our book Ultimate ASP.NET Core Web API, we are doing exactly that. You can find more info on this link: https://code-maze.com/ultimate-aspnetcore-webapi-second-edition/ You can even find a preview of that exact part.
Also in our security book, which you can find on the same link we combine ASP.NET Core Identity with IdentityServer4/Duende so everything is covered there as well.
Hello, which layer are you going to add pagination, sorting etc to, services layer or infrastructure layer?
Hello. You will spread it a bit between the layers. The query should go in the Repository Layer since you want to create such a query that is as fast as possible. That’s why we in our book create extensions on IQueryable which allows us to implement all the conditions and execute that query on the database completely. If you have some additional validations and you have to repack the result for additional headers and stuff, you can do that in the service layer. Again, the entire process is well described in our Ultimate ASP.NET Core Web API book.
Would I also add MVC controllers in the presentation layer? I am trying to avoid to add the MVC controllers and views to the web project but adding them to the presentation class library gives me a bunch of errors. Could you maybe show how to add them along with the api controllers in the presentation layer? Thanks so much in advance!
Hello there. To be honest, I didn’t try to do that with the MVC project but as with Web API, you have to tell your main project where to find your controllers. Maybe this can help you: https://stackoverflow.com/questions/401376/asp-net-mvc-put-controllers-into-a-separate-project
I actually tried it with that StackOverflow article but it doesn’t work unfortunately..
It is possible to deploy an api with this architecture in Azure Static Web Apps?
Hey Yassert, Azure Static Web Apps are used for the deployment of static applications. That includes most of the client-side applications including Blazor WebAssembly.
Hi Marinko, thank you for your great article.
I have few questions :
1. In your ebook “Ultimate ASP.Net Core Web API”, did you use Onion Architecture or Layered architecture ? and why you choose that architecture in that project.
2. In this article you said The Onion architecture was first introduced by Jeffrey Palermo, to overcome the issues of the traditional N-layered architecture approach. Can you please list some of the problem faced when using the traditional N-layered architecture?
Hello Johnson.
You are most welcome. To be honest, this was written by one of our authors, but it’s all the same – article is on our site 🙂
1) In our first version of the book we’ve used Onion architecture because as we said in the article: “All of the layers interact with each other strictly through the interfaces defined in the layers below.” This is a great way to create a solution.
2) Well in N-Layered architecture the sentence I quoted in the answer under 1is not true. There, the UI/Presentation layer can interact with the domain layer directly not through abstractions, and even more, it shouldn’t be interacting with the domain layer at all. I can write about that a lot but you can read here what more experienced people have to say on that topic 🙂
Good article, agree with most of the points. Only concern: “Managers”:
As for “yet another abstraction over already abstracted EF” – agree with you, we should not expose EF or any other DB provider and make strict methods for each case.
Regarding managers, in the repository layer, it acts as a UoW. So basically you only inject your manager class, which wraps all your repository user classes, and then you can work with a single class to call all your user repository classes and call a single Save method to wrap all the executions inside a single transaction. In the repository manager class, we like using the Lazy class since it is creating an instance of the repo class only when that one is needed, but you can use DI here as well if you want to go DI all the way.
The same thing goes for the ServiceManager just it doesn’t have any connection to the save method from EF Core.
Regarding the “yet another abstraction…” thing, I stopped replying to that a long time ago. There will always be two sides to everything in this world, so this is no exception as well. I’ve read tons of articles having pros and cons, and it is always on a developer to decide. We know why we are doing things this way and we will keep propagating that for sure. To be honest, this shouldn’t be important at all. The architecture is the main thing here, and if someone doesn’t want to use the repository layer, then they shouldn’t use it, and that is it 🙂
Hello.
Thanks for the article!
At the bottom, where it says
We can then open the browser at the
https://localhost:50001/swaggeraddress, where we can find theSwaggeruser interface:Shouldn’t it be 5001?
Thanks,
André.
Yeah, that’s a typo. Thanks for that.
Great post!!! What do you recommend if the service manager or repository manager grows too much? could be partial classes?
Regards
Hello Alejandro. Thank you for your comment. Yes, it could be partial classes but basically, these classes are just simple wrappers around individual repos/services. So, you can make them as small as possible but IMO you don’t get anything much from that because there is nothing in these classes that you have to maintain in the long term or anything similar because you are just creating individual service/repo instances in a lazy manner, and that logic is straight forward.
Excellent article, could you help me, where should I add the calculable properties in this architecture. Thank you!
Hello Yassert. What do you mean by Calculable properties, I’m not sure that I understand? Basically, any business logic should be moved to the service layer, so yes, calculations go there as well.
Thanks for your answer, I mean the invoice total, for example, currently these calculations are made in the entity class, thanks!
Hi
Can you share code github url
The source code is linked at the top of the article
Thank-you for this article. I have implemented a Repo + UnitOfWork pattern for many years over several projects and have never run into any issues. It’s a solid pattern. Many want to change and continually improve but I always say just because you can change something doesn’t mean you should. This is not at you OP this is more at the dev community as a whole. Once again thanks for the refresher and reflection on onion architecture.
You are most welcome, John. Also, thank you too for reading the article and your comment.
Would you publish another article about DDD concepts? We really need something clean about this from you!!
We still don’t have any plans to go into the DDD area with our articles, but we will cover it eventually for sure.
Great article..
Thanks. I’m glad you like it.
Should very good article, and then blazor webassemly adopt a similar architecture?
In my opinion, implementing something like this on the client side is overkill. You can always use folders in the same app to split some responsibilities but I would use different projects only if I want to reuse some components or to introduce lazy loading.
Thank you very much,One more question ,Should the blazor assembly share some libraries with the server ?such as DTO and verification
Of course, the main advantage of creating the client app in C# is the possibility to share the code between the client and the server app.
Thank you for this great and useful article.
It was very helpful.
You are most welcome. Thank you too for reading it and for the comment.
Thanks for this article. I have a question. Can I use action filters in services?
There is no point in doing that. Use it as a global filter configured inside the Startup file or use it inside of your controllers. If you want to use AF just to remove code duplications, in the service just create another method and extract the repeating logic.
it would be greatly appreciated if you share git repo link.
Link is already in the article. Please check the start of the article in the red box.
Great article. Recently I’ve noticed there is a lot of error-prone demos and videos where people report about onion, but it can have lots of violations 🙂
The idea with split of service layer – makes great sense. It’s a big question, how to avoid violations in onion type of architecture, so that’s a step ahead.
Couple of things to propose also:
Cheers.
Hello Eugene. Thank you for the comment and your suggestions, I am pretty sure our readers will benefit from them.
Have a great day and all the best.
Thanks for writing the article.
Good coding, clean approach and splitting of responsibilities.
Unfortunately I see these kind of repository-architectures all the time, they are very problematic on the long term.
– the repository pattern takes the power of Entity Framework completely away. (relational queries, advanced sorting, filtering, everything)
– abstracting EF (Core) away is wishful thinking. I saw it many times, it is usually impossible to replace EF with something else after a few years of coding.
– if you want to use a pattern like this you shouldn’t return IEnumerable, you should return IQueryable.
– the REST service shouldn’t return all database records at once.
– the repository pattern gives you a false idea that the repositories are not related to each other and can be used individually. This is not the case. With complex data models this leads to all kind of problems.
ASP.NET Core OData actually fixes most of the problems by default.
Thank you for the comment. I must say that we have developed large projects using these repository steuctures and it never failed, not a single time. Also in our book we implement paging filtering sorting using this pattern and it works pretty well on large amount of data. About IQueriable, you should use it while fetching data from db, once you want to use that data, outside the repository layer, I will always return IEnumerable. You can filter everything out on the repo layer. Again, architecture is a tricky stuff and people should use it as it fits the project, there is no one single way. At least, that is my opinion. But again, thank you for this comment, I always enjoy having constructive talks 🙂
Thank you 😉
It depends on the project, developers, indeed. There is no one size fits all.
I just think that the repository pattern (splitting repositories per entity class) is overrated. It lacks the fact that the data from the repositories are highly related, at least if you are using a complex datamodel with lots of relationships.
Obviously, I support the idea to share queries between logic, when necessary.
But I saw quite some implementations where filtering and sorting still ends up outside the repository. Or, alternatively you end up with functions like: GetUsers, GetUsersSortedByName, GetUsersFilteredByAgeAndSortedBy…AndGroupedBy. Because this gets messy and blown up, sometimes devs then start to create their own query format like GetUsers(userquery).
Then why not use the powerful Linq queries and IQueryable 🙂
Like I said, abstracting away EF is wishful thinking in a complex solution, even with things like repository pattern.
“Then why not use the powerful Linq queries and IQueryable”
This is the main point, in our case you would see action for example like this: GetAllOwners(OwnerParameters params)… And then all the way down in the repository you would find:
_context.Owners
.Skip(param.Skip)
.Take(param.Take)
.Filter(param.Name..)
.Sort(param.SortTerm)… all executed on top of IQueriable, so it will be executed inside the database returning only what you want in the most optimized way.
If the tool is well used, we all can do a lot with it, that is at least the true thing 🙂
I understand, your example is what I mentioned as “Because this gets messy and blown up, sometimes devs then start to create their own query format like GetUsers(userquery).”
It is possible, but how far do you go to support all kind of queries. In the end, you are just competing with Linq 🙂
Hello Tom.
Please, share a repo with an example of your way to work with EF, it’s always interesting saw the both sides.
The main problem returning of IQueryable is that UnitTesting no longer will be working. Because the query which is send to database is no longer controllable with IQueryable. Query code can be contained in Repository, or Service layer, or Controller. In very bad projects it will be contained in client (my colleagues have written some magic code to write queries in WPF-client).
Using IQueryable will speed up your initial development cycle. But maintenance will be a masacre. Why you ask? Because you never knew in which layer your query is contained. It could be possible that your query is splitted. Some parts in Repository, some parts in Controllers. Maybee some parts in a helper class.
If you are using UnitTests and hav IQueryable then you no longer need to wirte UnitTest because they don’t make sense if you use IQueryable.
Do not use IQueryable, except you are the only developer on the project!
Thank you Andreas.
I agree that spreading IQueryable over multiple layers is more complicated, also for Unit Tests.
But the question is: how would you implement use-cases where mutiple layers are extending IQueryable. What is the alternative?
For example:
– UI requests all orders for Customer X with status Open, user wants to sort by Amount.
– Security layer adds filtering to return only orders that the user is allowed to see.
– Another layer adds filtering to return only orders larger than $1000 since the user configured that somewhere in the settings.
– Another layer adds filtering to return only orders that are not Deleted and not older than 5 years.
Well, you get the idea.
We have scenarios like this implemented with IQueryable and it works amazing. In the end, only 1 query is executed by the database and only the data that is needed is returned. Also, layers don’t have to know about each others query logic.
Do you have a repo where you implement .Skip(param.Skip)
.Take(param.Take) ?
Yes, you can search for our Paging article. Also in our WebAPI book we talk in detail about these techniques.
Thank you Andreas.
I agree that spreading IQueryable over multiple layers is more complicated, also for Unit Tests.
But the question is: how would you implement use-cases where mutiple layers are extending IQueryable. What is the alternative?
For example:
– UI requests all orders for Customer X with status Open, user wants to sort by Amount.
– Security layer adds filtering to return only orders that the user is allowed to see.
– Another layer adds filtering to return only orders larger than $1000 since the user configured that somewhere in the settings.
– Another layer adds filtering to return only orders that are not Deleted and not older than 5 years.
Well, you get the idea.
We have scenarios like this implemented with IQueryable and it works amazing. In the end, only 1 query is executed by the database and only the data that is needed is returned. Also, layers don’t have to know about each others query logic.
Hello all! Firstly, thanks for this very nice onion archtiecture guide. I am a big fan of clean architectures because at the end it will be easier to maintain. However, I also understand Marinko’s concern. Sometimes queries are not as easy as getting a list or a single entity model. Instead, they can have numerous joins and other complex queries involved. Often, you end up with a model that looks different than your entity model. As of right now, your OwnerRepository and AccountRepository only return entity models. How would you solve a scenario for which the query would alter the structure of the entity model?
To give you a concrete example, lets say that you need to make a query in the AccountRepository that groups by the DateCreated propery. Essentially, you would end up with a model where each DateCreated would map to a list of accounts. How would you handle that?
You don’t modify the entity model, it should be the representation of your database table. What you do is creating a new DTO which fits your needs and use the service layer to do some business logic to populate that DTO and return it as a result to the controller and to the client. How you are going to execute your business logic is up to you, but that’s exactly why you have the service layer.
That is not going to be performant at all. You want to harness the power of sql queries. Some queries join different tables based on some conditions and do some additional work on top of that. Making individual queries and piecing that together by code could end up in really bad performance.
I don’t agree with that. You can execute your SQL statements in a very proeficient way on top of your existing entity model and then just do some business logic to pack the result in the correct DTO. The bottom line is that your entiries shouldn’t be changed. You can use them to get the data from the db but once the data is fetched, you should use DTO to manipulate your result and send it to the presentation layer.
Okay, quick example based on your article. Let’s say the frontend team wants all accounts where the owner’s date of birth is greater than 18 (DateOfBirth > 18). The Account model can stay as is but instead of the OwnerId property, they want an OwnerName property inside the Account model (replacing the id with the name of the owner).
This is adding a fair amount of complexity that can definetly occur in real life project. How would you do that?
With EF I can just fire off one query than can do exactly that. If I would have to do this in the service layer, I would need to fire off 2 queries, one to get all accounts and one to get all owners and then I need to do some matching to find the Owner for each account.
With n FKs, I would need n queries, plus the computational overhead to piece everything together the way I want the DTO to look like. In EF however, I can do a single query that can do all of that at once. Performance wise, there is a huge difference. Code will always be less performant than a perfect query. That is why we have database engineers, otherwise they would be useless.
What is your solution to that?
The way I handle this is to have a searchcreate parameter to define my searchable terms and allow me to apply validation expressions to the model that is given as a parameter to the controller, and a dto to transfer the search terms to my app service. From my service, I build an expression<func<T,bool>> that can be passed to my repository and used in the .Where. the benefit of this is that the generated query in my app service (business logic on how to search) can be unit tested. My Repo is still responsible for getting the data, but the service is now the thing that defines how to search the data.
FYI: I am not trying to complain about the onion architecture in general. I love the look of the architecture and your detailed article! They are great. I would also like to use it in my next project but I am trying to think of a solution for the type of problem I am seeing here.
Well, I am thinking exactly the same. You can use a single query where you would filter out all the owners older than 18 and then include their accounts. The EF Core would translate that as a single efficient query. So, there are no multiple queries. Just, this happens on the repository layer, on the service layer you would map your result to a proper DTO and return that to a client. For me, this is always a way to go, trying to execute a query as fastest as it can be executed and then maooing that result to a required DTO so it could be transferred to FE. Of course, it is your oroject and you will do it as you like 🙂
Definitely, the Include statement will evaluate the query properly. But I have a question in my mind, is it good as performance? As I know, the include statement selects all fields in the second table (the Account table in this case). Is there a solution to select specific fields from the account table?
From EF Core 5, you can have filtered Include:
context.Owners
.Include(a => a.Accounts.Where(condition))
I agree with you Tom. I think it al depends on the amount of (query) flexibility you need to have from a front-end perspective.
If you have relatively fixed queries that won’t change easily, this architecture would work very well. Obviously you can add some simple sorting and filtering.
If you want a powerful user-interface where the end-user can construct queries easily (filter, sort, include and group on any field), then this won’t really work. Unless you create a query model that is as rich as the IQueryable interface/filter expressions.
Maybe I am a bit biased because I saw this whole DTO architecture imlemented in a project where the end-user needed “free” querying possibilities. It was a total disaster, with an enormous amount of DTO’s and data collection methods. The end-users where frustrated that the architecture couldn’t answer their questions, the devs where frustrated because they spend all their time on creating data collection methods and mapping DTO’s…
Don’t Use EF!! Its a hell trap.