

After successfully learning how to upload files, the logical next step is to learn how to download them as well. That way we can have the complete picture and can apply what we’ve learned in various projects and working with different types of files.
Now, let’s get on with the implementation.
Refactoring the Current Implementation
In this part, since we are adding new functionality, we will first adjust the current implementation. The adjustments will cover the addition of a service that contains all the desired logic for handling files in general. That way, we are improving readability and opening opportunities for extending the service in the future with more file handling operations.

Server-side Refactoring
Currently, we have an upload button in our form for creating a user. When we create a user, the uploaded picture becomes the profile picture. For the sake of simplicity, we will reuse the current implementation and extend it to implement file download. That said, the pictures that we upload during user creation will be the files that we are going to download after.
As a first step, since we’re going to have both upload and download of files, we will go to our API and rename the UploadController to FileController:
[Route("api/[controller]")]
[ApiController]
public class FileController : ControllerBase
{
    // same code here
}
That way we are wrapping up the file handling logic into one controller that contains endpoints for every operation.
Okay, well, that was easy, since we just renamed the controller.
What’s next?
Given that we are focusing on a file download, the next step is to extend the controller with a new endpoint for download operation. At the moment, the method will only return a successful result with a corresponding message:
[Route("api/[controller]")]
[ApiController]
public class FileController : ControllerBase
{
    [HttpPost, DisableRequestSizeLimit]
    [Route("upload")]
    public IActionResult Upload()
    {
        // same code here
    }

    [HttpGet, DisableRequestSizeLimit]
    [Route("download")]
    public IActionResult Download()
    {
        var message = "Download end-point hit!";
        return Ok(new { message });
    }
}
Done. But, what’s worth mentioning here is that we added a Route attribute to both of our endpoints. This step was not necessary, but it will help us in knowing which end-point we actually want to execute from the client side.
For the time being, we will leave the download operation to return only a successful result and, in the meantime, start with the implementation of the client-side. That way, we can have a clearer view of what are the potential needs of a user and how to modify the API to fulfill those needs.
Client-side Refactoring
To begin with, let’s open our client-side project. Since we’ve renamed the controller’s name in the API, we have to reflect those changes to the components on the client-side for everything to work as before. Changing the name to FileController and adding Route, its end-point has changed as well, therefore we have to update the code in the upload.component.ts:
this.http.post('https://localhost:5001/api/file/upload', formData, {reportProgress: true, observe: 'events'})
  .subscribe({
    next: (event) => {
    if (event.type === HttpEventType.UploadProgress)
      this.progress = Math.round(100 * event.loaded / event.total);
    else if (event.type === HttpEventType.Response) {
      this.message = 'Upload success.';
      this.onUploadFinished.emit(event.body);
    }
  },
  error: (err: HttpErrorResponse) => console.log(err)
});
Now we can run the application again and confirm that it is working as if nothing has changed!
Since it is running smoothly, we can continue our refactoring journey. Considering that we’re now covering multiple file operations, it is suggested as one of the best practices to put similar operations like that in a service.
We are going to create a service using a well-known Angular CLI command:
ng g service _service/file --skip-tests
This command will create a service named FileService in a folder named _services, without the test files.
Note: The “_” in the folder name is optional. It only helps us push the folders that we use frequently to the top of the project tree so that we can easily locate them.
The next step is to move the logic for sending an upload request from the upload.component.ts to our newly created file.service.ts:
export class FileService {

  constructor(private http: HttpClient) { }

  public upload(formData: FormData) {
    return this.http.post('https://localhost:5001/api/file/upload', formData, {
        reportProgress: true,
        observe: 'events',
    });
  }
}
And then inject the service to call the new method in upload.component.ts:
export class UploadComponent implements OnInit {
  progress: number;
  message: string;
  @Output() public onUploadFinished = new EventEmitter();

  constructor(private fileService: FileService ) { }

  //The same code here

    this.fileService.upload(formData)
      .subscribe({
        next: (event) => {
          if (event.type === HttpEventType.UploadProgress)
            this.progress = Math.round(100 * event.loaded / event.total);
          else if (event.type === HttpEventType.Response) {
            this.message = 'Upload success.';
            this.onUploadFinished.emit(event.body);
          }
        },
        error: (err: HttpErrorResponse) => console.log(err)
      });
  }
Awesome. Now we can make sure once again that everything works as expected. With this, we are concluding the refactoring part and can safely move on to adding a download component to our client-side project.
Starting with the File Download Operation
Without further ado, let’s continue in the same manner and create a method for file download in our file.service.ts:
public download() {
    return this.http.get('https://localhost:5001/api/file/download', {});
}
While looking at the file.service.ts, we can notice that the first part of the URL for both upload and download methods is the same since the FileService is targeting the FileController on the server-side. That said, we can extract it in a separate variable and access it through interpolation:
private url: string = 'https://localhost:5001/api/file';

constructor(private http: HttpClient) {}

public upload(formData: FormData) {
    return this.http.post(`${this.url}/upload`, formData, {
        reportProgress: true,
        observe: 'events',
    });
}

public download() {
    return this.http.get(`${this.url}/download`, {});
}
After the successful refactoring of the FileService, we will create a component that consumes the service and downloads our file. We will name it, respectfully, DownloadComponent, to match the one for upload that we already have. Angular CLI steps in once more with its command for a component generation:
ng generate component download --skip-tests
or shorter:
ng g c download --skip-tests
This time we can skip the creation of the folder because the CLI will do that for us.
The behavior of the DownloadComponent will follow the general pattern – it will call the FileService, handle the response, and propagate it back to its parent component. To accomplish that, we have to add logic to the download.component.ts that makes it happen:
import { Component, OnInit } from '@angular/core';
import { FileService } from './../_service/file.service';

@Component({
    selector: 'app-download',
    templateUrl: './download.component.html',
    styleUrls: ['./download.component.css'],
})
export class DownloadComponent implements OnInit {
  message: string;
  progress: number;

  constructor(private fileService: FileService) {}

    ngOnInit(): void {}

    download = () => {
        this.fileService.download()
        .subscribe((response) => {
            this.message = response['message'];
        });
    }
}
Also, we have to add the template file code:
<div class="row mb-3 mt-3">
  <div class="col-md-3">
    <button type="button" class="btn btn-success" (click)="download()">Download File</button>
  </div>
  <div class="col-md-4">
    <span class="download" *ngIf="progress > 0">
      {{progress}}%
    </span>
    <span class="download">
      {{message}}
    </span>
  </div>
</div>
With this, we can wrap up the implementation of the download operation. Now, let’s adjust our application to actually call the download method by listing the desired files for download.
Listing files for Download on the UI
To choose a file to download, we first need to list those files somewhere in the application and trigger the download request with the help of the UI components.
Reading Files From the User List
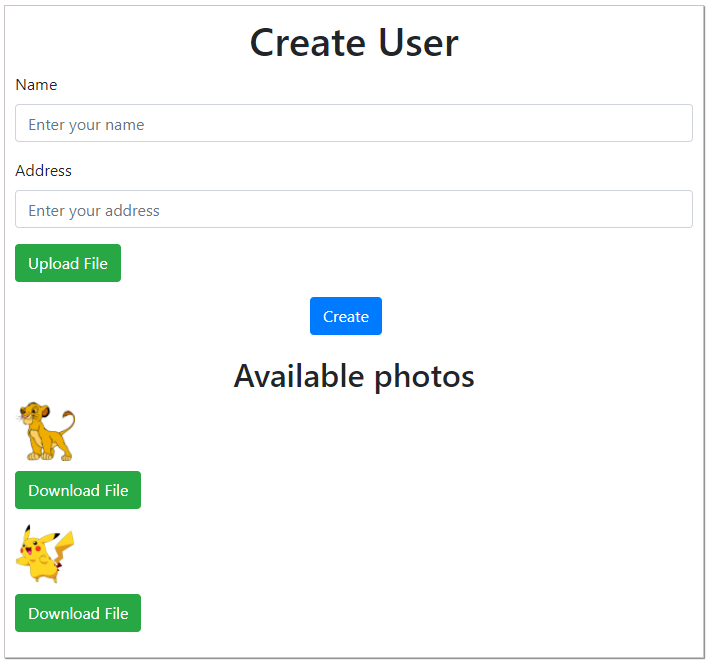
As mentioned in the beginning, we will load a list of users from the database and take their corresponding profile pictures. But to have something to show, we first need to create some users. On the homepage of the application, by entering credentials and uploading a picture, we can successfully create a User.
When we add a user, the profile picture will also automatically appear in a folder inside our application. That way we won’t have any problems reading those files and showing them on the UI. For the sake of simplicity, we will show them below the user creation form. Each photo in the list will have an associated download button which will trigger the download for that particular file.
For the realization of the idea of iterating through a list of users, we first need to load the users from the database. Luckily, we already have a method in the app.component.ts that does that for us so we will just call it in the initialization method:
ngOnInit() {
    this.isCreate = true;
    this.getUsers();
}
After that, we will list the users’ photos in the app.component.html under the form, in the first section of the page:
<section>
<!-- same code here -->
    </form>
    <div class="photos" *ngIf="users.length > 0">
        <h2>Available photos</h2>
        <div *ngFor="let user of users" class="photo">
            <img [src]="createImgPath(user.imgPath)" style="width:60px; height:60px;">
            <app-download></app-download>
        </div>
    </div>
</section>
<!-- same code here -->
Here, we also added the selector for the DownloadComponent so its template renders next to each profile picture.
And add a bit of CSS to the app.component.css:
.photos {
    margin-top: 20px;
}

.photo {
    margin-bottom: 5px;
}
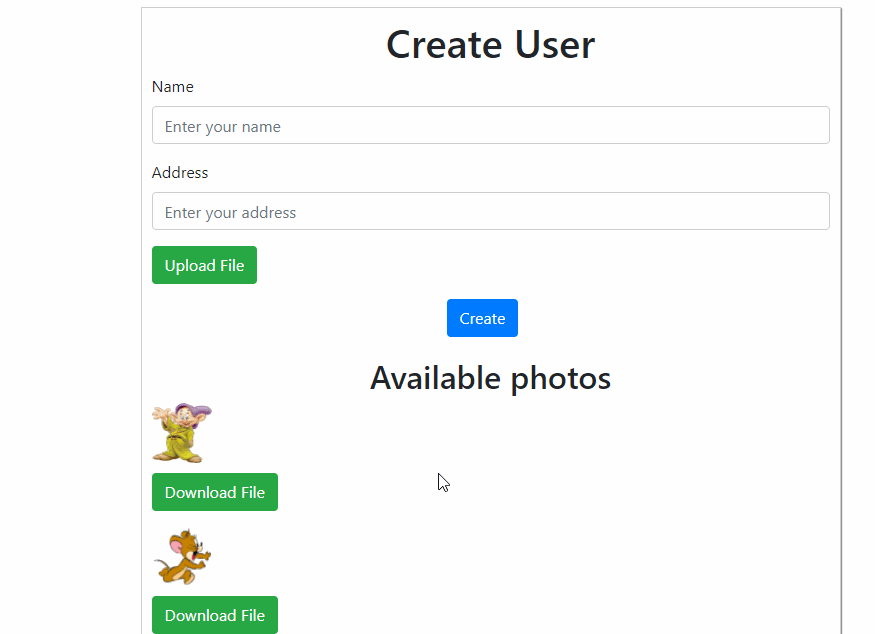
After starting the application again, we can see the profile pictures loaded on the UI:
By clicking the download button, we will get a message that we have hit the download end-point:

With this implementation, we are manipulating the user data that we read from the database, selecting image properties, and showing them. But what if we want to read the files directly from a folder?
Let’s cover that part too.
Reading Files From a Folder
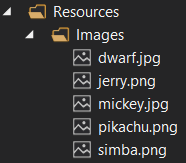
To be able to read from a folder, we need its path. Since the files belong to the project, we can combine the path using the project’s current directory and the folder name that we initially defined. When we access the desired folder, we pick up the files with specific extensions since we only want pictures. That way we will get paths for each file and render them on the UI as we do now by reading from the database.
Firstly, we are going to add a new end-point to our FileController.cs called “GetPhotos”, whose route will be, respectfully, “getPhotos”. We will fill it with the necessary logic for reading .jpg, .jpeg and .png files from a folder in the solution.
Note: If the only photos in the folder are the ones associated with users, try to add more files so that there is a clear difference between these two approaches. Also, try to add a file with an extension different from the one that we’re looking for here.
The updated FileController.cs now contains the new logic for reading the photos:
[HttpGet, DisableRequestSizeLimit]
[Route("getPhotos")]
public IActionResult GetPhotos()
{
    try
    {
        var folderName = Path.Combine("Resources", "Images");
        var pathToRead = Path.Combine(Directory.GetCurrentDirectory(), folderName);
        var photos = Directory.EnumerateFiles(pathToRead)
            .Where(IsAPhotoFile)
            .Select(fullPath => Path.Combine(folderName, Path.GetFileName(fullPath)));

        return Ok(new { photos });
    }
    catch (Exception ex)
    {
        return StatusCode(500, $"Internal server error: {ex}");
    }
}

private bool IsAPhotoFile(string fileName)
{
    return fileName.EndsWith(".jpg", StringComparison.OrdinalIgnoreCase)
        || fileName.EndsWith(".jpeg", StringComparison.OrdinalIgnoreCase)
        || fileName.EndsWith(".png", StringComparison.OrdinalIgnoreCase);
}
Showing Files From a Folder on the UI
For using it on the client-side, we need to add the corresponding method to the file.service.ts as well:
public getPhotos() {
    return this.http.get(`${this.url}/getPhotos`);
}
The next step is calling the method in our app.component.ts:
public photos: string[] = [];

constructor(private http: HttpClient, private fileService: FileService) { }

ngOnInit() {
    this.isCreate = true;
    this.getPhotos();
}

private getPhotos = () => {
    this.fileService.getPhotos().subscribe(data => this.photos = data['photos']);
}

public returnToCreate = () => {
    this.isCreate = true;
    this.name = '';
    this.address = '';
    this.getPhotos();
}
Firstly we add the photos property and inject the FileService inside the component. Then, the first call of the function in the initialization function so that we load the list of photos when we access the home page for the first time. The second call is in the returnToCreate() function. Since successful user creation triggers that method, we expect a refreshed list every time we add a new user and its photo. Lastly, we can delete the unnecessary getUsers() call from the initialization function.
Finally, reference the list of URLs on the UI instead of the list of users and show it if it’s not empty:
<div class="photos" *ngIf="photos.length > 0">
    <h2>Available photos</h2>
    <div *ngFor="let photo of photos" class="photo">
        <img [src]="createImgPath(photo)" style="width:60px; height:60px;">
        <app-download></app-download>
    </div>
</div>
By comparing the files in the Images folder and the ones on the UI, we can see that all photos with the desired extension are shown and not only the ones that belonged to users:
Now that we have our files ready on the UI, they are ready for download as well. Stay tuned for the next part.
Finishing up the File Download Operation
By clicking the download button, we expect that the picture associated with that specific button gets downloaded. To differentiate which file will be downloaded, we need to send some data to the server. The idea is simple: pass the file URL from the form to the file.service.ts and then receive it in the FileController.cs. Passing the URL, we know exactly which file will be downloaded since the URL contains the extension as well. The mentioned implementation requires changes in both the client and server parts.
Client-side Update
On the client part, we are going to extend the download method by passing the URL as a parameter. Since the DownloadComponent exists separately, we will have to pass the data somehow. For that, we will use Angular’s Input decorator. It provides us with the possibility to pass any data from the parent to the child component – in this case, from AppComponent to DownloadComponent. The URL of the file will be passed to the back-end as a query parameter.
Now let’s make the needed adjustments which will be covered in several files.
First, let’s update the download function in the file.service.ts:
public download(fileUrl: string) {
    return this.http.get(`${this.url}/download?fileUrl=${fileUrl}`, {
        reportProgress: true,
        responseType: 'blob',
    });
}
Then, respectfully, the download.component.ts in which the method is called:
@Input() public fileUrl: string;

ngOnInit(): void {}

download() {
    this.fileService.download(this.fileUrl).subscribe((response) => {
        this.message = response['message'];
    });
}
And finally, pass the desired URL from the app.component.html:
<div *ngFor="let photo of photos" class="photo">
    <img [src]="createImgPath(photo)" alt="profile picture" style="width:60px; height:60px;">
    <app-download [fileUrl]="photo"></app-download>
</div>
Server-side Update
What’s left updating is the server-side FileService.cs too:
[HttpGet, DisableRequestSizeLimit]
[Route("download")]
public async Task<IActionResult> Download([FromQuery] string fileUrl)
{
    var filePath = Path.Combine(Directory.GetCurrentDirectory(), fileUrl);

    if (!System.IO.File.Exists(filePath))
        return NotFound();

    var memory = new MemoryStream();
    await using (var stream = new FileStream(filePath, FileMode.Open))
    {
        await stream.CopyToAsync(memory);
    }
        memory.Position = 0;

        return File(memory, GetContentType(filePath), filePath);
}
...
private string GetContentType(string path)
{
    var provider = new FileExtensionContentTypeProvider();
    string contentType;

    if (!provider.TryGetContentType(path, out contentType))
    {
        contentType = "application/octet-stream";
    }

    return contentType;
}
Looking at the code, there is nothing that we haven’t seen before. When we pass the URL parameter, we combine it with the directory in which our pictures are saved and read the file from that specific location. Later on, we copy the content of the file to a stream and return it to the client as a File. What could be worth mentioning is the FileExtensionContentTypeProvider class which helps us get the MIME type of the file in one line of code.
Wrapping up the File Download
And yes, we have to handle the data returned from the API. We are going to do it in a way that downloads the photo automatically.
So, let’s first modify the download function inside the file.service.ts file:
public download(fileUrl: string) {
  return this.http.get(`${this.url}/download?fileUrl=${fileUrl}`, {
    reportProgress: true,
    observe: 'events',
    responseType: 'blob'
  });
}
Next, let’s modify the download.component.ts file:
download = () => {
    this.fileService.download(this.fileUrl).subscribe((event) => {
        if (event.type === HttpEventType.UploadProgress)
            this.progress = Math.round((100 * event.loaded) / event.total);
        else if (event.type === HttpEventType.Response) {
            this.message = 'Download success.';
            this.downloadFile(event);
        }
    });
}

private downloadFile = (data: HttpResponse<Blob>) => {
    const downloadedFile = new Blob([data.body], { type: data.body.type });
    const a = document.createElement('a');
    a.setAttribute('style', 'display:none;');
    document.body.appendChild(a);
    a.download = this.fileUrl;
    a.href = URL.createObjectURL(downloadedFile);
    a.target = '_blank';
    a.click();
    document.body.removeChild(a);
}
The reason why we are manipulating the DOM in this manner is that we want to save the user from doing any more work by downloading the file automatically. To achieve that, first, we create an anchor element. Then we hook the downloaded BLOB and the URL of the file to its properties.
Finally, we want to style our message a bit in the download.component.css file:
.download {
  font-weight:bold;
  color:#28a745;
  margin-left: 15px;
  line-height: 36px;
}

div {
  margin-top: 5px;
}
After all of the changes, we can test our functionality:
Nice job.
Conclusion
File download is a very common requirement nowadays since we are manipulating hundreds of data every day. As an extension to the first article about the file upload, this way we can conclude this topic and be sure we can successfully cover any obstacle that comes our way regarding file manipulation in the browser. The process includes a few simple steps which we learned in this article:
- Listing files from a database or a folder
- Generating a download request to the server
- And, finally, automatically downloading a file to our local folder.
is there any way you can to add the “Delete” functionality
I think this features is very important
[HttpDelete, DisableRequestSizeLimit]
[Route(“delete”)]
public async Task<IActionResult> Delete([FromQuery] string fileUrl)
{
var message = “Delete end-point hit!”;
var filePath = Path.Combine(Directory.GetCurrentDirectory(), fileUrl);
if (!System.IO.File.Exists(filePath))
return NotFound();
System.IO.File.Delete(filePath);
//return File(memory, GetContentType(filePath), filePath);
return Ok(new { message });
}
delete = () => {
this.fileService.delete(this.fileUrl).subscribe((event) => {
if (event.type === HttpEventType.UploadProgress)
this.progress = Math.round((100 * event.loaded) / event.total);
else if (event.type === HttpEventType.Response) {
this.message = ‘Delete` success.’;
//this.downloadFile(event);
this.onDeleteFinished.emit(event.body);
}
});
}
public delete(fileUrl: string) {
return this.http.delete(
</span><span style="color: rgb(86, 156, 214);">${this</span>.<span style="color: rgb(156, 220, 254);">url</span><span style="color: rgb(86, 156, 214);">}</span><span style="color: rgb(206, 145, 120);">/delete?fileUrl=</span><span style="color: rgb(86, 156, 214);">${</span><span style="color: rgb(156, 220, 254);">fileUrl</span><span style="color: rgb(86, 156, 214);">}</span><span style="color: rgb(206, 145, 120);">, {reportProgress: true,
observe: ‘events’,
});
}
Bom exemplo. Obrigado!
likt to github repo doesn’t work ” Download Files with ASP.NET Core and Angular repository”
I am sorry for that, we forgot to make it public. It will be fixed ASAP.