

In the previous article, we learned how to create user registration logic with Angular and ASP.NET Core Web API. But, we are missing some pieces of the puzzle. Firstly, we don’t have the confirm password logic implemented and secondly, we are not handling our Identity errors properly. So in this article, we are going to learn how to use custom validators in angular to handle password confirmation logic.
Additionally, we are going to introduce the HTTP interceptor that will help us handle and display error messages on the Registration page (on the Login page as well – once we create it).
Furthermore, we are going to learn how to modify the password and email configurations by using the ASP.NET Core Identity Options.

For complete navigation through the entire series, you can visit the Angular Security with ASP.NET Core Identity page.
Let’s get going.
Adding Registration Link to the Menu
Right now, if we want to navigate to the Registration page, we have to type the URI in the browser. Of course, this is not what we want.
So, to fix this, we have to modify the menu.html.component file:
<nav class="navbar navbar-expand-lg navbar-dark bg-dark">
    ...
    <div class="collapse navbar-collapse" id="navbarSupportedContent">
      <ul class="navbar-nav mr-auto">
        ...
      </ul>
      <form class="d-flex">
        <ul class="navbar-nav mr-auto mt-2 mt-lg-0">
          <li class="nav-item">
            <a class="nav-link"[routerLink]="['/authentication/register']" routerLinkActive="active"
              [routerLinkActiveOptions]="{exact: true}">Register</a>
          </li>
        </ul>
      </form>
    </div>
</nav>
With this in place, as soon as we start our Angular application, we are going to see the Registration link. Once we click on it, the Registration page displays:
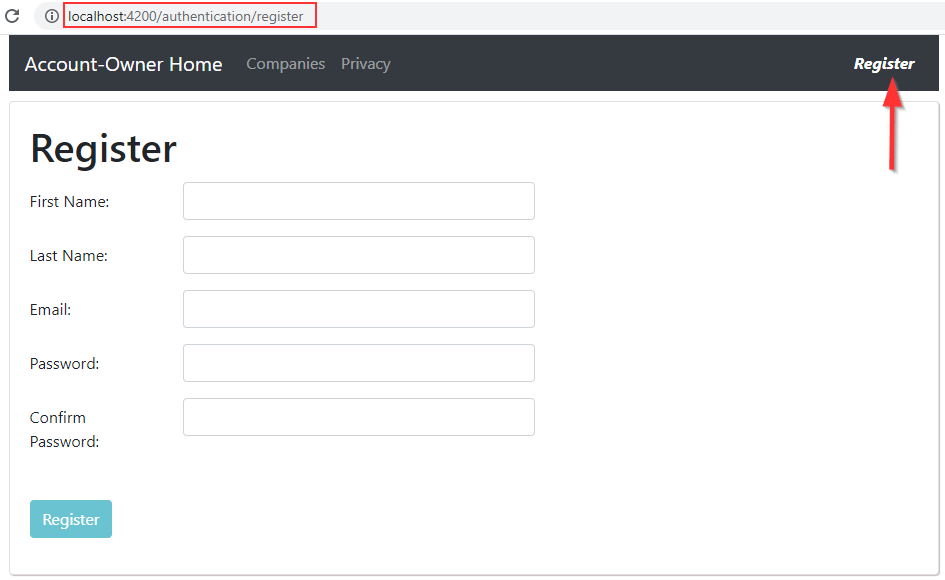
Now, we can move on and implement custom validators in our application.
Using Custom Validators for the Password Confirmation
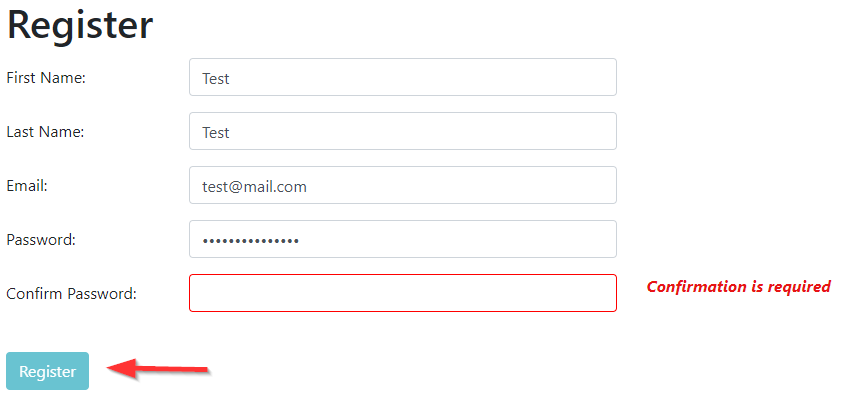
If we populate all the fields on the registration form, but add different values for the Password and Confirm Password fields and press the Register button, we are going to see that our API returns an appropriate error message:

This is great, but it would be even better if we could display that message to the user before they send the request to the server.
To do that, we can add custom validators to validate our Confirm Password field.
That said, let’s create another service in the shared folder:
ng g service shared/custom-validators/password-confirmation-validator --skip-tests
Now, let’s implement the validation logic:
import { Injectable } from '@angular/core';
import { AbstractControl, ValidatorFn } from '@angular/forms';

@Injectable({
  providedIn: 'root'
})
export class PasswordConfirmationValidatorService {

  constructor() { }

  public validateConfirmPassword = (passwordControl: AbstractControl): ValidatorFn => {
    return (confirmationControl: AbstractControl) : { [key: string]: boolean } | null => {

      const confirmValue = confirmationControl.value;
      const passwordValue = passwordControl.value;

      if (confirmValue === '') {
          return;
      }

      if (confirmValue !== passwordValue) {
          return  { mustMatch: true }
      }

      return null;
    };
  }
}
Because we are going to send a parameter to this custom validator, we are using the validateConfirmPassword factory function (a function that returns a function). This function accepts the password control as a parameter and returns the function of ValidatorFn type. Then, the second function – the one we return, accepts the confirm password control as a parameter. Inside it, we extract the values from both controls.
If the Confirm Password control is empty, we just exit the function. If the values of the Password and Confirm Password controls are different, we return an object with the name of the error (mustMatch) and the value (true). Finally, if nothing is true, we return null.
Now, we have to modify the ngOnInit function in the register-user.component.ts file:
constructor(private authService: AuthenticationService, private passConfValidator: PasswordConfirmationValidatorService) { }

ngOnInit(): void {
  this.registerForm = new FormGroup({
    firstName: new FormControl(''),
    lastName: new FormControl(''),
    email: new FormControl('', [Validators.required, Validators.email]),
    password: new FormControl('', [Validators.required]),
    confirm: new FormControl('')
  });
  this.registerForm.get('confirm').setValidators([Validators.required,
    this.passConfValidator.validateConfirmPassword(this.registerForm.get('password'))]);
}
Here, we inject the PasswordConfirmationValidatorService in the constructor. Then, after we create our FormGroup object, we extract the confirm control and add two validators to it by calling the setValidators function. The first validator is the required validator, and the second is our custom one.
Finally, we have to modify the register-user.component.html file:
<div class="form-group row">
    <label for="confirm" class="col-form-label col-sm-2">Confirm Password:</label>
        <div class="col-md-5">
            <input type="password" id="confirm" formControlName="confirm" class="form-control" />
        </div>
        <div class="col-md-5">
            <em *ngIf="validateControl('confirm') && hasError('confirm', 'required')">Confirmation is required</em>
            <em *ngIf="hasError('confirm', 'mustMatch')">Passwords must match</em>
        </div>
</div>
Notice that we use the mustMatch name for the confirmation error.
Testing the Password Confirmation
Now, let’s try to populate all the fields except the Confirm Password:
We can see our form is invalid.
Also, let’s try to populate the Confirm Password field with a value different from the Password field:
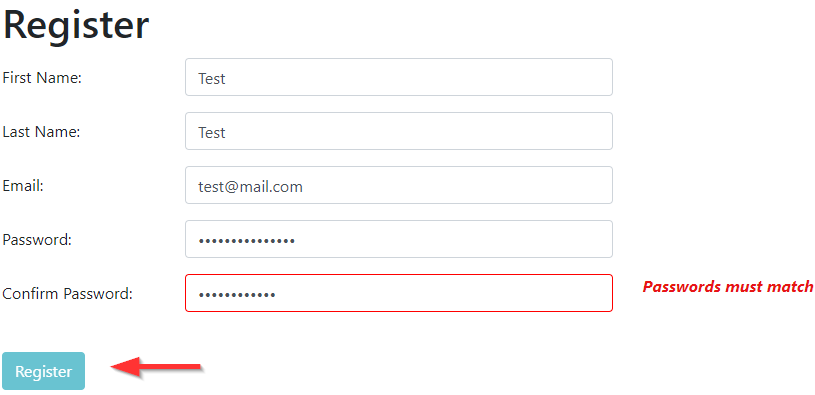
Our form is still invalid, but this time, we can see a different message.
Of course, once we type the correct value in the Confirm Password field, we are going to have a valid form.
Handling ASP.NET Core Identity Errors in Angular with HTTP Interceptor
If our user provides invalid data in the registration form, ASP.NET Core Identity rules will apply and prevent the registration action. Also, our API will return the response with all the errors. For now, we are just logging these errors to the console window, but we are about to change that.
Let’s start with a new ErrorHandling service:
ng g service shared/services/error-handler --skip-tests
What we want to do is to intercept the response from the Web API and check if it contains errors. If it does, we are going to check the status code of that error and provide a valid message.
So, let’s modify the service:
import { Injectable } from '@angular/core';
import { HttpInterceptor, HttpRequest, HttpHandler, HttpEvent, HttpErrorResponse } from '@angular/common/http';
import { Observable, throwError } from 'rxjs';
import { catchError } from 'rxjs/operators';
import { Router } from '@angular/router';

@Injectable({
  providedIn: 'root'
})
export class ErrorHandlerService implements HttpInterceptor {

  constructor(private router: Router) { }
  intercept(req: HttpRequest<any>, next: HttpHandler): Observable<HttpEvent<any>> {
    return next.handle(req)
    .pipe(
      catchError((error: HttpErrorResponse) => {
        let errorMessage = this.handleError(error);
        return throwError(() => new Error(errorMessage));
      })
    )
  }
}
Our service must implement the HttpInterceptor interface and its intercept function. In the intercept function, we handle the request and catch the possible error with the catchError operator from rxjs. Inside, we call the handleError function to extract the error message and emit the error message with the throwError function.
Now, we need to implement a missing function:
private handleError = (error: HttpErrorResponse) : string => {
  if(error.status === 404){
    return this.handleNotFound(error);
  }
  else if(error.status === 400){
    return this.handleBadRequest(error);
  }
}

private handleNotFound = (error: HttpErrorResponse): string => {
  this.router.navigate(['/404']);
  return error.message;
}

private handleBadRequest = (error: HttpErrorResponse): string => {
  if(this.router.url === '/authentication/register'){
    let message = '';
    const values = Object.values(error.error.errors);
    values.map((m: string) => {
       message += m + '<br>';
    })

    return message.slice(0, -4);
  }
  else{
    return error.error ? error.error : error.message;
  }
}
In the handleError function, we check the status code of the error and call the appropriate function. As we can see, if the status code is 404, we redirect the user to the 404 page. But if it is 400 – BadRequest, we check the URI of the request. If it is the registration URI, we extract the messages and make a single string from them. Otherwise, we just return a message.
After the service implementation, we have to import it in the app.module.ts file:
import { HttpClientModule, HTTP_INTERCEPTORS } from '@angular/common/http';
Additionally, we have to modify the providers array in the same file:
providers: [
  {
    provide: HTTP_INTERCEPTORS,
    useClass: ErrorHandlerService,
    multi: true
  }
],
We have to provide the HTTP_INTERCEPTORS injection token with the class to instantiate the token.
Showing Error on the Page
To show the errors from the API’s response, we have to modify the register-user.component.ts file:
export class RegisterUserComponent implements OnInit {
  public registerForm: FormGroup;
  public errorMessage: string = '';
  public showError: boolean;

  ...

  public registerUser = (registerFormValue) => {
    this.showError = false;
    const formValues = { ...registerFormValue };

  ...

 this.authService.registerUser("api/accounts/registration", user)
 .subscribe({
    next: (_) => console.log("Successful registration"),
    error: (err: HttpErrorResponse) => {
      this.errorMessage = err.message;
      this.showError = true;
    }
  })
}
Nothing too fancy here. If the ErrorHandler service emits the error message, we catch it in the error part and populate the errorMessage property, and set the showError property to true. Also, once we click the Register button, we set the showError property to false.
Of course, we need to modify the register-user.component.html file:
<div class="card">
    <div class="card-body">
        <h1 class="card-title">Register</h1>

        <div *ngIf="showError" class="alert alert-danger" role="alert">
            <span [innerHTML]="errorMessage"></span>
        </div>
...
Finally, we can test this:
Excellent.
The error messages are in place.
Modifying Identity Options
As we can see from the previous example, our password must fulfill certain default rules to be valid. But, if we want, we can modify them to fit our needs.
To do that, we have to modify the AddIdentity method inside the Program class.
We have different properties that we can play with. For the example’s sake, let’s require a password that must be at least 7 characters without digits. Also, we are going to require a unique email to prevent user registration with an already used email address:
builder.Services.AddIdentity<User, IdentityRole>(opt =>
{
    opt.Password.RequiredLength = 7;
    opt.Password.RequireDigit = false;

    opt.User.RequireUniqueEmail = true;
}).AddEntityFrameworkStores<RepositoryContext>();
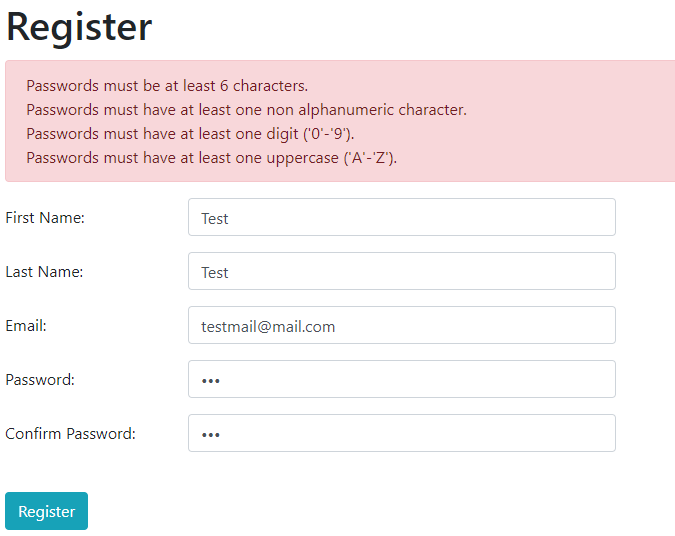
Now, if we test this with an invalid password, we are going to get different warnings:
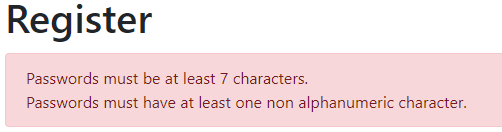
Nicely done.
Moreover, let’s use a proper password but also the email that already exists in the database:
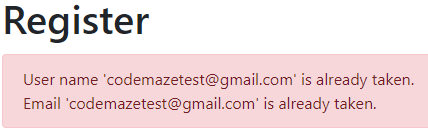
As a result, we can see error messages.
Of course, messages like this could be a potential security risk. You can read more about it in our article on this topic.
Conclusion
Right now, we have completed our user registration functionality. We have learned how to properly handle errors and how to use custom validators in our Angular application to validate password confirmation. Furthermore, we now know how to modify default Identity Options and customize them to our needs.
In the next article, we are going to learn about Login and Logout actions with Angular and ASP.NET Core Identity.
So, see you there.
Thank you so much for this guide! I cannot express to you how invaluable this has been.
I just want to add one bug I have found, if the 2 passwords match and then you go back and alter the password again, the validator is not run again and so we do not see the validation error and you can submit the form. Additionally, if we fill out the confirm first and then the password, the validator again does not run and so it will say passwords do not match even if they do indeed match. I fixed this by modifying the validateControl method as follows:
validateControl(controlName: string) { if (controlName == 'password') // added this and the following line this.registerForm.get('confirm')?.updateValueAndValidity(); return this.registerForm.get(controlName)?.invalid && this.registerForm.get(controlName)?.touched; }Thank you Asheq. It is so nice of you to share your solution.
Hi,
I use the latest angular and the [ confirmValue === ”” ] part in the PasswordConfirmationValidator service does not work.
return; ==> I always got an error: “Type ‘undefined’ is not assignable to type ‘{ [key: string]: boolean; } | null’.”
Can you help me? What should I replace the line with?
Hello Boldo. The best suggestion I can give you is to download our source code and compare it to yours. I’ve used this example with Angular 14 (in my personal project) and everything worked without a problem. To be honest, your error sounds familiar to me but there is no way that I could remember what caused it at that time. So the best option for you is to use our source code and see where the differences are.
First of all thank you for the course. It helps me alot learning Angular.
I ran into an error which I cant seem to fix.
The error occurs in the function private handleBadRequest
I’m using Angular 14 where i ran into different error’s which i was able to fix but i’m stuck on this one.
Hi. This article and all in this series use Angular 13 for the client app, so I am not sure why you had previous errors since the code shouldn’t be any different in Angular 14. That said, I am not sure why you have this error, and to be honest I have no idea what type of error this is. The values variable should be an array and like that, you should be able to call the map function on it.
Thank you for your quick response.
The message i get is:
Argument of type ‘(m: string) => void’ is not assignable to parameter of type ‘(value: unknown, index: number, array: unknown[]) => void’.
Types of parameters ‘m’ and ‘value’ are incompatible.
Type ‘unknown’ is not assignable to type ‘string’.ts(2345)
maybe this clear things up
You probably didn’t use the –strict false option on the application creation and now Angular wants you to strongly define each variable. And since the values variable is of type unknown[] it cant use the m variable as a string.
I think, but I didn’t try them, there are two solutions. Either don’t use m: string, but just m. Or, and I would suggest, disabling the strict mode, and setting it to false. I think it is in tsconfig file, but try searching for it.
Hi Man!
Thanks for This Amazing Resources. Codemaze is Best.
Why You add Register link within a Form in “Adding Registration Link to the Menu”.
Is There’s Specific Reason Like Best Practice .. etc.
Hello. You are very welcome and thank you too for all the kind words. Regarding your question, no this is not the best practice or anything similar. To be honest I am not a CSS guru so it was the easiest way for me, at that moment, to push the link to the right using Bootstrap classes 🙂 🙂
Thanks for Reply.
Basically I am not Talking About CSS Classes.
I am Talking About html Form Element.
Yes I understood that. Just I wanted to say, that I saw the bootstraps navigation menu example and just used it as is. It had similar setup.