

Authorization is a security mechanism that determines a user’s access level to a resource. We often need to implement custom authorization logic per the rules set by the organization or a project.
In this article, we will learn how to implement a custom authorization attribute in ASP.NET Core.
While we go in-depth in this article with custom authorization attributes, we have introductory articles on Custom Attributes and Generic Attributes if these are new topics to you.

To learn more about role-based authorization, please refer to Angular Role-Based Authorization with ASP.NET Core Identity and Role-Based Authorization with Blazor WebAssembly.
VIDEO: Custom Authorization and Policy-Based Authorization in .NET.
Custom Authorize Attribute
ASP.NET Core provides filters to execute user-defined code before or after an action method. One of those filters that helps in authorizing the request before the action method invokes it is the IAuthorizationFilter.
Now, let’s make use of this filter and implement a simple custom authorization attribute.
Implement a Simple Custom Authorize Attribute
IAuthorizationFilter exposes a single OnAuthorization() method that executes every time before an action method invokes:
void OnAuthorization(AuthorizationFilterContext context);
So, to create a custom authorization attribute, we can create an attribute that inherits from the IAuthorizationFilter interface and implement the OnAuthorization() method:
public sealed class CustomAuthorizeAttribute : Attribute, IAuthorizationFilter
{
    public void OnAuthorization(AuthorizationFilterContext context)
    {
        if (context != null)
        {
            // Auth logic
        }
    }
}
We can use this attribute over an action method or controller. Now the action method doesn’t execute unless the authorization check is successful within the OnAuthorization() method:
[HttpGet]
[CustomAuthorize]
public IEnumerable<WeatherForecast> Get()
{
    return Enumerable.Range(1, 5).Select(index => new WeatherForecast
    {
        Date = DateOnly.FromDateTime(DateTime.Now.AddDays(index)),
        TemperatureC = Random.Shared.Next(-20, 55),
        Summary = Summaries[Random.Shared.Next(Summaries.Length)]
    })
    .ToArray();
}
This is a good approach, but sometimes we need to inject external dependencies within the filter to perform authorization logic. For example, to retrieve the logged-in user’s claims, we would inject IHttpContextAccessor to access the claims:
public class CustomAuthorizeAttribute : Attribute
{
    private readonly IEnumerable<Claim> _claims;

    public CustomAuthorizeAttribute(IHttpContextAccessor httpContextAccessor)
    {
        _claims = httpContextAccessor.HttpContext.User.Claims;
    }
}
The drawback of the simple approach we discussed is that we cannot inject external dependencies into the filter. This is because attributes must have their constructor parameters supplied when we use them.
This is where we can make use of the TypeFilterAttribute. It has an ImplementationType property of System.Type data type, which initializes via the constructor:
public class TypeFilterAttribute : Attribute, IFilterFactory, IOrderedFilter
{
    public TypeFilterAttribute(Type type)
    {
        ImplementationType = type ?? throw new ArgumentNullException(nameof(type));
    }

    public Type ImplementationType { get; }

    // ...more code omitted for brevity
}
This TypeFilterAttribute uses Microsoft.Extensions.DependencyInjection.ObjectFactory to instantiate ImplementationType , rather than resolving from an IoC container. With this, we can now define dependencies with the attribute, and the runtime takes care of the dependency injection.
Now, by combining both IAuthorizationFilter and TypeFilterAttribute, we can create a custom AuthorizeAttribute that supports injecting external dependencies.
Let’s now look at this in practice.
Implement a Custom Authorize Attribute With Dependencies
Now, let’s implement a simple custom authorize attribute that verifies the HTTP request for a custom session header passed.
First, we spin up an ASP.NET Core Web API project and configure the HttpContextAccessor for dependency injection in the Program.cs file:
builder.Services.AddHttpContextAccessor();
After that, we define the SessionRequirementFilter:
public class SessionRequirementFilter : IAuthorizationFilter
{
    private readonly IHttpContextAccessor _httpContextAccessor;

    public SessionRequirementFilter(IHttpContextAccessor httpContextAccessor)
    {
        _httpContextAccessor = httpContextAccessor;
    }

    public void OnAuthorization(AuthorizationFilterContext context)
    {
        if (!_httpContextAccessor.HttpContext!.Request.Headers["X-Session-Id"].Any())
        {
            context.Result = new UnauthorizedObjectResult(string.Empty);
            return;
        }
    }
}
We inherit from IAuthorizationFilter and implements the OnAuthorization method where we check for the existence of the custom session header X-Session-Id in the request. As you have noticed, we are injecting the IHttpContextAccessor for accessing the HttpContext.
Next, we create an attribute that inherits from TypeFilterAttribute:
public class SessionRequirementAttribute : TypeFilterAttribute
{
    public SessionRequirementAttribute() : base(typeof(SessionRequirementFilter))
    {
    }
}
Inheriting from TypeFilterAttribute allows us to pass the SessionRequirementFilter class that executes when we use this attribute.
Finally, we can decorate the attribute over the autogenerated WeatherForecast controller’s Get() method:
[HttpGet("WithCustomAuthorizeAttribute")]
[SessionRequirement]
public IEnumerable<WeatherForecast> Get()
{
    return Enumerable.Range(1, 5).Select(index => new WeatherForecast
    {
        Date = DateOnly.FromDateTime(DateTime.Now.AddDays(index)),
        TemperatureC = Random.Shared.Next(-20, 55),
        Summary = Summaries[Random.Shared.Next(Summaries.Length)]
    })
    .ToArray();
}
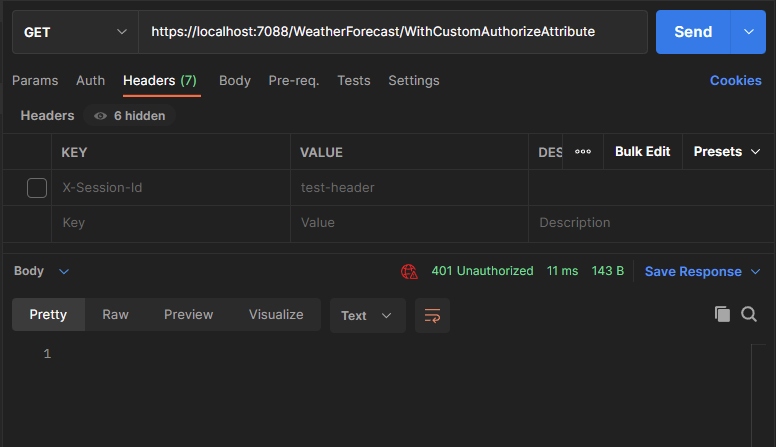
Let’s execute the code now without passing the X-Session-Id header. The Get() method doesn’t invoke and instead returns an Unauthorized (401) response:
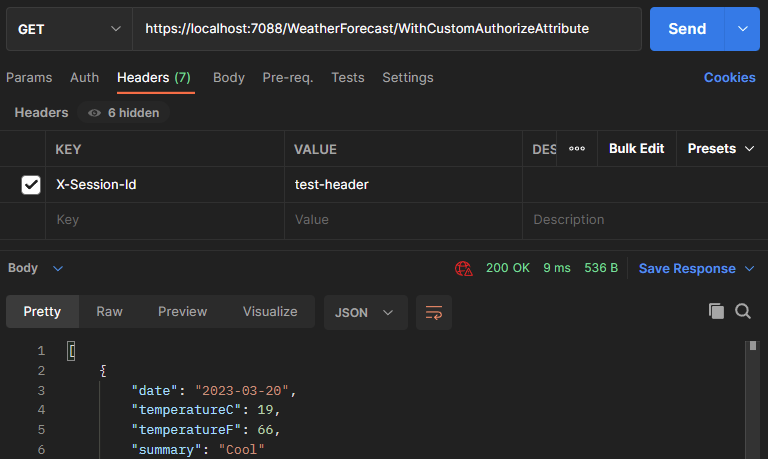
On the other hand, if we add the session header, we get the response with an OK(200) HTTP status code:
Policy-Based Authorization
While we can use custom authorize attributes for building authorization logic, Microsoft recommends Policy-Based Authorization for building custom authorization. Policy-Based Authorization decouples authorization and application logic and provides a flexible, reusable, and extensible security model in ASP.NET Core.
We need to know three concepts to implement a Policy-Based Authorization:
- Policies
- Requirements
- Handlers
A policy comprises several requirements. A requirement is a class that accepts parameters to validate against the authorization logic. Lastly, an Authorization handler holds the logic to validate a policy based on the requirements added to it.
Now, let’s put this into practice. We will implement the same authorization check we did in the previous section to verify the HTTP request for a custom session header passed.
Implement Policy-Based Authorization
Firstly, let’s create a requirement for the session header validation:
public class SessionRequirement : IAuthorizationRequirement
{
    public SessionRequirement(string sessionHeaderName)
    {
        SessionHeaderName = sessionHeaderName;
    }

    public string SessionHeaderName { get; }
}
Requirements must implement the empty marker interface IAuthorizationRequirement. We also accept a constructor parameter to pass in the name of the session header we want to check the existence for.
Next, we create a handler that holds the authorization logic:
public class SessionHandler : AuthorizationHandler<SessionRequirement>
{
    private readonly IHttpContextAccessor _httpContextAccessor;

    public SessionHandler(IHttpContextAccessor httpContextAccessor)
    {
        _httpContextAccessor = httpContextAccessor;
    }

    protected override Task HandleRequirementAsync
        (AuthorizationHandlerContext context, SessionRequirement requirement)
    {
        var httpRequest = _httpContextAccessor.HttpContext!.Request;

        if (!httpRequest.Headers[requirement.SessionHeaderName].Any())
        {
            context.Fail();
            return Task.CompletedTask;
        }

        context.Succeed(requirement);

        return Task.CompletedTask;
    }
}
To create an authorization handler, we inherit from AuthorizationHandler<TRequirement>. This ensures the invocation of the authorization handler for the requirement type TRequirement.
We then implement the HandleRequirementAsync() method of AuthorizationHandler class. This accepts the authorization context and the requirement instance itself. We then get the header name from the SessionRequirement instance and validates it with the external IHttpContextAccessor service injected via constructor.
After we evaluate the requirement, we then call the Succeed() method on the AuthorizationHandlerContext instance and pass the requirement instance as a parameter to the method. This marks that the requirement is successful.
On the other hand, we use the Fail() method on the AuthorizationHandlerContext instance to mark that the requirement is unsuccessful. This blocks further access to the requested resource.
Next, let’s register the handler with the services collection:
builder.Services.AddSingleton<IAuthorizationHandler, SessionHandler>();
Now we can register the policy with the Authorization services:
builder.Services.AddAuthorization(options =>
{
    options.AddPolicy("SessionPolicy", policy =>
    {
        policy.Requirements.Add(new SessionRequirement("X-Session-Id"));
    });
});
Here, we create a policy named SessionPolicy and configure the associated requirements. Although we can add multiple requirements to a policy, in our example, we add a single SessionRequirement and pass the name of the session header via the constructor.
Finally, let’s use the policy in our controller action method:
[HttpGet("WithCustomAuthorizationPolicy")]
[Authorize(Policy = "SessionPolicy")]
public IEnumerable<WeatherForecast> Get()
{
    return Enumerable.Range(1, 5).Select(index => new WeatherForecast
    {
        Date = DateOnly.FromDateTime(DateTime.Now.AddDays(index)),
        TemperatureC = Random.Shared.Next(-20, 55),
        Summary = Summaries[Random.Shared.Next(Summaries.Length)]
    })
    .ToArray();
}
The usage is pretty straightforward as we pass the name of the policy created to the Authorize attribute’s constructor. This mandates policy fulfillment for the execution of the action method.
Let’s now test the code.
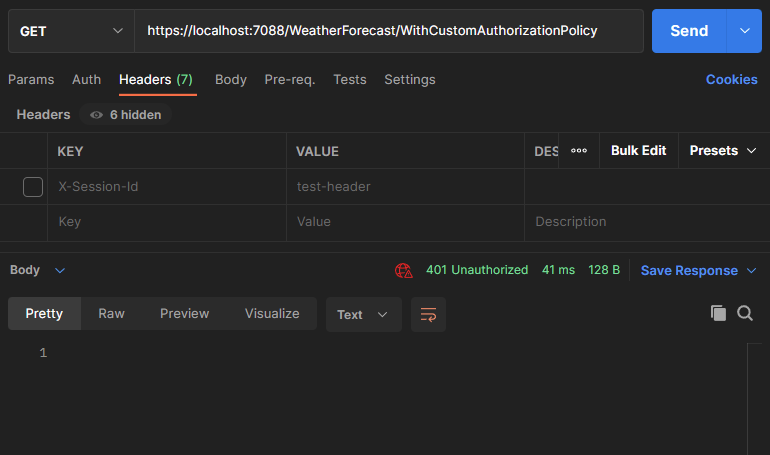
We execute the code without passing the X-Session-Id header and we get an unauthorized response:
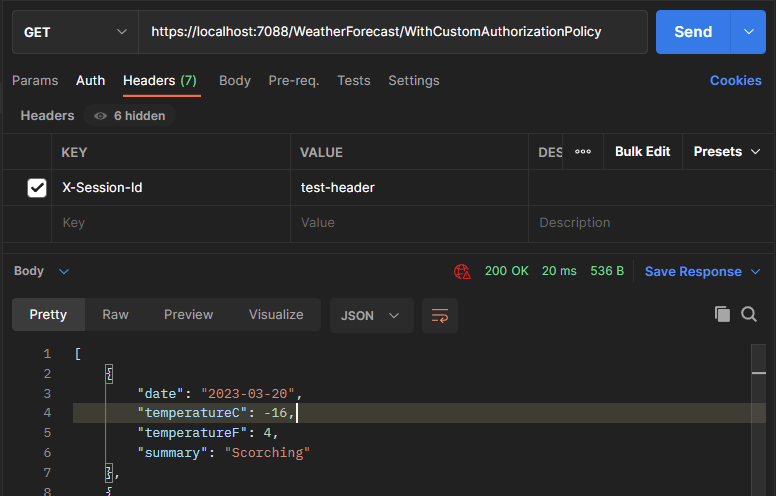
On the contrary, adding the session header produces a successful response:
Conclusion
We learned two ways to create custom authorization in ASP.NET Core. Although implementing custom authorization attributes with IAuthorizationFilter is simple, Policy-based authorization is more flexible and it helps us to build a loosely coupled security model by decoupling the authorization and application logic. This is why Policy-based authorization is better for implementing scalable authorization solutions.
Does policy-based authorization allow you to extend the default logic of authorization with JWT tokens?
Never done that, so I am really not sure
How it is possible to work? SessionHandler has injected
IHttpContextAccessorin constructor but it is registered as singleton with</span>builder.Services.AddSingleton<IAuthorizationHandler, SessionHandler>();. I think HttpContext is new for every request so for sure it is registered as scope dependency. I think you cannot injected scope dependency to singleton dependency.Hi Piotr. You can always download the source code to check the implementation. You will see it works. This is because we are not registering HttpContext but HttpContextAccessor using the AddHttpContextAccessor method. If you inspect that method’s implementation, you will see that it registers IHttpContextAccessor as a singleton service.
Is it necessary to add a custom policy-based authorization attribute on every endpoint?
As I am getting error on implementing it on controller level.
No, you don’t have to use it on each action. You can download our source code and move that authorization attribute with a policy from the action to the controller, and it should still work.