

In this article, we are going to learn how to implement Blazor WebAssembly registration functionality to create a new user for our application. We are going to integrate the ASP.NET Core Identity library to help us in the process. After the Identity integration, we are going to create a registration functionality on the server-side and after that the Blazor WebAssembly registration form for our users to interact with.
Of course, we are aware that if you create an ASP.NET Core hosted WebAssembly project with the default Authentication, you will have a lot of actions (including the Register, Login, Logout, etc.) already added to the project. But, if you want to learn how Registration and Authentication (in the next articles) functionalities work in Blazor WebAssembly, and how to integrate Identity to support the entire process, this is the right way to go.
For the complete navigation for this series, you can visit the Blazor Series page.

So, let’s start.
ASP.NET Core Identity Integration in the Web API Project
That said, let’s start with the integration process.
We are going to open the server-side project and install the required library:

After the installation, let’s modify the Context class:
public class ProductContext : IdentityDbContext<IdentityUser>
{
    public ProductContext(DbContextOptions options)
        :base(options)
    {
    }

    protected override void OnModelCreating(ModelBuilder modelBuilder)
    {
        base.OnModelCreating(modelBuilder);

        modelBuilder.ApplyConfiguration(new ProductConfiguration());
    }

    public DbSet<Product> Products { get; set; }
}
We are not using a custom user because we don’t need any custom fields. If you want to learn how to add a custom user class with the custom properties, you can read the Introducing Identity to the ASP.NET Core Project article from the mentioned series.
Now, let’s register Identity:
services.AddIdentity<IdentityUser, IdentityRole>()
    .AddEntityFrameworkStores<ProductContext>();
Or in the .NET 6 and above:
builder.Services.AddIdentity<IdentityUser, IdentityRole>()
  .AddEntityFrameworkStores<ProductContext>();
For this example, we don’t need any additional customization related to the password or user rules, but if you want those in your project feel free to read the mentioned article.
Additionally, we have to add the authentication functionality to the request pipeline:
app.UseAuthentication();
app.UseAuthorization();
With this in place, we can create the required tables in our database:
PM> Add-Migration IdentityTablesCreation
PM> Update-Database
If you inspect your database now, you will find all the AspNet tables next to the Products table we created in this series.
Implementing Registration in the Web API Project
In the Entities project, we are going to create a new DTO folder with two classes required for the registration action:
public class UserForRegistrationDto
{
    [Required(ErrorMessage = "Email is required.")]
    public string Email { get; set; }

    [Required(ErrorMessage = "Password is required")]
    public string Password { get; set; }

    [Compare("Password", ErrorMessage = "The password and confirmation password do not match.")]
    public string ConfirmPassword { get; set; }
}
public class RegistrationResponseDto
{
    public bool IsSuccessfulRegistration { get; set; }
    public IEnumerable<string> Errors { get; set; }
}
Now, let’s create a new Accounts controller in the Controllers folder and implement the registration logic:
[Route("api/accounts")]
[ApiController]
public class AccountsController : ControllerBase
{
    private readonly UserManager<IdentityUser> _userManager;

    public AccountsController(UserManager<IdentityUser> userManager)
    {
        _userManager = userManager;
    }

    [HttpPost("Registration")]
    public async Task<IActionResult> RegisterUser([FromBody] UserForRegistrationDto userForRegistration)
    {
        if (userForRegistration == null || !ModelState.IsValid)
            return BadRequest();

        var user = new IdentityUser { UserName = userForRegistration.Email, Email = userForRegistration.Email };

        var result = await _userManager.CreateAsync(user, userForRegistration.Password);
        if (!result.Succeeded)
        {
            var errors = result.Errors.Select(e => e.Description);

            return BadRequest(new RegistrationResponseDto { Errors = errors });
        }

        return StatusCode(201);
    }
}
This is a pretty straightforward logic for user registration and if you want to learn in more detail about it, feel free to read our User Registration with ASP.NET Core Identity article.
That’s it regarding the server-side registration logic. We can now move on to the Blazor WebAssembly Registration part.
Implementing Blazor WebAssembly Registration Logic
On the client side, the first thing we have to do is to create a new IAuthenticationService interface in the HttpRepository folder:
public interface IAuthenticationService
{
    Task<RegistrationResponseDto> RegisterUser(UserForRegistrationDto userForRegistration);
}
Now, let’s create the AuthenticationService class and implement this interface:
public class AuthenticationService : IAuthenticationService
{
    private readonly HttpClient _client;
    private readonly JsonSerializerOptions _options;

    public AuthenticationService(HttpClient client)
    {
        _client = client;
        _options = new JsonSerializerOptions { PropertyNameCaseInsensitive = true };
    }

    public async Task<RegistrationResponseDto> RegisterUser(UserForRegistrationDto userForRegistration)
    {
        var content = JsonSerializer.Serialize(userForRegistration);
        var bodyContent = new StringContent(content, Encoding.UTF8, "application/json");

        var registrationResult = await _client.PostAsync("accounts/registration", bodyContent);
        var registrationContent = await registrationResult.Content.ReadAsStringAsync();

        if (!registrationResult.IsSuccessStatusCode)
        {
            var result = JsonSerializer.Deserialize<RegistrationResponseDto>(registrationContent, _options);
            return result;
        }

        return new RegistrationResponseDto { IsSuccessfulRegistration = true };
    }
}
This is a straightforward logic where we send the request with the userForRegistration object and if the request fails, we deserialize the response and return it. Otherwise, we just return a new RegistrationResponseDto object with a successful result.
After this, we have to register the authentication service in the Program.cs class:
builder.Services.AddScoped<IProductHttpRepository, ProductHttpRepository>();
builder.Services.AddScoped<IAuthenticationService, AuthenticationService>();
Creating Blazor WebAssembly Registration Form
In the Pages folder, we are going to create two files: Registration.razor and Registration.razor.cs.
Let’s start with the class modification first:
public partial class Registration
{
    private UserForRegistrationDto _userForRegistration = new UserForRegistrationDto();

    [Inject]
    public IAuthenticationService AuthenticationService { get; set; }
    [Inject]
    public NavigationManager NavigationManager { get; set; }
    public bool ShowRegistrationErrors { get; set; }
    public IEnumerable<string> Errors { get; set; }

    public async Task Register()
    {
        ShowRegistrationErrors = false;

        var result = await AuthenticationService.RegisterUser(_userForRegistration);
        if(!result.IsSuccessfulRegistration)
        {
            Errors = result.Errors;
            ShowRegistrationErrors = true;
        }
        else
        {
            NavigationManager.NavigateTo("/");
        }
    }
}
One thing to note here. In the Register method, if the registration is successful, we navigate to the Home page. We do that because we don’t have the Login page yet. As soon as we create that page, we will change the navigation code line. The rest of the logic is pretty easy to follow.
Now, let’s move to the component modification:
@page "/registration"
<h3>Registration</h3>

@if (ShowRegistrationErrors)
{
    <div class="alert alert-danger" role="alert">
        @foreach (var error in Errors)
        {
            <p>@error</p>
        }
    </div>
}

<EditForm Model="_userForRegistration" OnValidSubmit="Register" class="card card-body bg-light mt-5">
    <DataAnnotationsValidator />
    <div class="form-group row">
        <label for="email" class="col-md-2 col-form-label">Email:</label>
        <div class="col-md-10">
            <InputText id="email" class="form-control" @bind-Value="_userForRegistration.Email" />
            <ValidationMessage For="@(() => _userForRegistration.Email)" />
        </div>
    </div>

    <div class="form-group row">
        <label for="password" class="col-md-2 col-form-label">Password:</label>
        <div class="col-md-10">
            <InputText type="password" id="password" class="form-control" @bind-Value="_userForRegistration.Password" />
            <ValidationMessage For="@(() => _userForRegistration.Password)" />
        </div>
    </div>

    <div class="form-group row">
        <label for="confirm" class="col-md-2 col-form-label">Confirm Password:</label>
        <div class="col-md-10">
            <InputText type="password" id="confirm" class="form-control" @bind-Value="_userForRegistration.ConfirmPassword" />
            <ValidationMessage For="@(() => _userForRegistration.ConfirmPassword)" />
        </div>
    </div>

    <div class="row">
        <div class="col-md-12 text-right">
            <button type="submit" class="btn btn-success">Register</button>
        </div>
    </div>
</EditForm>
With the if statement, we decide whether we want to show the registration error messages or not. Then below, we use our EditForm component for the registration purpose. There is nothing new in the EditForm component since we used almost the same logic in the CreateProduct page.
Now, before we test this, let’s create a new AuthLinks component, in the Components folder, to enable Register and Login links:
<AuthorizeView>
    <Authorized>
        Hello, @context.User.Identity.Name!
        <a href="Logout">Log out</a>
    </Authorized>
    <NotAuthorized>
        <a href="Registration">Register</a>
        <a href="Login">Log in</a>
    </NotAuthorized>
</AuthorizeView>
We have already explained all of these components in the previous article. Additionally, we already have our test authentication provider and we need to modify the ClaimsIdentity constructor:
var anonymous = new ClaimsIdentity();
With this code, we create an anonymous user. This test authentication provider will be replaced with a real one in the next article of this series.
Finally, we have to modify the MainLayout.razor file:
@inherits LayoutComponentBase

<div class="page">
    <div class="sidebar">
        <NavMenu />
    </div>

    <div class="main">
        <div class="top-row px-4">
            <AuthLinks />
        </div>

        <div class="content px-4">
            <CascadingValue Name="HeadingColor" Value="@_color">
                @Body
            </CascadingValue>
        </div>
    </div>
</div>

@code {
    private readonly string _color = "#0505b5";
}
Excellent. We can test this now.
Testing Blazor WebAssembly Registration Functionality
Let’s start the server app first, and then the client application.
As soon as the client application starts, we are going to see the Register and Login links:

Once we click the Register link, we are going to be navigated to the Registration page.
There we can test our form validation:
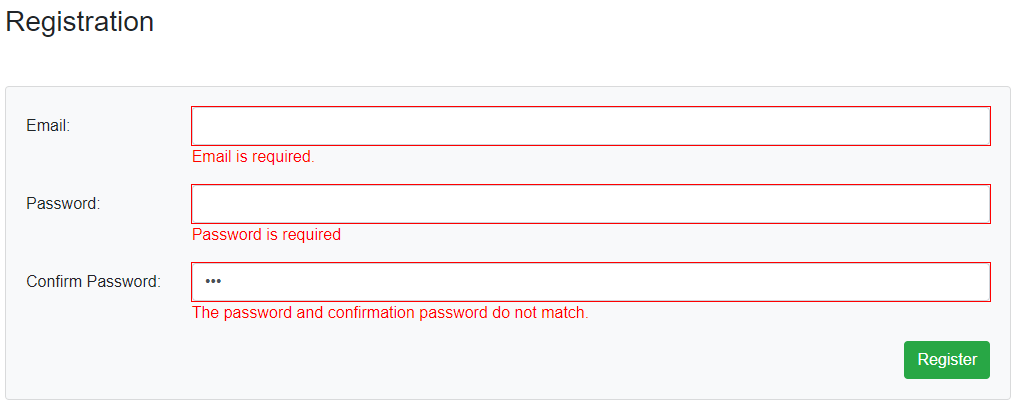
If the registration action fails, we are going to see additional messages:
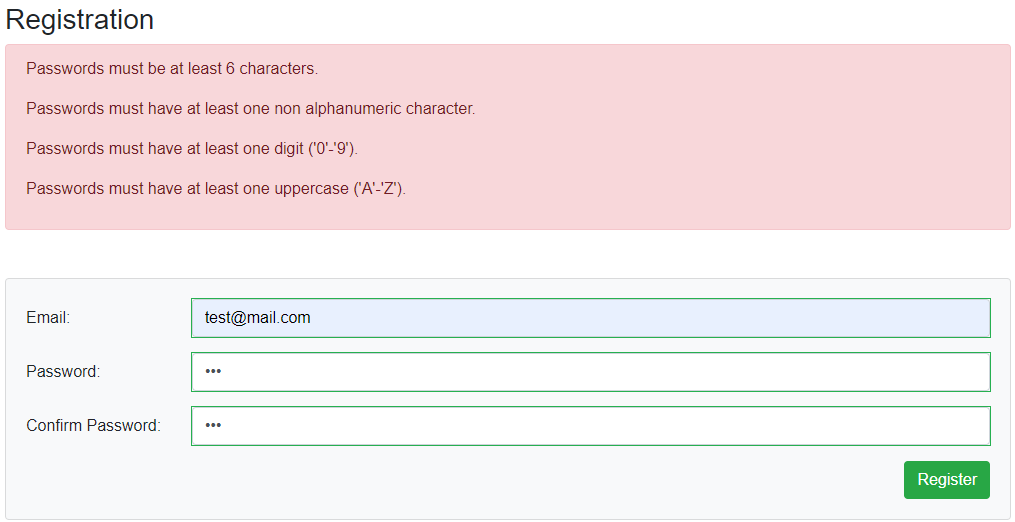
You can visit our User Registration with ASP.NET Core Identity article, to learn more about these Password rules and how to modify them.
Finally, we can submit a valid form with the valid data and we are going to be redirected to the Home page. You can check your database in the AspNetUsers table for the created user.
Conclusion
Excellent job.
We have learned:
- How to integrate ASP.NET Core Identity in our Web API Project
- The way to implement registration on the server and the client applications
- And how to create links and registration form with complete validation
In the next article, we are going to cover the authentication process and add a real example of the authentication provider.
Thanks for the tutorial.
The url in AuthenticationService.cs should be
await _client.PostAsync(“api/accounts/registration”, bodyContent);
Hi Denis. Please check the source code, the link is at the beginning of the article. You will find the AuthService with our URI: https://github.com/CodeMazeBlog/blazor-series/blob/blazor-registration-aspnetcore-identity/BlazorProducts.Client/BlazorProducts.Client/HttpRepository/AuthenticationService.cs
This is because the HttpClient was registered in the Program class with the API part in the URI:https://github.com/CodeMazeBlog/blazor-series/blob/blazor-registration-aspnetcore-identity/BlazorProducts.Client/BlazorProducts.Client/Program.cs
For those of you having errors about CascadingAuthenticationState, just wrap the <AuthorizeView> tag with <CascadingAuthenticationState> in AuthLinks.razor (using .NET 6)
Hi Sam. If you inspect our source code, you will see the App.razor is already wrapped with the Cascading component. This is a part of the series, so we did it in one of the previous articles. Anyway, thank you for the suggestion.
You instantiate a UserForRegistrationDto class in the register component, being a class it’s fine, but if we are following the Ultimate API book the userForRegistrationDto is a positional record. This is gonna blow things up surely.
Is it wise to use object mapping in the razor class?
Sorry I should have said a class with setters.
Hi David. You can use the mapper if you want to send records as a part of the request. You need the class though, for the Form, it must have an active setter.
Nice information! How would you inject UserManager in the repository pattern, outisde of the controller?
In the same way you do it here. Through the constructor. It depends on the way you implement repo pattern but anyhow you can inject it in any class.
Right! My error was somewhere else. Fantastic work, thanks!