

In this article, we are going to learn more about Blazor WebAssembly HttpClient and how to use it to fetch data from the ASP.NET Core Web API server. The HttpClient service is preconfigured in BlazorWebAssembly applications, but since we are working with the API project on a different domain (Cross-origin resource sharing), we are going to create our custom HTTP logic and handle the results accordingly.
One thing to mention, when you create your Blazor WebAssembly project, you can check the ASP.NET Core hosted option that will create and configure the server for your application. Both, the client and the server applications will run in the same domain. So, you can do it that way as well.
Start folder to download the projects to follow along with this article and the End folder for the finished projects.For the complete navigation of this series, you can visit the Blazor Series page.

Web API Project Overview
In the Start folder, you can find two projects. The client application from the previous article, and the server Web API application. Since the Web API works with data from the SQL database, all you have to do is to modify the connection string in the appsettings.json file and start the application. This will create the database and seed the required data. Our API project is written in .NET 5, but we will explain what is different in the newer version next to each code snippet.
Before we start, let’s do a quick overview of the Web API application.
We can see two projects. The Web API project and the Entities project that we are going to share with the Blazor client application.
In the Web API project, we can see a standard setup. A context class with the configuration class for seeding data, the MigrationManager class to execute our migration as soon as the application starts, and our Migration files.
We have applied a couple of changes to the launchSettings.json file:
{
  "$schema": "http://json.schemastore.org/launchsettings.json",
  "iisSettings": {
    "windowsAuthentication": false,
    "anonymousAuthentication": true,
    "iisExpress": {
      "applicationUrl": "http://localhost:52497",
      "sslPort": 44316
    }
  },
  "profiles": {
    "BlazorProducts.Server": {
      "commandName": "Project",
      "launchBrowser": false,
      "applicationUrl": "https://localhost:5011;http://localhost:5010",
      "environmentVariables": {
        "ASPNETCORE_ENVIRONMENT": "Development"
      }
    }
  }
}
And to the Startup class, to configure CORS and register DbContext:
public void ConfigureServices(IServiceCollection services)
{
    services.AddCors(policy =>
    {
        policy.AddPolicy("CorsPolicy", opt => opt
            .AllowAnyOrigin()
            .AllowAnyHeader()
            .AllowAnyMethod());
    });

    services.AddDbContext<ProductContext>(opt => opt.UseSqlServer(Configuration.GetConnectionString("sqlConnection")));

    services.AddControllers();
}
public void Configure(IApplicationBuilder app, IWebHostEnvironment env)
{
    if (env.IsDevelopment())
    {
        app.UseDeveloperExceptionPage();
    }

    app.UseHttpsRedirection();
    app.UseCors("CorsPolicy");

    //the rest of the code
}
In a newer .NET version, we don’t have these two methods, and we use only the Program class:
var builder = WebApplication.CreateBuilder(args);

// Add services to the container.

builder.Services.AddControllers();

var app = builder.Build();

// Configure the HTTP request pipeline.

app.UseHttpsRedirection();

app.UseAuthorization();

app.MapControllers();

app.Run();
That said, we have to use builder.Services.AddCors method to register CORS, and of course, builder.Services.AddDbCntenxt method to register DbContext right below the comment that states where should we register our services to the container.
The app.UseCors method should be used in the same place below the app.UseHttpsRedirection method.
That said, let’s start with the Web API logic first.
Fetching Products from the Database
We are going to start by creating a Repository folder with the ProductRepository class and the IProductRepository interface inside it. After creation, let’s modify the interface:
public interface IProductRepository
{
    Task<IEnumerable<Product>> GetProducts();
}
Right after that, let’s modify the ProductRepository class:
public class ProductRepository : IProductRepository
{
    private readonly ProductContext _context;

    public ProductRepository(ProductContext context)
    {
        _context = context;
    }

    public async Task<IEnumerable<Product>> GetProducts() => await _context.Products.ToListAsync();
}
This is just a basic async operation where we extract our data from the database. We are not going to dive deep into the repository logic, but if you want to learn more about it and how to implement it using the best practices, you can read our Repository Pattern in ASP.NET Core Web API article. There is the async version of that implementation as well.
Now, let’s register our repository service in the Startup class:
public void ConfigureServices(IServiceCollection services)
{
    services.AddCors(policy =>
    {
        policy.AddPolicy("CorsPolicy", opt => opt
            .AllowAnyOrigin()
            .AllowAnyHeader()
            .AllowAnyMethod());
       });

       services.AddDbContext<ProductContext>(opt => opt.UseSqlServer(Configuration.GetConnectionString("sqlConnection")));

       services.AddScoped<IProductRepository, ProductRepository>();

       services.AddControllers();
}
In a newer .NET version, we would use:
builder.Services.AddScoped<IProductRepository, ProductRepository>();
Finally, let’s create an empty API Controller named ProductsController in the Controllers folder and modify it to send our data to the client:
[Route("api/products")]
[ApiController]
public class ProductsController : ControllerBase
{
    private readonly IProductRepository _repo;

    public ProductsController(IProductRepository repo)
    {
        _repo = repo;
    }

    public async Task<IActionResult> Get()
    {
        var products = await _repo.GetProducts();
        return Ok(products);
    }
}
And that’s all it takes.
We can test this with Postman:
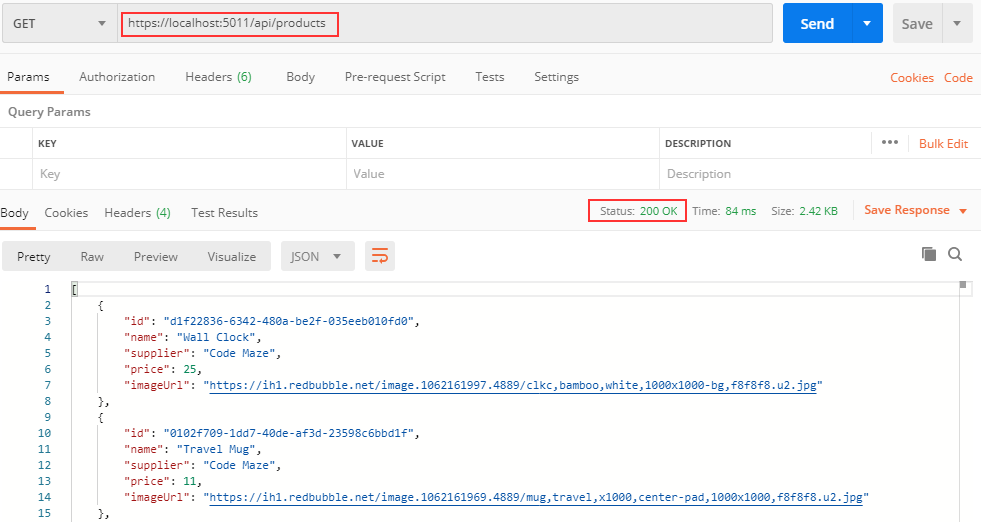
We can confirm everything is working as expected.
Now, let’s continue with the client-side logic.
Blazor WebAssembly HttpClient
When we want to communicate with the Web API project from our client-side project, we can use the HttpClient service provided by the framework. It is already registered in the Program.cs class:
var builder = WebAssemblyHostBuilder.CreateDefault(args);
builder.RootComponents.Add<App>("#app");

builder.Services.AddScoped(sp => new HttpClient { BaseAddress = new Uri(builder.HostEnvironment.BaseAddress) });

await builder.Build().RunAsync();
You can see that we don’t have the Startup class and the ConfigureServices method.
We have to register our services in the Program class. Additionally, HttpClient is configured to use a base address (https://localhost:5001) as a default address, but that won’t work for us because our API runs on https://localhost:5011.
We are going to deal with that.
Furthermore, if we inspect the FetchData razor file, we can see the usage of the HttpClient service with the GetFromJsonAsync method. But, since we are going to require additional logic in our get request, with query parameters and all, we are going to use our logic for the HTTP requests. We don’t need the FetchData component, so let’s remove it and let’s modify the NavMenu component to include the Products menu instead of Fetch Data:
<div class="@NavMenuCssClass" @onclick="ToggleNavMenu">
    <ul class="nav flex-column">
        <li class="nav-item px-3">
            <NavLink class="nav-link" href="" Match="NavLinkMatch.All">
                <span class="oi oi-home" aria-hidden="true"></span> Home
            </NavLink>
        </li>
        <li class="nav-item px-3">
            <NavLink class="nav-link" href="counter">
                <span class="oi oi-plus" aria-hidden="true"></span> Counter
            </NavLink>
        </li>
        <li class="nav-item px-3">
            <NavLink class="nav-link" href="products">
                <span class="oi oi-list-rich" aria-hidden="true"></span> Products
            </NavLink>
        </li>
    </ul>
</div>
Excellent.
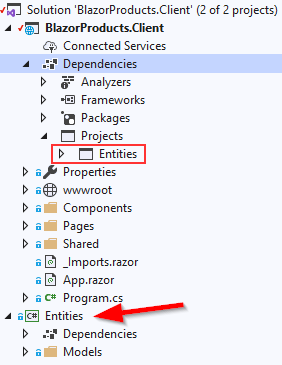
Now, let’s import the Entities project to our client solution by using the Add Existing Project option. Additionally, we have to add the Entities project’s reference to the BlazorProducts.Client project:
To continue, we are going to create a new HttpRepository folder in the client project with the IProductHttpRepository interface and the ProductHttpRepository class.
Let’s start with the interface modification:
public interface IProductHttpRepository
{
    Task<List<Product>> GetProducts();
}
And let’s implement this interface in the class:
public class ProductHttpRepository : IProductHttpRepository
{
    private readonly HttpClient _client;
    private readonly JsonSerializerOptions _options;

    public ProductHttpRepository(HttpClient client)
    {
        _client = client;
        _options = new JsonSerializerOptions { PropertyNameCaseInsensitive = true };
    }

    public async Task<List<Product>> GetProducts()
    {
        var response = await _client.GetAsync("products");
        var content = await response.Content.ReadAsStringAsync();
        if (!response.IsSuccessStatusCode)
        {
            throw new ApplicationException(content);
        }

        var products = JsonSerializer.Deserialize<List<Product>>(content, _options);
        return products;
    }
}
Here, we inject the HttpClient service and use it to send a Get request to the server-side application. As soon as we receive the response, we extract it in the content variable, deserialize it, and return it to the component.
Additionally, we have to register this service in the Program class:
builder.Services.AddScoped(sp => new HttpClient { BaseAddress = new Uri(builder.HostEnvironment.BaseAddress) });
builder.Services.AddScoped<IProductHttpRepository, ProductHttpRepository>();

await builder.Build().RunAsync();
Excellent.
Setting the HttpClient BaseAddress
As you can see in the GetProducts method when we call the _client.GetAsync() method, and just use the products for the requestUri parameter. To support this, we have to modify the HttpClient registration in the Program.cs class:
builder.Services.AddScoped(sp => new HttpClient { BaseAddress = new Uri("https://localhost:5011/api/") });
With this approach, you can register the base URI during the HttpClient registration and then just use the rest of the URI in the request.
AddHttpClient method:
builder.Services.AddHttpClient("ProductsAPI", (sp, cl) =>
{
    cl.BaseAddress = new Uri("https://localhost:5011/api/");
});

builder.Services.AddScoped(
    sp => sp.GetService<IHttpClientFactory>().CreateClient("ProductsAPI"));
This method adds the IHttpClientFactory interface and configures the named HttpClient. So, don’t get confused, this is just a different way to register the HttpClient in our app, but it is the more preferred way of doing so. We strongly recommend reading the Using HttpClientFactory in ASP.NET Core Applications article to learn more about the HttpClientFactory and why you should use it. We will continue with the default HttpClient registration.
Let’s move to the component logic.
Creating Components to Display Data
In the Pages folder, we are going to create two files – Products.razor and Products.razor.cs files. Let’s start with the Products.razor file modification:
@page "/products"

<div class="row">
    <div class="col-md-10">
        @*Place for search and sort*@
    </div>
    <div class="col-md-2">
        <a href="/createProduct">Create Product</a>
    </div>
</div>
<div class="row">
    <div class="col">
        @*Place for products*@
    </div>
</div>
<div class="row">
    <div class="col">
        @*Place for pagination*@
    </div>
</div>
And after that, let’s modify the Products class:
public partial class Products
{
    public List<Product> ProductList { get; set; } = new List<Product>();

    [Inject]
    public IProductHttpRepository ProductRepo { get; set; }

    protected async override Task OnInitializedAsync()
    {
        ProductList = await ProductRepo.GetProducts();

        //just for testing
        foreach (var product in ProductList)
        {
            Console.WriteLine(product.Name);
        }
    }
}
In this file, we inject our IProductHttpRepository interface using the [Inject] attribute and use it to call the GetProducts method from the repository class. After that, we just loop through each product to test if this works as expected.
Now, we can start our applications, press F12, navigate to the Products page, and inspect the logs:
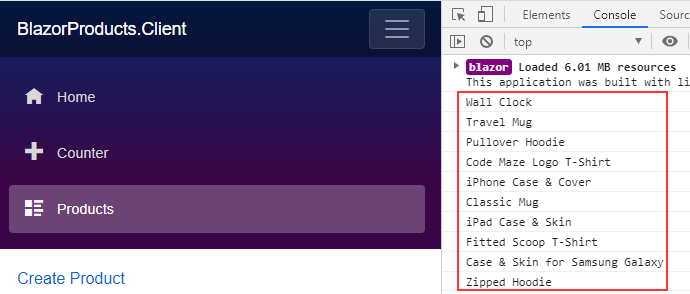
Excellent. Our data is here.
To continue, let’s create a new ProductTable folder with ProductTable.razor and ProductTable.razor.cs files inside it. All of that in the Components folder.
So, let’s start with the class modification first:
public partial class ProductTable
{
    [Parameter]
    public List<Product> Products { get; set; }
}
All we do here is create a Products parameter to accept all the products from the parent component. Now, let’s use it to generate our view in the razor file:
@if (Products.Count > 0)
{
    <table class="table">
        <thead>
            <tr>
                <th scope="col"></th>
                <th scope="col">Name</th>
                <th scope="col">Supplier</th>
                <th scope="col">Price</th>
                <th scope="col">Update</th>
                <th scope="col">Delete</th>
            </tr>
        </thead>
        <tbody>
            @foreach (var product in Products)
            {
                <tr>
                    <td>
                        <img src="@product.ImageUrl" alt="product image" style="width:100px;" />
                    </td>
                    <td class="align-middle">
                        @product.Name
                    </td>
                    <td class="align-middle">
                        @product.Supplier
                    </td>
                    <td class="align-middle">
                        [email protected]
                    </td>
                    <td class="align-middle">
                        <button type="button" class="btn btn-info">Update</button>
                    </td>
                    <td class="align-middle">
                        <button type="button" class="btn btn-danger">Delete</button>
                    </td>
                </tr>
             }
            </tbody>
    </table>
}
else
{
    <span>
        Loading products...
    </span>
}
Here, we create a conditional rendering. If our Products parameter is still an empty list, we just show the message “Loading products…”. But as soon as we populate the Products list, we render the table with some bootstrap CSS classes.
Finally, we have to add this component to the Products.razor file:
@page "/products"
@using BlazorProducts.Client.Components.ProductTable

<div class="row">
    <div class="col-md-10">
        @*Place for search and sort*@
    </div>
    <div class="col-md-2">
        <a href="/createProduct">Create Product</a>
    </div>
</div>
<div class="row">
    <div class="col">
        <ProductTable Products="ProductList" />
    </div>
</div>
<div class="row">
    <div class="col">
        @*Place for pagination*@
    </div>
</div>
As soon as we start our application and navigate to the Products page, we are going to see a quick “Loading products…” message and then our products:
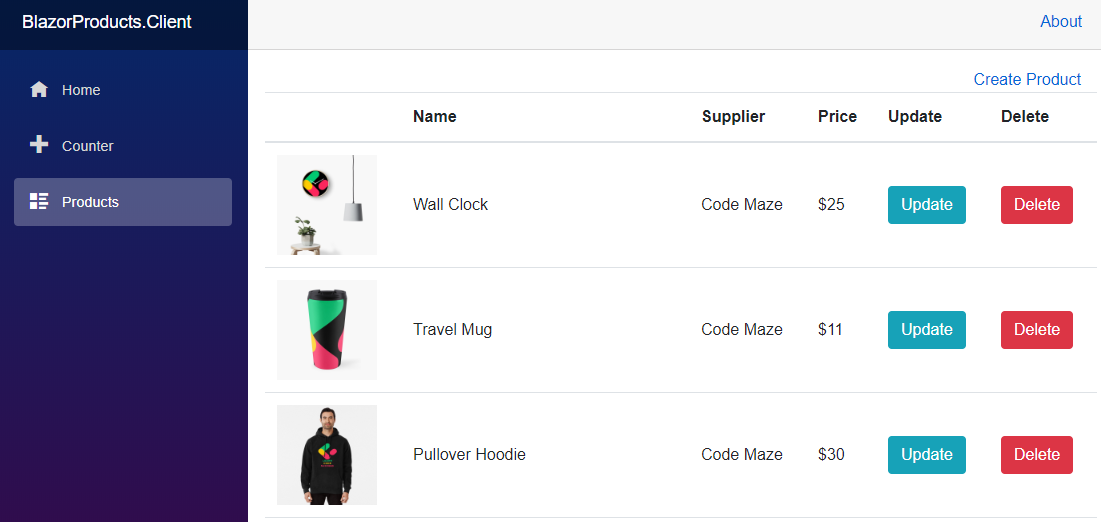
Nicely done.
Conclusion
Now we know how to fetch our data from the API using the HttpClient provided by the Blazor framework. Additionally, we have learned how to create and register services in the Blazor WebAssembly application and how to render data we got from the server.
In the next article, we are going to implement pagination on both Web API and Blazor WebAssembly sides.
Where did you define the ProductContext? I believe this might be something that is causing my problem. I set something similar up except I am using DynamoDB. My API is functioning properly, however when I call the httprequest from the client, I get a CORS error.
I excluded the ProductRepository class and IProductRepository Interface because I was unsure of where to define the ProductContext and how to use the builder.Services.AddDBContext(). Any help would be appreciated.
Hello Daniel. Please just inspect or download our source code. The link is at the begining of the article. This will help you for sure.
Hi there,
Do you have any reference on how I can consume a soap service from Blazor Wasm?
Hello Yassert. No, we don’t have any.
My friend, I’m crating a blazor WASM app and when I make a call to a controller using HttpClient this only work for a GET call but when I make a call to a POST this don’t work and not show a exception, simply not execute the controller, I’ve prove Web API with PostMan and don’t have problems
Please if you can help me
This is the client code
public async Task Save()
{
HttpResponseMessage response;
response = await client.PostAsJsonAsync<ThotERP.Shared.Entities.Usuario>(“api/Usuario/Add”, viewModel.UserToRegister);
if (response.IsSuccessStatusCode)
{
await GetData();
}
StateHasChanged();
}
This is the code in the controller
[HttpPost(“Add”)]
public async Task<IActionResult> Add(Usuario users)
{
IActionResult result = BadRequest();
try
{
if (users != null)
{
await context.AddAsync(users);
var response = await context.SaveChangesAsync();
if (response > 0)
{
result = Ok(users);
}
}
}
catch (Exception Ex)
{
result = BadRequest(Ex.Message + “: ” + Ex.InnerException);
}
return result;
}
Hello. This article handles just the Get request. If you continue with the series, you will find articles that handle all the other requests and also the source code for each article, so you can inspect it as well.
Hi Marinko,
Thank you for this article. Appreciate this effort.
It would be better to append “Async” suffix to async methods. This is a common convention used in .NET to more easily differentiate synchronous and asynchronous methods.
public async Task<List<Product>> GetProductsAsync() { //code }I completely agree with you. Just the thing is that our repository has no sync methods just the async ones so it has nothing to differentiate from. Usually, the recommendation is if you have both sync and async to add that suffix. But again, I completely support your statement and agree with it.
How does one deal wit jwt if a site is secured via that method the api I mean nice article
Hi David. This series contains severel articles dedicated to authentication with blazor wasm and wep api using jwt. So, you can navigate to the main page of this series
https://code-maze.com/blazor-webassembly-series/ and there you will find the articles I’m referring to.
Hello Marinko,
can we design a generic HttpClient Repository (interface and BaseClass)?
If yes could you please guide me to any helpful material(article on net or youtube video).
Thanks
First of all I would like to thank you for writing such a useful, series . you are really a great teacher. I am following your series and i have learnt quite a lot from your articles. These are very well written and explained.
I have two questions
1) If we have a repository(Web API repository ) in the Blazor Server project Do still we need to create an HttpClientRepository in the client project.
2) can we create a HttpClientRepository Wrapper class in the client project just like we did in the API project to store all the repositories at one place and only have one services.Add() statement in our startup file.
Another question related to MudBlazor , you have started that series as well.
If we are using MudBlazor Table component , Do we still need to implement the paging and sorting in the Blazor Web Assembly? What are pros/cons of both approach.
Hello Zia. Thank you very much for the kind words in your comment. That means a lot to me, it really does.
Regarding your questions:
1) If you have the Blazor Client and the Web API as separate projects (client – server) than you have to create HttpClientRepository on the client side. But if you have just a Blazor Server project (which has the UI as well as MVC does) than you don’t need to use the HttpClient class because you are already on the server side and all you have to do is to implement a regular repository (if you want to use it of course).
2) If you want, you can. Just in my example, I didn’t find it that much useful as it is on the server side.
Regarding MudBlazor, you don’t have to implement a client-side pagination but you have to do it on the server side (this is true only if you want to use MudBlazor table component with a server side data). Of course, if you want to implement pagination only on the client side than you just have to use the MudBlazor’s table component. You will see how the server-side pagination, sorting, and searching works using MudBlazor in my next article of that series.
About pros or cons, let me say IMO it is faster to do it on the client side with MudBlazor, other then that, I like both.
Thanks for the prompt reply.
I am looking forward to the next posts in the mudBlazor series.
i
Thank you for your work. Finally something clear and explained in simple way.
Which is the best way to pass some parameters to the API? For example, to filter by Product Name: GetProducts(string name). How pass the string “name” to the API? Thanks a lot.
Hello Igor. First of all, thank you very much for the kind words. This is always so much appreciated. Regarding your question, if you read our entire series, or at least continue to next articles, you are going to see how we pass parameters for paging, searching and sorting. In the same way we can do for the filtering. Basically, for such actions, it is the best to use query string parameters. Once you get to the create and update actions, you should use POST and PUT requests with the body parameters. Again, just continue reading our Blazor WebAssembly article, or try our video course, and you will learn a lot more, I am 100% sure.
Hi Marinco, please this may not be related to this post, but I really need some answers buggling my mind for months now.
I have to develop an enterprise application for use by over 200 users in an intranet, I want to find out if Blazor + Web API is a good option, if yes which is ideal, Blazor WASM or Blazor Server. Thank you
Hello Michael. First of all to decide wether to use Blazor Server or Blazor WASM you can read our starting article of the entire series: https://code-maze.com/blazor-webassembly-introduction/ . Whatever you choose, Blazor is awesome in pretty fun to work with. I always prefer working with Blazor WASM, because I like to separate my client and server side apps. You can also use the Blazor WASM with ASP.NET Core Hosted. Our tutorials are mainly dedicated to WASM but most of the stuff are the same for the Blazor server.
Thanks Marinko, so Blazor WASM + ASP.NET Core Web API, Entity framework can help achieve what I want to do assuming I decide to go with that option?
Yes it can. You can deploy it both as a single app.
Thank you so much, cant wait to see my enterprise application developed with Blazor WASM + Web API integration
You are very welcome. You can follow our tutorials if you need any help with that or you can watch our video course which is exactly blazor wasm + web api. If you are interested, the link is on the menu bar.
I read about the httpclient factory and it seems that Microsoft recommend to use that.
What are you thoughts about that?
builder.Services.AddHttpClient()
You should use it if your app has multiple HTTP clients to send different requests to the server. As we explained in the article, the AddHttpClient will add the IHttpClientFactory and create a named client. Later on in your app, you can use that factory to create a new client. You can see this example in our article about Blazor WASM and IS4 https://code-maze.com/using-access-token-with-blazor-webassembly-httpclient/